
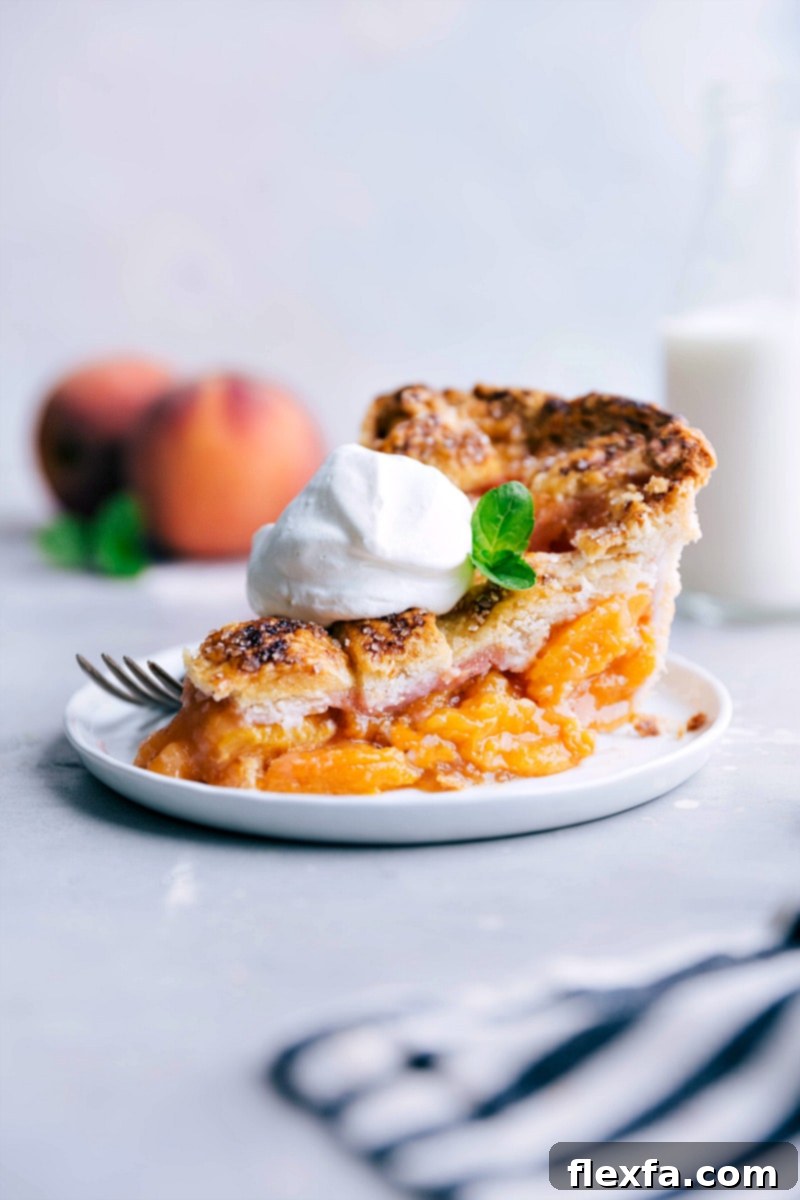
The Best Homemade Peach Pie: A Flaky Crust & Fresh Peach Filling
Indulge in the quintessential taste of summer with this truly delicious Homemade Peach Pie Recipe. It boasts a perfectly flaky, golden-brown crust that cradles a sweet, succulent fresh peach filling, bursting with natural fruit flavor. This isn’t just a dessert; it’s a culinary experience.
Elevate your serving experience by pairing a warm slice with a generous scoop of fresh whipped cream or creamy vanilla bean ice cream. It’s the ultimate summer treat that promises to delight every palate!
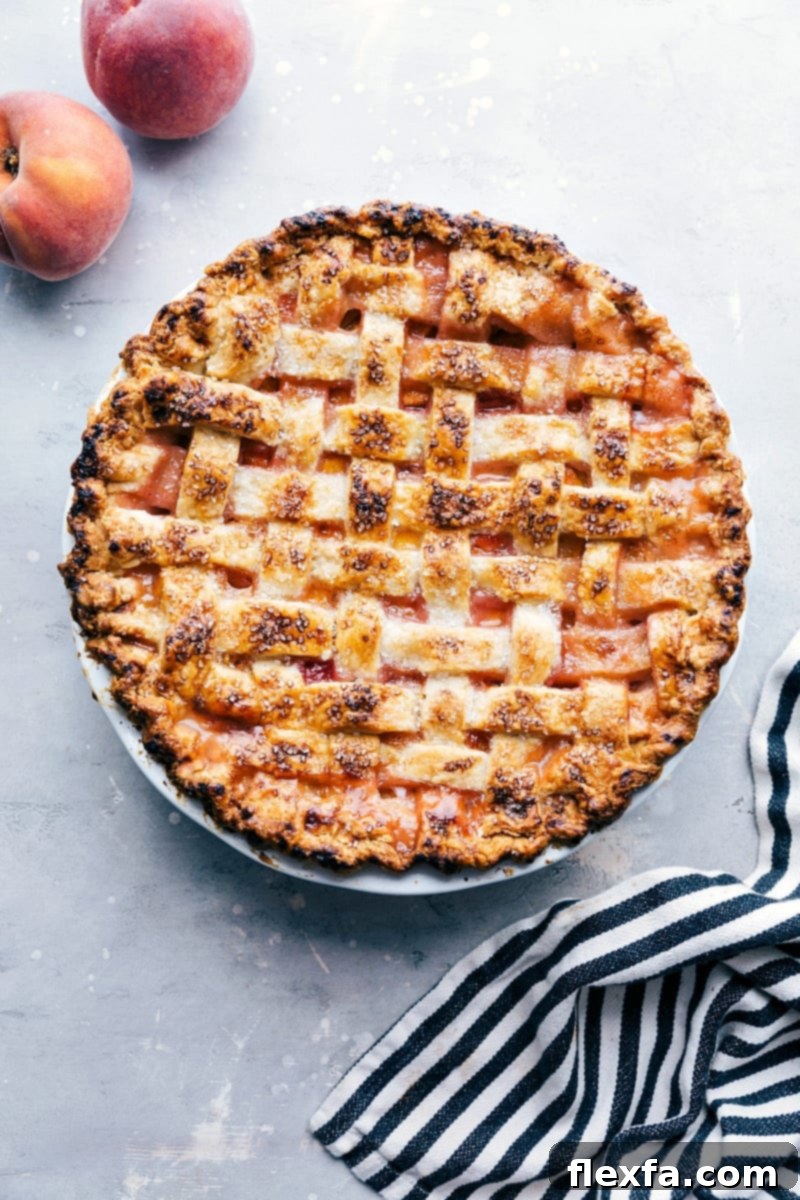

From the Author’s Kitchen
You Haven’t Truly Lived Until You’ve Savoring This Peach Pie!
Growing up, our backyard was a haven of abundance, graced with several magnificent peach trees. For me, peaches weren’t just a seasonal fruit; they were an integral part of daily life, woven into countless family memories and meals. They found their way into everything, from my morning oatmeal and refreshing smoothies to delightful homemade milkshakes. Each year, I eagerly anticipated the arrival of peach season, a time filled with the promise of sweet, juicy harvests and endless culinary possibilities.
Years later, my love affair with peaches deepened when I acquired “The Peach Truck Cookbook” by Jessica and Stephen Rose, the visionary founders behind Nashville’s famed Peach Truck. I couldn’t wait to immerse myself in their collection of over 100 peach-centric recipes. While every page held a tempting delight, their classic Peach Pie immediately captured my attention. Inspired by their expertise and my own childhood memories, I’ve made a few thoughtful adjustments and enhancements to craft a version that I proudly call my own. Today, I am beyond excited to share this perfected recipe with you, inviting you to create your own cherished peach pie moments.
Essential Ingredients for Your Perfect Peach Pie
Crafting the perfect peach pie begins with selecting the right ingredients. Each component plays a vital role in achieving that irresistible flaky crust and a rich, flavorful filling. Here’s a detailed look at what you’ll need and why:
- Peaches: The star of the show! Always opt for ripe yet firm peaches. Their natural sweetness and slightly tangy notes are crucial for a vibrant filling. If you’re working with less-than-perfectly-ripe peaches or simply want to streamline the peeling process, the boil-and-chill method (blanching) makes skin removal effortless, ensuring a smooth, pleasant texture in your pie.
- All-Purpose Flour: More than just a binder, flour is essential for the structure of your crust and the thickening of your filling. For the pie crust, keeping your flour (and all crust ingredients) thoroughly chilled is a secret weapon. Cold flour prevents gluten from over-developing, resulting in a tender, incredibly flaky dough rather than a tough one.
- Granulated Sugar: This provides the perfect sweetness to balance the tartness of the peaches. In the crust, a touch of sugar contributes to its delicate flavor. For a truly professional and appealing finish, sprinkle a little extra granulated sugar over the top of your pie before baking. This creates a beautiful, crunchy, and golden caramelized topping that adds another layer of texture.
- Salt: A small but mighty ingredient! A pinch of salt in both the crust and the filling is critical. It doesn’t make your pie salty; instead, it acts as a flavor enhancer, balancing and amplifying all the sweet notes from the peaches and sugar, preventing the pie from tasting flat.
- Vegetable Shortening: For an exceptionally flaky pie crust, cold vegetable shortening is paramount. Unlike butter, shortening has a higher melting point and 100% fat content, which creates distinct layers in the dough as it bakes, resulting in unparalleled flakiness. Remember to keep it very cold and avoid overmixing the dough to maintain those crucial fat pockets.
- Ice Water: Essential for bringing the pie dough together without activating too much gluten. The colder the water, the less likely your shortening will melt, preserving the flaky texture.
- Apple Cider Vinegar: This might seem like an unusual addition to a pie crust, but trust us, it’s a game-changer! The acidity in apple cider vinegar inhibits gluten development, contributing to a more tender and pliable crust. It’s the secret to a melt-in-your-mouth texture.
- Large Egg: Eggs serve a dual purpose in this recipe. One egg is incorporated into the pie crust to add richness and help bind the dough, creating a more cohesive and workable texture. Another egg, whisked with a touch of water, forms an egg wash that’s brushed over the top crust before baking. This wash gives the pie a beautiful, glossy, golden-brown finish and enhances its overall appeal.
- Cornstarch: This is your go-to thickener for the peach filling. As the pie bakes, the cornstarch works its magic, absorbing excess moisture released by the peaches and transforming it into a luscious, perfectly set filling. This prevents a watery pie and ensures every slice holds its shape beautifully.
- Lemon: Fresh lemon juice is added to the peach filling to brighten the flavors and prevent the peaches from oxidizing. Its zesty notes complement the sweetness of the peaches, adding a refreshing tang.
- Vanilla Bean Paste or Extract: A touch of vanilla adds depth and warmth to the peach filling, enhancing its overall aroma and taste profile. Vanilla bean paste offers visible specks and a more intense flavor, but high-quality vanilla extract works beautifully too.
Quick Tip: Can I Use Canned Peaches for Pie?
Yes, you absolutely can use canned peaches as an alternative to fresh ones, especially when fresh peaches are out of season or hard to find. However, a few adjustments are necessary for the best results. Make sure to drain the canned peaches very well to remove excess liquid, which can lead to a soggy pie. Peaches canned in juice (not heavy syrup) are ideal, as they allow you more control over the pie’s overall sweetness. You may also need to slightly adjust the amount of sugar and cornstarch in the filling, as canned peaches are often sweeter and may release less liquid during baking. Taste your drained peaches and adjust accordingly, perhaps reducing the sugar slightly and adding cornstarch as needed to achieve the desired consistency.
Crafting Your Masterpiece: How To Make Peach Pie
Making a homemade peach pie might seem daunting, but by following these simple steps, you’ll achieve a perfect, bakery-worthy dessert every time. The key is to pay attention to detail, especially when it comes to keeping your crust ingredients cold.
- Prepare the Flaky Crust: Begin by combining the chilled flour, sugar, and salt. Cut in the cold vegetable shortening until the mixture resembles coarse crumbs with some pea-sized pieces. Slowly add a mixture of ice water, apple cider vinegar, and egg, mixing just until the dough comes together. Divide into two disks, wrap, and chill thoroughly for at least 2 hours. This chilling step is crucial for a tender, flaky crust.
- Roll Out the Dough: On a lightly floured surface, roll out one disk of chilled dough to fit your pie pan, creating the bottom crust. For the top, roll out the second disk and cut it into even strips if you plan to make a beautiful lattice design, or leave it as a full round for a double-crust pie.
- Craft the Juicy Filling: In a large bowl, gently toss your peeled and sliced fresh peaches with lemon juice and vanilla. In a separate bowl, whisk together granulated sugar, cornstarch, and a pinch of salt. Add this sugar mixture to the peaches and toss carefully to ensure every slice is coated without bruising the delicate fruit.
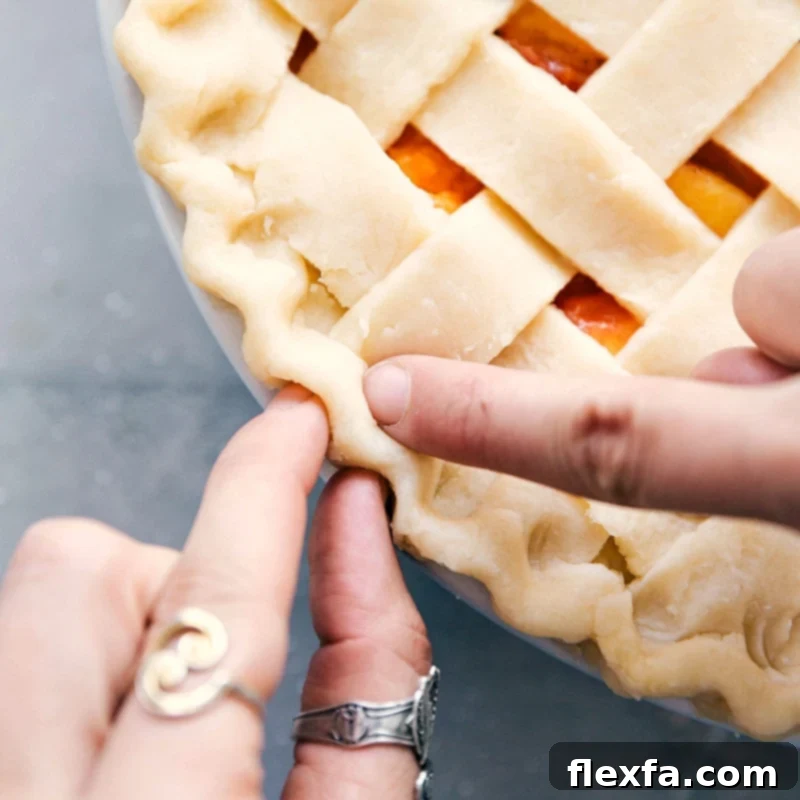
- Assemble with Care: Spoon the prepared peach filling evenly into your dough-lined pie pan. If creating a lattice top, carefully lay the pastry strips over the filling, weaving them to form a beautiful pattern. Fold the edges of both crusts under and crimp them decoratively. For that irresistible golden sheen, brush the top crust with an egg wash (beaten egg mixed with a tablespoon of water) and sprinkle with a tablespoon of sugar. Chill the assembled pie for 20 minutes before baking to help the crust hold its shape.
- Bake to Golden Perfection: Preheat your oven and line a sheet pan with aluminum foil to catch any bubbling overflow. Bake the pie initially at a higher temperature to set the crust quickly, then reduce the heat to allow the filling to cook thoroughly and the crust to become perfectly golden brown. If the crust begins to brown too quickly, shield it with foil. After baking, allow the pie to cool completely on a wire rack for 2-4 hours. This crucial cooling period allows the filling to set and thicken, ensuring clean, beautiful slices.
Expert Tips for the Most Flavorful Peach Pie Filling
The filling is the heart of your peach pie, and a few key techniques can ensure it’s bursting with flavor and perfectly textured:
- Prioritize Ripe, Fresh Peaches: The quality of your peaches directly impacts the flavor of your pie. Always choose peaches that are ripe, fragrant, and slightly soft to the touch. Fresh, seasonal peaches will give your pie an unparalleled depth of flavor that canned versions simply can’t match.
- Embrace Simplicity to Let Peaches Shine: A truly great peach pie allows the natural taste of the fruit to be the star. Keep the supporting flavors simple and harmonious. A dash of vanilla extract or paste adds a warm, comforting depth, while a squeeze of fresh lemon juice brightens the overall profile and prevents the filling from becoming overly sweet.
- Handle Peaches Gently: Peaches are delicate! When tossing the sliced fruit with the sugar and cornstarch mixture, use a light hand. Stir gently with a rubber spatula or your hands to avoid bruising the peach slices, which can make the filling appear mushy or release too much liquid.
- Prevent a Soggy Bottom: To avoid a dreaded soggy bottom crust, consider a few tricks. Blind bake your bottom crust for about 10-15 minutes before adding the filling. You can also sprinkle a thin layer of breadcrumbs or crushed cornflakes on the bottom crust before adding the peach filling to absorb any excess moisture. Ensuring your peaches are well-drained (if using canned) or at peak ripeness (not overripe and mushy) also helps.
- Adjust Sugar to Peach Sweetness: The amount of sugar needed can vary depending on the sweetness of your peaches. Taste a small piece of your raw peach. If they are very sweet, you might reduce the sugar in the filling slightly. If they are tarter, you might add a touch more. This ensures a perfectly balanced sweet and tart filling.
More Delicious Fruit-Filled Desserts to Explore:
Desserts
The BEST Lemon Bars Recipe
Desserts
Strawberry Shortcake Recipe
Desserts
Fruit Pizza Recipe
Desserts
Cinnamon Roll Apple Pie
Print Recipe
Classic Homemade Peach Pie
Chelsea Lords
This Peach Pie features an irresistible flaky homemade crust complemented by a sweet, juicy fresh peach filling that bursts with natural flavor, making it the ultimate summer delight.
40 minutes
55 minutes
4 hours
5 hours 35 minutes
8 servings
Equipment
- Pastry cutter or 2 table knives
- Sheet pan (15″ x 10″)
- Parchment paper
- 9-inch Pie pan
- Aluminum foil
Ingredients
For the Flaky Pie Crust
- 3 cups all-purpose flour, plus more for dusting
- 1 tablespoon granulated sugar
- 1/2 teaspoon salt
- 1-1/4 cups vegetable shortening, very cold
- 5 tablespoons ice water
- 1 tablespoon apple cider vinegar
- 1 large egg
For the Sweet Peach Filling
- 4 pounds ripe peaches, pitted and sliced (about 12 cups)
- 1/2 cup + 1 tablespoon granulated sugar
- 1/4 cup cornstarch
- 1/8 teaspoon salt
- Juice of 1 lemon (approximately 2 tablespoons)
- 1 teaspoon vanilla bean paste or vanilla extract
- 1 large egg (for egg wash)
Instructions
- Crucial First Tip: Keep Everything Cold! The number one secret to a wonderfully flaky pie crust is maintaining cold temperatures throughout the process. Ensure all crust ingredients, especially the flour and shortening, are thoroughly chilled before you begin. Similarly, keep your prepared peaches and filling as cold as possible right up until the pie goes into the hot oven.
- Prepare the Homemade Pie Crust: In a medium-sized mixing bowl, sift together the all-purpose flour, granulated sugar, and salt. Add the very cold vegetable shortening and cut it into the flour mixture using a pastry cutter or two table knives. Continue until the mixture resembles coarse crumbs with some larger, pea-sized pieces of shortening remaining. In a separate small bowl, whisk together the ice water, apple cider vinegar, and one large egg. Gradually add this liquid mixture to the flour mixture, stirring gently with a fork until the dough just comes together. Be careful not to overmix. Divide the dough into two equal halves, flatten each half into a disk, and wrap them tightly in plastic wrap. Chill in the refrigerator for a minimum of 2 hours, or ideally, overnight.
- Preheat Oven and Prep Pan: Preheat your oven to 425°F (220°C). Line a large sheet pan with parchment paper; this will be used for both baking the pie and catching any potential drips.
- Roll Out the Dough: On a lightly floured surface, take one chilled dough disk and roll it out into a round approximately 1/4-inch thick, ensuring it’s large enough to fit comfortably into a 9-inch pie pan with some overhang. Carefully transfer this dough round to your pie pan. Roll out the second dough disk following the same procedure. Place this second round of dough onto the prepared parchment-lined sheet pan. Use a knife or pastry wheel to cut it into 2-1/2 inch-wide strips for a lattice top, or prepare it as a solid top crust if preferred. Return both the pie pan with the bottom crust and the cut pastry strips (on the sheet pan) to the refrigerator to chill while you prepare the filling.
- Prepare the Peach Filling: Follow the peach preparation instructions in “Recipe Notes” below. Once peeled, pitted, and sliced, place the prepared peaches in a large mixing bowl. Add the vanilla bean paste (or extract) and 2 tablespoons of fresh lemon juice; gently toss the peaches to ensure they are evenly coated. In a separate, small bowl, stir together the 1/2 cup plus 1 tablespoon granulated sugar, cornstarch, and 1/8 teaspoon salt. Add this dry mixture to the peaches and gently toss again until all the peach slices are thoroughly coated.
- Assemble the Pie: Spoon the peach filling evenly into the chilled, dough-lined pie pan. If using pastry strips, artfully arrange them in a lattice pattern over the top of the peach filling. Trim any excess dough from the edges, then fold the bottom and top crust edges under, pressing them together to seal. Crimp the edges decoratively using your fingers or a fork. In a small bowl, beat the remaining large egg with 1 tablespoon of water to create an egg wash. Lightly brush this egg wash over the entire top crust of the pie. Finally, sprinkle the remaining 1 tablespoon of granulated sugar evenly over the egg-washed crust for a sparkling, golden finish. Place the assembled pie back in the refrigerator to chill for an additional 20 minutes.
- Bake the Peach Pie: Line a second sheet pan with aluminum foil and place it on the bottom rack of your preheated oven. This will act as a drip catcher for any filling that might bubble over. Place your chilled peach pie on the center rack of the oven. Bake for 15 minutes at 425°F (220°C). After 15 minutes, reduce the oven temperature to 375°F (190°C) and continue to bake for another 40–50 minutes, or until the crust is beautifully golden brown and the filling is visibly bubbling through the lattice (or vents). If the crust starts to brown too quickly during the last 20 minutes of baking, loosely shield the pie with a sheet of aluminum foil.
- Cool Completely: Once baked, carefully remove the pie from the oven and transfer it to a wire rack. It is absolutely crucial to let the pie cool completely, which can take approximately 2–4 hours (or even longer, depending on your kitchen’s temperature). This extended cooling time allows the cornstarch in the filling to fully activate and set, ensuring a firm, sliceable pie with a perfectly thickened, juicy filling. Do not attempt to slice it prematurely, or you’ll end up with a runny pie.
Recipe Notes for Success
Preparation for Unripe Peaches: If your peaches are on the firmer side, follow this blanching method for easy peeling. Using a small paring knife, gently score a shallow “X” on the bottom of each peach. Carefully place the peaches into a pot of rapidly boiling water for approximately 60 seconds. Using a slotted spoon, swiftly remove the peaches and immediately transfer them into a large bowl filled with ice water (an ice bath). As soon as the peaches are cool enough to handle, the softened skin around the “X” should easily peel away with your fingers or a paring knife.
Preparation for Ripe Peaches: For perfectly ripe peaches, the peeling process is even quicker. Place the peaches in boiling water for about 30 seconds. Using a slotted spoon, transfer them to an ice bath. Once cool enough, the skin should gently slide right off with minimal effort, often just by rubbing with your fingers.
Slicing Your Peaches: After peeling, cut each peach in half around its pit. Gently twist the two halves in opposite directions to separate them. Carefully remove the pit. Then, slice the peach halves into uniform 1/2-inch thick slices. Consistency in slice size ensures even cooking within the pie.
Storage Recommendations: To keep your leftover homemade peach pie fresh, cover it tightly with plastic wrap or aluminum foil and store it in the refrigerator. It will remain delicious for up to 4 days. For longer-term storage, individual slices can be wrapped securely in plastic wrap, then wrapped again in aluminum foil, and frozen for up to 3 months. Thaw in the refrigerator overnight and reheat gently in the oven for best results.
Nutrition Information
Calories: 649kcal
|
Carbohydrates: 80g
|
Protein: 9g
|
Fat: 34g
|
Saturated Fat: 9g
|
Cholesterol: 47mg
|
Sodium: 171mg
|
Potassium: 498mg
|
Fiber: 5g
|
Sugar: 38g
|
Vitamin A: 807IU
|
Vitamin C: 16mg
|
Calcium: 28mg
|
Iron: 3mg
Nutrition information is automatically calculated and should be used as an approximation. Actual values may vary based on specific ingredients and preparation methods.
Loved this recipe? Share your thoughts below!