

Irresistible Oreo Frosting: Your Ultimate Guide to Cookies and Cream Perfection
Transform your desserts from delightful to absolutely legendary with this incredible Oreo Frosting. Creamy, rich, wonderfully buttery, and bursting with the iconic flavor of crushed Oreo cookies, this frosting is a game-changer. Whether you’re topping cupcakes, filling a cake, or simply enjoying a spoonful (we won’t tell!), this recipe promises a sweet, satisfying experience that will leave everyone craving more.

Why You’ll Love This Oreo Frosting Recipe
While classic cream cheese frosting and velvety vanilla buttercream are undeniably delicious, there’s something uniquely special about Oreo frosting. This recipe takes homemade frosting to an entirely new level, offering a thick, luscious texture and an intense cookies and cream flavor that is simply irresistible.
As a passionate Oreo enthusiast, I can confidently say this is one of my all-time favorite frostings. It’s incredibly easy to prepare, requiring just a few common ingredients and straightforward steps. In no time, you’ll have a frosting that’s perfect for elevating a simple vanilla cake, making boxed cake mix cupcakes taste gourmet, or even as a decadent spoonful straight from the bowl. Prepare to impress with minimal effort!
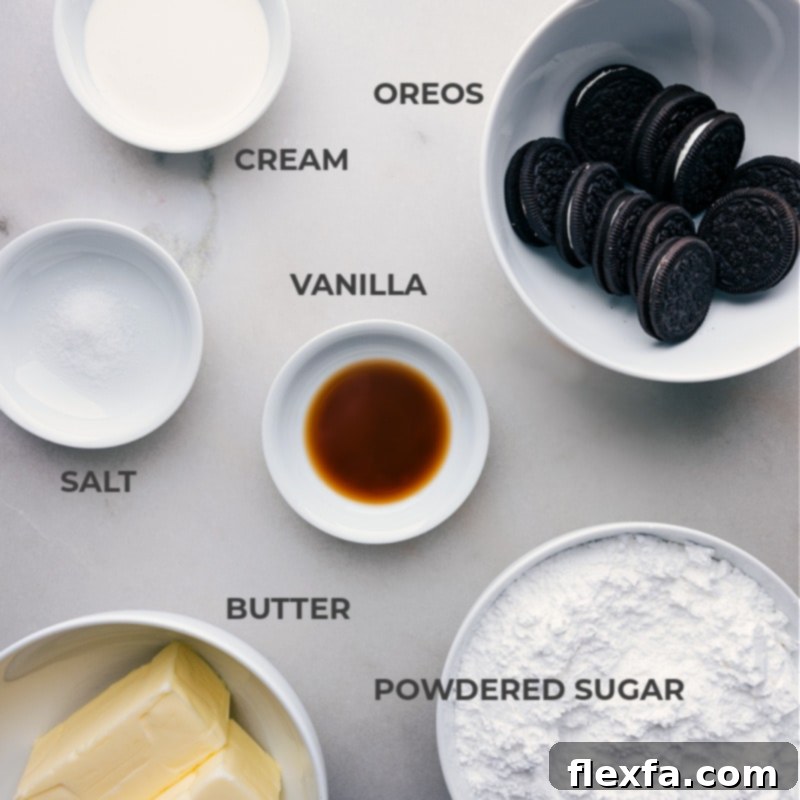
Essential Ingredients for the Perfect Oreo Frosting
Crafting the ultimate Oreo frosting begins with selecting the right ingredients. Each component plays a vital role in achieving that creamy texture and signature flavor. Here’s a closer look at what you’ll need to whip up this delectable topping:
- Oreo Cookies: For the most authentic and pleasing flavor, stick to classic chocolate and vanilla Oreos. Avoid Double Stuf or other flavored varieties, as they can alter the balance and consistency of the frosting. The key here is achieving *fine crumbs* – this ensures a smooth, non-clogging frosting, especially if you plan to pipe it.
- Unsalted Butter: Room temperature butter is crucial. It blends seamlessly with other ingredients, creating a smooth, airy, and creamy frosting. If your butter is too cold, your frosting will be lumpy; if it’s too soft or melted, your frosting might be too loose and greasy.
- Powdered Sugar: Also known as confectioners’ sugar, this fine sugar is the sweet backbone of our frosting. Its delicate texture dissolves easily, contributing to a silky-smooth finish without any grittiness. Ensure your measuring cups are fully filled and leveled for accuracy.
- Pure Vanilla Extract: Opt for pure vanilla extract over imitation for a deep, rich, and aromatic flavor that beautifully complements the chocolate and cream notes of the Oreos.
- Heavy Whipping Cream: Used cold, heavy cream adds a luxurious creaminess and allows you to adjust the frosting’s thickness to perfection. Start with a small amount and add more gradually until you reach your desired consistency.
- Salt: A tiny pinch of salt might seem counterintuitive in a sweet recipe, but it’s a secret weapon! It enhances all the other flavors, balances the sweetness, and prevents the frosting from tasting overly sugary.
Quick Tip: Powdered vs. Confectioners’ Sugar
While often used interchangeably, powdered sugar and confectioners’ sugar are essentially the same product. Confectioners’ sugar typically contains a small amount of cornstarch to prevent caking, which also aids in creating a lighter, more stable frosting. Rest assured, either label will work perfectly for this recipe.
Kitchen Equipment You’ll Need
Having the right tools on hand will make preparing your Oreo frosting a breeze. Here’s what you’ll need:
- Stand Mixer with Paddle Attachment (or Hand Mixer): Essential for creaming the butter and thoroughly mixing all ingredients to achieve a smooth consistency. The paddle attachment is preferred for frosting to incorporate air without over-whipping.
- Blender or Food Processor: Critical for crushing your Oreo cookies into super fine crumbs, which is key for a silky frosting texture.
- Rubber Spatula: For scraping down the sides of your mixing bowl, ensuring all ingredients are evenly incorporated.
- Measuring Cups and Spoons: For accurate ingredient measurements.
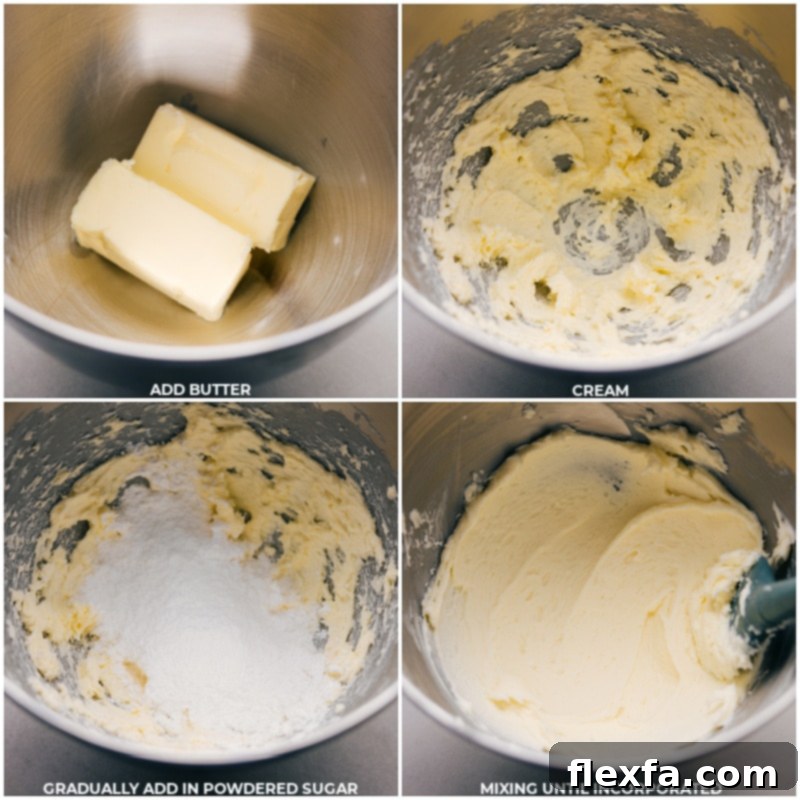
Step-by-Step Guide: How to Make Creamy Oreo Frosting
Creating this dreamy cookies and cream frosting is simpler than you might think. Follow these detailed steps to ensure a perfect batch every time:
- Prepare Your Butter: Begin with unsalted butter that has reached true room temperature. It should be soft enough to indent easily with your finger but still hold its shape, not melted or greasy. This is crucial for a smooth frosting.
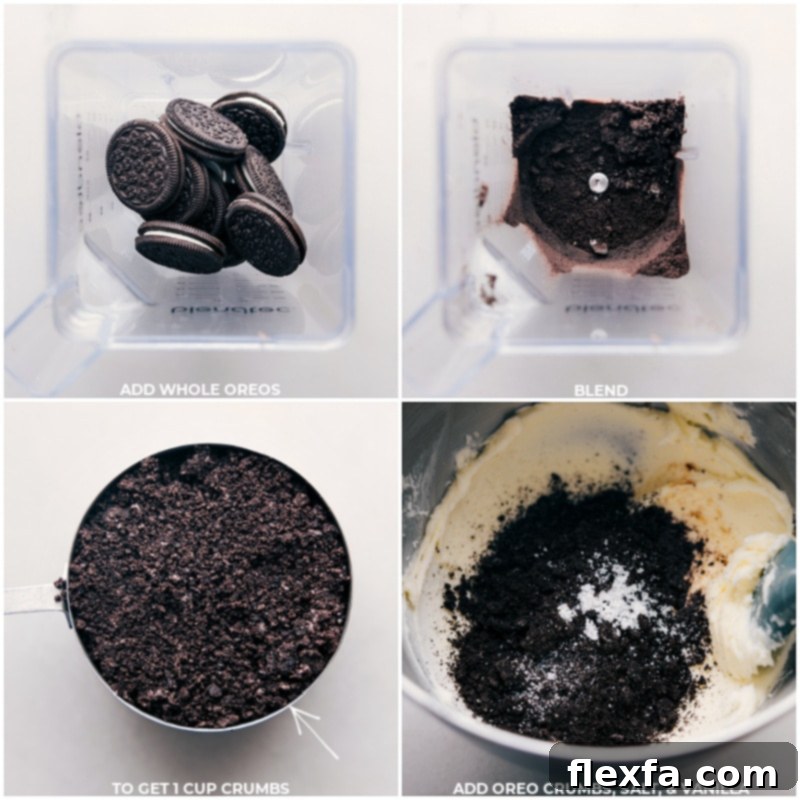
- Crush the Oreos: There’s no need to separate the cookie from its creamy filling! Place whole Oreo cookies into a powerful blender or food processor. Pulse until you achieve very fine crumbs. This fine texture prevents any gritty bits in your frosting and ensures a smooth piping experience. Aim for approximately 1 cup of crumbs.
- Cream the Butter: In the bowl of a stand mixer fitted with the paddle attachment (or a large bowl if using a hand mixer), beat the softened butter on low speed. Mix until the butter is light, fluffy, and creamy, taking care not to over-whip it. Over-whipping can introduce too much air and lead to a less stable frosting.
- Gradually Add Powdered Sugar: With the mixer still on low speed, begin adding the powdered sugar, about 1/2 cup at a time. Pause the mixer between additions and scrape down the sides and bottom of the bowl with a rubber spatula to ensure all the sugar is fully incorporated with the butter. This step helps prevent a cloud of sugar from erupting and ensures a uniform texture.
- Incorporate Oreo Crumbs and Flavor: Once all the powdered sugar is combined, add the fine Oreo crumbs, pure vanilla extract, and salt. Keep the mixer on low speed and slowly begin adding the cold heavy cream, starting with 2 tablespoons. Mix until all the ingredients are well combined and the frosting starts to come together.
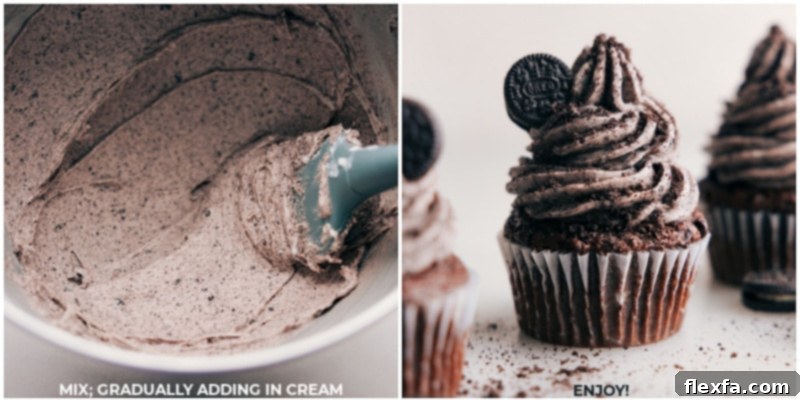
- Adjust Consistency: Assess the frosting’s thickness. If it appears too stiff or thick for your liking, add another teaspoon of cold heavy cream, one at a time, mixing thoroughly after each addition. Continue this process until you achieve the desired spreadable or pipeable consistency.
- Taste and Refine: Give your frosting a quick taste test. If you desire a more intense flavor or wish to further balance the sweetness, you can add a tiny pinch more salt.
- Ready to Frost: Once your creamy Oreo frosting is perfectly prepared, it’s ready to be used! Ensure any cakes or cupcakes you plan to frost are completely cooled to prevent the frosting from melting.
Creative Ways to Use Your Oreo Frosting
This luscious Oreo frosting is incredibly versatile and can elevate a wide array of desserts. Here are some of my favorite ways to enjoy this delightful creation:
- Cakes and Cupcakes: The most classic use! It’s absolutely perfect for generously topping or intricately piping onto chocolate, vanilla, or even red velvet cakes and cupcakes.
- Sandwich Cookies: Use it as a rich, creamy filling to create homemade sandwich cookies with your favorite plain biscuits or shortbread.
- Brownies and Bars: Spread a thick layer over cooled brownies or dessert bars for an extra layer of decadence and texture.
- Whoopie Pies: This frosting makes an exceptional creamy filling for classic whoopie pies, complementing the soft cake-like cookies beautifully.
- Parfaits and Trifles: Layer the frosting with crumbled cake, cookies, fresh fruit, or brownies in a glass for an elegant and rich layered dessert.
- Ice Cream Topping or Mix-In: Swirl it into homemade ice cream base before freezing for a cookies and cream ice cream, or warm it slightly and drizzle over store-bought ice cream for an instant upgrade.
- Dips and Spreads: Serve it as a fun, sweet dip for pretzels, marshmallows, vanilla wafers, graham crackers, or fresh fruit like apple slices.
- Dessert Pizza: Spread it as a base on a cookie crust, then top with more crushed Oreos, chocolate chips, and a drizzle of fudge.
- Donut Filling: Inject this frosting into homemade or plain store-bought donuts for a gourmet treat.
Quick Tip: Easy Piping Bag Filling
Baking alone and struggling to fill a piping bag? Here’s a cool trick: simply place the piping bag (tip side down) into a tall glass or large measuring cup, then fold the top edge of the bag over the rim. This creates a stable opening, allowing you to easily spoon in the frosting with one hand. Voila!
Expert Tips for Flawless Oreo Frosting
Achieving consistently perfect Oreo frosting is easy with a few insider tips. Keep these in mind to ensure your frosting turns out smooth, creamy, and utterly delicious every single time:
- Fine Oreo Crumbs are Non-Negotiable: Always pulse your whole Oreos (including the cream filling) into very fine, almost powder-like crumbs using a food processor or blender. Larger chunks can clog your piping bag or create an unpleasant gritty texture in the finished frosting.
- Add Heavy Cream Gradually: The amount of heavy cream needed can vary slightly based on humidity and butter consistency. Always start with the minimum recommended amount (2 tablespoons) and add more, one teaspoon at a time, until you reach your desired thickness. This prevents the frosting from becoming too thin too quickly.
- Scrape the Bowl Thoroughly: During the mixing process, especially after adding powdered sugar, frequently pause your mixer and use a rubber spatula to scrape down the sides and bottom of the bowl. This ensures all ingredients are fully incorporated, preventing pockets of unmixed butter or sugar.
- Avoid Over-Beating After Adding Oreos: Once the Oreo crumbs are added, mix only until just combined. Over-beating at this stage can break down the cookie pieces too much, potentially releasing oils and leading to a greasier or grainy frosting texture.
- Experiment with Flavor Variations: Don’t be afraid to get creative! For a delightful twist, consider adding a touch of mint extract along with crushed Mint Oreos for a seasonal treat, or a spoonful of smooth peanut butter for a chocolate-peanut butter dream.
- Use Unsalted Butter: Using unsalted butter gives you control over the total salt content, allowing you to fine-tune the flavor balance. If you only have salted butter, omit the added salt from the recipe.
Achieving the Perfect Butter Consistency
The secret to wonderfully smooth, creamy, and pipeable Oreo frosting truly lies in starting with butter at the ideal room temperature. It makes a world of difference in how well your ingredients emulsify and the final texture of your frosting.
How to Check for Ideal Softness:
- The Finger Test: Gently press your finger into the butter. It should leave a slight indent without your finger sinking all the way through or the butter feeling mushy.
- The Slice Test: When cut, the butter should slice easily but still maintain its shape and not collapse.
- Temperature Check: Ideally, your butter should be around 65-70°F (18-21°C). If it’s colder, it will be hard to cream; if warmer, your frosting might be too runny.
Quick Butter Softening Methods:
- Cut into Pieces: If you’re short on time, cut your cold butter into small, 1-inch (2.5 cm) cubes. Spread them out on a plate, and they’ll come to room temperature much faster, typically within 15-20 minutes.
- Warm Glass Trick: Fill a glass with hot tap water and let it sit for a minute. Pour out the water and dry the glass. Invert the warm glass over your stick of butter on a plate, creating a warm, humid environment that quickly softens the butter.
- Microwave (Use with Caution!): This method is quick but requires extreme care to avoid melting. Heat your butter in the microwave at 10% power for 8-10 seconds. Check its consistency, flip it, and repeat for another 5-8 seconds if needed. Stop immediately if it starts to melt!
Storage Guidelines for Oreo Frosting
- Refrigeration: Store any leftover Oreo frosting in an airtight container in the refrigerator for up to one week.
- Freezing: For longer storage, you can freeze the frosting for up to three months. Ensure it’s in a freezer-safe, airtight container.
- Thawing and Re-whipping: If frozen, thaw the frosting overnight in the refrigerator. Before using, let it come to room temperature (this might take an hour or two on the counter), then give it a good re-whip with your mixer for a few minutes to restore its creamy, fluffy texture.
- Make Ahead: This frosting is excellent for making in advance! Simply prepare it, refrigerate, and then bring to room temperature and remix before you’re ready to frost.
Common Questions About Oreo Frosting (FAQ)
Here are answers to some frequently asked questions to help you master this delicious Oreo frosting:
- Can I use flavored Oreos or Double Stuf Oreos?
While classic Oreos are recommended for the best flavor balance and consistency, you can experiment with flavored Oreos like Mint or Golden Oreos for a twist. However, avoid Double Stuf Oreos as their extra filling can make the frosting too sweet or affect its texture negatively.
- Why is my frosting grainy?
Grainy frosting usually indicates that the powdered sugar wasn’t fully dissolved or the Oreo crumbs weren’t fine enough. Ensure you add powdered sugar gradually, scrape the bowl often, and pulse your Oreos until they are very fine. Over-beating after adding Oreos can also contribute to a grainy texture.
- My frosting is too thin/thick. How can I fix it?
If your frosting is too thin, try adding a tablespoon or two more powdered sugar and mixing until incorporated. If it’s too thick, add heavy cream one teaspoon at a time until the desired consistency is reached. Always adjust gradually!
- Can I make this frosting vegan?
Yes, with some substitutions! You’ll need vegan butter sticks, a dairy-free heavy cream alternative (like full-fat canned coconut cream, chilled), and ensuring your Oreos are vegan (classic Oreos are often accidentally vegan in many regions, but always check labels). The process remains the same.
Delicious Recipes Using Leftover Oreos
If you find yourself with extra Oreos after making this frosting, don’t let them go to waste! These delightful recipes are perfect for using up those remaining cookies:
- No-Bake Oreo Truffles: Decadent chocolate-covered Oreo balls, incredibly easy and impressive.
- Oreo Fudge: A creamy, rich fudge infused with white chocolate and crunchy Oreo pieces.
- Chocolate Covered Oreos: Simple yet elegant, dipped in chocolate and finished with a delicate drizzle.
- Icebox Cake: Layers of Oreos and a creamy Nutella filling, chilled to perfection for a no-bake dessert.
- Brownie Oreo Ice Cream Bars: A delightful combination of fudgy brownies, Oreo crunch, and cool ice cream, often served with hot fudge sauce.

Oreo Frosting (Cookies and Cream Frosting)
Oreo Frosting is creamy, buttery, sweet, and loaded with Oreo goodness—taking any dessert to the next level!
- By: Chelsea Lords
- Prep Time: 25 minutes
- Total Time: 25 minutes
- Yields: 12 cupcakes (see note 1)
Print Recipe
Equipment
- Stand mixer with paddle attachment (or hand mixer)
- Blender or food processor
Ingredients
- 1 cup Oreo crumbs (from approximately 10 Oreo cookies)
- 16 tablespoons unsalted butter (1 cup), at room temperature (see note 2)
- 3 cups powdered sugar (see note 3)
- 2 teaspoons vanilla extract
- 2 to 4 tablespoons heavy cream, cold
- 1/4 teaspoon salt
Instructions
- Ensure butter is at room temperature—soft but not melted (refer to note 2 and the Butter Prep section above for tips).
- Without separating the cookies from their filling, place whole Oreo cookies into a powerful blender or food processor. Pulse until you have 1 cup of very fine crumbs.
- Add the room-temperature butter to a stand mixer bowl fitted with the paddle attachment (or a large bowl if using a hand mixer). Mix on low speed until the butter is creamy and light. Avoid over-whipping.
- Gradually add the powdered sugar, about 1/2 cup at a time. After each addition, pause the mixer and scrape down the sides and bottom of the bowl. Continue mixing on low speed until the sugar is fully combined with the butter.
- Add the prepared Oreo crumbs, vanilla extract, and salt. While the mixer is on low speed, slowly begin adding the cold heavy cream, starting with 2 tablespoons. Mix until all ingredients are just combined and the frosting begins to form.
- Check the frosting’s consistency. If it’s too thick, add an additional teaspoon of cold heavy cream at a time, mixing well after each addition, until you achieve your desired spreadable or pipeable thickness. Taste the frosting and add more salt if desired to enhance flavors and balance sweetness.
- Once the frosting is ready, spread or pipe it onto completely cooled cupcakes, cakes, or other desserts.
Recipe Notes
- Note 1: This recipe yields enough frosting to generously frost a 9×13-inch cake, an 8 or 9-inch two-layer cake, 24 standard cupcakes, or 12 oversized cupcakes as pictured in the post.
- Note 2: Ideal butter should be soft to the touch and pliable but still hold its shape—not melted or greasy. Too soft can make the frosting runny; too cold can lead to lumps. (See “Achieving the Perfect Butter Consistency” section for softening tips!)
- Note 3: For accurate measurement, ensure measuring cups are fully filled with powdered sugar and level off the top with the back of a table knife.
- Nutrition Note: Nutrition information provided is an approximation for one serving, based on 12 servings per batch of frosting.
- Storage: Leftover frosting can be stored in an airtight container in the refrigerator for up to 1 week or frozen for up to 3 months. Thaw frozen frosting in the fridge, then bring to room temperature and re-whip before use.
Nutrition Information (Approximate Per Serving)
- Serving: 1 serving
- Calories: 330 kcal
- Carbohydrates: 40g
- Protein: 1g
- Fat: 19g
- Saturated Fat: 11g
- Polyunsaturated Fat: 1g
- Monounsaturated Fat: 6g
- Trans Fat: 1g
- Cholesterol: 45mg
- Sodium: 104mg
- Potassium: 40mg
- Fiber: 0.4g
- Sugar: 35g
- Vitamin A: 530IU
- Vitamin C: 0.01mg
- Calcium: 10mg
- Iron: 2mg
Nutrition information is automatically calculated and should only be used as an approximation.
We hope you adore this incredible Oreo Frosting recipe! If you give it a try, please come back and share your thoughts in the comments below. Your feedback and ratings help other bakers discover and enjoy this sweet treat too!