
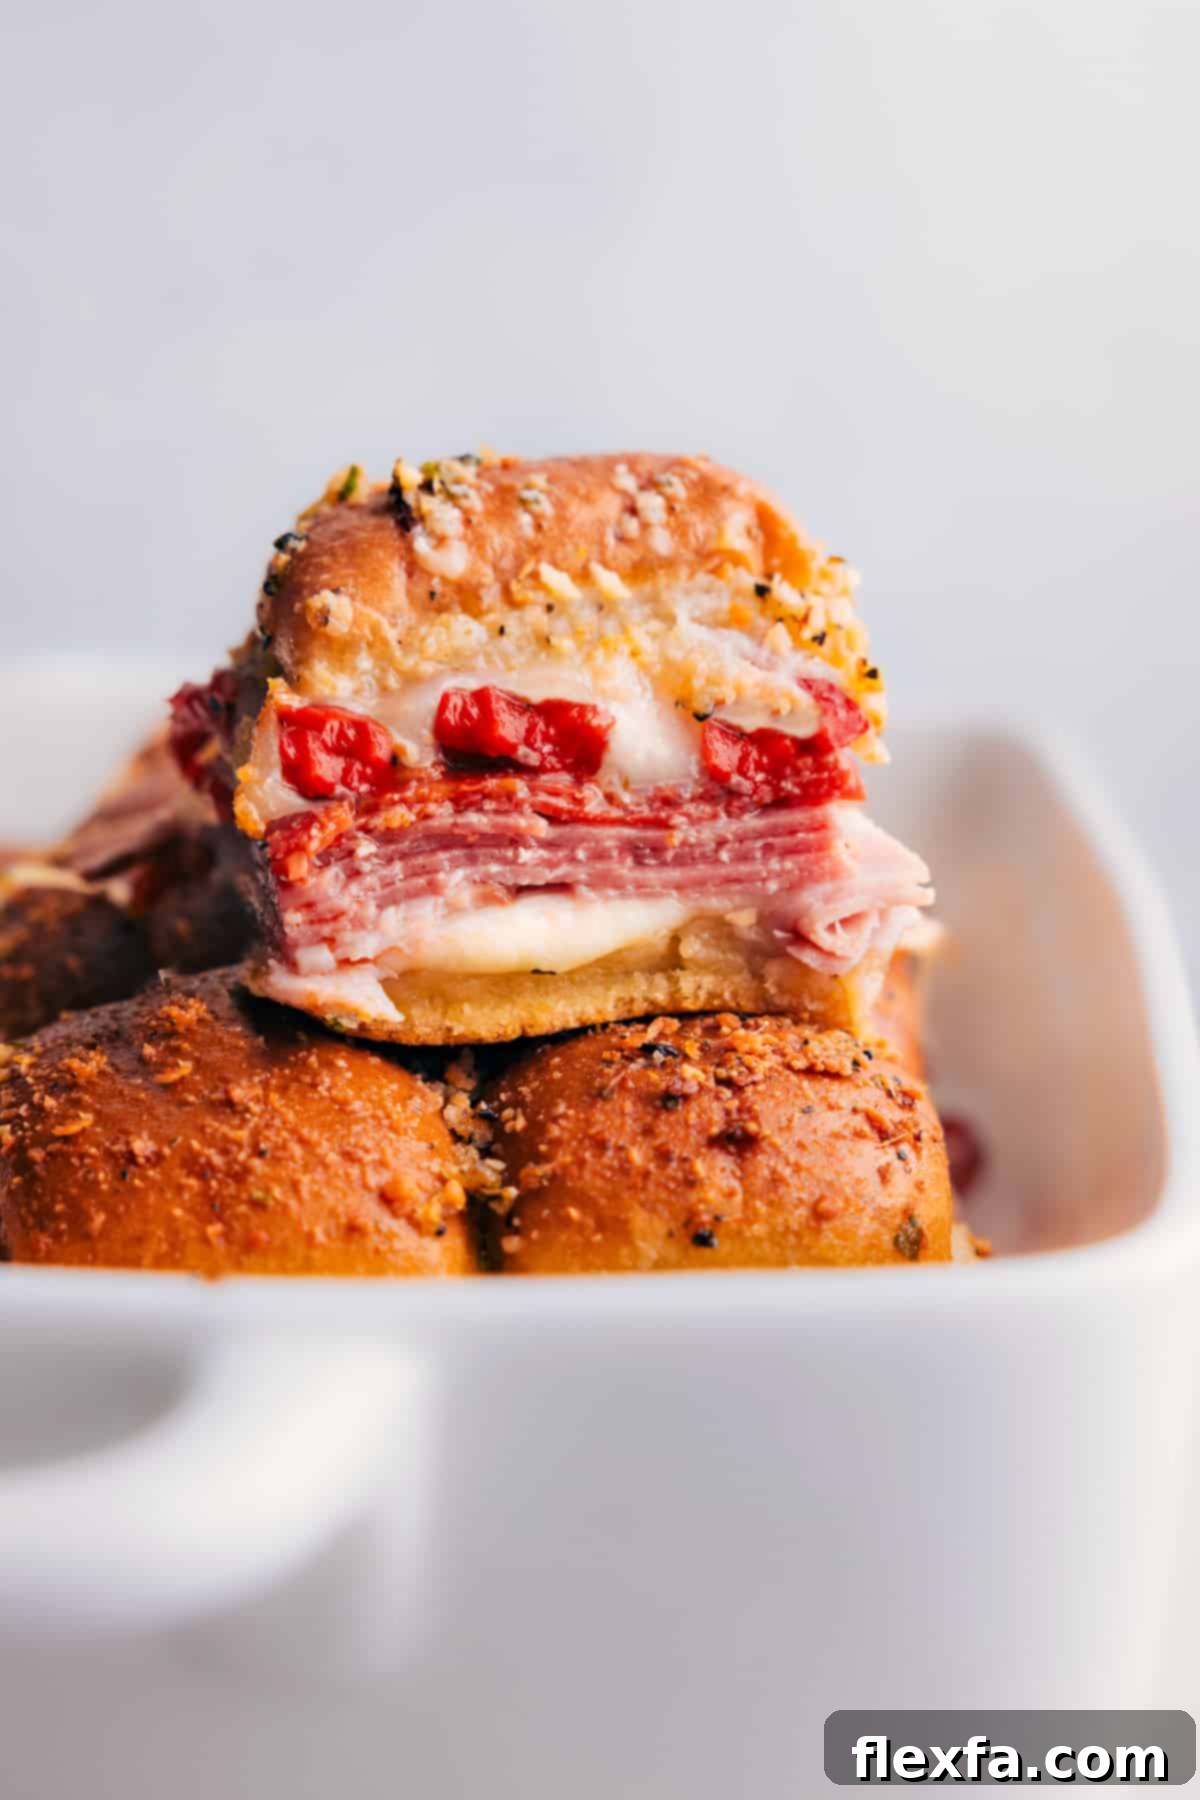
This Italian Sliders Recipe offers a delightful blend of Italian deli meats, melty cheese, and a savory butter topping, all nestled in soft Hawaiian rolls. Quick to prepare and incredibly simple to bake, these sliders are guaranteed to be a hit at any gathering, from casual weeknight dinners to festive holiday parties.
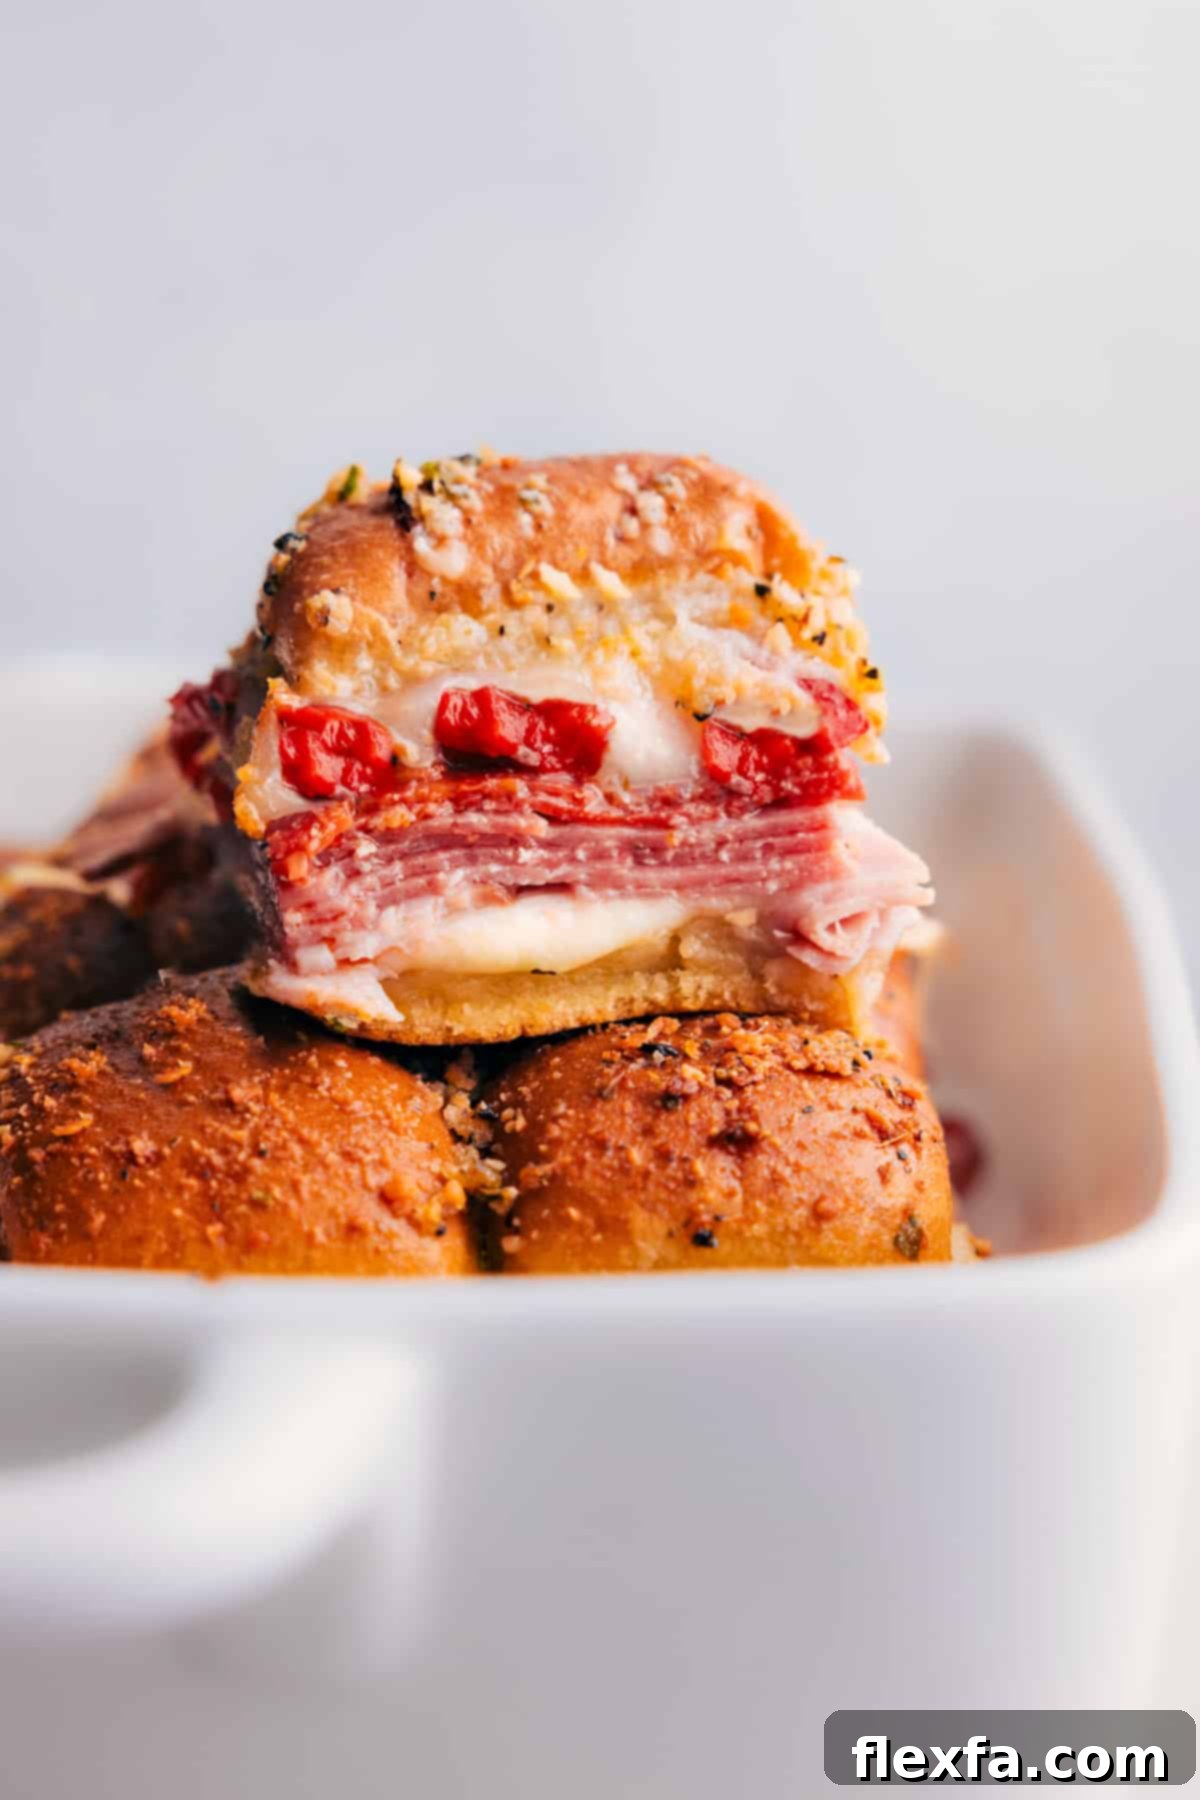
The Best Italian Sliders Recipe: Your Go-To for Easy Entertaining
When it comes to hosting, especially during the bustling holiday season or spontaneous get-togethers, finding a dish that is universally loved, simple to prepare, and budget-friendly can be a challenge. That’s where these incredible Italian Sliders come in! They are consistently my top choice for entertaining, offering a delicious solution that everyone, without fail, raves about.
Imagine a dish that practically serves itself, allowing you more time to enjoy your guests. These sliders are precisely that. They’re ideal for making in batches and setting out for friends and family to help themselves. The combination of savory deli meats, melted Provolone, and a rich, seasoned butter topping creates an irresistible aroma and taste that draws everyone in.
I recall making these Italian Sliders for an after-Christmas celebration one year, and they were such an enormous success that I completely underestimated the demand! People couldn’t stop talking about them, and the platter emptied so quickly that I found myself heading back to the grocery store the very next day to grab more ingredients. That’s when I truly realized I had a winning recipe on my hands – one I simply had to share!
Why You’ll Adore This Italian Slider Recipe
There are countless reasons why these baked Italian sliders have become a beloved staple in my kitchen and among my friends. Here’s why they’re destined to become your new favorite too:
- Effortlessly Delicious: With minimal prep and hands-on time, you can create a spectacular dish that tastes like you spent hours in the kitchen.
- Ultimate Crowd-Pleaser: From kids to adults, these savory sliders disappear fast. The combination of classic Italian flavors on a sweet roll is simply irresistible.
- Perfect for Any Occasion: Whether it’s a game day party, a holiday gathering, a casual potluck, or just a fun family dinner, these sliders fit right in.
- Customizable to Your Taste: Easily swap cheeses, meats, or add extra veggies to make them uniquely yours. The base recipe is incredibly versatile.
- Budget-Friendly: Made with readily available and affordable ingredients, these sliders offer great value, especially when feeding a large group.
- Minimal Cleanup: Baked in a single pan, cleanup is a breeze, leaving you more time to enjoy your meal and company.
- Make-Ahead Potential: Prepare them partly in advance, and simply pop them in the oven when your guests arrive for fresh, hot appetizers.
Essential Ingredients for Perfect Italian Sliders
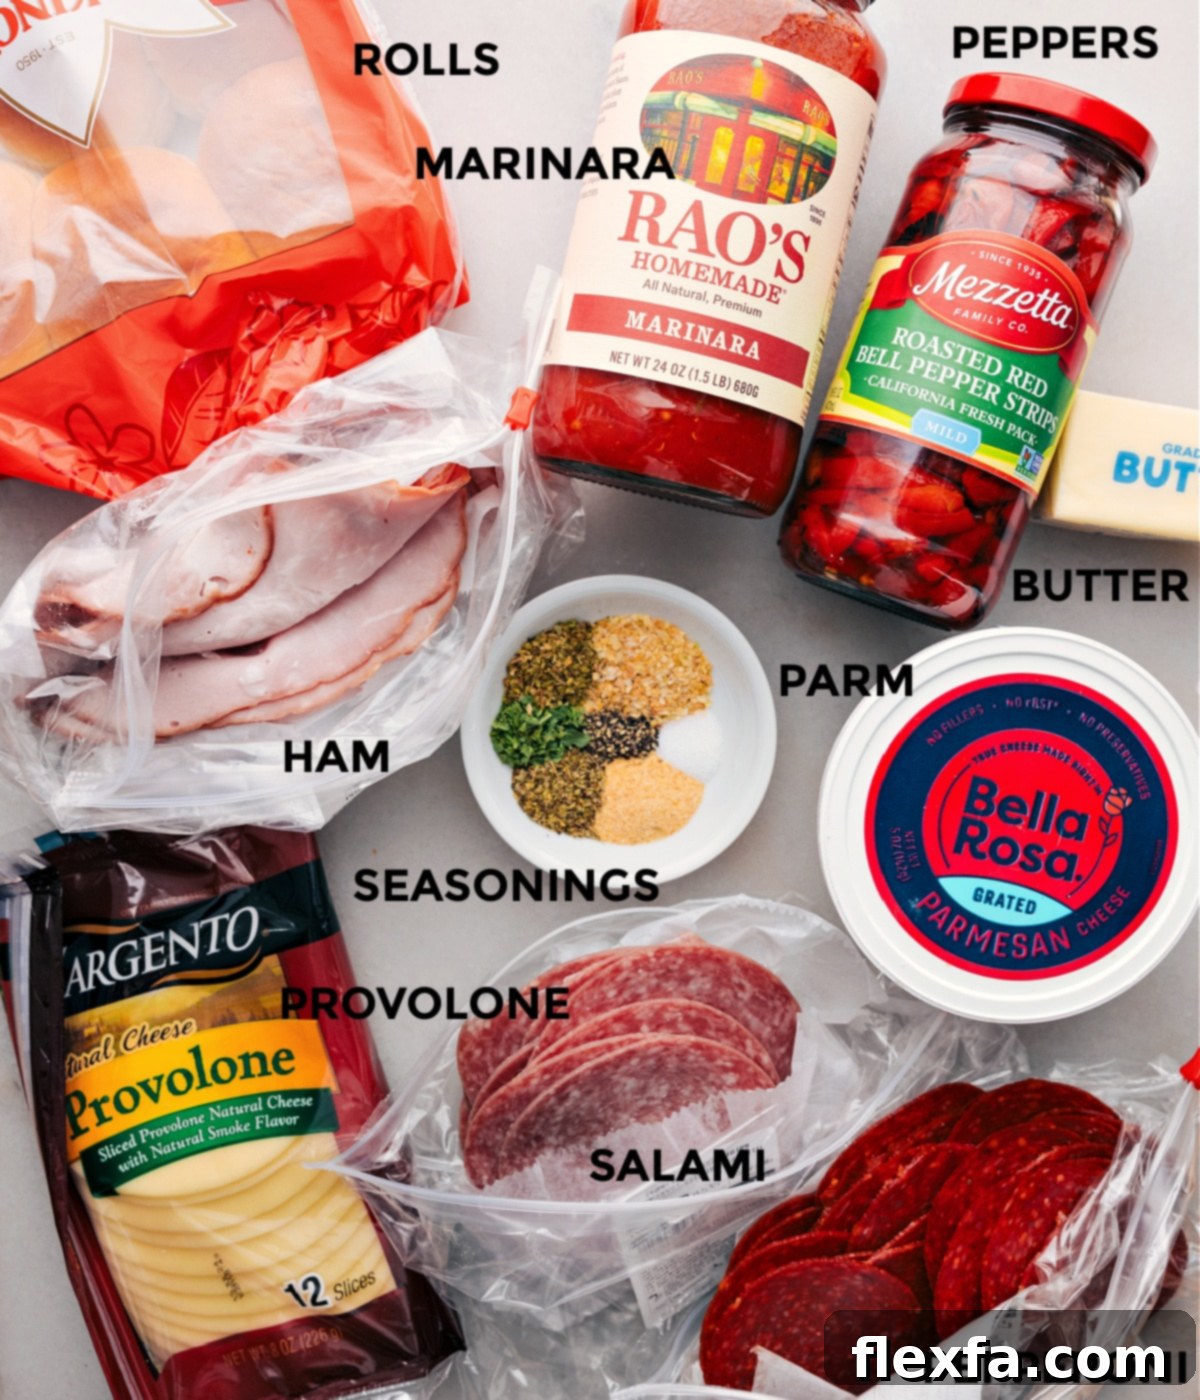
The beauty of this recipe lies in its simplicity and the quality of its components. Here’s a detailed look at what you’ll need and some tips for selecting the best:
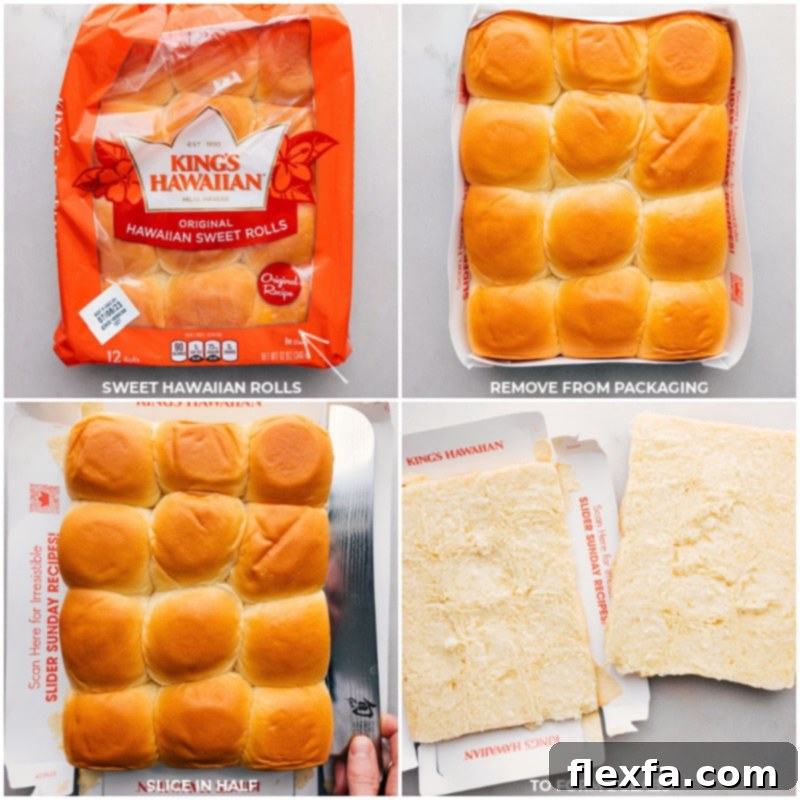
- Hawaiian Sweet Rolls: The foundation of our sliders! Opt for a soft, fresh package. The inherent sweetness of these rolls perfectly complements the savory, salty Italian meats and cheeses, creating a balanced and addictive flavor profile. Keeping the rolls connected as a single block makes assembly incredibly easy.
- Provolone Cheese: A classic Italian cheese known for its mild, slightly sharp flavor and excellent melting qualities. For extra depth, you can swap half of the Provolone with mozzarella for a stringier, milder melt, or even a smoked Provolone for a deeper flavor.
- Ham, Salami, & Pepperoni: This trio creates the quintessential Italian deli flavor.
- Thinly Sliced Deli Ham: Choose a good quality, thinly sliced ham, such as a black forest or honey ham, for a savory base.
- Salami: Genoa salami is a popular choice for its rich, garlicky, and slightly tangy flavor. Ensure it’s thinly sliced from the deli for the best texture.
- Pepperoni: Adds a delightful spice and distinct flavor. You can use large deli slices or smaller pre-packaged rounds, adjusting quantity as needed.
The key here is thinly sliced deli meats to ensure each bite is packed with flavor without being overly thick or chewy.
- Roasted Red Peppers (Optional): These add a fantastic sweet and smoky counterpoint to the rich meats and cheese. If you choose to include them, ensure they are thoroughly drained and patted very dry to prevent your sliders from becoming soggy. If you’re not a fan, feel free to omit them entirely.
- Parmesan Cheese (Optional): A sprinkle of grated Parmesan on top before the final bake adds an extra layer of salty, umami flavor and helps create a beautifully golden, cheesy crust that’s utterly irresistible. Freshly grated Parmesan will always offer the best flavor.
- Savory Butter Topping: This is the secret weapon that elevates these sliders! A generous brushing of melted butter combined with a blend of dried minced onion, garlic powder, dried oregano, parsley, Italian seasoning, salt, and pepper adds moisture, flavor, and a delightful crispiness to the rolls. Don’t skimp on this step!
Featured Comment
“I’ve made these several times for parties and they are always a hit!! And multiple people ask for the recipe.”
– Charlotte
How to Make The Best Italian Sliders: Step-by-Step Instructions
Creating these delightful Italian sliders is incredibly straightforward. Follow these simple steps for perfectly baked, cheesy, and flavorful results every time:
- Prepare Your Pan & Oven: Begin by preheating your oven to 350°F (175°C). Lightly grease a 9×13-inch baking pan with cooking spray, then line it with parchment paper for easy removal and cleanup. This ensures your sliders won’t stick and makes serving a breeze.
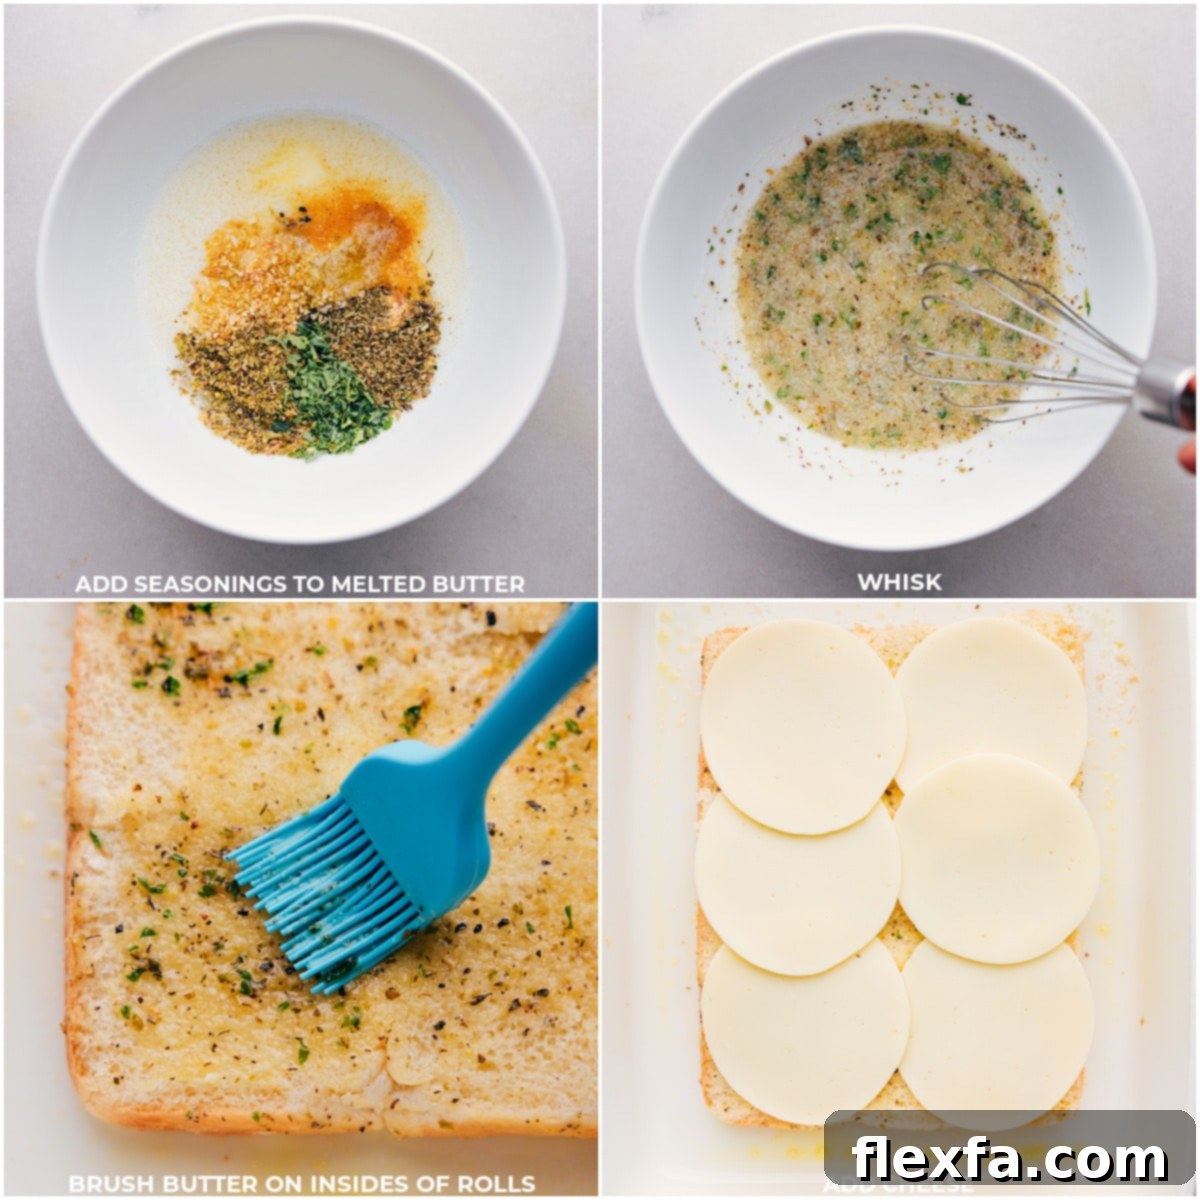
- Craft the Flavorful Butter Topping: In a microwave-safe bowl, melt the unsalted butter. Allow it to cool slightly to prevent it from cooking the dried herbs. Whisk in the dried minced onion, garlic powder, dried oregano, dried parsley, Italian seasoning, salt, and pepper until well combined. This aromatic mixture is crucial for the sliders’ incredible taste and golden crust.
- Slice and Butter the Rolls: Using a sharp serrated bread knife, carefully slice the entire block of Hawaiian rolls in half horizontally, keeping the individual rolls connected. This creates a top and bottom “slab.” Place the bottom half of the rolls into your prepared baking pan. Generously brush about 2 tablespoons of the seasoned butter mixture onto the cut sides of both the top and bottom halves of the rolls.
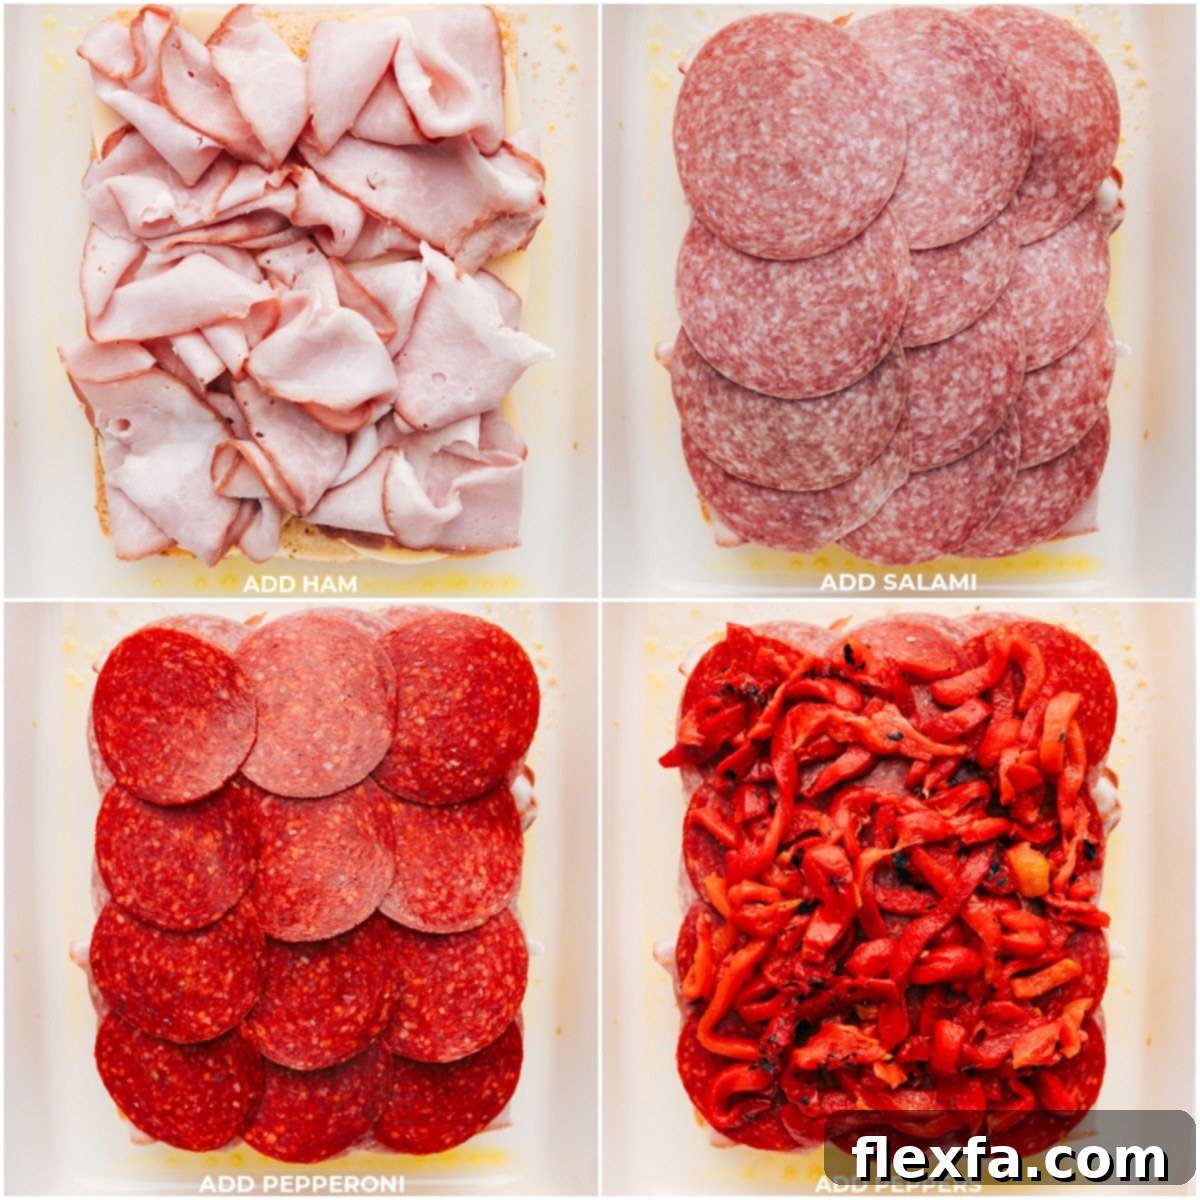
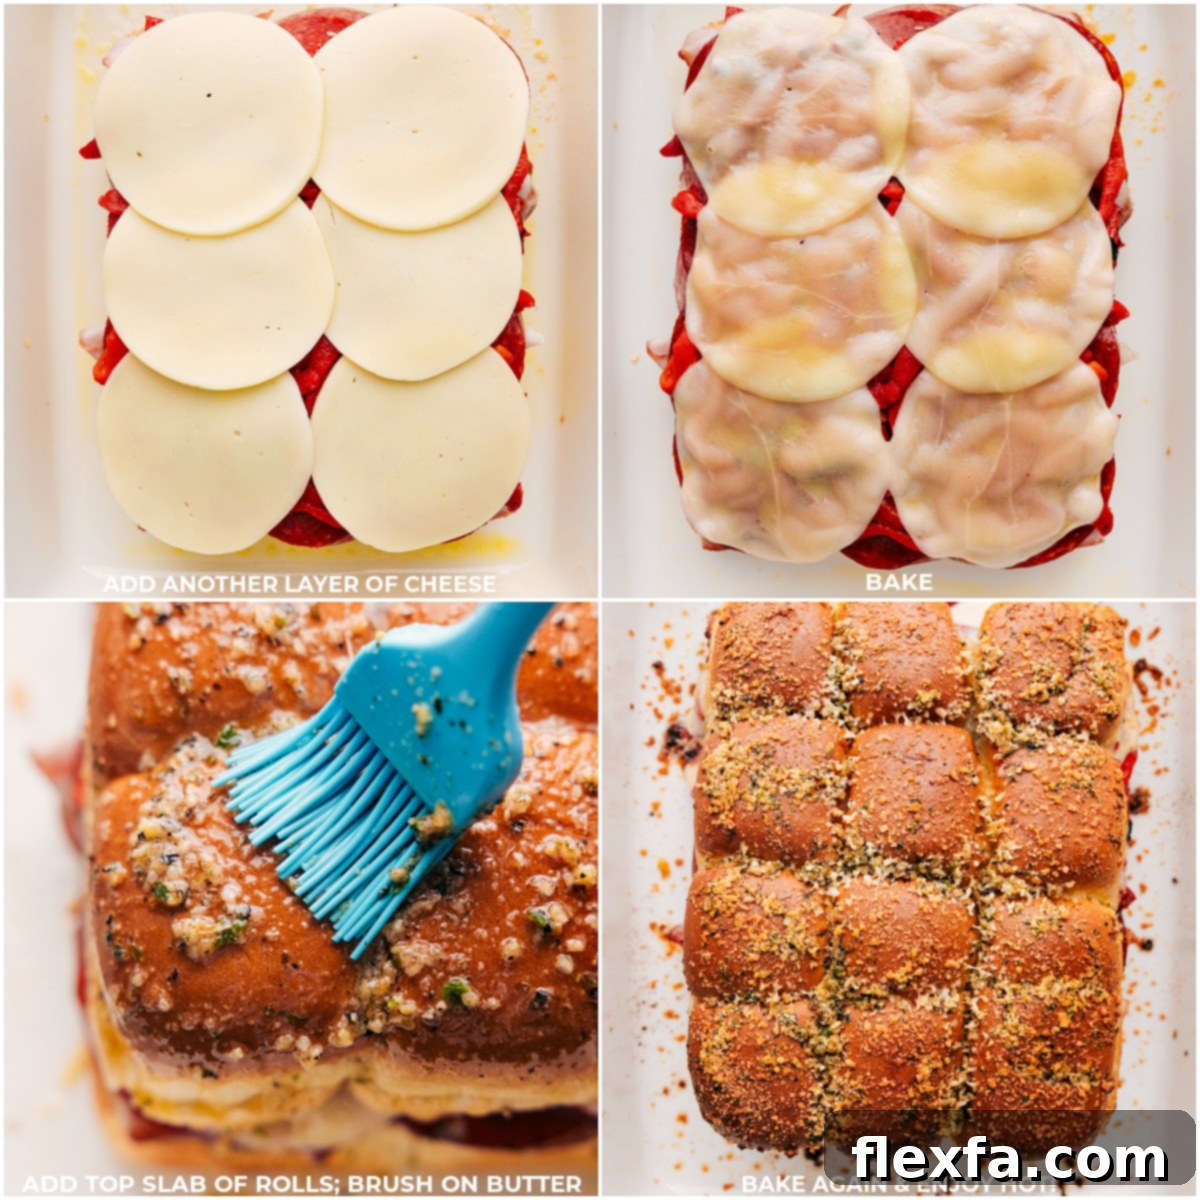
- Layer the Fillings & Initial Bake: On the bottom half of the rolls in the pan, arrange half of your Provolone cheese slices. Then, layer the ham, followed by the salami, pepperoni, and finally, the roasted red pepper strips (if using). Top this magnificent stack with the remaining 6 slices of Provolone cheese. At this stage, do not add the top half of the rolls. Bake the bottom portion, uncovered, for 10 minutes. This helps melt the cheese slightly and warm the meats through.
- Complete Assembly & Final Bake: Remove the pan from the oven. Carefully place the top half of the rolls back onto the filled bottom halves. Now, brush the tops and sides of the assembled sliders generously with the remaining butter mixture. If you’re adding Parmesan cheese, sprinkle it evenly over the top. Cover the pan tightly with aluminum foil and return it to the oven to bake for another 20 minutes. This steams the sliders, ensuring the cheese is perfectly melted and the rolls are soft.
- Achieve Golden Perfection: After 20 minutes, remove the foil. Continue baking for an additional 5-10 minutes, or until the tops of the rolls are beautifully golden brown and the cheese is bubbly and fully melted.
- Serve Warm: Once out of the oven, let the sliders cool for a few minutes before cutting them into individual portions. Serve them immediately while they’re warm and the cheese is gloriously gooey, perhaps with a side of warmed marinara sauce for dipping.
Quick Tip for Slicing Rolls
For the cleanest cut and to keep your Hawaiian rolls intact, always use a sharp bread knife with a serrated edge. This will allow you to slice straight through the entire block of rolls in one smooth motion, creating perfect top and bottom layers without tearing.
Tips for Achieving Perfect Italian Sliders Every Time
While this recipe is simple, a few expert tips can elevate your Italian sliders from great to absolutely phenomenal:
- Dry Your Roasted Red Peppers: If you’re using roasted red peppers, this step is non-negotiable! Excess moisture will make your sliders soggy. Place them on several layers of paper towels and press firmly to remove as much liquid as possible before adding them to the rolls.
- Don’t Skimp on the Butter Topping: The seasoned butter is what gives these sliders their incredible flavor and a beautiful golden crust. Brush it generously over both the cut sides and the top and sides of the assembled rolls.
- Keep Rolls Connected: Slicing the entire block of rolls in half horizontally ensures all your sliders are uniform in size and prevents fillings from escaping during baking. It also makes assembly much quicker.
- Use Good Quality Deli Meats and Cheese: The flavor of your sliders is directly proportional to the quality of your ingredients. Opt for fresh, thinly sliced deli ham, Genoa salami, and good Provolone for the best taste.
- Bake in Stages: Baking the bottom half of the sliders with the fillings first allows the cheese to start melting and the meats to warm without over-toasting the top rolls. Covering them with foil in the second stage helps steam them, ensuring a soft bun.
- Serve Immediately: Italian sliders are best served hot, straight out of the oven, when the cheese is perfectly gooey and the rolls are warm and tender.
- Line with Parchment Paper: For easy cleanup and to prevent sticking, always line your baking pan with parchment paper. It also makes it easier to lift the entire batch out of the pan if needed.
Variations & Customizations for Your Italian Sliders
One of the best things about this Italian sliders recipe is its versatility. Feel free to get creative and adapt it to your taste preferences:
- Cheese Swaps: Experiment with different cheeses! Mozzarella for extra meltiness, Swiss for a nutty flavor, or a blend of Italian cheeses like provolone and fontina.
- Add More Veggies: Sautéed onions, thinly sliced bell peppers, spinach, or even banana peppers can add extra flavor and texture. Just make sure to cook or drain watery vegetables thoroughly.
- Spice It Up: A pinch of red pepper flakes mixed into the butter topping or sprinkled over the fillings will add a pleasant kick. You could also add a touch of hot giardiniera.
- Different Meats: While the ham, salami, and pepperoni combo is classic, you can try other Italian deli meats like capicola or mortadella. For a non-pork option, use turkey pepperoni and chicken ham.
- Sun-Dried Tomatoes: Instead of roasted red peppers, try thinly sliced sun-dried tomatoes (oil-packed, drained well) for a concentrated tomato flavor.
- Herb Variations: Change up the herbs in the butter topping. Fresh chopped basil or oregano can be added at the end for a brighter flavor.
- Garlic Bread Style: For an even more intense garlic flavor, spread a thin layer of garlic paste on the cut sides of the rolls before adding the seasoned butter.
- Marinara Inside: A very thin layer of marinara sauce spread on the bottom rolls before adding the cheese can give them a “pizza slider” vibe. Be cautious not to add too much, or they will become soggy.
What to Serve with Delicious Italian Sliders
These Italian sliders are hearty enough to be a meal on their own, but they also pair wonderfully with a variety of sides to complete your spread. Here are some fantastic options:
- Fresh Green Salad: A simple garden salad with crisp lettuce, cherry tomatoes, cucumbers, and a light vinaigrette dressing or a tangy Italian dressing offers a refreshing contrast.
- Crisp Veggie Sticks: Offer a colorful platter of carrot sticks, celery stalks, cucumber slices, and bell pepper strips with a creamy ranch or hummus dip for a healthy crunch.
- Pasta Salad: A classic Italian pasta salad, tossed with olives, cherry tomatoes, mozzarella balls, and a zesty dressing, complements the flavors perfectly.
- Classic Potato Chips: You can never go wrong with a bowl of your favorite crunchy potato chips or even some gourmet kettle chips for a satisfying side.
- Marinated Olives and Pickles: A small bowl of assorted marinated olives, cornichons, or pickled banana peppers can add a delightful tangy element that cuts through the richness of the sliders.
- Comforting Soup: For a cozy meal, pair your sliders with a warm bowl of roasted tomato basil soup or a hearty minestrone soup. The combination is wonderfully comforting.
- Caprese or Italian Skewers: Create simple skewers with fresh mozzarella balls, cherry tomatoes, and basil leaves, drizzled with balsamic glaze. Or, add olives and cubes of Italian cheese for an extra touch.
- Fries or Onion Rings: For a more indulgent side, a serving of crispy seasoned fries or golden onion rings always makes a great accompaniment.
- Fruit Salad: A light and refreshing fruit salad can be a wonderful palate cleanser, especially if serving these sliders at a brunch or lunch event.
Storage & Reheating Italian Sliders: Enjoying Leftovers
- Cool Down Completely: Before storing, allow your Italian sliders to cool completely to room temperature. This prevents condensation from building up, which can make them soggy.
- Proper Packaging: Once cooled, place the sliders in an airtight container or a resealable plastic bag. You can store them as individual sliders or keep them in larger sections.
- Refrigerate Promptly: Store the packaged sliders in the refrigerator for up to 3 days. Beyond this, the bread can start to dry out and the flavors may diminish.
- Reheating Instructions: To reheat, arrange the sliders on a baking sheet. For best results, cover them loosely with aluminum foil to prevent them from drying out. Warm in a preheated oven at 350°F (175°C) for about 10-15 minutes, or until thoroughly heated through and the cheese is re-melted. An air fryer can also work for individual sliders, heating them at 300°F (150°C) for 5-7 minutes.
- Freezing (Not Recommended): While technically possible, freezing is generally not recommended for these sliders as the bread can become mushy upon thawing, and the texture of the melted cheese may change. It’s best to enjoy them fresh or within the refrigerated storage period.
Frequently Asked Questions (FAQs) About Italian Sliders
- Can I prepare Italian sliders ahead of time? Yes! You can assemble the sliders (without baking) up to 2-3 hours in advance. Cover them tightly with plastic wrap and refrigerate. When ready to bake, add the butter topping and follow the baking instructions. You can also melt the butter and combine the seasonings ahead of time, storing it in the fridge until needed.
- What kind of rolls work best? Hawaiian sweet rolls are highly recommended due to their soft texture and subtle sweetness, which perfectly balances the savory meats and cheese. However, you can use other small dinner rolls or brioche buns if Hawaiian rolls are unavailable.
- Can I use different types of meat or cheese? Absolutely! This recipe is very flexible. Feel free to substitute with your favorite Italian deli meats like capicola or use a combination of different cheeses such as mozzarella, provolone, or even a little Parmesan within the layers.
- How do I prevent the sliders from getting soggy? The key is to ensure any wet ingredients, like roasted red peppers, are thoroughly drained and patted dry. Also, avoid adding too much sauce or liquid. Baking the bottom layer first helps set the ingredients before adding the top bun.
- Can I make these sliders vegetarian? Yes, you can! Omit the deli meats and instead layer with grilled vegetables like zucchini, eggplant, mushrooms, or additional roasted red peppers. Use plenty of cheese for flavor and melt.
Explore More Delicious Slider Recipes:
Dinner
French Dip Sliders
Lunch
Ham and Cheese Sliders Recipe
Sandwiches
Turkey Sliders Recipe
Dinner
Italian Beef Sliders
Italian Sliders Recipe
Try this quick and simple Italian Sliders Recipe, packed with delicious ham, salami, pepperoni, roasted red peppers, and gooey Provolone cheese. A guaranteed crowd-pleaser for any event!
Print Recipe
Equipment
- 9 x 13-inch baking pan
- Serrated bread knife
- Microwave-safe bowl
- Whisk
- Basting brush
Ingredients
- Cooking spray
- 12-count package Hawaiian sweet dinner rolls
- 12 slices Provolone cheese, divided
- 5 ounces thinly sliced deli ham (approx. 12 slices)
- 2 ounces salami (approx. 12 large slices)
- 2 ounces pepperoni (approx. 12 large slices or 24 smaller)
- 8 ounces roasted red pepper strips (optional, thoroughly drained and dried)
- 1 tablespoon grated Parmesan cheese (optional)
- Warmed Marinara sauce, for serving (optional)
- 8 tablespoons unsalted butter, melted
- 1-1/2 teaspoons dried minced onion
- 1 teaspoon garlic powder
- 1/2 teaspoon dried oregano
- 1/2 teaspoon dried parsley
- 1/2 teaspoon Italian seasoning
- 1/4 teaspoon salt
- 1/4 teaspoon pepper
Instructions
- Preheat Oven & Prepare Pan: Preheat your oven to 350°F (175°C). Lightly grease a 9×13-inch baking pan with cooking spray, then line it with parchment paper for easy removal.
- Prepare Butter Topping: In a microwave-safe bowl, melt the butter. Let it cool slightly, then whisk in the dried minced onion, garlic powder, dried oregano, dried parsley, Italian seasoning, salt, and pepper until thoroughly combined.
- Slice and Butter Rolls: Using a sharp serrated bread knife, carefully slice the entire block of Hawaiian rolls in half horizontally, keeping them connected. Place the bottom half of the rolls in the prepared pan. Brush approximately 2 tablespoons of the seasoned butter mixture onto the cut sides of both the top and bottom halves of the rolls.
- Layer Fillings & Initial Bake: Arrange 6 slices of Provolone cheese over the bottom half of the rolls. Layer with ham, salami, pepperoni, and then the thoroughly drained and dried roasted red pepper strips (if using). Top with the remaining 6 slices of Provolone cheese. Do not add the top slab of rolls yet. Bake, uncovered, for 10 minutes.
- Finish Assembly & Bake: Remove the pan from the oven. Carefully place the top half of the rolls onto the sliders. Generously brush the top and sides of the rolls with the remaining butter mixture. If desired, sprinkle grated Parmesan cheese on top. Cover the pan tightly with aluminum foil and bake for 20 minutes.
- Golden Finish & Serve: Remove the foil and bake for an additional 5–10 minutes, or until the top is golden brown and the cheese is beautifully melted and bubbly.
- Serve Warm: Let the sliders cool for a few minutes before cutting them into individual portions. Serve hot, optionally with warmed marinara sauce for dipping.
Recipe Notes
Note 1: Slicing Rolls: For best results, keep the Hawaiian rolls intact as a block and slice them horizontally through the middle using a serrated bread knife. This ensures even halves and easy assembly.
Note 2: Deli Meats: I prefer using thinly sliced deli pepperoni and salami. Since deli slices are typically larger, you’ll need about 12 slices of each. If using smaller, pre-packaged meats, you may need around 24 pieces to cover the rolls adequately. Adjust quantities to your preference.
Note 3: Roasted Red Peppers: If you’re not a fan, feel free to omit the roasted red peppers. If using, 8 ounces is roughly 1 cup. It’s crucial to thoroughly drain and squeeze out any excess moisture with paper towels to prevent the sliders from becoming soggy. Ensure they are very dry before adding them.
Storage: Allow the sliders to cool completely to room temperature. Store them in an airtight bag or container in the refrigerator for up to 3 days. Reheat in the oven at 350°F for about 10-15 minutes, covered with foil, until warm and the cheese is re-melted.
Nutrition
Serving: 1 slider | Calories: 303kcal | Carbohydrates: 17g | Protein: 13g | Fat: 21g | Saturated Fat: 11g | Polyunsaturated Fat: 1g | Monounsaturated Fat: 6g | Trans Fat: 0.4g | Cholesterol: 59mg | Sodium: 851mg | Potassium: 134mg | Fiber: 0.3g | Sugar: 4g | Vitamin A: 502IU | Vitamin C: 9mg | Calcium: 161mg | Iron: 1mg
Nutrition information is automatically calculated and should be used as an approximation.
Loved this recipe? Leave a comment below!
Your feedback helps others discover amazing recipes.