

Get ready to discover your new favorite dessert! This delightful peanut butter and chocolate Tiger Butter Fudge is not only incredibly delicious but also one of the simplest treats you can whip up. Forget complicated techniques and endless hours in the kitchen – you’ll only need **four staple ingredients** and the convenience of a microwave to create this show-stopping, swirled masterpiece. Perfect for satisfying a sudden sweet craving, impressing guests, or gifting to loved ones, this recipe promises a smooth, rich, and utterly irresistible fudge that tastes like it took all day to make!


Author’s Note
Sweet, Simple, and Impossible to Resist: A Family Favorite!
Growing up, the holiday season always brought with it a cherished family tradition: a dedicated “baking day” where my siblings and I would eagerly assist our parents in preparing a delightful assortment of treats. These homemade goodies weren’t just for us; they were lovingly crafted into thoughtful gifts for neighbors, friends, and co-workers. Among the many festive staples, one particular recipe always stood out and became an absolute must-make every single year: **Tiger Fudge**, affectionately known as Tiger Butter Fudge.
I vividly recall the joy on people’s faces as we dropped off our holiday packages. The moment they spotted the distinctive swirled fudge, we’d often hear an enthusiastic, “Oh good, the fudge!” It was clear that everyone eagerly anticipated this special treat, year after year. Given its immense popularity and the countless requests for the recipe, I simply had to share it with all of you. It’s truly a gem – incredibly simple to make, irresistibly delicious, and undoubtedly one of my all-time favorite recipes.
What makes this particular fudge so special? It boasts a wonderfully soft, velvety smooth texture that melts in your mouth, delivering a perfectly balanced and rich combination of chocolate and creamy peanut butter flavors. The best part? This entire recipe comes together in mere minutes, right in your microwave. There’s no need for fussy candy thermometers, complex double boilers, or any special tools that might intimidate a beginner. It’s pure dessert magic, effortlessly created in your kitchen!
Why You’ll Love This Easy Tiger Butter Fudge
If you’re searching for a dessert that delivers maximum flavor with minimal effort, you’ve found it! Here’s why this Tiger Butter Fudge recipe is about to become a permanent fixture in your recipe box:
- Effortlessly Simple: With just four ingredients and no baking required, this fudge is practically foolproof.
- Microwave Magic: Forget the stovetop or fancy equipment. Your microwave does all the heavy lifting!
- No Candy Thermometer: A common barrier for many fudge recipes, but not this one. Enjoy perfect fudge without the guesswork.
- Irresistible Flavor: The classic combination of rich chocolate and creamy peanut butter creates a sweet, salty, and utterly addictive taste sensation.
- Beautiful Presentation: The iconic tiger stripe swirl makes this fudge a visually stunning treat, perfect for any occasion.
- Perfect for Gifting: Homemade fudge is always a welcome gift, and this recipe is especially popular during the holidays.
- Quick to Set: You’ll be enjoying this delightful treat in under an hour, including chilling time.
Key Ingredients for Tiger Butter Fudge
This recipe truly shines because of its simplicity and the quality of its core ingredients. You only need four items to create this masterpiece:
- White Chocolate Chips: These form the base of your lighter fudge layer. When chocolate is the primary ingredient, its quality significantly impacts the final taste and texture. Opt for a high-quality brand of white chocolate chips for a smoother melt and superior flavor. Lower-grade chocolates often contain fillers and waxes, which can result in a grainy, waxy, or off-tasting fudge. Investing in good chocolate makes all the difference here.
- Creamy Peanut Butter: The star of the show for that signature peanut butter flavor and a key component in both layers. Make sure to use creamy peanut butter (such as Jif or Skippy) for the smoothest possible texture. Avoid natural peanut butter that separates, as its oil content can interfere with the fudge’s setting and consistency.
- Semi-Sweet Chocolate Chips: These provide a rich, deep chocolate flavor for the darker swirls. Again, choose a quality brand to ensure a smooth melt and excellent taste.
- Milk Chocolate Chips: Adding milk chocolate chips alongside semi-sweet helps to create a balanced chocolate flavor that isn’t too bitter, ensuring a universally appealing sweetness. If you prefer a more intense chocolate flavor or don’t have milk chocolate on hand, you can substitute this with an additional cup of semi-sweet chocolate chips.
How To Make Tiger Butter Fudge: Step-by-Step Guide
Making this Tiger Butter Fudge is incredibly straightforward. Follow these detailed steps to achieve perfect, swirled results every time:
- Prepare Your Pan: Start by lining a standard 9×13-inch sheet pan with parchment paper or aluminum foil. Ensure there’s enough overhang on the sides to easily lift the fudge block out once it’s set. If you’re using foil, a light spritz of cooking spray will prevent sticking. Set the prepared pan aside.
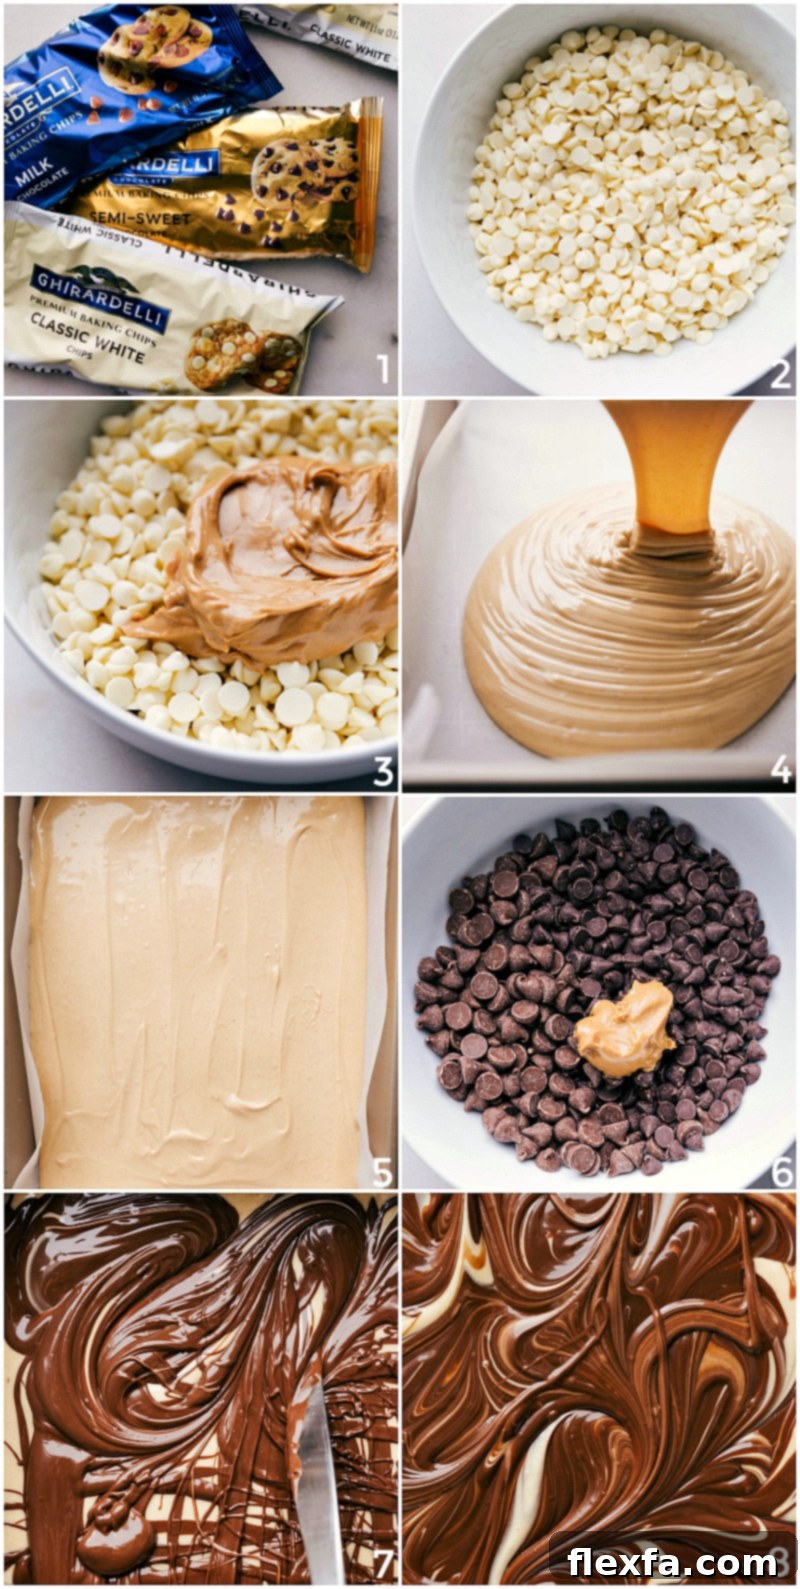
- Melt the White Chocolate Layer: In a large, microwave-safe bowl, combine the white chocolate chips and 3/4 cup of creamy peanut butter. Microwave this mixture for 30 seconds, then remove and stir for about 20 seconds. Return to the microwave and continue heating in short bursts of 15 seconds, stirring thoroughly for 10 seconds after each burst. It’s crucial not to overheat the chocolate. Once the chips are mostly melted, simply continue stirring until the mixture becomes completely smooth and lump-free, relying on residual heat. Pour this creamy white chocolate and peanut butter mixture evenly into your prepared pan.
- Melt the Chocolate Swirl Layer: In a separate large bowl, combine both the semi-sweet and milk chocolate chips with the remaining 2 tablespoons of peanut butter. Microwave for 30 seconds, then stir for 20 seconds. Just like the white chocolate, continue microwaving in 15-second intervals, stirring for 10 seconds between each, until the chocolate is smooth and fully melted. Again, avoid overheating; stirring vigorously will melt the remaining chips.
- Create the Iconic Swirls: Once both chocolate mixtures are ready, drizzle the darker chocolate layer over the white chocolate layer that’s already in the pan. Don’t worry about perfection at this stage. Take a table knife, a skewer, or even a toothpick and gently swirl the two layers together. The key is to create beautiful, distinct marbled patterns without overmixing them into a single color. Let the contrasting layers shine!
- Set the Fudge: Gently tap the pan on your counter a few times. This helps to release any trapped air bubbles and ensures a smooth, even surface for your fudge.
- Chill to Perfection: Place the pan in the refrigerator for 30 minutes to an hour, or until the fudge is completely chilled and firm to the touch. This chilling time is essential for the fudge to set properly and be easy to cut.
- Slice and Serve: Once firm, use the parchment paper or foil overhang to lift the entire block of fudge from the pan. Transfer it to a cutting board. Using a sharp knife, cut the fudge into small, bite-sized squares or bars. Serve immediately and enjoy your homemade Tiger Butter Fudge!
Quick Tip: Preventing Seized Chocolate
A common pitfall when melting chocolate is for it to “seize,” meaning it suddenly becomes thick, lumpy, and unworkable. This usually happens when even a tiny amount of liquid (like water or steam) comes into contact with the melting chocolate. To avoid this, always ensure your bowls and utensils are completely dry. If your chocolate does seize, try stirring in boiling water, one teaspoon at a time, until it becomes smooth again. While this can sometimes salvage the chocolate, it’s not always guaranteed, so prevention is key!
Pro Tips for the Best Tiger Butter Fudge
While this recipe is incredibly easy, a few extra tips can elevate your Tiger Butter Fudge from good to absolutely phenomenal:
- Don’t Overheat Chocolate: Chocolate can easily burn or seize if microwaved for too long. Always use short bursts and rely on stirring to melt the remaining chips using residual heat. This prevents scorching and ensures a smooth texture.
- Quality Matters: As mentioned, using high-quality chocolate chips will make a noticeable difference in both flavor and texture. It’s worth the investment for a truly decadent fudge.
- Creamy Peanut Butter is Key: Stick to classic creamy peanut butter. Natural peanut butter, with its separated oils, can alter the consistency of the fudge.
- Achieve the Perfect Swirl: For distinct tiger stripes, don’t overmix the chocolate layers. Gentle swirls with a knife or skewer are all you need to create that beautiful marbled effect.
- Chill Thoroughly: Adequate chilling time is essential for the fudge to firm up properly, making it easy to cut into clean squares.
- Clean Cuts: For neat squares, use a sharp knife. You can even run the knife under hot water and wipe it dry between cuts for exceptionally clean edges.
Flavor Variations and Customizations
While the classic Tiger Butter Fudge is perfect as is, you can easily customize it to suit your taste or create festive versions:
- Nutty Crunch: Fold in chopped peanuts, pecans, or walnuts into either or both chocolate layers before pouring into the pan for added crunch.
- Extracts: A few drops of vanilla extract, almond extract, or even peppermint extract (for a holiday twist) can be added to either chocolate mixture for an extra layer of flavor.
- Sprinkle Fun: Before the fudge sets, sprinkle some festive sprinkles, chopped candy, or sea salt on top for visual appeal and an extra flavor kick.
- Different Chocolates: Experiment with dark chocolate chips for a more intense chocolate flavor, or butterscotch chips for a different sweet profile.
Serving and Gifting Ideas
This Tiger Butter Fudge is versatile for any occasion:
- Dessert Platter: Cut into small squares and arrange on a platter for an effortless and elegant dessert.
- Holiday Gifts: Package individual pieces or small batches in decorative boxes, tins, or cellophane bags tied with a ribbon for thoughtful homemade gifts.
- Party Favors: A sweet treat your guests can take home after a celebration.
- Everyday Treat: Keep a stash in the fridge for a quick pick-me-up or a satisfying after-dinner indulgence.
Storage and Make-Ahead Tips
To enjoy your Tiger Butter Fudge at its best, proper storage is key:
- Refrigeration is Best: This fudge, especially with its peanut butter content, tends to get soft and melty at room temperature. Always store leftovers in an airtight container in the refrigerator.
- Shelf Life: When stored properly in the fridge, your homemade Tiger Butter Fudge will stay fresh and delicious for up to one week.
- Freezing: For longer storage, you can freeze the fudge! Wrap individual pieces or the entire block tightly in plastic wrap, then place in an airtight freezer-safe container or bag. It can be frozen for up to 2-3 months. Thaw in the refrigerator before serving.
- Make Ahead: This fudge is an excellent make-ahead dessert. Prepare it a day or two in advance of your event or gifting needs to save time and reduce stress.
More Simple Fudge Recipes You’ll Love:
Desserts
Chocolate Covered Oreo Fudge
Desserts
Reese’s Fudge
Desserts
Caramel Apple Fudge
Desserts
Peppermint Fudge Recipe

Tiger Butter Fudge
Chelsea Lords
This Tiger Butter Fudge is a wonderfully easy, no-bake treat that combines the creamy richness of peanut butter with decadent chocolate. Made with just four ingredients and your microwave, it creates beautiful swirled bars perfect for any occasion – from holiday gifting to a quick sweet craving. It’s a soft, smooth, and utterly irresistible dessert!
15 minutes
30 minutes
45 minutes
54 bars
Equipment
-
9×13-inch Sheet Pan
-
Parchment Paper
-
Microwave-safe bowls
-
Spatula or spoon for stirring
-
Sharp knife for cutting
Ingredients
-
4
cups
white chocolate chips
(see note 1 below for quality recommendations) -
3/4
cup + 2 tablespoons
creamy peanut butter
(divided) -
1
cup
semi-sweet chocolate chips -
1
cup
milk chocolate chips
(or an additional 1 cup semi-sweet chocolate chips)
Instructions
-
Prepare Pan: Line a 9×13-inch sheet pan with parchment paper or foil, leaving an overhang on the sides. If using foil, lightly spritz it with cooking spray. Set aside.
-
Melt White Chocolate Layer: In a large, microwave-safe bowl, combine the white chocolate chips and 3/4 cup of creamy peanut butter. Microwave for 30 seconds, then stir for 20 seconds. Continue microwaving in 15-second bursts, stirring for 10 seconds between each, until the chocolate is mostly melted. Remove from microwave and continue stirring until completely smooth. Pour this mixture into the prepared pan and spread evenly.
-
Melt Chocolate Swirl Layer: In a separate large bowl, combine the semi-sweet chocolate chips, milk chocolate chips, and the remaining 2 tablespoons of peanut butter. Microwave for 30 seconds, then stir for 20 seconds. Continue microwaving in 15-second bursts, stirring for 10 seconds between each, until the chocolate is mostly melted. Remove from microwave and continue stirring until completely smooth.
-
Create Swirls & Chill: Drizzle the melted chocolate swirl layer over the white chocolate layer in the pan. Using a table knife or skewer, gently swirl the two layers together to create the distinctive tiger stripe pattern. Do not overmix. Place the pan in the refrigerator for 30 minutes to 1 hour, or until the fudge is firm and completely chilled.
-
Cut and Serve: Once firm, use the parchment paper/foil overhang to lift the block of fudge from the pan and transfer it to a cutting board. Cut into small squares or bars. Serve and enjoy!
Recipe Notes
Note 1: Quality of Chocolate: When chocolate is the star ingredient, its quality profoundly impacts the final product. For this Tiger Butter Fudge, aim for high-quality white, milk, and semi-sweet chocolate chips. Better chocolate not only delivers superior flavor but also contributes to a smoother, more desirable fudge texture. Lower-grade chocolates often contain excessive fillers or waxes, which can lead to a waxy, off-tasting, or crumbly fudge. Choose wisely for the best results!
Storage: Store any leftover Tiger Butter Fudge in an airtight container in the refrigerator. This fudge tends to get very soft and melty at room temperature due to its rich ingredients. It will keep well in the fridge for up to one week. For longer storage, wrap tightly and freeze for up to 2-3 months.
Nutrition Information
Serving Size: 1 bar |
Calories: 128 kcal |
Carbohydrates: 12 g |
Protein: 1.3 g |
Fat: 8.7 g |
Cholesterol: 10.1 mg |
Sodium: 14.1 mg |
Fiber: 0.4 g |
Sugar: 11.4 g
Nutrition information is automatically calculated and should be used as an approximation.
Enjoyed making this incredibly easy and delicious Tiger Butter Fudge? We’d love to hear from you! Leave a comment below with your thoughts or any creative twists you added to the recipe.