

Indulge in the pure joy of baking with these incredibly soft and irresistibly chewy Funfetti Cookies, generously loaded with a vibrant explosion of rainbow sprinkles! These delightful treats are the ultimate fusion, blending the comforting familiarity of classic soft sugar cookies with the playful, celebratory flavors of Funfetti cake. Forget the box mix; this homemade recipe promises an elevated experience that will capture hearts and taste buds.

The Ultimate Soft & Chewy Funfetti Cookies: Your New Favorite Recipe!
Growing up, many of us fondly remember the simple pleasure of Funfetti cookies made from a box mix. While those nostalgic treats held a special place in our hearts, there’s an undeniable magic that happens when you create something from scratch. This recipe for homemade Funfetti Cookies isn’t just an ode to those childhood favorites; it’s a significant upgrade. It delivers everything you loved – the tender crumb, the buttery richness, and, of course, a generous shower of sprinkles – but with a depth of flavor and a perfect texture that only a homemade recipe can achieve. The best part? They are surprisingly simple to make, proving that superior taste doesn’t have to mean complicated steps.
These Funfetti Cookies are a celebration in every bite, perfect for birthdays, holidays, or simply brightening an ordinary day. Each cookie boasts a perfectly soft, chewy center with slightly crisp edges, a hallmark of a truly well-made cookie. The carefully balanced ingredients ensure a rich, vanilla-infused base that truly lets the fun of the sprinkles shine through without overpowering them. This isn’t just another cookie recipe; it’s *the* Funfetti cookie recipe you’ll come back to again and again.
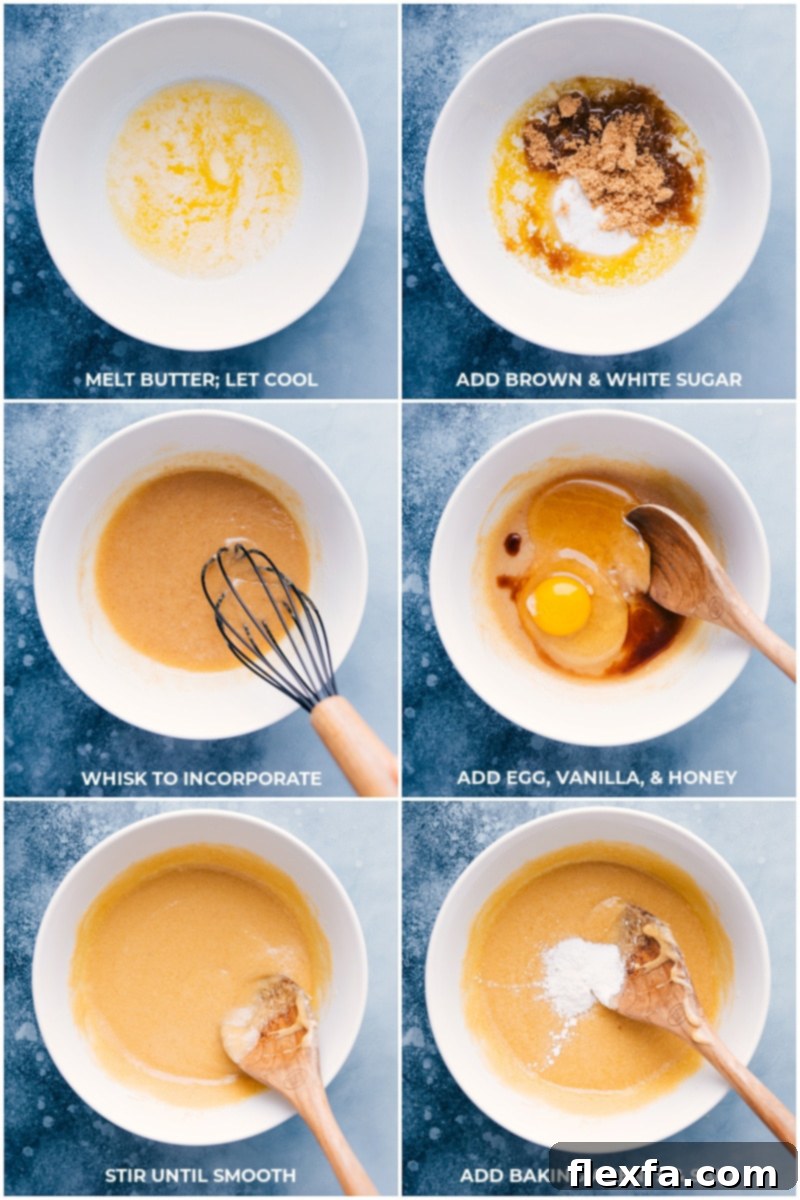
Mastering the Magic: Why Chilling Your Funfetti Cookie Dough is Essential
Many home bakers often wonder if chilling cookie dough is truly necessary, and for these Funfetti Cookies, the answer is a resounding yes! This seemingly simple step is a game-changer, crucial for achieving that ideal soft and chewy texture with perfectly shaped cookies. Here’s a closer look at the science behind why giving your cookie dough some chill time makes all the difference:
- Prevents Excessive Spreading: When butter is cold, it takes longer to melt in the oven. The longer the fat remains solid, the less your cookies will spread, resulting in thicker, chewier cookies rather than flat, crispy ones. This ensures your Funfetti creations maintain their delightful plumpness.
- Enhances Flavor Development: Chilling the dough allows the various ingredients, especially the sugar, to fully absorb the liquid components. This hydration process doesn’t just prevent spreading; it deepens and melds the flavors together, creating a more complex and satisfying taste profile. Think of it as marinating your dough – the longer it sits, the better it tastes!
- Improves Texture: As the dough chills, the flour continues to hydrate, leading to a more tender and cohesive dough. This results in cookies that are not only chewy but also incredibly soft and pleasant to eat. A well-chilled dough is also easier to handle and shape, making your baking process smoother.
- Concentrates Sweetness: The chilling process can subtly concentrate the sugars and flavors, leading to a more intense and delicious cookie. This means every bite of your Funfetti cookie will be bursting with sweet, celebratory goodness.
So, resist the urge to skip this vital step. A little patience in chilling the dough will be richly rewarded with Funfetti Cookies that are simply superior in taste and texture.
Crafting Perfection: Expert Tips for Rolling and Shaping Funfetti Cookies
Achieving bakery-worthy Funfetti cookies isn’t just about the ingredients; it’s also about technique. The way you roll and shape your dough can dramatically impact the final appearance and texture of your cookies. Follow these expert tips for perfectly uniform and delectable Funfetti treats:
- Embrace Precision with a Food Scale: While not strictly mandatory, using a food scale to portion your dough is highly recommended. It ensures each cookie ball is exactly the same size (approximately 30g or 1.5 tablespoons), which leads to even baking. No more guessing which cookies are done and which need more time! This simple step elevates your homemade cookies to a professional standard, making them look as good as they taste.
- Form Taller, Thinner Dough Balls: Instead of rolling traditional round balls, try forming your dough into taller, more cylindrical shapes. This method encourages the cookies to spread outward while maintaining a thicker center during baking. The result is a cookie with gloriously thick, chewy middles and beautifully delicate, crispy edges – the best of both worlds!
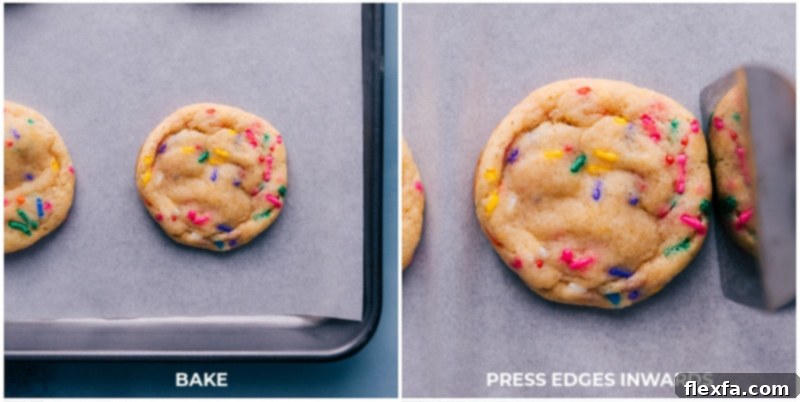
- The Immediate Post-Bake Edge Press: This is a secret weapon for achieving that perfectly round, chewy-centered cookie. As soon as your cookies come out of the oven, while they are still hot and pliable, use the back of a spoon or a metal spatula to gently press any stray edges inward. This quick action helps to define the shape, creating those desirable crispy edges and keeping the center wonderfully soft and thick. Remember to work quickly before the cookies set!
These shaping techniques, combined with properly chilled dough, are key to creating Funfetti Cookies that are not only delicious but also visually appealing and consistently perfect.
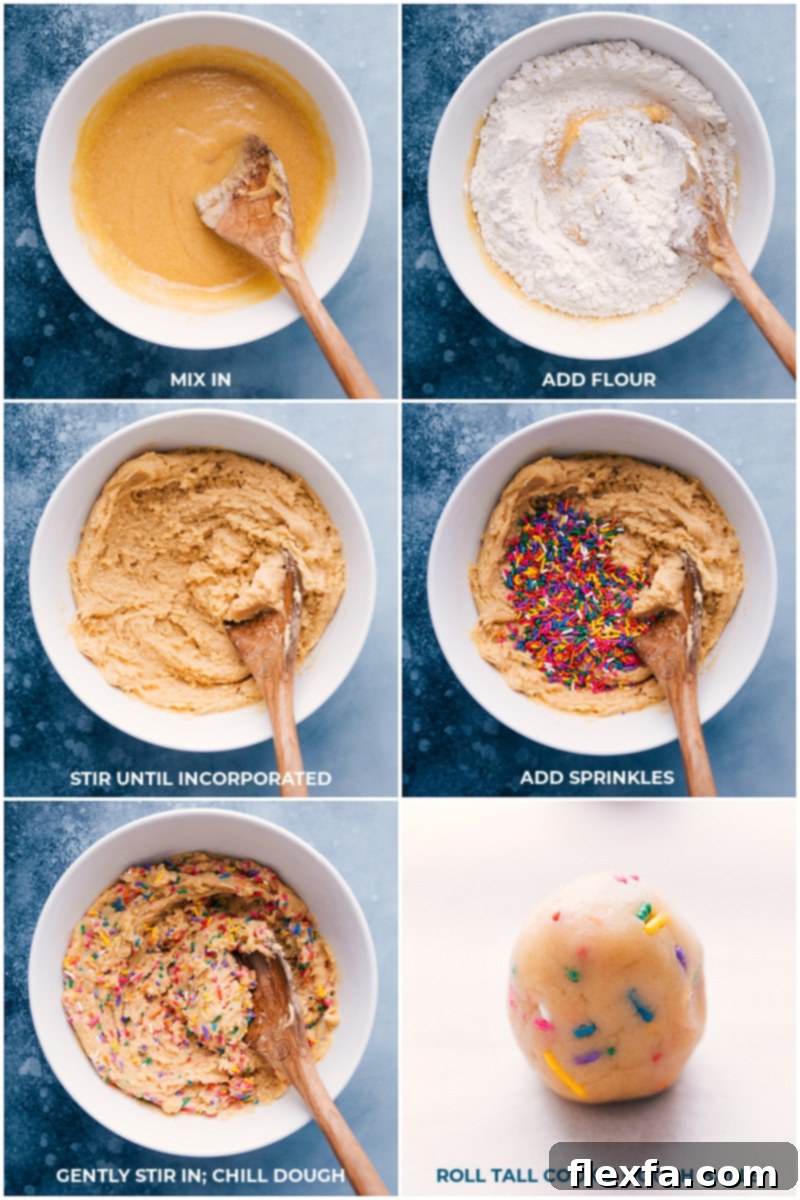
Sprinkle Smarts: Choosing the Right Jimmies for Vibrant Funfetti Cookies
The star of any Funfetti cookie is undoubtedly the sprinkles! But not all sprinkles are created equal, especially when it comes to maintaining those vibrant colors in your cookie dough. Choosing the right type and handling them correctly will ensure your cookies are a delightful kaleidoscope of color without any muddying or bleeding.
- Stir Gently for Even Distribution: When incorporating your sprinkles, use a light hand. A wooden spoon is ideal for gently folding the jimmies into the dough. Overmixing can crush the sprinkles, leading to a less defined color, and in some cases, can cause the colors to bleed prematurely into the dough, giving it an unintended hue. The goal is even distribution without excessive agitation.
- Opt for Jimmies, Not Nonpareils: This is perhaps the most crucial sprinkle tip! Jimmies, which are cylindrical and made from a softer wax, are your best friend for Funfetti cookies. They are much less likely to bleed their colors into the dough during mixing and baking, ensuring your cookies retain distinct, bright speckles of color. Nonpareils, on the other hand, are tiny, hard, round sprinkles with a candy coating that tends to dissolve and bleed color quite easily, often resulting in “funky colored” (or grayish) dough.
- Customize Your Colors: While classic rainbow jimmies are quintessential Funfetti, don’t hesitate to get creative! Substitute rainbow jimmies with specific color combinations to match any holiday, party theme, or special event. Think red and green for Christmas, pastels for Easter, or school colors for a graduation celebration. The possibilities are endless for personalizing your Funfetti creations.
By following these sprinkle guidelines, your Funfetti Cookies will not only taste incredible but also boast a visually stunning array of colors that truly embody the spirit of fun and celebration.
Essential Baking Tips for Flawless Funfetti Cookies
Even with a great recipe, a few key baking techniques can make all the difference between good cookies and truly spectacular ones. Pay attention to these details to ensure your Funfetti Cookies turn out perfectly every time:
- Achieve Harmony with Room-Temperature Ingredients: This tip is paramount for superior cookie texture. Eggs and butter that are at room temperature emulsify better, meaning they blend more smoothly and evenly with other ingredients. This creates a homogeneous dough that bakes more uniformly, resulting in a tender, consistent crumb. If your eggs are cold, simply soak them in a bowl of warm water for about 10 minutes, or pull them out of the fridge at least 30 minutes before you plan to start baking.
- Measure Flour with Precision: Incorrect flour measurement is a common pitfall that can drastically alter your cookie’s texture. Too much flour leads to dry, crumbly cookies, while too little can result in excessive spreading. The most accurate way to measure flour is to spoon it into your measuring cup until it’s overfilled, then level it off with the back of a straight edge (like a butter knife). Avoid scooping directly from the bag with the measuring cup, as this compacts the flour, adding too much.
- Give Them Space to Spread: Cookies need room to breathe and expand! Avoid overcrowding your baking sheet by baking only 6-8 cookies at a time. This allows for proper airflow around each cookie, ensuring they bake evenly and spread to their ideal shape without merging into one giant “cookie-cake.”
- Embrace the Art of Underbaking: For that coveted soft and chewy texture, it’s always better to slightly underbake your cookies. Remove them from the oven when the edges are just set and lightly golden, but the centers still look a little soft and slightly underdone. Remember, cookies continue to bake for a few minutes on the hot baking sheet after they’re removed from the oven. This residual heat, known as carryover cooking, will finish them off to perfection, leaving them wonderfully tender.
- Patience is a Virtue: Let Them Cool: While it’s tempting to devour them straight from the oven, these Funfetti Cookies truly shine after they’ve had a chance to cool. As they cool, the flavors meld and deepen, and the texture sets beautifully. For an even more profound flavor, letting them sit overnight allows the ingredients to fully harmonize, making them taste even better the next day.
By incorporating these baking nuances, you’ll consistently create Funfetti Cookies that are a testament to homemade perfection.

Storing and Freezing Funfetti Cookies & Dough for Future Enjoyment
Whether you’re planning ahead or simply want to keep your delicious Funfetti cookies fresh, proper storage is key. Here’s how to ensure your cookies (or dough) remain delightful for as long as possible:
- Room Temperature Cookie Storage: Once your baked Funfetti cookies have completely cooled, store them in an airtight container at room temperature. This will keep them fresh and chewy for up to 3-4 days. For optimal freshness and to prevent them from drying out, you can also place a slice of bread in the container with the cookies; the cookies will absorb moisture from the bread.
- The Smart Choice: Freezing Cookie Dough, Not Baked Cookies: For longer-term storage and ultimate freshness, we highly recommend freezing the cookie dough rather than the baked cookies. Freezing baked cookies can sometimes alter their texture upon thawing, making them less soft and chewy.
- How to Freeze Dough: To freeze the dough, scoop out individual cookie dough balls (using the same shaping method as for baking) and place them on a parchment-lined baking sheet. Freeze them for 1-2 hours, or until solid. Once frozen solid, transfer the dough balls to a freezer-safe, airtight container or heavy-duty freezer bag. They can be stored in the freezer for up to three months.
- Baking from Frozen: When you’re ready for a fresh batch of Funfetti, simply bake the frozen dough balls straight from the freezer! There’s no need to thaw them. Just add a few extra minutes (typically 2-4 minutes) to the regular baking time. Watch for those lightly browned edges and still-soft centers. This method allows you to enjoy warm, freshly baked Funfetti cookies whenever the craving strikes, with minimal effort.
By following these storage and freezing tips, you can always have a stash of these delightful Funfetti Cookies ready to bring a smile to anyone’s face!
More Irresistible Dessert Recipes to Explore
If you’ve loved making these Funfetti Cookies, you might be keen to explore other delightful treats that are just as satisfying and fun to bake. Here are a few more dessert recipes from our collection that we think you’ll adore:
- Magic Cookie Bars with M&M’s candies: A wonderfully decadent layered bar cookie, packed with chocolate, coconut, nuts, and sweetened condensed milk, made even more festive with M&M’s.
- Dessert Cheese Ball brownie-batter flavored: A unique and delightful no-bake treat that combines the rich flavor of brownie batter with a creamy cheesecake base, perfect for dipping.
- Gingersnap Cookies with an amazing spice blend: Crispy on the outside, chewy on the inside, and bursting with warm, aromatic spices – a timeless classic for any season.
- Chewy Granola Bars with mini chocolate chips: A wholesome and delicious snack, packed with oats and chocolate chips, perfect for a quick breakfast or an afternoon energy boost.
- Sugar Cookie Snack Mix with powder sugar-coated cereal: A fun, easy, and addictive snack mix that tastes just like your favorite frosted sugar cookies, perfect for parties or movie nights.

Print Recipe
Classic Homemade Funfetti Cookies
Chelsea Lords
30 minutes
10 minutes
1 hour 10 minutes
1 hour 50 minutes
22 cookies
Video Overview
Watch a quick video tutorial on how to make these delicious Funfetti Cookies:
Video Title: Funfetti Cookies
Description: Our favorite soft and chewy Funfetti Cookies are loaded-up with rainbow sprinkles! These cookies are the perfect mash-up of classically soft sugar cookies and Funfetti cake flavors.
Thumbnail: View Thumbnail
Video Link: Watch Video
Equipment
-
Sheet pan (15″ x 10″)
-
Parchment paper or silicone baking mat
Ingredients
- 8 tablespoons unsalted butter
- 1/3 cup light brown sugar firmly packed
- 1/3 cup granulated sugar
- 1 large egg
- 1/2 teaspoon vanilla extract
- 1 tablespoon honey
- 3/4 teaspoon salt
- 1/2 teaspoon baking soda
- 1/2 teaspoon baking powder
- 1-3/4 cups all-purpose flour (see note 1)
- 1/3 cup jimmies sprinkles (see note 2)
Instructions
-
Melt the butter in a very large, microwave-safe bowl. Once melted, set aside for 5–10 minutes to cool to room temperature. This is crucial as hot butter will melt the sugar and make the cookies greasy, affecting texture.
-
Once the butter has cooled sufficiently, stir in the light brown sugar and granulated sugar. Whisk vigorously until the mixture is completely smooth and the butter and sugars are fully incorporated, about 1–2 minutes. It might seem like they won’t come together initially, but keep mixing until homogenous. Then, stir in the egg, vanilla extract, and honey until smooth.
-
Add the salt, baking soda, and baking powder to the wet ingredients and stir well to integrate them. Next, add the correctly measured all-purpose flour (refer to Note 1 for precise measurement) and mix until just combined. Be careful not to overmix, as this can develop gluten and result in tough cookies. Finally, gently fold in the jimmies sprinkles. Cover the bowl tightly with plastic wrap and chill the dough for a minimum of 90 minutes.
-
Preheat your oven to 350°F (175°C). Line a large sheet pan with parchment paper or use a nonstick silicone baking mat. Roll the chilled dough into tall, cylindrical balls, each weighing approximately 1.5 tablespoons (30g) in size (refer to the image above for the ideal shape and size). Place only 6 cookie balls on the prepared pan, ensuring ample space between them for proper spreading during baking. Once the cookie balls are on the pan, place the entire pan in the freezer for 10 minutes. This quick chill helps the dough firm up again after being handled, preventing excessive spreading. Repeat this process with the remaining cookie dough; this recipe should yield around 20–21 cookies.
-
After 10 minutes in the freezer, bake the cookies for 8–12 minutes. For the ultimate soft and chewy texture, it’s best to err on the side of underbaking. (We find 10 minutes to be perfect). The cookies will continue to set and bake on the hot baking sheet once removed from the oven. Take them out as soon as the edges begin to lightly brown and the centers still look slightly soft. Immediately upon removing from the oven, use the back of a metal spatula to gently press any edges that have spread outward back into a neat, round shape. This helps create those desirable crispy edges and a thick, chewy center. Let the cookies cool on the pan for 5 minutes before carefully transferring them to a wire rack to cool completely. Continue baking the remaining dough in batches, or follow the freezing instructions below if you wish to save some dough for later.
Recipe Notes
Note 2: Choosing the Right Sprinkles: Always use jimmies sprinkles for these Funfetti cookies, not nonpareils. Jimmies are less prone to bleeding their colors into the dough during mixing and baking, which helps maintain the vibrant, distinct rainbow hues. Nonpareils, with their hard, sugary coating, tend to dissolve and bleed, potentially leaving your cookies with dull or “funky-colored” dough.
Storage: Store baked Funfetti cookies in an airtight container at room temperature. For peak freshness and chewiness, they are best enjoyed within 3–4 days. To help keep them soft, you can add a slice of plain bread to the container; the cookies will absorb its moisture.
Freezing Dough: Instead of freezing baked cookies, which can sometimes alter their texture, freeze the dough! Scoop individual cookie dough balls onto a large sheet pan and freeze until completely solid. Once solid, transfer the frozen dough balls to an airtight, freezer-safe container or heavy-duty freezer bag. The dough can be frozen for up to 3 months. To bake from frozen: Place frozen cookie dough balls on a prepared baking sheet and bake directly from the freezer. There’s no need to thaw. Simply add a few extra minutes (usually 2-4 minutes) to the baking time until the edges are lightly browned and the centers remain soft. This allows for fresh, warm cookies anytime!
Nutrition
Serving:
1 cookie
|
Calories:
97kcal
|
Carbohydrates:
13g
|
Protein:
1g
|
Fat:
5g
|
Saturated Fat:
3g
|
Trans Fat:
1g
|
Cholesterol:
19mg
|
Sodium:
118mg
|
Potassium:
12mg
|
Fiber:
1g
|
Sugar:
11g
|
Vitamin A:
145IU
|
Vitamin C:
1mg
|
Calcium:
11mg
|
Iron:
1mg
Nutrition information is automatically calculated, so should only be used as an approximation.
Did you love this recipe? Leave a comment below and share your thoughts!