
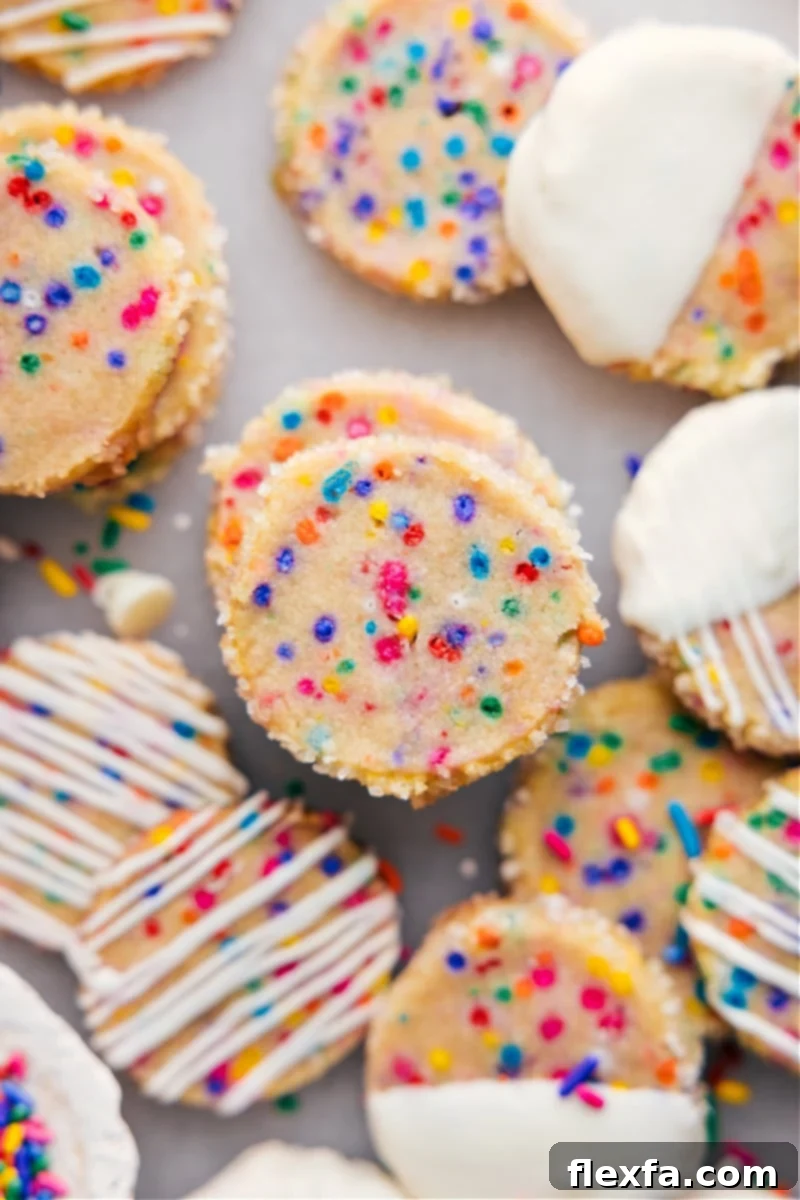
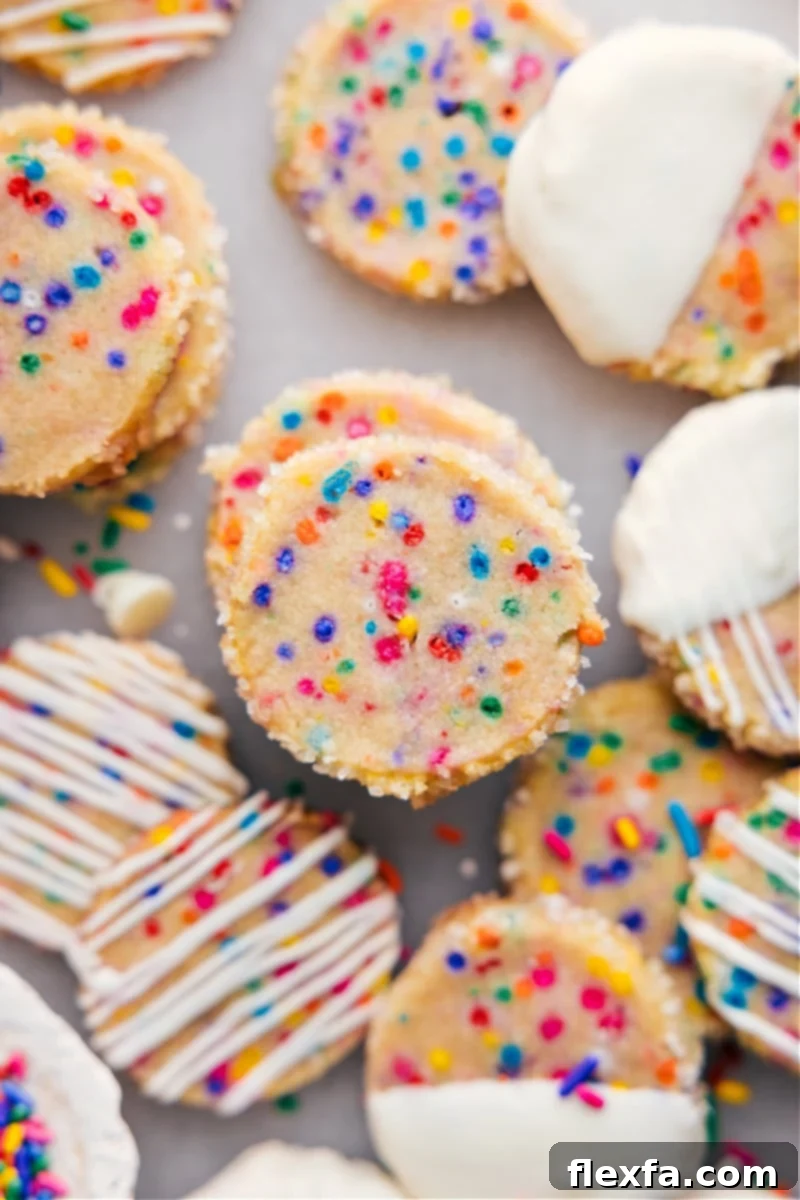
These Slice and Bake Cookies are a delightful answer to your sweet cravings, offering a perfect blend of rich, buttery flavor and tender sweetness. Each cookie is playfully dotted with vibrant, colorful sprinkles, promising a cheerful bite every time. For an extra touch of indulgence, a luxurious drizzle of creamy white chocolate elevates these treats to an irresistible level of deliciousness, making them truly special.

Author’s Note
My Newest Life Hack: The Magic of Slice and Bake Cookies!
A few months ago, a dear friend introduced me to the sheer genius of slice-and-bake cookies. She whipped up a batch in what felt like mere minutes, and I was utterly astonished. “How do you do it so fast?” I asked, completely captivated. Her secret? Keeping pre-made cookie dough logs perpetually stocked in her fridge or freezer. It was a revelation! That very moment, I knew I had stumbled upon a genuine life hack, and I was determined to master it myself.
I immediately dove into testing, baking batch after batch, meticulously tweaking ratios and techniques. My goal was simple: to create the perfect, consistently soft, and irresistibly delicious slice and bake cookie. I quickly discovered that a touch of cornstarch was key to maintaining that coveted soft texture, preventing the cookies from becoming dry or crumbly. Furthermore, I learned the critical importance of weighing the flour rather than using volume measurements; this ensures the dough remains wonderfully tender and never tough. For those vibrant bursts of color, I found that rainbow jimmies were superior to nonpareils, as they beautifully hold their shape and color without bleeding into the dough.
The chilling time also proved to be crucial. Through trial and error, I found that a minimum of two hours in the refrigerator allows the dough to firm up perfectly, resulting in clean, precise slices and cookies that hold their shape beautifully in the oven. This meticulous testing process was all worth it when I finally landed on this foolproof recipe.
Now, my fridge and freezer are never without a couple of these convenient dough logs. It’s transformed my baking routine! If a neighbor drops by unexpectedly, or if my kids declare an urgent need for a treat, fresh, warm cookies are just minutes away. There’s no messy prep, no waiting for dough to soften, just the simple joy of slicing what I need and baking it on demand. It’s truly fresh cookies, whenever I want them, with absolutely no fuss. This recipe is not just about making cookies; it’s about making life a little sweeter and a lot easier!
Why You’ll Adore This Slice and Bake Cookie Recipe
These aren’t just any cookies; they’re your new favorite kitchen shortcut for deliciousness! Here’s why you’ll find yourself coming back to this recipe again and again:
- Unbeatable Convenience: The ultimate make-ahead treat! Prepare the dough logs whenever you have time, then simply slice and bake when a craving strikes or unexpected guests arrive. Fresh, warm cookies are just minutes away.
- Irresistible Flavor & Texture: Expect a truly buttery, sweet cookie with a perfectly soft and chewy center, balanced by delightfully crisp edges. The subtle hint of vanilla and almond elevates the classic cookie flavor.
- Vibrant & Fun: Adorned with colorful sprinkles, these cookies are a feast for the eyes as well as the palate, making them perfect for celebrations or brightening any day.
- Customizable Indulgence: While delicious on their own, the optional white chocolate drizzle adds an extra layer of creamy sweetness and visual appeal. Explore endless variations to make them uniquely yours!
- Freezer-Friendly: Stock your freezer with dough logs and enjoy freshly baked cookies for weeks or even months. It’s like having a gourmet bakery right in your home.
- Kid-Friendly: A fantastic recipe to get kids involved in the kitchen, from mixing the dough to choosing their favorite sprinkles. Plus, they adore the colorful results!
Essential Slice and Bake Cookies Ingredients
Crafting the perfect slice and bake cookie begins with high-quality ingredients. Here’s what you’ll need, along with some helpful tips and substitutions to ensure your cookies turn out perfectly every time.
| Ingredient | Easy Swap or Tip for Success |
|---|---|
| Unsalted butter | Using cold, unsalted butter is crucial for the creaming process, leading to a lighter, fluffier dough. If using salted butter, reduce the added salt by about ¼ teaspoon. |
| Light brown sugar | Brown sugar provides moisture and a lovely chewiness. For a slightly lighter color and a crisper cookie, you can swap in half white granulated sugar. |
| Vanilla + almond extract | Vanilla is non-negotiable for classic cookie flavor. A tiny dash of almond extract adds a sophisticated depth; skip it if you prefer a pure vanilla profile. |
| Cornstarch | This is our secret ingredient for ultra-soft cookies, helping to prevent them from drying out. Arrowroot powder can be used as a substitute in a pinch. |
| All-purpose flour | For the most consistent and tender results, always measure your flour by weight (grams) rather than volume (cups). Over-measuring leads to dry, tough cookies. |
| Rainbow jimmies | Jimmies (the cylindrical sprinkles) are preferred over nonpareils (the tiny bead-like sprinkles) as they hold their shape and vibrant colors much better without bleeding into the dough during mixing and baking. |
| Egg wash + coarse sugar | An egg wash helps the coarse sugar adhere, creating a beautiful golden crust and extra sparkle. If extra-coarse sugar is hard to find, sparkling sugar or cane sugar work wonderfully. |
How To Make Perfectly Easy Slice and Bake Cookies
Follow these simple steps to create your own batch of irresistible make-ahead cookie dough and fresh-baked treats:
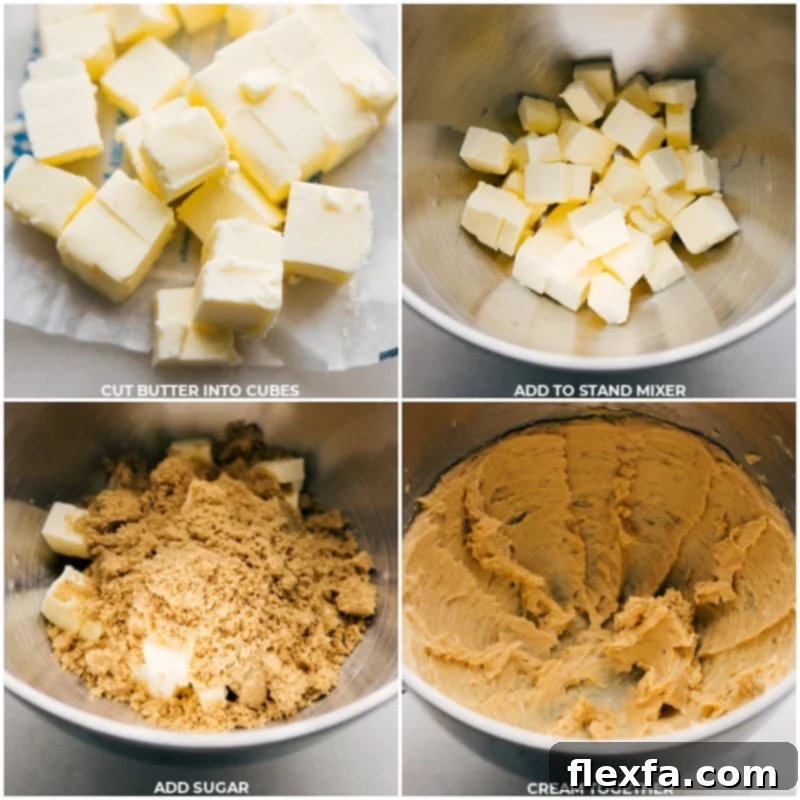
- Cream Butter and Sugar to Perfection: In a stand mixer fitted with a paddle attachment (or using a hand mixer), combine your cold, cubed unsalted butter and light brown sugar. Beat them together on medium speed until the mixture becomes wonderfully smooth, light, and creamy, resembling the consistency of thick peanut butter. This usually takes about 3-5 minutes. Remember to pause and scrape down the sides of the bowl frequently to ensure everything is evenly incorporated.
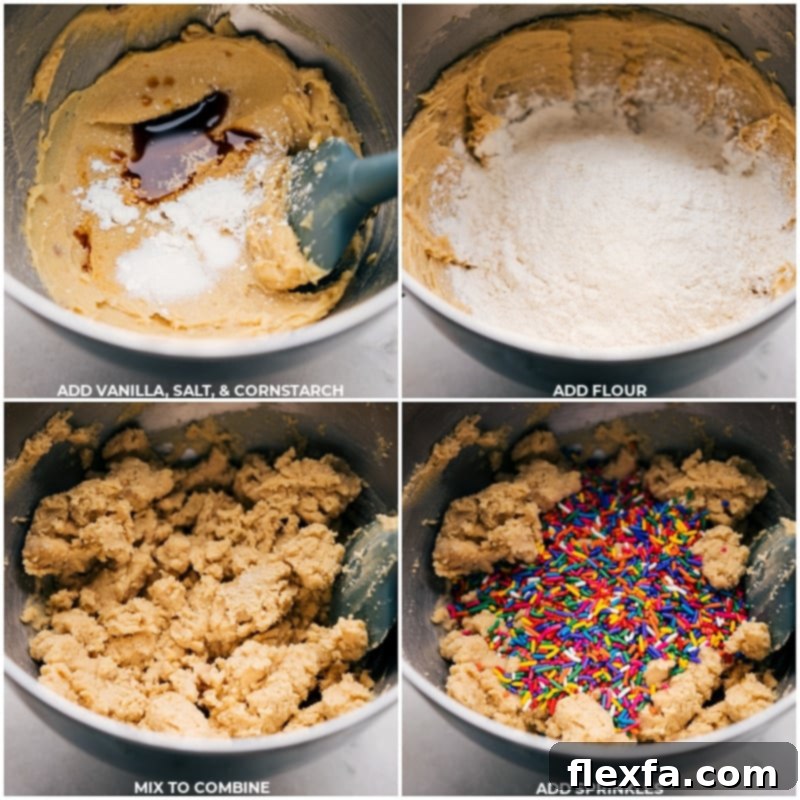
- Introduce Flavors and Dry Ingredients: Reduce the mixer speed to low. Add the vanilla extract, optional almond extract, salt, and cornstarch. Beat just until these ingredients are fully combined. Next, gradually add the all-purpose flour, mixing only until it is just incorporated and no dry streaks remain. It’s crucial to avoid overmixing at this stage, as it can develop the gluten in the flour, leading to tougher cookies.
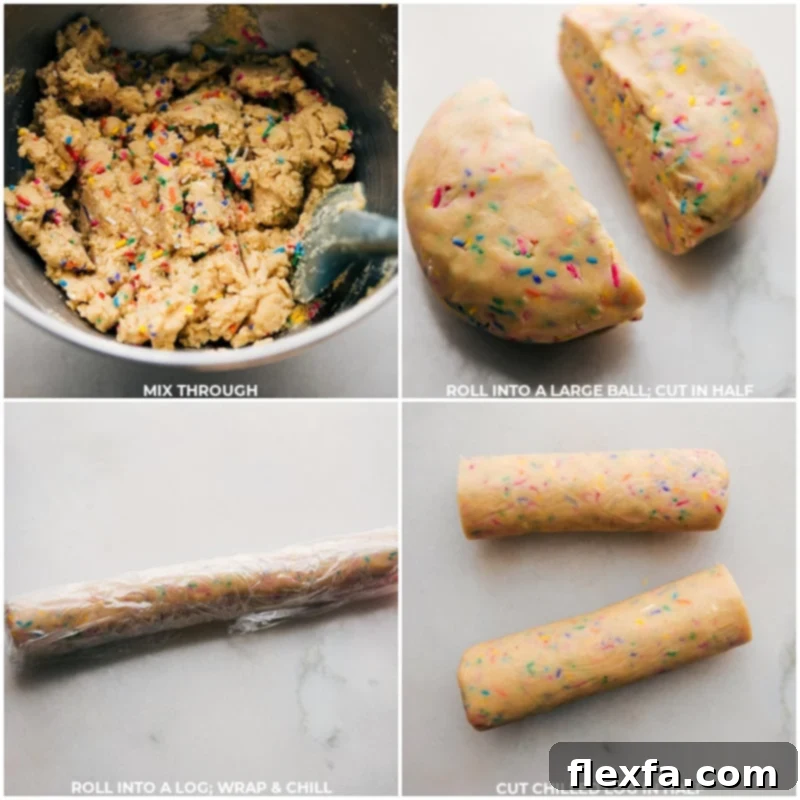
- Fold in Sprinkles and Prepare for Chilling: Gently fold in the rainbow jimmies by hand. Mix carefully to distribute them evenly throughout the dough without crushing them or causing their colors to bleed. The dough might appear slightly crumbly at first, but it will come together with a bit of mixing and gentle kneading by hand. Gather the dough into one large ball, then divide it in half. Shape each half into a log, approximately 11 inches long and about 1.5 inches in diameter. Rolling the logs on your countertop can help achieve an even cylindrical shape. Wrap each dough log tightly in plastic wrap and place them in the refrigerator to chill for at least 2 hours. This chilling period is essential for firming up the dough, making it easier to slice and preventing excessive spreading during baking.
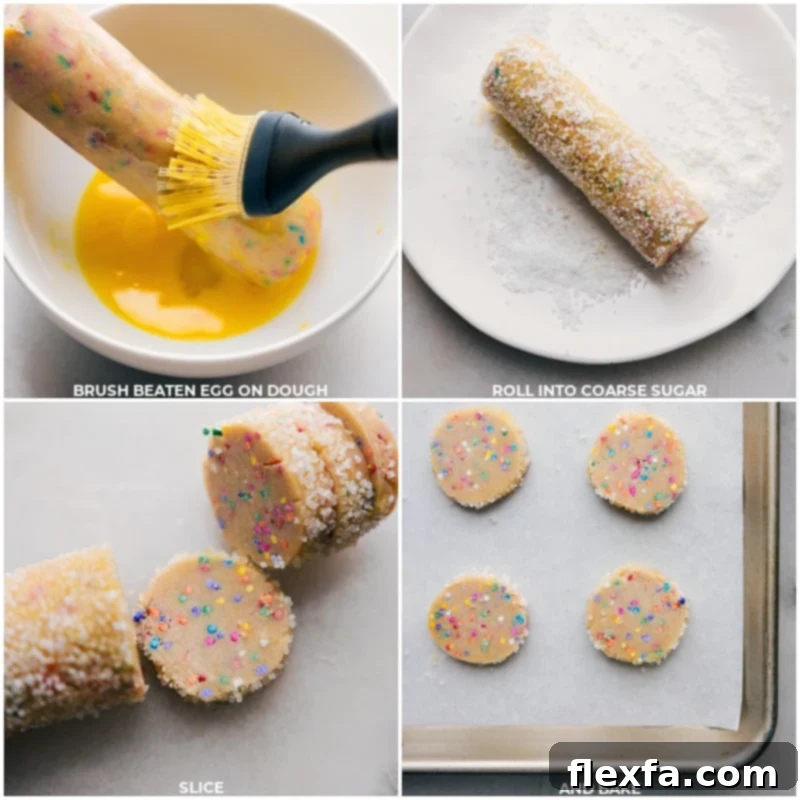
- Coat, Slice, and Bake to Golden Perfection: Preheat your oven to 350°F (175°C). Line a sheet pan with parchment paper or a silicone baking mat. Pour the extra-coarse sugar onto a large flat plate. Take one chilled dough log from the fridge, unwrap it, and cut it in half for easier handling. Brush the entire outside surface of each half-log with the lightly beaten egg. Then, roll the dough log in the coarse sugar, pressing gently to ensure a generous, even coating. Slice each coated dough log into 1/2-inch thick rounds. Arrange the cookies on the prepared sheet pan, leaving about 1 inch of space between each. Bake for 8 to 12 minutes, or until the edges are just beginning to turn a light golden brown and the centers appear set. Keep a close eye on them to prevent overbaking, which can result in dry cookies.
- Cool and Finish with Optional Drizzle: Carefully remove the baked cookies from the oven and transfer them to a wire cooling rack to cool completely. This prevents the bottoms from becoming soggy. Repeat the baking process with the remaining dough log. If you choose to add the optional white chocolate drizzle: In a microwave-safe bowl, combine the white chocolate chips and vegetable oil. Microwave in 20-second intervals, stirring thoroughly for 15 seconds after each burst, until the chocolate is fully melted and smooth. You can then dip half of each cooled cookie into the melted white chocolate, or transfer the chocolate to a plastic bag, snip off a tiny corner, and artfully drizzle it over the cookies. Allow the chocolate to set at room temperature before serving or storing.
Expert Tips For Perfect Slice and Bake Cookies Every Time
Achieve cookie perfection with these crucial tips:
- Avoid Over-mixing the Flour: Once you add the flour, mix just until it’s combined and no dry streaks are visible. Over-mixing develops gluten, which can lead to tough, dense cookies rather than soft and tender ones.
- Gentle Mixing of Sprinkles: When folding in the jimmies, be gentle and use a spatula. Vigorous mixing can break the sprinkles, causing their colors to bleed into the dough and making your beautiful rainbow cookies look dull.
- Roll Dough Logs Evenly: Take your time to roll the dough into uniform logs. This ensures that when you slice them, all your cookies will be roughly the same size, promoting even baking and consistent texture.
- Ensure Even Slicing: Use a sharp, non-serrated knife to slice your chilled dough logs into even 1/2-inch thick discs. Consistent thickness is key to ensuring all cookies bake evenly and finish at the same time.
- Watch the Bake Time Closely: Cookie ovens can vary, so start checking your cookies at the 8-minute mark. They are done when the edges are just lightly golden and the centers appear set but still slightly soft. Overbaking is the quickest way to dry out your cookies.
- Reshape While Warm: If any of your cookies come out of the oven a little misshapen (it happens!), gently reshape them into perfect circles using the back of a spoon or a small cookie cutter immediately after removing them from the oven, while they are still warm and pliable.
Storage Solutions for Freshness
To keep your baked Slice and Bake Cookies at their best:
- Store cooled cookies in an airtight container at room temperature for up to 3-4 days. If your cookies are coated with white chocolate, place parchment paper between layers to prevent sticking.
- For longer storage, freeze baked cookies in a single layer on a baking sheet until firm, then transfer to a freezer-safe bag or container for up to 2-3 months. Thaw at room temperature before serving.
- Freezing Dough Logs: This is where the true “slice and bake” magic shines! Wrap dough logs tightly in plastic wrap, then again in aluminum foil, and store in the freezer for up to 3 months. When ready to bake, you can slice and bake directly from frozen, simply adding an extra 2-4 minutes to the baking time. This method ensures you always have fresh, warm cookies just a moment away.
More Easy & Irresistible Dessert Recipes:
Cakes & Bars
Lemon Icebox Cake (Just 4 Ingredients!)
Desserts
Peanut Butter Puppy Chow (Muddy Buddies)
Frozen Treats
Fun & Easy Ice Cream In A Bag
Desserts
Easy No-Bake Oreo Fluff Recipe

Print Recipe
Slice and Bake Cookies
Chelsea Lords
20 minutes
10 minutes
2 hours
2 hours
30 minutes
24
cookies
Video
Equipment
-
Stand mixer or hand mixer
-
Sheet pan (15″ x 10″)
-
Parchment paper or silicone baking mat
-
Cooling rack
Ingredients
- 16 tablespoons unsalted butter cold, cut into small cubes
- 3/4 cup light brown sugar lightly packed
- 1-1/2 teaspoons vanilla extract
- 1/8 teaspoon almond extract optional
- 1/2 heaping teaspoon salt
- 1 teaspoon cornstarch
- 2-1/4 cups all-purpose flour see note 1
- 1/2 cup Rainbow Sprinkles see note 2
- 1 large egg lightly beaten
- 1/2 cup extra-coarse sugar for rolling cookies in, see note 3
- 1 cup white chocolate chips
- 1 teaspoon vegetable oil
Instructions
-
In a stand mixer fitted with a paddle attachment (or with a hand mixer), beat butter and brown sugar until they’re creamy, similar to a peanut butter consistency, about 3–5 minutes. Scrape the sides of the bowl as needed.
-
Add vanilla extract, almond extract (if using), salt, and cornstarch. Beat just until combined. Add flour and beat just until incorporated. Avoid overmixing.
-
Fold in the sprinkles and mix gently. The dough may seem a bit crumbly at first, but it will come together with some mixing/kneading.
-
Form the dough into 1 large ball, then divide it in half. Shape each half into a log about 11 inches long and roughly 1.5 inches in diameter. Roll it on the counter to help even it out. Wrap each log tightly in plastic wrap and chill in the fridge for at least 2 hours.
-
Preheat oven to 350°F. Line a sheet pan with parchment paper or a silicone baking mat. Pour the sparkling sugar onto a large flat plate. Unwrap one log of dough at a time, cut it in half, then brush the outside of each half-log with the beaten egg. Roll the dough log in the sparkling sugar.
-
Slice each dough log into 1/2-inch thick cookies. Place cookies on the prepared sheet pan, spacing 1-inch apart. Bake until the edges are just starting to lightly brown, which should take about 8–12 minutes. Keep a close eye on them to prevent overbaking.
-
Remove cookies from oven and transfer them to a cooling rack. Let them cool completely. Repeat with the rest of the dough.
-
Optional White Chocolate Drizzle: In a microwave-safe bowl, combine white chocolate chips and vegetable oil. Microwave in 20-second increments, stirring for 15 seconds between each burst, until chocolate is melted and smooth. Dip half of each cooled cookie into the white chocolate or pour the melted chocolate into a plastic bag, snip off the tip, and drizzle it over the cookies. Allow the chocolate to set at room temperature before serving.
Recipe Notes
Note 2: Choosing the Right Sprinkles: When it comes to sprinkles, choose jimmies over nonpareils for this recipe. Jimmies are elongated and cylindrical, which means they are less likely to bleed their color into your dough during mixing and baking, maintaining their vibrant appearance. Nonpareils, on the other hand, are tiny, round beads that often melt and dye the cookie dough, and can sometimes have an unpleasantly crunchy texture.
Note 3: Coarse Sugar for Texture and Sparkle: The extra-coarse sugar used for rolling the dough logs adds a fantastic sweetness, a delightful crunch, and a beautiful sparkling finish to the cookies. If you can’t find extra-coarse sugar at your local grocery store, don’t worry! You can easily substitute with sparkling sugar or Turbinado cane sugar (also known as raw sugar), both of which will provide a similar textural and visual appeal.
Storage for Freshness and Convenience: Store baked cookies in an airtight container at room temperature for up to 3-4 days. If they have a white chocolate coating, separate layers with parchment paper to prevent sticking. For ultimate convenience, freeze the prepared dough logs tightly wrapped for up to 3 months. Slice the dough directly from frozen and bake, increasing the baking time by a few minutes. This ensures you always have warm, fresh cookies readily available!
Nutrition
Calories: 165kcal |
Carbohydrates: 23.6g |
Protein: 1.7g |
Fat: 9.1g |
Cholesterol: 28.1mg |
Sodium: 54.6mg |
Fiber: 0.4g |
Sugar: 12.4g
Nutrition information is automatically calculated, so should only be used as an approximation.
Like this? Leave a comment below!
Creative Variations
Make Slice And Bake Cookies Your Own!
This recipe provides a fantastic base, but don’t be afraid to get creative and customize your slice and bake cookies to suit any occasion or preference. Here are some ideas to inspire you:
- Explore Different Flavors:
- Citrus Zest: Add 1-2 teaspoons of finely grated lemon, orange, or lime zest to the dough along with the extracts for a bright, refreshing twist.
- Spice Blends: Infuse your cookies with warmth by adding 1-2 teaspoons of seasonal spices. Try pumpkin pie spice, apple pie spice, or a simple blend of cinnamon and nutmeg.
- Other Extracts: Swap almond extract for peppermint extract (perfect for holidays), coffee extract, or even a hint of rum extract for a boozy kick.
- Add Nuts for Crunch:
- Fold in 1/2 cup of finely chopped nuts like pecans, walnuts, almonds, or pistachios into the dough along with the sprinkles.
- For extra flavor and texture, roll the exterior of your dough logs in finely chopped nuts before slicing and baking.
- Seasonal and Holiday Themes:
- Holiday Sprinkles: Use red and green sprinkles for Christmas, pastels for Easter, or orange and black for Halloween. The coarse sugar can also be colored with food coloring for a festive touch.
- Seasonal Flavors: Combine peppermint extract with crushed candy canes for a winter treat, or orange zest and extract for a summer delight.
- Indulgent Chocolate Slice and Bake Cookies:
- Chocolate Chip Dough: Replace half of the rainbow sprinkles with mini chocolate chips (dark, milk, or white chocolate).
- Double Chocolate: Add 2-3 tablespoons of unsweetened cocoa powder to the dry ingredients for a rich chocolate dough, then mix in chocolate chips.
- Chocolate Drizzle Variations: Instead of white chocolate, drizzle with melted dark chocolate or milk chocolate. Top with sea salt, chopped nuts, or more sprinkles for visual appeal.
- Dipped Cookie Creations:
- After baking and cooling, fully dip your cookies in melted chocolate (dark, milk, or white).
- Before the chocolate sets, sprinkle with toasted coconut flakes, crushed nuts, more colorful jimmies, or even edible glitter for a truly show-stopping dessert.
- Make Sandwich Cookies: Once cooled, spread a layer of your favorite buttercream frosting, ganache, or even cream cheese frosting between two matching cookies to create delightful sandwich cookies.
Frequently Asked Questions (FAQ)
Here are answers to some common questions about making slice and bake cookies:
- Q: Can I use room temperature butter?
- A: While many cookie recipes call for room temperature butter, for slice and bake cookies, cold butter is often preferred. It helps create a firmer dough that is easier to handle, shape into logs, and slice cleanly without spreading too much during baking. Using cold butter also helps maintain a slightly chewy texture.
- Q: My dough is too crumbly/sticky, what went wrong?
- A: If your dough is too crumbly, it might be due to over-measuring flour (always weigh if possible!) or not creaming the butter and sugar enough. If it’s too sticky, the butter might have been too warm, or not enough flour was added. Ensure all measurements are accurate and give the dough sufficient chilling time to firm up.
- Q: Why did my cookies spread too much?
- A: Excessive spreading is usually due to insufficient chilling time, butter being too warm (or even slightly melted), or over-mixing the flour, which develops gluten and relaxes the dough. Make sure your dough logs are well-chilled for at least 2 hours before slicing and baking.
- Q: How long can cookie dough logs be stored?
- A: Tightly wrapped dough logs can be stored in the refrigerator for up to 5-7 days. For longer storage, they can be kept in the freezer for up to 3 months. Always ensure they are well-wrapped to prevent freezer burn.
- Q: Can I skip the coarse sugar coating?
- A: Absolutely! The coarse sugar adds a lovely crunch and sparkling appearance, but it’s entirely optional. Your cookies will still be delicious without it.