
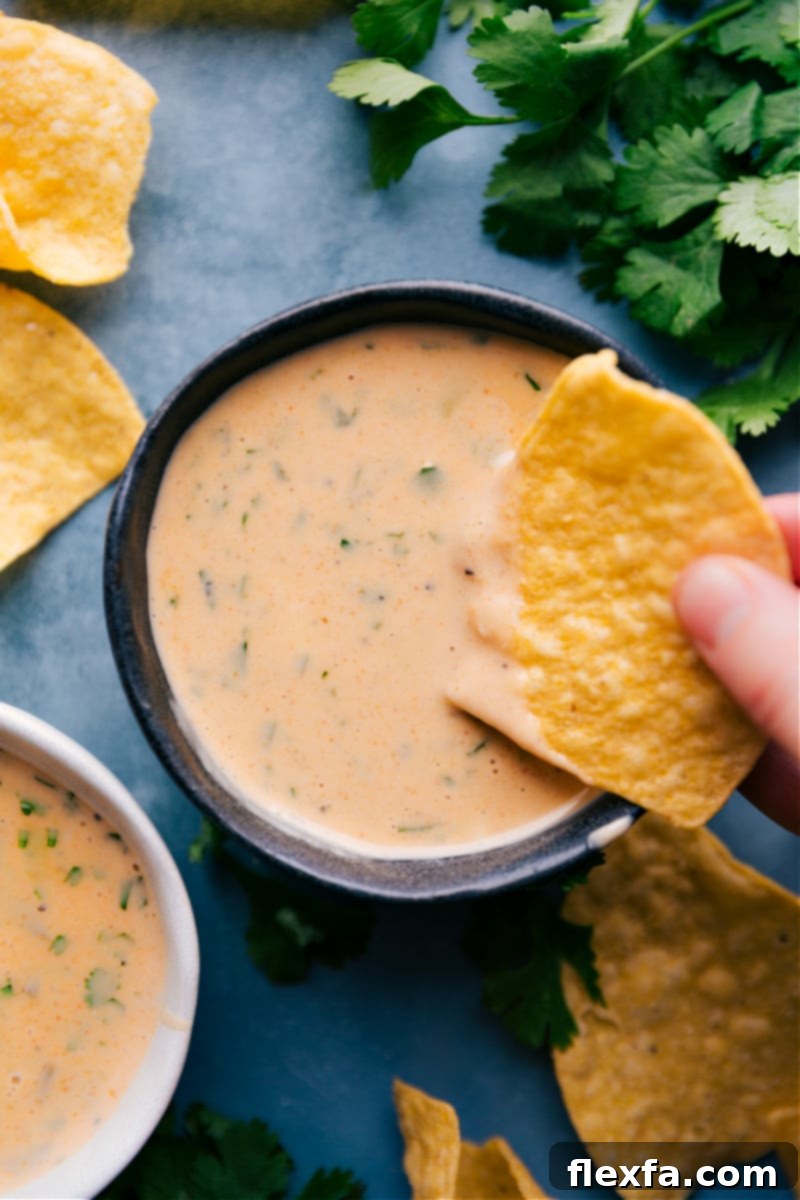
Queso Dip melts into a luxuriously creamy, irresistibly cheesy dream in just minutes on your stovetop. This perfectly seasoned dip is practically begging for a mountain of salty tortilla chips and is guaranteed to be a crowd-pleaser at any gathering. Forget store-bought; homemade queso is surprisingly simple and infinitely more delicious!
If you love vibrant, flavorful dips, you absolutely must try our popular 7 Layer Bean Dip next! It’s another guaranteed hit!

The Ultimate Easy Queso Recipe: A Party Favorite You’ll Make Again and Again!
There’s nothing quite like a warm, gooey, perfectly seasoned queso dip to elevate a casual get-together or a game day feast. This isn’t just *any* queso recipe; this is *the* queso recipe that will have everyone asking for your secret!
The journey to perfecting this recipe began with a challenge from my brother-in-law, a self-proclaimed queso connoisseur. He tasked me with recreating his absolute favorite restaurant queso – a rich, velvety dip that seemed to defy explanation. This mission involved countless hours of experimentation, meticulous taste testing (a truly delicious hardship!), and even a friendly chat with the talented chef at his beloved local restaurant.
I was convinced there had to be some elaborate secret, perhaps a complex blend of several exotic cheeses. To my surprise, the chef revealed a remarkably simple truth: the magic lies in one star ingredient – Land O’ Lakes® White American Cheese. They’d never used anything else, and the consistency and flavor were always spot on. Armed with this crucial insight, I finalized a recipe that not only earned my brother-in-law’s coveted “stamp of approval” but also became an instant favorite among friends and family. I’m beyond thrilled to finally share this incredibly simple, yet fantastically flavorful, recipe with you all.
Not only is it incredibly tasty and boasts that perfect restaurant-style texture, but it’s also ridiculously quick and easy to make. In under 20 minutes, you can have a gourmet-quality queso that tastes like it took hours. Score!
What Is Queso? Understanding the Beloved Cheese Dip
At its heart, “Queso” is the shortened term for “Chile Con Queso,” which translates from Spanish to “chile peppers with cheese.” It’s a beloved Tex-Mex appetizer or side dish, consisting of a thick, creamy, and spicy melted cheese dip, typically served warm with tortilla chips for dipping. Its rich, indulgent nature makes it an undeniable crowd-plepleaser.
However, the world of “queso” can be a bit confusing, especially with so many cheese-related terms in Spanish cuisine. It’s important to distinguish our creamy dip from other popular dishes and cheeses:
- Queso Fundido: Often confused with our dip, Queso Fundido is a dish made entirely of hot, melted cheese (typically Oaxaca or Asadero) that is often mixed with chorizo or other ingredients and served with tortillas for scooping, rather than dipping. It tends to be stringier and more solid than a dip.
- Queso Fresco: This is a fresh, soft, and moist Mexican cheese, commonly crumbled over dishes like tacos, enchiladas, or salads. It does not melt easily into a smooth dip like American cheese.
- Quesabirria: A recent viral sensation, Quesabirria refers to tacos made with birria-style stewed meat and a generous amount of melted cheese (often Oaxaca or Monterey Jack), served with a flavorful consommé for dipping. While it involves melted cheese, it’s a taco dish, not a standalone dip.
- Queso Oaxaca: A semi-hard, white, string cheese from Mexico, similar to mozzarella. It’s excellent for melting in quesadillas or fundido but requires different techniques to make a smooth dip.
- Queso Blanco: A fresh, unaged white cheese, traditionally made from cow’s milk. Like Queso Fresco, it crumbles easily and softens when heated but doesn’t melt smoothly into a dip.
This particular Queso recipe is celebrated for its luxurious creaminess, intense cheesy flavor, and a perfect touch of spice. It’s designed to be effortlessly dippable, making it the ideal accompaniment for your favorite salty tortilla chips. Best of all, achieving this restaurant-quality perfection couldn’t be simpler!
How To Make The Best Creamy Queso Dip: Step-by-Step Guide
You’re just minutes away from enjoying this unbelievably creamy Queso, perfect for coating every salty tortilla chip. Below is a detailed overview of the process, complete with essential tips and variation ideas to customize your dip. For the precise measurements and full recipe, be sure to scroll down to the comprehensive recipe card.
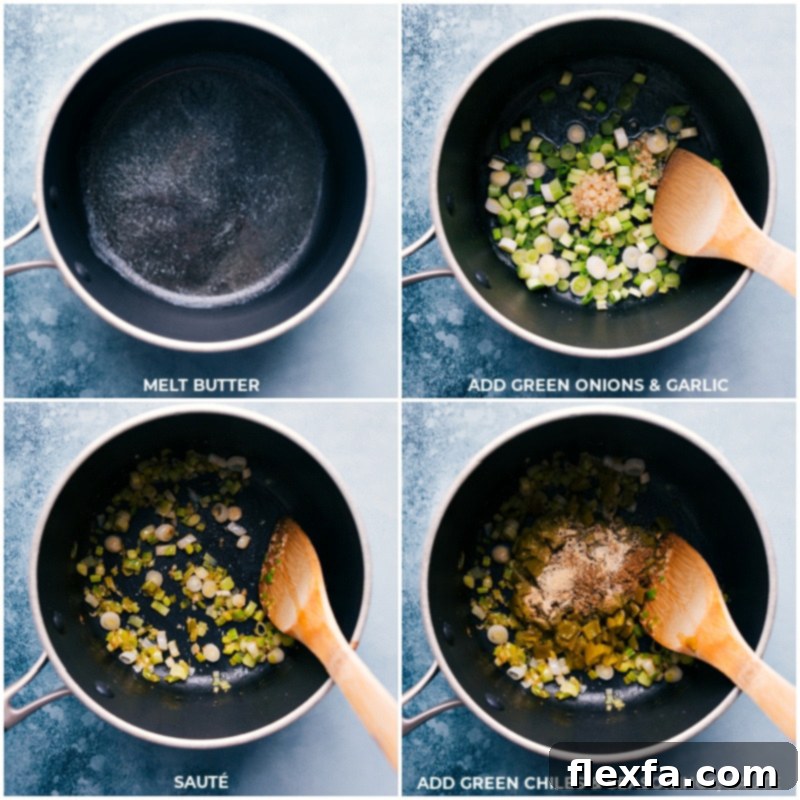
- Prepare Your Base: Begin by melting unsalted butter in a medium pot over medium heat. Once shimmering, add thinly sliced green onions (reserving some for garnish if desired) and sauté until they soften and become fragrant, typically 3-5 minutes. Follow with minced garlic, stirring for just about 30 seconds until aromatic. The key here is not to burn the garlic, which can turn bitter quickly. Using butter rather than oil is crucial for a richer, smoother cheesy dip.
- Bloom the Flavors: Next, thoroughly drain a can of fire-roasted diced green chiles and add them to the pot along with your chosen spices: ground cumin, onion powder, garlic powder, and paprika. Stir constantly for 1-2 minutes. This brief sautéing step, known as “blooming,” helps to awaken the full aroma and flavor of the spices and chiles, infusing your queso with depth. If you crave more heat, this is the perfect time to finely dice and add a fresh jalapeño or serrano pepper, or sprinkle in some ground cayenne pepper to your liking.
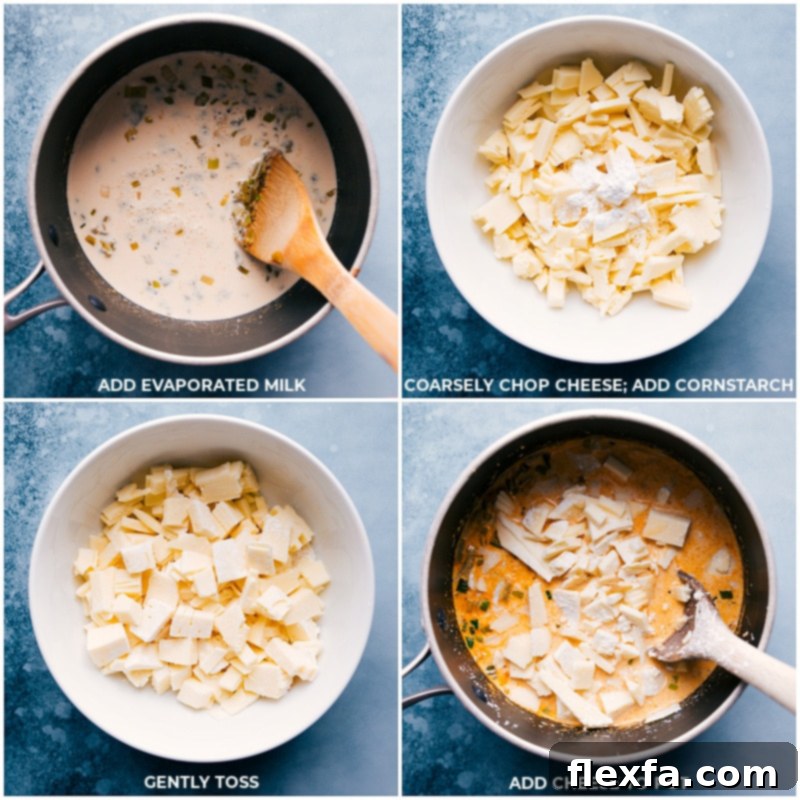
- Introduce the Evaporated Milk: Give your can of evaporated milk a good shake before pouring it into the pot. Stir well to combine with the sautéed ingredients and bring the mixture to a gentle simmer over medium heat. It’s vital not to let it come to a rolling boil, as excessive heat can negatively impact the cheese’s texture later on.
- Melt the Cheese to Perfection: While the milk heats, prepare your star ingredient: tear the white American cheese slices into smaller pieces, or grate it if you’ve purchased a block from the deli. Toss these cheese pieces with cornstarch in a small bowl. This cornstarch coating is a crucial step that helps prevent the cheese from clumping and ensures an incredibly smooth, velvety dip, free from any graininess. Once the milk is simmering, reduce the heat to medium-low and gradually add the cheese-cornstarch mixture to the pot. Stir continuously and patiently until all the cheese is completely melted and smoothly incorporated. Resist the urge to increase the heat, as this is the most common cause of grainy or separated queso. The sauce will still seem a bit thin at first, but it will thicken beautifully as it cools slightly.
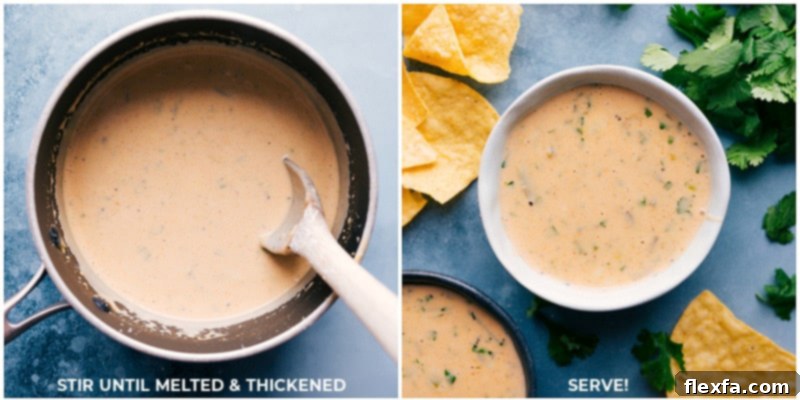
- Season and Serve: Once the cheese is fully melted, taste the queso using a tortilla chip. Since most tortilla chips are salted, this helps you gauge the perfect level of seasoning for the dip itself. Adjust salt and pepper, or any other spices, to your preference. If using, stir in fresh, finely chopped cilantro for a burst of freshness. Remove from heat immediately and serve your spectacular homemade queso warm with an abundance of salty tortilla chips! You might just find yourself skipping dinner for this delightful dip – and trust me, there’s no judgment here!
Queso Ingredients: The Secret to a Flawless Dip
Each ingredient in this recipe plays a vital role in achieving that perfect creamy, flavorful queso. Here’s a deeper look into what you’ll need and why:
- White American Cheese: This is truly the “secret ingredient” that makes this queso unparalleled. For the best results, source it from the deli counter and ask for thick slices, which are easier to shred or chop. Unlike many other cheeses, American cheese melts incredibly smoothly without becoming oily or stringy, thanks to its emulsifying salts. If genuine white American cheese is unavailable, a good quality sharp or extra-sharp cheddar can be a substitute, but expect a slightly different texture and flavor profile.
- Cornstarch: This unassuming ingredient is critical for two reasons: it acts as a thickening agent, giving the dip its luxurious body, and more importantly, it helps prevent the cheese from clumping or becoming grainy when melted. Tossing the cheese in cornstarch before adding it to the pot ensures a silky-smooth consistency.
- Unsalted Butter: Butter provides a rich, foundational flavor and helps sauté the aromatics beautifully. Using unsalted butter allows you complete control over the final salt level of your queso, which is important since tortilla chips are typically quite salty.
- Green Onions: These add a delicate, mild onion flavor and a touch of freshness that brightens the dip. Use both the white and light green parts for the best balance of flavor. You can also use finely diced yellow onion or shallots for a slightly different, but still delicious, aromatic base.
- Minced Garlic: Freshly minced garlic contributes an essential pungent and aromatic note. Sauté it briefly until fragrant, but be careful not to burn it, as burnt garlic can impart a bitter taste.
- Spices (Cumin, Onion Powder, Garlic Powder, Paprika): This blend of spices creates the classic Tex-Mex flavor profile characteristic of authentic queso. Ground cumin adds a warm, earthy depth; onion and garlic powders reinforce the savory base; and paprika contributes a mild sweetness and vibrant color. Feel free to adjust the quantities to match your taste preferences, adding more if you desire a bolder flavor.
- Fire-Roasted Diced Green Chiles: These chiles are a fantastic shortcut to adding a smoky, sweet, and subtly spicy flavor without any extra effort. The charring process intensifies their natural taste. Choose mild chiles for a family-friendly dip, or opt for medium or hot if you prefer a spicier kick.
- Evaporated Milk: This shelf-stable canned milk is a cornerstone of creamy, stable cheese sauces. With 60% of its water content removed, it’s richer and thicker than regular milk and significantly less prone to separating when heated with cheese. It provides the ideal creamy base for a smooth, homogenous queso. Absolutely do NOT use sweetened condensed milk, as it would make your dip unpleasantly sweet.
Our Top Queso Tips for Perfection, Every Time
Achieving that perfectly smooth, creamy, and flavorful queso is easier than you think, especially with these expert tips:
- Temperature Control is Key: Don’t Overheat! When warming the evaporated milk, aim for a gentle simmer, not a vigorous boil. High heat is the enemy of smooth cheese sauces; it can cause the cheese to “break,” resulting in a grainy, separated, or oily dip. Patience on the stovetop will be rewarded.
- Melt Cheese Over Low Heat: Once you add the cheese, reduce the heat to medium-low. This step requires a bit of patience, but it’s crucial. Resist the urge to crank up the heat to speed things along, as this will almost certainly lead to a grainy, unappetizing texture and an overly thick consistency. Gentle, consistent heat encourages a smooth melt.
- Stir, Stir, Stir Constantly: As the cheese is melting into the evaporated milk, continuous stirring is non-negotiable. This ensures the cheese melts evenly, prevents it from sticking to the bottom of the pot, and helps create that luxuriously creamy, homogenous sauce we’re after.
- Choose Quality, Freshly Prepared Cheese: While we highly recommend Land O’ Lakes White American Cheese for its superior melt, if you opt for a different cheese (like cheddar), always buy it in a block and grate it yourself. Pre-shredded cheeses are often coated with cellulose or other anti-caking agents that can prevent them from melting smoothly, leading to a clumpy or grainy dip.
- Taste with a Chip for Perfect Seasoning: Before adding any extra salt, dip a tortilla chip into your freshly made queso and taste it. Tortilla chips are inherently salty, and factoring this into your seasoning adjustments will prevent your queso from becoming excessively salty. Adjust other spices to your preference after this initial taste test.
- Mind the Consistency: Your queso might seem a bit thin when it first finishes melting. Don’t worry! It will thicken beautifully as it stands and cools slightly. If it becomes too thick upon cooling, see our storage and reheating tips below.
- Prep Ahead for Success: Have all your ingredients measured, chopped, and ready to go (mise en place). This makes the process incredibly smooth and quick, especially since timing is important for a perfect melt.
Storage and Reheating
Queso Storage
This queso dip is absolutely divine right off the stovetop, but like most melted cheese recipes, it will naturally thicken and harden as it cools. Don’t despair, keeping it creamy for longer or reheating it is simple!
Here’s how to keep it perfectly warm and creamy for an extended serving period: Transfer the fresh queso to a small slow cooker (ideally a 2-4 quart size) and set it to the “warm” setting. Serve it directly from the slow cooker, stirring it occasionally to maintain an even temperature and consistency. This is fantastic for parties!
Alternatively, if your queso gets too thick after cooling, here’s how to re-warm it: Gently reheat it over low heat in a pot on the stovetop, stirring constantly. Or, microwave it in short bursts of 10-15 seconds, stirring well after each burst, until it reaches your desired warmth and consistency. Always keep it covered when microwaving to retain moisture. If the queso becomes too thick during reheating, gradually add an extra splash of evaporated milk (while stirring constantly) until it’s smooth and dippable again. Avoid high heat, as this can cause separation.
Queso stores beautifully in the refrigerator for 3-5 days. Ensure it’s kept in an airtight container to maintain freshness. When you’re ready to enjoy it again, use one of the reheating methods described above. Please note that this homemade Queso does not freeze and thaw well; the texture tends to become grainy and separated, so it’s best enjoyed fresh or reheated from the fridge.
Serve Alongside: Perfect Pairings for Your Queso Dip
While classic tortilla chips are always a winning combination, this versatile queso dip can elevate a variety of dishes and snacks. Here are some fantastic ideas to serve alongside your irresistible queso:
- Baked Chicken Tacos: The creamy queso makes a perfect topping or side for these delicious tacos, especially when paired with a fresh cilantro-lime sauce.
- White Turkey Chili: A dollop of warm queso adds an extra layer of richness and flavor to a comforting bowl of white turkey chili with ground turkey and white beans.
- Loaded Sweet Potatoes: Drizzle your queso over loaded sweet potatoes featuring an avocado-corn topping for a hearty and satisfying meal.
- Mexican Street Corn Pasta Salad: Enjoy a spoonful of queso alongside this vibrant pasta salad, dressed with a creamy chili-lime dressing.
- Black Bean Corn Avocado Salad: This fresh salad, tossed in a zesty chili-lime vinaigrette, offers a refreshing contrast to the warm, creamy queso.
- Fajitas or Burrito Bowls: Elevate your weeknight fajitas or homemade burrito bowls by adding a generous serving of queso as a decadent sauce.
- French Fries or Tater Tots: For an ultimate comfort food experience, pour warm queso over a pile of crispy French fries or tater tots.
- Vegetable Sticks: Offer a healthier dipping option with crunchy carrot sticks, celery sticks, bell pepper strips, or cucumber slices.
- Nachos: What’s better than queso? Queso-smothered nachos! Layer it over tortilla chips with your favorite toppings for an instant party platter.
Queso Frequently Asked Questions (FAQs)
Here are some common questions about making and enjoying homemade queso:
- Can I make this queso spicier? Absolutely! For more heat, add finely diced jalapeños or serrano peppers when sautéing the green chiles. You can also mix in a pinch of cayenne pepper or a dash of your favorite hot sauce at the end.
- Why is my queso grainy or separated? This is usually due to overheating the cheese. Cheese breaks down and becomes oily or grainy at too high a temperature. Ensure you melt the cheese over low to medium-low heat and stir constantly. Using cornstarch also helps prevent this.
- Can I add meat to my queso? Yes! Browned and seasoned ground beef, chorizo, or shredded chicken are delicious additions. Add them to the queso after it has fully melted, stirring to combine.
- What if my queso is too thick? If your queso becomes too thick, especially after cooling, simply stir in a splash or two of evaporated milk while gently reheating it over low heat until it reaches your desired consistency.
- What if my queso is too thin? If your queso is too thin, it might not have fully thickened yet. Allow it to sit for a few minutes off the heat, stirring occasionally. If it’s still too thin, you can try mixing a small amount of cornstarch (1/2 teaspoon) with an equal amount of cold milk to create a slurry, then gradually whisking it into the warm queso while gently heating, until thickened.
- Can I use regular milk instead of evaporated milk? While you technically can, evaporated milk is highly recommended. It creates a much creamier and more stable dip that is less likely to separate. Regular milk may result in a thinner, less consistent queso.

Pin
Creamy Stovetop Queso Dip
Chelsea Lords
10 minutes
10 minutes
8 servings
Video
Equipment
-
Medium pot
Ingredients
- 2-1/2 cups (12 ounces) white American cheese you’ll have to get it at deli counter—see note 1
- 1-1/2 teaspoons cornstarch
- 1 tablespoon unsalted butter
- 3/4 cup green onions whites and light green parts, thinly sliced
- 2 teaspoons minced garlic
- 1/2 teaspoon ground cumin
- 1/2 teaspoon onion powder
- 1/2 teaspoon garlic powder
- 1/2 teaspoon paprika
- Salt and pepper
- 1 (4-ounce) can diced green chiles see note 2
- 1 (12-ounce) can evaporated milk see note 3
- 1/4 cup finely chopped cilantro optional
- Tortilla chips for dipping
Instructions
-
Shred the white American cheese or coarsely chop it if it comes in slices. If you don’t have an exact weight, measure out 2-1/2 cups. In a small bowl, toss the prepared cheese pieces with the cornstarch until evenly coated. Set aside.
-
Set your stovetop to medium heat. Melt the unsalted butter in a medium-sized pot. Once the butter is melted and slightly shimmering, add the thinly sliced green onions (whites and light green parts). Cook, stirring occasionally, for 3–5 minutes, or until the onions are softened and fragrant. Add the minced garlic and stir for just 30 seconds, until aromatic. Be careful not to let the garlic brown.
-
Thoroughly drain the can of diced green chiles. Add the drained chiles, ground cumin, onion powder, garlic powder, paprika, and a starting amount of salt and pepper (e.g., 1/2 teaspoon of each) to the pot. Cook, stirring constantly, for 1–2 minutes until the spices are very fragrant. This step “blooms” the spices and enhances their flavor.
-
Give the can of evaporated milk a good shake before pouring it into the pot. Stir to combine all ingredients and bring the mixture to a gentle simmer over medium heat. It is crucial NOT to increase the heat or allow the milk to come to a rolling boil, as this can cause the cheese to separate. Once simmering, reduce the heat to medium-low.
-
Add the cheese and cornstarch mixture to the pot. Stir constantly and patiently until all the cheese is fully melted and incorporated into a smooth, creamy sauce. This process takes a bit of time; increasing the heat will almost certainly result in a grainy or separated dip. The sauce might still appear slightly thin initially, but it will thicken beautifully as it rests. Once melted, taste the queso using a tortilla chip to gauge the saltiness and adjust any seasonings (salt, pepper, or other spices) to your preference. If using, stir in the finely chopped cilantro. Remove the pot from the heat and serve your delicious homemade queso warm with plenty of tortilla chips.
-
As the queso cools, it will naturally thicken and harden, just like any melted cheese-based recipe. To keep it nice and creamy for a longer serving period, transfer it to a small slow cooker (ideally 2–4 quarts) and set it to the “warm” setting. Serve directly from the slow cooker, stirring occasionally. Alternatively, if it becomes too thick after cooling, gently rewarm it over low heat in a pot on the stovetop, stirring constantly, or microwave it (covered) in 10-second bursts, stirring well after each interval, until warmed through and smooth. If needed, add an extra splash of evaporated milk (while stirring constantly) during reheating to achieve the desired consistency.
Recipe Notes
You’ll find white American cheese (Land O’ Lakes is highly recommended) at your deli counter. If it typically comes sliced, ask the deli staff for the largest possible slice thickness—this will give you thicker blocks that are much easier to shred or finely chop. This particular cheese is the “secret” to achieving the incredible creaminess and authentic restaurant-style texture of this recipe, so prioritize finding it if you can! A good runner-up substitute, if American cheese is absolutely unavailable, would be regular sharp or extra-sharp cheddar, which will offer a strong cheesy flavor but may result in a slightly different texture.
Note 2: Fire-Roasted Diced Green Chiles
Fire-roasted diced green chiles are charred over an open flame before being diced and canned. This process imparts a wonderful smoky and slightly sweet flavor, adding significant depth to your queso without any additional work on your part. You can also use regular diced green chiles if fire-roasted are not available. If you desire more heat, opt for a can of hotter chiles or add a finely diced fresh jalapeño or serrano pepper when blooming the spices.
Note 3: Evaporated Milk
Evaporated milk is a shelf-stable canned milk product where about 60% of the water has been removed from fresh milk. This concentration makes it exceptionally creamy and far less likely to separate or curdle when used in cheese sauces, making it the superior choice for this queso recipe. It ensures a consistently smooth and stable dip. In some countries, it might be labeled as “unsweetened condensed milk.” Be sure to double-check that it is unsweetened; sweetened condensed milk is a completely different product with high sugar content and is not a suitable substitute for this recipe, as it would make the queso far too sweet.
Storage: Queso stores nicely in the fridge for 3–5 days. Keep it in an airtight container and use the reheating methods described above. Queso doesn’t freeze/thaw well; the texture tends to become grainy and separate.
Nutrition
Nutrition information is automatically calculated, so should only be used as an approximation.