

Delightful 3-Ingredient Christmas Candies: Your Ultimate Guide to Easy Holiday Treats
The holiday season is a time for joy, togetherness, and, of course, delicious treats! But who says festive baking has to be complicated? Our collection of easy 3-ingredient Christmas candies is here to prove that you can create stunning and scrumptious holiday delights without spending hours in the kitchen. Whether you’re looking for simple homemade gifts, quick snacks for a holiday party, or just something sweet to enjoy with your family, these recipes are perfect. Featuring white chocolate peppermint hearts, Rudolph Noses pretzel bites, thin mint Oreo cups, and classic easy turtles, these recipes are designed for maximum flavor with minimal effort. Get ready to impress everyone with these unbelievably simple and utterly irresistible holiday confections!

1. Dazzling White Chocolate Peppermint Hearts
These festive White Chocolate Peppermint Hearts are not only visually appealing but also incredibly simple to make, requiring just a few basic ingredients. They’re a delightful blend of sweet white chocolate and refreshing peppermint, making them an ideal treat for the holiday season. Perfect for sharing, gifting, or even decorating your Christmas tree!
Quick Tips for Perfect Peppermint Hearts:
- Choose High-Quality White Chocolate: The secret to exceptional flavor and a smooth melt lies in the quality of your white chocolate. Brands like Guittard or Ghirardelli are highly recommended for their superior taste and melting properties. Both chocolate chips and baking bars work wonderfully for these peppermint hearts.
- Parchment Paper is Your Best Friend: For effortless removal and a clean workspace, always line your baking sheet with parchment paper before arranging your candy canes. This simple step ensures your beautiful hearts lift off easily once set.
- Transform into Edible Ornaments: Want to add a unique touch to your Christmas tree? Before the chocolate fully sets, gently press a loop of festive string into the melted chocolate in each heart. Once hardened, you’ll have charming, edible ornaments that are sure to be a conversation starter!
Recommended Products:
- Festive Christmas Sprinkles: Add a vibrant pop of color and holiday cheer to your hearts.
- Miniature Candy Canes: The essential base for creating the heart shape.
White Chocolate Peppermint Hearts Recipe
By: Chelsea Lords
These charming candy cane hearts feature a creamy white chocolate center, adorned with festive sprinkles. They’re quick, easy, and undeniably delicious!
- Prep Time: 10 minutes
- Setting Time: 20 minutes
- Total Time: 30 minutes
- Yields: 10 candy cane hearts
- Average Rating: 4.69 out of 5 stars (based on 16 votes)
Equipment Needed:
- Sheet pan (15″ x 10″)
- Parchment paper
Ingredients:
- 20 miniature candy canes, unwrapped
- 6 ounces high-quality white chocolate (chips or baking bar, for best taste and melt)
- Holiday sprinkles, for topping
- 1/2 to 1 teaspoon vegetable oil (optional, to thin chocolate if needed)
Instructions:
- Prepare a large sheet pan by lining it completely with parchment paper. This will ensure easy removal of your finished candies.
- Carefully arrange the unwrapped miniature candy canes on the prepared tray. Place two candy canes together, hooking their curved ends to form a perfect heart shape. Repeat this process until all candy canes are used.
- Melt the white chocolate. Place the white chocolate in a microwave-safe bowl. Microwave in short bursts of 15 seconds, stirring thoroughly for 10-15 seconds after each burst. This patient melting method prevents the chocolate from burning and ensures a smooth, creamy consistency.
- If your melted chocolate appears too thick, add vegetable oil very slowly, just 1/2 to 1 teaspoon at a time, until it reaches a desired, slightly thinner pouring consistency. Be cautious not to add too much.
- Transfer the melted white chocolate into a sturdy plastic bag (a Ziploc bag works well). Snip off a tiny tip from one corner of the bag with scissors to create a piping tool.
- Carefully pipe the melted chocolate into the empty centers of each candy cane heart. Once filled, gently wiggle the candy canes slightly to help the chocolate settle and achieve a smooth surface.
- Immediately after piping the chocolate, generously sprinkle your chosen holiday sprinkles over each heart. Act quickly, as the chocolate will start to set.
- Allow the peppermint hearts to set completely at room temperature or in the refrigerator for faster setting. Once firm, they are ready to enjoy or package.
Recipe Notes:
- Storage: Store any leftover White Chocolate Peppermint Hearts in an airtight container at room temperature for up to one week. To prevent melting and maintain freshness, keep them in a cool, dry place. For extended storage, they can be refrigerated for up to two weeks.
Nutrition Information (per serving):
- Serving Size: 1 serving
- Calories: 99 kcal
- Carbohydrates: 16g
- Protein: 0.6g
- Fat: 3g
- Saturated Fat: 1g
- Polyunsaturated Fat: 0.3g
- Monounsaturated Fat: 1.25g
- Cholesterol: 2mg
- Sodium: 8mg
- Potassium: 28mg
- Fiber: 0.02g
- Sugar: 16.3g
- Vitamin A: 10 IU
- Calcium: 20mg
Nutrition information is automatically calculated and should be used as an approximation only.

2. Playful Rudolph Noses Pretzel Bites
Bring a smile to everyone’s face with these adorable and irresistible Rudolph Noses Christmas Candies! Combining the perfect balance of sweet and salty, these treats are unbelievably simple to create and are always a huge hit. They make fantastic edible gifts, party favors, or a fun centerpiece for your holiday table.
Quick Tips for Perfect Rudolph Noses:
- Pretzel Perfection: While regular twist pretzels work well, square pretzels are often preferred for these Christmas candies as they provide a more stable base for the chocolate and M&M. Stick with plain, unsalted pretzels to let the sweet chocolate shine without any competing butter flavors.
- Versatile Chocolate Choices: You can experiment with different types of chocolate kisses or hugs (Hershey’s Kisses or Hugs) or even Rolos for these treats. Each offers a slightly different flavor profile and melting quality, adding a fun variety to your platter.
- Edible Table Centerpiece: For an extra festive touch, arrange these cute Rudolph Noses as an edible table centerpiece. Alternate between milk chocolate kisses, white chocolate hugs, and caramel-filled Rolos (if you find a solid caramel variety that doesn’t ooze) for a beautiful array of colors and textures that will captivate your guests.
Recommended Products:
- Rolo Candies: For a delightful caramel-chocolate combination.
- Christmas M&Ms: Essential for Rudolph’s bright red nose!
Rudolph Noses Recipe
By: Chelsea Lords
Rudolph Noses are the easiest festive treat to make! Simply melt your favorite chocolate (Hugs, Kisses, or Rolos) onto a pretzel, press in a holiday M&M, and let it set. The result is a sweet, salty, and totally snackable holiday candy!
- Prep Time: 5 minutes
- Cook Time: 4 minutes
- Total Time: 9 minutes
- Yields: 25 candies
- Average Rating: 4.86 out of 5 stars (based on 14 votes)
Equipment Needed:
- Sheet pan (15″ x 10″)
- Parchment paper
Ingredients:
- 25 pretzels (square or twist, plain recommended)
- 25 Hershey’s Hugs, Kisses, or Rolos (unwrapped, choose solid chocolate for best results)
- 25 holiday-themed M&M’s
Instructions:
- Preheat your oven to 350°F (175°C). It is crucial not to use convection settings, as this can cause the chocolate to crumble.
- Line a large sheet pan with parchment paper. This prevents sticking and makes cleanup a breeze. Carefully arrange the pretzels in a single layer across the lined pan.
- Unwrap your chosen chocolates (Hugs, Kisses, or Rolos) and place one chocolate on top of each pretzel.
- Bake in the preheated oven for 3-4 minutes. The goal is for the chocolates to become soft and slightly melted, but still hold their shape and not entirely liquify. Keep a close eye on them to prevent overbaking.
- Immediately remove the sheet pan from the oven. While the chocolates are still warm and soft, gently press one holiday M&M into the center of each chocolate. The warmth of the chocolate will help the M&M adhere perfectly.
- Allow the Rudolph Noses to cool completely at room temperature until the chocolate has fully hardened. Once set, they are ready to serve or store.
Recipe Notes:
- Chocolate Choice: For best results, stick with solid chocolate kisses or hugs. Caramel kisses often ooze out when heated, making for a messy treat.
- Baking Temperature and Time: If your chocolates tend to crumble (a common issue if the oven is too hot or the baking time is too long), try a test run with just one Rudolph Nose first. If it crumbles, reduce your baking time by a minute or two for the rest. Avoid using convection oven settings entirely.
- Storage: Store any leftover Rudolph Noses in an airtight container at room temperature for up to 3 days to maintain their freshness and crunch. For longer preservation, they can be refrigerated. If you wish to freeze them, place them in a freezer-safe bag or container and allow them to thaw completely before serving.
Nutrition Information (per serving):
- Serving Size: 1 serving
- Calories: 55 kcal
- Carbohydrates: 9g
- Protein: 0.9g
- Fat: 1g
- Cholesterol: 0.8mg
- Sodium: 86mg
- Fiber: 0.3g
- Sugar: 4.4g
Nutrition information is automatically calculated and should be used as an approximation only.
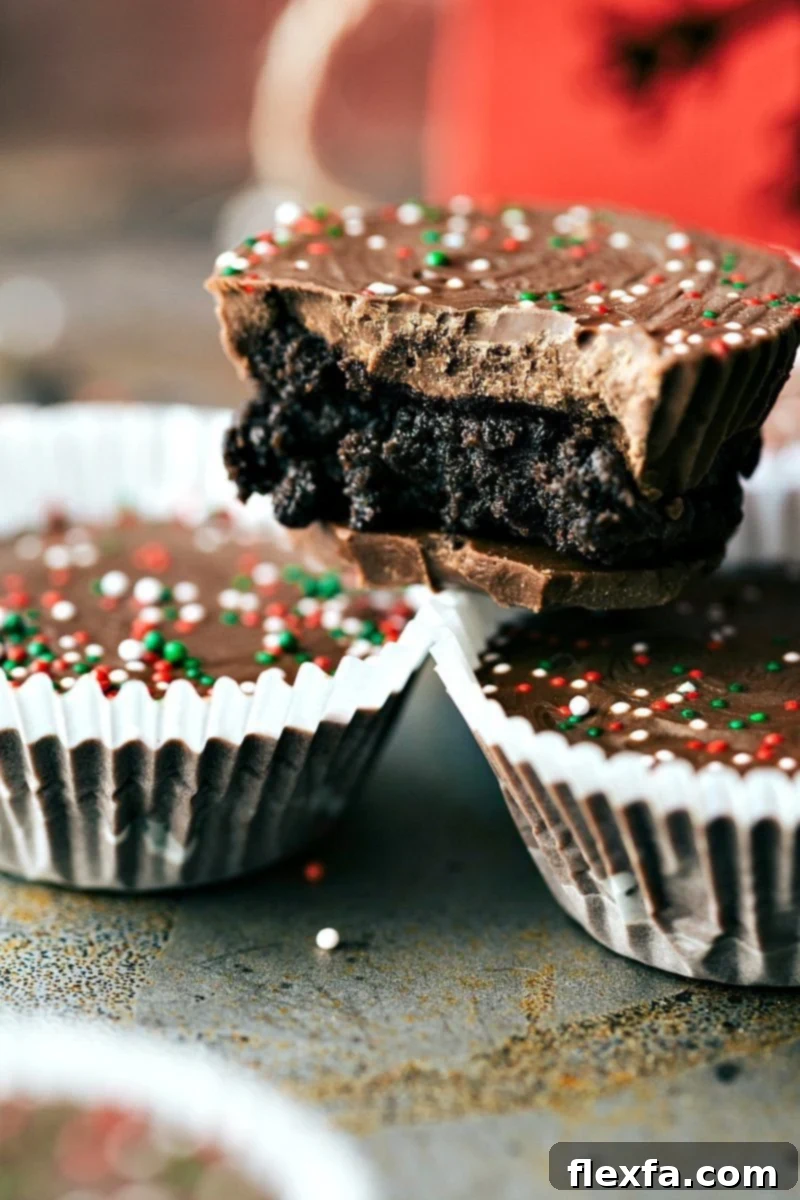
3. Irresistible Thin Mint Oreo Cups
Indulge in the refreshing combination of chocolate and mint with these decadent Thin Mint Oreo Cups. These bite-sized treats offer a creamy, minty Oreo filling nestled between layers of smooth Andes Mint chocolate, making them an absolute dream for mint chocolate lovers. They’re surprisingly easy to assemble and perfect for adding an elegant touch to your holiday dessert platter.
Quick Tips for Perfect Thin Mint Cups:
- Locating Andes Mint Baking Chips: You’ll typically find Andes Mint baking chips in the baking aisle of most grocery stores, usually alongside other chocolate chip varieties. Look for them in their distinctive green bag! These chips are key to achieving that signature minty chocolate flavor.
- Cream Cheese Temperature: Ensure your cream cheese is at room temperature before mixing with the Oreo crumbs. This allows for a smooth, lump-free mixture that is easy to work with and forms a consistent filling.
- Experiment with Toppings: While sprinkles are a classic choice for decoration, feel free to get creative! Crushed candy canes, a drizzle of contrasting chocolate, or even a tiny piece of fresh mint can elevate the presentation of these cups.
Recommended Products:
- Christmas Sprinkles: For a festive finish.
- Oreos: The classic chocolate sandwich cookie for the rich, crumbly base.
Thin Mint Cups Recipe
By: Chelsea Lords
These Thin Mint Cups are a chocolate-minty dream come true! A creamy Oreo-mint filling is perfectly sandwiched between layers of smooth Andes Mint chocolate. Easy to make, fun to eat, and absolutely delicious with a sprinkle of holiday cheer on top!
- Prep Time: 20 minutes
- Total Time: 20 minutes (plus chilling time)
- Yields: 6 servings
- Average Rating: 4.82 out of 5 stars (based on 16 votes)
Equipment Needed:
- Mini muffin pan
- Mini cupcake liners
- Blender or food processor
Ingredients:
- 16 Oreos or other chocolate sandwich cookies
- 4 ounces cream cheese, softened to room temperature
- 1 to 2 bags Andes Creme De Menthe baking chips (quantity depends on desired chocolate thickness)
- Sprinkles, optional, for decoration
Instructions:
- Begin by preparing your mini muffin pan. Line each cavity with mini cupcake liners to ensure easy removal of your finished cups.
- Next, create the cookie base. Place the Oreos (you do not need to separate the cookie from the cream filling) into a blender or food processor. Pulse until the cookies are finely crushed, resembling crumbs.
- In a medium bowl, combine the finely crushed Oreo crumbs with the room-temperature cream cheese. Beat the mixture until a thick, uniform dough forms.
- Cover the dough and chill it in the refrigerator for at least 30 minutes. This will make it much easier to handle and shape.
- While the dough chills, prepare your first layer of chocolate. Take one bag of Andes Creme De Menthe baking chips and place them in a large, microwave-safe bowl. Melt the chips in short bursts of 15 seconds, stirring thoroughly for 10-15 seconds between each burst, until completely smooth.
- Spoon a small amount of the melted Andes chocolate into the bottom of each prepared mini muffin liner. You don’t need a lot, just enough to form a thin base.
- Allow this bottom chocolate layer to set completely. If the chocolate starts to harden in your bowl while working, simply pop it back into the microwave for another 15 seconds or so to re-soften.
- Once the chocolate base is firm, remove the chilled Oreo-cream cheese dough from the refrigerator. Roll the dough into small, evenly sized balls. Then, flatten each ball into a thin, completely flat disk.
- Place one flattened Oreo disk on top of the set chocolate layer in each muffin liner.
- Spoon more melted Andes chocolate over each Oreo disk, ensuring it is fully covered to create the top layer of the cup.
- If desired, immediately add sprinkles to the top of each cup before the chocolate sets.
- Allow the Thin Mint Cups to set completely at room temperature or in the refrigerator. Once firm, they are ready to serve.
Recipe Notes:
- Chocolate Quantity: The amount of Andes baking chips needed can vary. If you prefer a generous chocolate coating, you might use 1 and a half to 2 bags. The exact measurement depends on the size of your Oreo filling disks and the desired thickness of your chocolate layers.
- Storage: To store any leftover Thin Mint Cups, keep them in an airtight container at room temperature for up to 3 days. For longer storage, refrigerate them for up to a week to maintain their fresh taste and texture. They can also be frozen for up to a month; just remember to thaw them before enjoying.
Nutrition Information (per serving):
- Serving Size: 1 serving
- Calories: 276 kcal
- Carbohydrates: 30g
- Protein: 2g
- Fat: 16g
- Saturated Fat: 10g
- Polyunsaturated Fat: 0.8g
- Monounsaturated Fat: 3g
- Trans Fat: 0.4g
- Cholesterol: 16mg
- Sodium: 121mg
- Potassium: 61mg
- Fiber: 1g
- Sugar: 23g
- Vitamin A: 138 IU
- Calcium: 34mg
- Iron: 1mg
Nutrition information is automatically calculated and should be used as an approximation only.
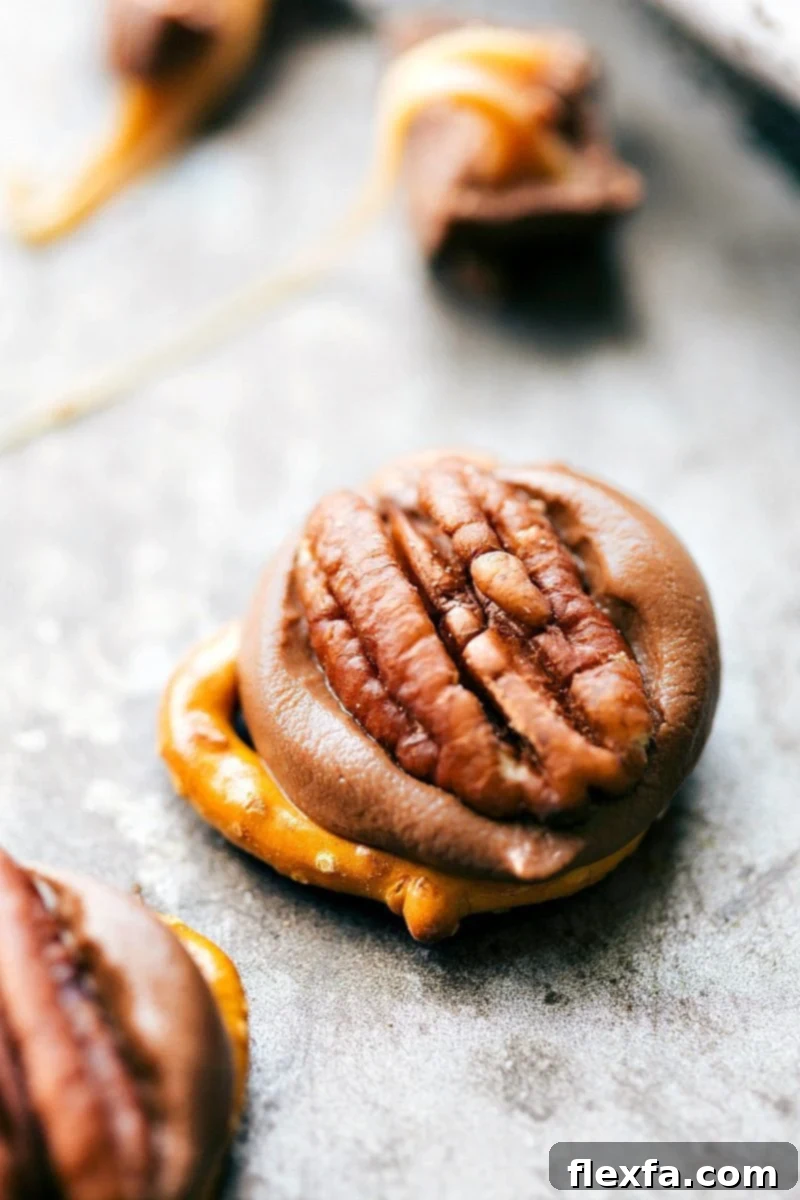
4. Classic Simple Turtle Christmas Candies
Indulge in the timeless combination of salty pretzels, gooey caramel, and crunchy pecans with these incredibly Simple Turtle Christmas Candies. This classic treat gets a fantastic homemade twist that requires minimal effort, making it ideal for holiday baking. They are the perfect balance of sweet and savory, offering an irresistible bite that everyone will love.
Recommended Products:
- Twist Pretzels: Provides the perfect salty crunch as the base.
- Rolo Candies: The essential ingredient for that rich, melted caramel and chocolate center.
- Pecans: For a traditional turtle, whole pecan halves are ideal.
Simple Turtle Candies Recipe
By: Chelsea Lords
These Turtles are the ultimate sweet-and-salty delight! Melted Rolos on pretzels get topped with a crunchy pecan, creating a quick, irresistible bite. They’re simple to make, utterly delicious, and perfect for holiday snacking or gifting!
- Prep Time: 10 minutes
- Cook Time: 3 minutes
- Total Time: 13 minutes
- Yields: 25 turtles
- Average Rating: 4.86 out of 5 stars (based on 14 votes)
Equipment Needed:
- Sheet pan (15″ x 10″)
- Parchment paper
Ingredients:
- 25 pretzels (twist or square, plain recommended)
- 25 Rolo candies, unwrapped
- 25 pecan halves
Instructions:
- Preheat your oven to 350°F (175°C). Please note that using convection oven settings is not recommended, as it can cause the Rolos to crumble or melt unevenly.
- Line a large sheet pan with parchment paper. This vital step prevents sticking and ensures your turtles are easy to remove after cooling. Arrange the pretzels in a single layer on the prepared tray, leaving a little space between each.
- Carefully unwrap each Rolo candy and place one Rolo on top of each pretzel. Ensure it’s centered to help it melt evenly over the pretzel.
- Bake in the preheated oven for 3-4 minutes. The Rolos should become soft and glossy, but not completely melted into a liquid puddle. Keep a close watch, as ovens vary.
- Immediately after removing the pan from the oven, while the Rolos are still very soft, gently press one pecan half into the center of each melted Rolo. The warmth will help the pecan settle firmly into the caramel and chocolate.
- Allow the Simple Turtle Candies to cool completely at room temperature. The chocolate and caramel will harden as they cool, binding all the delicious elements together. Once firm, they are ready to enjoy!
Recipe Notes:
- Preventing Crumbling: If you find that the chocolate or caramel “crumbles” rather than softens, it typically means the oven was too hot or the Rolos were baked for too long. To avoid this, we highly recommend testing with just one turtle first to gauge your oven’s behavior and ideal baking time. If it crumbles, reduce the baking time for the remaining candies. As mentioned, avoid using convection oven settings.
- Storage: To store any leftover Simple Turtle Candies, place them in an airtight container. They will remain fresh and delicious at room temperature for up to 3 days. For longer storage, you can refrigerate them to extend their freshness. If you wish to freeze these treats, place them in a freezer-safe bag or container and allow them to thaw fully before serving.
Nutrition Information (per serving):
- Serving Size: 1 serving
- Calories: 55 kcal
- Carbohydrates: 9g
- Protein: 0.9g
- Fat: 1g
- Cholesterol: 0.8mg
- Sodium: 86mg
- Fiber: 0.3g
- Sugar: 4g
Nutrition information is automatically calculated and should be used as an approximation only.
Enjoy Your Effortless Holiday Baking!
With these four incredibly simple 3-ingredient Christmas candy recipes, you’re well-equipped to spread holiday cheer this season. From the refreshing zest of White Chocolate Peppermint Hearts to the classic appeal of Caramel Pecan Turtles, each treat offers a unique flavor and texture experience with minimal fuss. These recipes are not just about ease; they’re about creating lasting memories and enjoying the magic of homemade delights. So go ahead, gather your ingredients, enlist some eager helpers, and embark on a sweet adventure that promises delicious results and festive smiles. Happy holiday baking!