
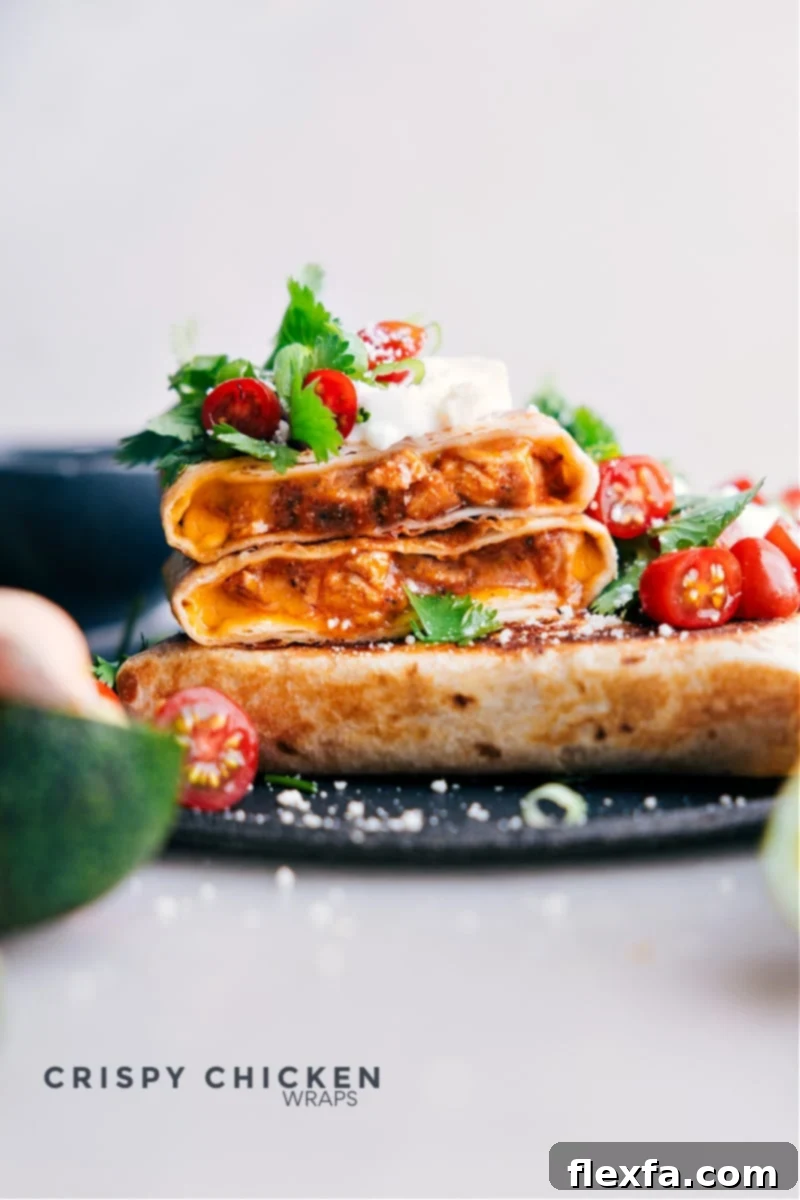
Crispy Chicken Wraps are an absolute game-changer for your meal rotation. Imagine succulent, smoky shredded chicken, perfectly balanced with creamy refried beans, and rich, melty cheese, all encased in a golden-brown, satisfyingly crunchy tortilla. This isn’t just a meal; it’s a delightful experience that brings together incredible flavors and textures, making it an instant family favorite.
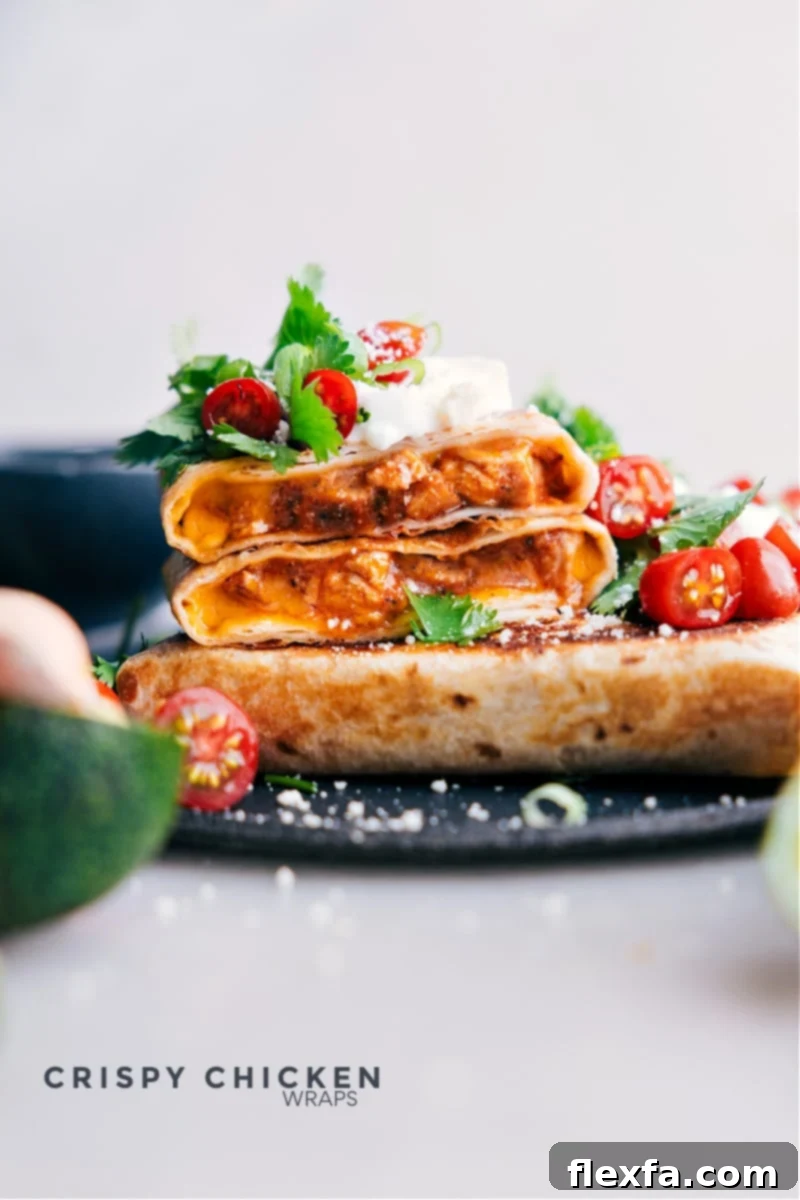
Irresistible Crispy Chicken Wraps: Your Go-To Weeknight Meal Solution
These truly irresistible chicken wraps are a culinary masterpiece, proving that delicious doesn’t have to mean difficult. Bursting with layers of robust flavor and packed with protein, they offer an excellent solution for a satisfying, filling, and incredibly easy weeknight dinner. Beyond dinner, they’re fantastic for a hearty lunch or even as a versatile option for meal prep throughout the week. The combination of savory ingredients and a satisfying crunch makes them a standout dish that’s sure to impress without requiring hours in the kitchen.
The magic begins with tender, succulent shredded chicken, impeccably seasoned with a carefully selected mild taco seasoning blend. This blend infuses the chicken with a warm, aromatic spice that is universally appealing. This seasoned chicken then finds its perfect partner in a tangy, smoky mild enchilada sauce, bringing a depth of savory notes that elevate the entire dish. Finally, freshly grated sharp cheddar cheese melts into a gooey, flavorful embrace, binding all the components together beautifully. The result is a filling that is profoundly flavorful, rich, and utterly satisfying, guaranteed to please even the most discerning palates.
To elevate the experience further, this rich chicken and cheese mixture is generously paired with creamy, smooth refried beans. These beans add a delightful texture, a subtle earthiness, and an extra layer of authentic Mexican-inspired flavor that complements the chicken and cheese beautifully. This delicious concoction is then snugly enveloped in a soft, generously-sized flour tortilla. But the journey to perfection doesn’t end there; before reaching your plate, each wrap is lightly coated with olive oil cooking spray and expertly browned in a hot skillet. This crucial step transforms the tortilla into a beautiful golden-brown casing with an irresistible crunch that perfectly contrasts the soft, tender, and flavorful interior. It’s this perfect interplay of textures and tastes that makes these wraps so utterly addictive.
One of the many beauties of these crispy chicken wraps is their incredible versatility when it comes to garnishing. They serve as a perfect canvas for customization, allowing you to add as many or as few toppings as your heart desires. Whether you prefer fresh herbs, zesty salsas, creamy dips, or a spicy kick, these wraps can be adapted to suit any taste. Essentially, any fresh, vibrant additions you’d typically enjoy on your favorite burritos or tacos will complement these wraps magnificently, turning each bite into a personalized flavor adventure. They’re a celebration of fresh ingredients and bold flavors, designed for maximum enjoyment with minimal effort.
Key Ingredients for Flavorful Crispy Chicken Wraps
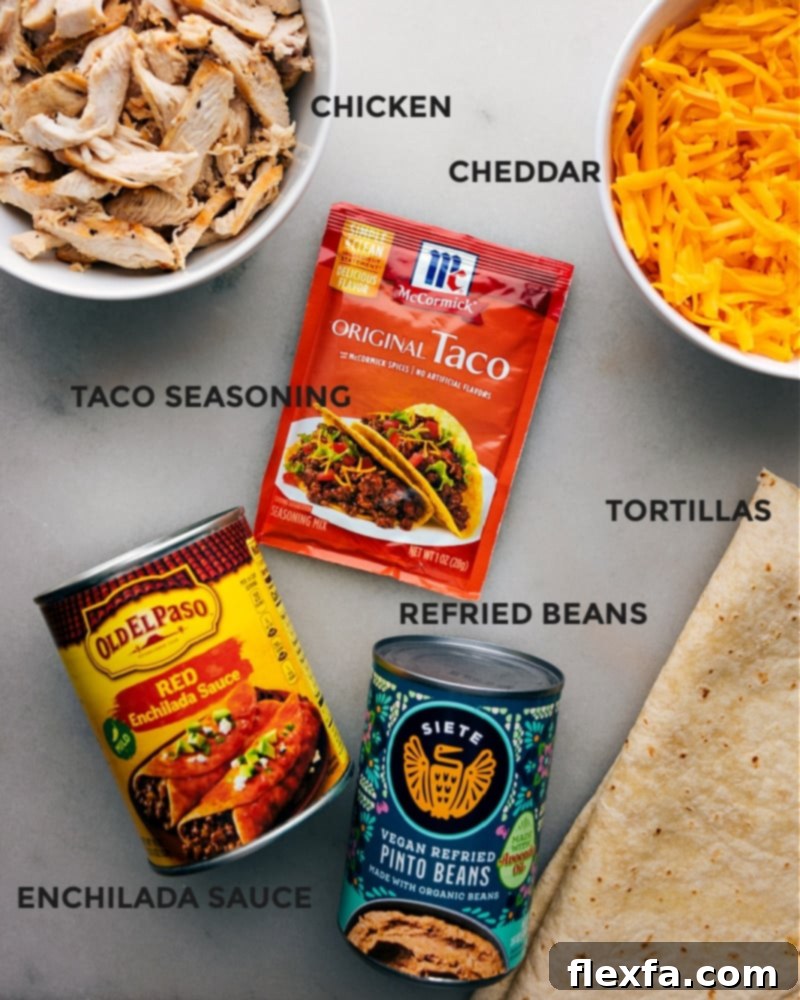
Crafting the perfect Crispy Chicken Wrap starts with selecting high-quality ingredients that bring a perfect balance of flavor and texture. Here’s a detailed look at what you’ll need and why each component is essential for achieving the ultimate wrap:
- Cooked and Shredded Chicken: The foundation of our wraps. For ultimate convenience and deep, savory flavor, a hot-and-ready rotisserie chicken from your local grocery store is an excellent choice. It’s typically well-seasoned, incredibly tender, and provides ample meat for a batch of wraps. To save even more precious time, look for pre-shredded rotisserie chicken meat, often available in the deli section. This option eliminates the need for any chicken prep.
- Alternatively: Leftover Cooked or Grilled Chicken: Don’t let good chicken go to waste! If you have plain cooked or grilled chicken, seasoned simply with salt and pepper, it’s perfectly suitable for this recipe. There’s absolutely no need to reheat it beforehand; the chicken will warm up beautifully as the wraps cook in the skillet, absorbing the rich flavors of the seasoning and sauce, ensuring every bite is moist and delicious.
- Mild Taco Seasoning: This essential blend provides the authentic Tex-Mex flavor profile that defines these wraps. Opt for a mild variety to ensure the wraps are broadly appealing, especially for families with varying spice tolerances. You have the flexibility to adjust the amount used based on your personal preference for seasoning intensity. If you enjoy a bit more kick, a medium-heat seasoning can be used, or a pinch of cayenne pepper can be added for a subtle warmth.
- Mild Enchilada Sauce: A critical ingredient for adding a smoky, tangy depth and a vibrant color to the filling. Be aware that the flavor and heat levels of enchilada sauces can vary significantly between different brands. We highly recommend Old El Paso® mild red enchilada sauce for its consistent quality and perfectly balanced flavor that complements the chicken without overpowering it. If this specific brand isn’t readily available, always taste-test your chosen sauce first to ensure it aligns with your desired spice level and overall taste profile. For those who love a truly authentic and customizable touch, consider making your own homemade Enchilada Sauce. Feel free to use medium or hot enchilada sauce if you prefer a spicier wrap, but adjust other seasonings accordingly.
- Freshly Grated Sharp Cheddar Cheese: The type of cheese profoundly impacts the outcome of your wraps. Grating your own cheese is a non-negotiable step for achieving superior results. Pre-shredded cheeses often contain anti-caking agents (like cellulose) that hinder smooth melting and can result in a grainy or clumpy texture. Freshly grated cheese, especially sharp or extra-sharp Cheddar, will melt into a wonderfully creamy, velvety consistency and deliver a more pronounced, richer cheese flavor that truly stands out and elevates the entire wrap.
- Large Flour Tortillas: The sturdy vessel for our delicious, generously filled wraps. It’s crucial to select large flour tortillas (often labeled “burrito-sized”) that are robust, pliable, and thick enough to hold a substantial amount of filling without tearing or breaking during assembly and cooking. Corn tortillas, while delicious in other applications, are typically more prone to tearing and can become brittle when crisped, making flour tortillas the superior choice for these hearty, crispy wraps.
- Refried Beans: These contribute significantly to the wraps’ creamy texture and add another layer of traditional Mexican flavor that is both comforting and delicious. They act as a binding agent, helping to hold the ingredients together, and offer a delightful smooth contrast to the shredded chicken. If you happen to have a batch of homemade pinto beans on hand, they are absolutely incredible in these wraps, offering an even richer, more authentic taste and texture.
- Olive Oil Cooking Spray: The unsung hero for achieving that coveted golden-brown, irresistibly crispy exterior. A light, even coating of cooking spray ensures the tortillas crisp up beautifully in the skillet without becoming greasy. It promotes even browning and a consistent crunch across the entire surface. Make sure to spray all sides evenly for a perfectly golden and crisp crust that’s a highlight of the dish.
Elevate Your Wraps: Delicious Topping Ideas
While these Crispy Chicken Wraps are fantastic on their own, adding fresh and flavorful toppings can take them to an entirely new level, transforming them into a personalized culinary delight. Think of them as the perfect complement to the savory, cheesy filling, adding bursts of freshness, creaminess, or a spicy kick. Here are some fantastic ideas to inspire your culinary creativity and enhance your wraps:
- Diced Tomatoes: For a burst of vibrant freshness and a touch of sweet acidity, freshly diced ripe tomatoes are a must. They add a lovely color and a juicy counterpoint to the rich filling. Alternatively, a generous spoonful of zesty salsa or chunky pico de gallo will bring an explosion of garden-fresh flavor and a satisfying texture to each bite.
- Sliced Avocado or Guacamole: The creamy, buttery texture of ripe avocado or rich, homemade guacamole adds a luxurious dimension to the wraps. It provides a cool, soothing contrast to any spice and brings a healthy dose of good fats, making the wrap feel even more substantial and indulgent.
- Sour Cream or Crema: A dollop of cool, tangy sour cream offers a delightful creaminess and richness that beautifully balances the intense flavors of the filling. Even fat-free or light sour cream works wonderfully, providing the desired texture and tang without extra calories. For an extra special touch, whip up a quick homemade crema by combining two parts sour cream with one part fresh lime juice—it’s simple yet transformative and adds a gourmet touch!
- Jalapeños: If you crave a bolder kick and enjoy a bit of heat, finely diced fresh or pickled jalapeño peppers are the way to go. They introduce a pleasant warmth and a vibrant, zesty crunch that spice enthusiasts will adore. Adjust the amount to your preferred level of heat, starting with a small sprinkle and adding more if desired.
- Lime Wedges: A squeeze of fresh lime juice just before serving is like a secret weapon in Tex-Mex cuisine. It brightens all the flavors, adds a refreshing zest, and cuts through the richness of the cheese and beans, leaving a clean, zesty finish. Don’t underestimate the power of a simple lime; it truly awakens the palate!
- Chopped Onions: Whether you prefer the sharp bite of red onions or the milder flavor of white onions, a sprinkle of finely chopped onions adds a delightful crunch and a pungent, savory zing that enhances the overall flavor profile. For a milder, slightly sweeter touch, consider quick-pickled red onions which add a lovely tang.
- Fresh Cilantro: A generous sprinkle of fresh, chopped cilantro adds an authentic herby freshness and a beautiful pop of green. It’s an essential garnish for many Mexican and Tex-Mex dishes, providing a bright, aromatic finish that ties all the flavors together.
Mastering Crispy Chicken Wraps: Expert Tips for Success
Achieving perfectly crispy, flavorful chicken wraps is simpler than you think with a few key techniques and careful attention to detail. These expert tips will help ensure your wraps are golden, crunchy, and absolutely delicious every time, transforming your cooking experience:
- Always Use Freshly Grated Cheese: This tip cannot be overstated for a reason. Freshly grated cheese melts far more smoothly and creates a creamier, richer texture within your wraps compared to pre-shredded varieties. Pre-packaged shredded cheeses often contain anti-caking agents like cellulose or cornstarch, which prevent them from melting properly and can result in a gritty or clumpy residue. Invest a few extra minutes in grating your own cheese for a noticeably superior, velvety result that truly enhances the wrap’s interior.
- Opt for Quality Tortillas: The tortilla is more than just a wrapper; it’s a fundamental part of the wrap’s overall texture and flavor. High-quality flour tortillas are robust, flexible, and less likely to tear during the folding and cooking process. They also absorb moisture better without becoming soggy, ensuring that desirable crisp exterior. A good quality tortilla will confidently hold up to a generous filling and crisp beautifully, providing the perfect foundation for your delicious creation.
- Utilize a Non-Stick Pan for Browning: When it comes to achieving that desirable crispy, golden-brown exterior, a good quality non-stick skillet is your absolute best friend. It prevents the tortillas from sticking, ensures even browning across the surface, and allows you to use minimal olive oil for a healthier yet perfectly crisp finish. This makes flipping the wraps easy and prevents any unsightly tears or messy mishaps during cooking.
- Avoid Overfilling Your Wraps: It’s incredibly tempting to load up your wraps with as much delicious filling as possible, but moderation is truly key here. Overfilling can make the wraps incredibly difficult to fold neatly and securely, leading to potential spills during cooking and preventing them from sealing properly. A good rule of thumb is to leave a substantial border (about 1-2 inches) around the edges of the tortilla for easier, tighter, and more successful folding.
- Start Cooking Seam-Side Down: This is a crucial technique for keeping your wraps perfectly intact and preventing the filling from escaping. Placing the wraps seam-side down first allows the heat from the skillet to effectively “seal” the folded edges, essentially gluing them together. This ensures your wrap maintains its perfect packet shape throughout the cooking process, resulting in a cleaner and more appealing presentation.
- Maintain Optimal Heat Control: Finding the right balance of heat is absolutely essential for crisping the tortilla to perfection without burning it. Medium-high heat is generally ideal for achieving that coveted golden-brown crunch. If the heat is too high, the tortilla will burn quickly before the interior filling has a chance to fully warm and the cheese to melt. Conversely, if the heat is too low, the tortilla may become dry and hard without developing that desirable golden crisp. Keep a watchful eye on your wraps and adjust the heat as needed throughout the cooking process.
- Cook in Batches to Prevent Crowding: Resist the urge to cram too many wraps into the skillet at once. Overcrowding significantly lowers the pan’s temperature and traps steam, which can lead to soggy rather than gloriously crispy tortillas. Depending on the size of your skillet, cook two or three wraps at a time, ensuring they have enough space for even heat distribution and proper browning on all sides. This patience will be generously rewarded with superior crispiness and a consistent texture for every single wrap.
Step-by-Step Guide: How to Assemble and Brown Crispy Chicken Wraps
Creating these delicious crispy wraps is a straightforward and enjoyable process that yields incredibly satisfying results. Follow these simple, detailed steps for perfectly folded, golden-brown, and crunchy wraps every time:
Assembling the Wrap:
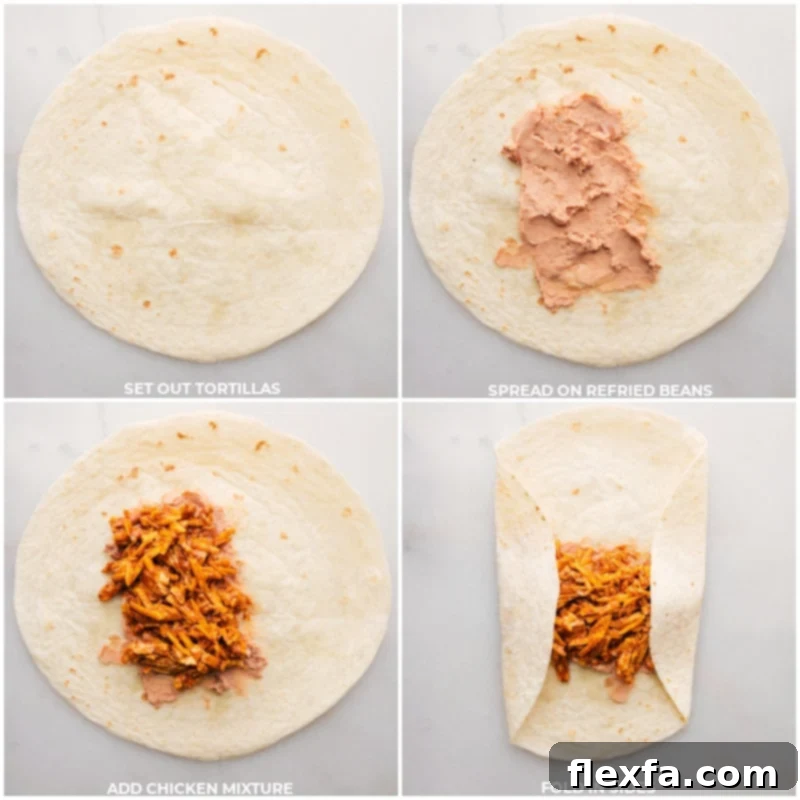
- Prepare Your Workspace: Lay a large flour tortilla flat on a clean, dry work surface. This provides a stable and clean base for your assembly process.
- Layer the Refried Beans: First, spread a generous layer of creamy refried beans evenly across the center of the tortilla. Be sure to leave a substantial border (approximately 1 to 2 inches) along all the edges of the tortilla. This border is absolutely crucial for successful and tight folding.
- Add the Chicken Mixture: Next, heap your prepared chicken and cheese filling directly on top of the refried beans in the center of the tortilla. Ensure the filling is contained within the bean layer and respects the generous border you’ve created.
- Fold the Sides: Carefully fold in both the left and right sides of the tortilla towards the middle. These folded sides should partially overlap the filling, effectively securing it and beginning to form the packet shape.
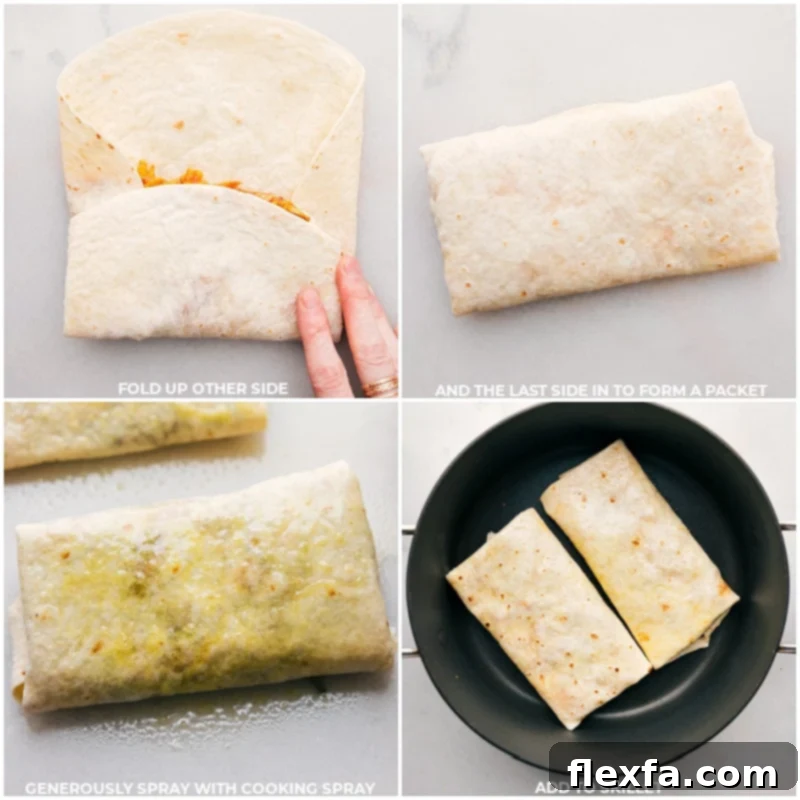
- Fold the Bottom: Take the edge of the tortilla that is nearest to you and fold it tightly over the filling and the previously folded-in sides. Ensure this fold is snug and firm to create a compact, secure packet.
- Complete the Wrap: Finally, grasp the farthest edge of the tortilla. While keeping it taut and firm, pull it over to the other side, rolling it to completely enclose your filling. You should now have a neat, tightly sealed packet, ready for its transformation into a crispy delight.
Browning the Wrap in a Skillet:
- Preheat Your Skillet: Heat a non-stick skillet over medium-high heat. Allow it to get sufficiently hot, but not smoking. A well-heated pan is essential for immediate crisping and even browning.
- Prepare the Wraps: While the skillet heats, generously spray all sides of your assembled Crispy Chicken Wraps with olive oil cooking spray. This light coating is key to promoting even browning and ensures a beautiful, irresistible crisp.
- Initial Browning (Seam Side Down): Carefully place the prepared wraps into the hot skillet with the seam side facing down. This essential step helps to seal the wrap, preventing it from unraveling during cooking and maintaining its neat shape. Cook for approximately 1 to 2 minutes, or until that initial side turns a lovely golden brown and achieves a satisfying crispy texture.
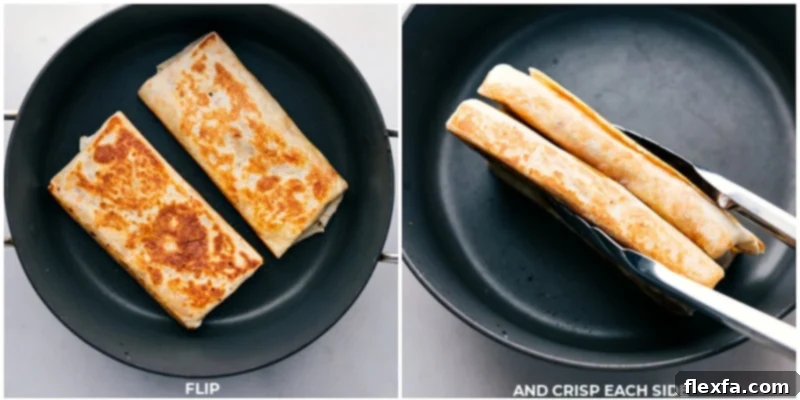
- Flip and Continue Browning: Using a pair of tongs, cautiously flip the wrap over to cook the second side. Allow it to cook for another 1 to 2 minutes, or until it also becomes beautifully golden brown and crispy, developing that desirable crunch.
- Crisp the Edges: Don’t forget the sides! Use your tongs to gently rotate and hold the wraps on their thinner edges against the hot skillet. This ensures all sides get a chance to crisp up evenly, creating a perfectly golden and crunchy exterior all around, maximizing the delicious texture.
- Cook in Batches: To avoid overcrowding the skillet and ensure optimal crisping, it’s best to cook only two or three wraps at a time, depending on your skillet’s size. Overcrowding can lower the pan’s temperature and lead to steaming rather than browning. Continue this process with the remaining wraps until all are perfectly browned and crispy.
Quick Tip for Perfect Crispy Wraps
The secret to achieving perfectly crisp wraps with a thoroughly heated, melty interior lies in striking the right balance between cooking the filling and crisping the tortilla. We highly recommend pre-warming the chicken and bean mixture in the microwave for 20-30 seconds per wrap *before* you place them in the skillet. This crucial pre-warming step ensures the filling is hot and the cheese is beautifully gooey, allowing you to focus solely on developing that desirable golden-brown, crispy tortilla in the skillet without worrying about the inside being cold. Maintain a consistent medium-high heat during browning; lower heat might result in a dry, undercooked tortilla that lacks crunch, while excessively high heat could quickly burn the tortilla before the filling is adequately warm. And always remember the importance of cooking spray – it’s your key to achieving those delightful, evenly crisped edges and a truly satisfying crunch!
Storage and Reheating Crispy Chicken Wraps
Planning ahead for future meals or saving leftovers? Proper storage is key to maintaining the quality and deliciousness of your Crispy Chicken Wraps. If you intend to store some wraps, it’s best to avoid crisping them in the skillet until you’re actually ready to eat them. This approach prevents them from becoming soggy upon reheating and preserves their fresh texture. Here’s how to store and reheat your wraps effectively, ensuring they taste just as good the second time around:
How to Store Crispy Chicken Wraps
For optimal results, ensure the wraps are not crisped if you plan to store them. Microwave them as directed in the recipe to warm the filling and melt the cheese, but skip the skillet browning step until you are ready to serve.
Short-Term Storage (Refrigeration):
- Cool Completely: After microwaving the wraps (without crisping), it is essential to allow them to cool thoroughly to room temperature. This is a crucial step; storing warm wraps will create condensation inside the wrapping, leading to undesirable sogginess that compromises the texture.
- Wrap Individually: Tightly encase each cooled wrap individually in aluminum foil or plastic wrap. This helps to protect them from air exposure, preventing them from drying out, and keeps them fresh and flavorful.
- Refrigerate: Place the individually wrapped portions in an airtight container or directly in the refrigerator. They will stay fresh and delicious for 3-4 days, making them perfect for grab-and-go lunches.
Long-Term Storage (Freezing):
- Cool Completely: Just like with refrigeration, ensure the wraps are entirely cool to room temperature before freezing. This prevents the formation of ice crystals and helps protect against freezer burn, which can affect both flavor and texture.
- Wrap Individually for Protection: Securely wrap each wrap individually in aluminum foil. For an extra layer of robust protection against freezer burn and to maintain peak freshness, place these foil-wrapped wraps into a heavy-duty freezer-safe bag or an airtight freezer-safe container. This dual-layer approach significantly helps preserve their quality.
- Freeze: When properly stored following these steps, the wraps can be frozen for up to 3 months, making them an excellent, convenient option for quick future meals whenever you need them.
Reheating Instructions:
- From the Refrigerator: Remove a wrap from its aluminum foil or plastic wrap and place it on a microwave-safe dish. Cover it loosely with a microwave-safe lid or another plate to retain moisture during heating. Microwave on high for 30-90 seconds, or until the filling is thoroughly heated through and the cheese is melted. Once heated, you can then proceed to crisp the wrap in a preheated non-stick skillet over medium-high heat for 1-2 minutes per side, following the original recipe directions for browning, to achieve that signature crispy texture. Alternatively, you can reheat it in a preheated oven at 350°F (175°C) for about 10-15 minutes, then finish by crisping in a skillet for the best texture.
- From the Freezer: For the best results and to ensure even heating, it’s highly recommended to let frozen Crispy Chicken Wraps thaw in the refrigerator overnight. Once completely thawed, follow the same reheating instructions as you would for refrigerated wraps. If reheating directly from frozen, microwave on a lower power setting for a longer duration (e.g., 2-4 minutes), checking periodically, until the filling is hot throughout. Then, crisp it in a skillet to restore the desired crunchy exterior.
More Delightful & Quick Wrap Recipes to Try
If you’ve fallen in love with the convenience, versatility, and sheer deliciousness of these Crispy Chicken Wraps, you’ll be thrilled to discover other quick and easy wrap recipes that are perfect for any meal occasion. Each offers a unique flavor profile and a satisfying experience, ensuring your meal rotation stays exciting and fresh:
- Chicken Bacon Avocado Wraps: Indulge in a rich and satisfying combination of savory, tender chicken, crispy bacon, and creamy avocado, all brought together with a luscious, tangy dressing. These wraps are a textural delight and incredibly flavorful, perfect for a hearty lunch or light dinner.
- Cashew Chicken Wraps: Experience an Asian-inspired delight featuring tender pieces of chicken, crunchy cashews, and an abundance of fresh, crisp vegetables, all tossed in a savory, umami-rich sauce. These wraps are light, vibrant, and packed with an irresistible flavor and crunch.
- Buffalo Chicken Wraps with Avocado: For those who love a spicy kick, these wraps deliver! Juicy buffalo-sauced chicken is perfectly balanced with the cooling creaminess of avocado and a tangy dressing, offering a satisfying blend of heat and refreshing flavors in every bite.
- Sriracha Tuna Salad Wraps: A fantastic option for a quick, flavorful, and light lunch, these wraps feature a zesty tuna salad infused with the fiery notes of sriracha. They are surprisingly robust in flavor, wonderfully refreshing, and come together in minutes.
- Turkey Lettuce Wraps: For a low-carb and exceptionally fresh alternative, these wraps utilize crisp lettuce leaves as the “boat” for a delicious, savory ground turkey filling. They are incredibly light, healthy, and satisfying, making them a perfect guilt-free meal.

Print Recipe
★
★
★
★
Crispy Chicken Wraps
Chelsea Lords
These wraps have a bit of heat, but I find them well balanced with sour cream or avocado.
15 minutes
6 minutes
21 minutes
6
wraps
Recipe Video
Equipment
-
Large nonstick skillet
Ingredients
- 2 cups cooked chicken shredded or diced, see note 1
- 1 (1-ounce) packet taco seasoning about 2 tablespoons; see note 2
- 3/4 cup mild enchilada sauce see note 3
- 2 cups freshly shredded sharp Cheddar cheese see note 4
- 6 large flour tortillas burrito-sized
- 1 (16-ounce) can refried beans
- Olive oil cooking spray
- Optional toppings see note 5
Instructions
-
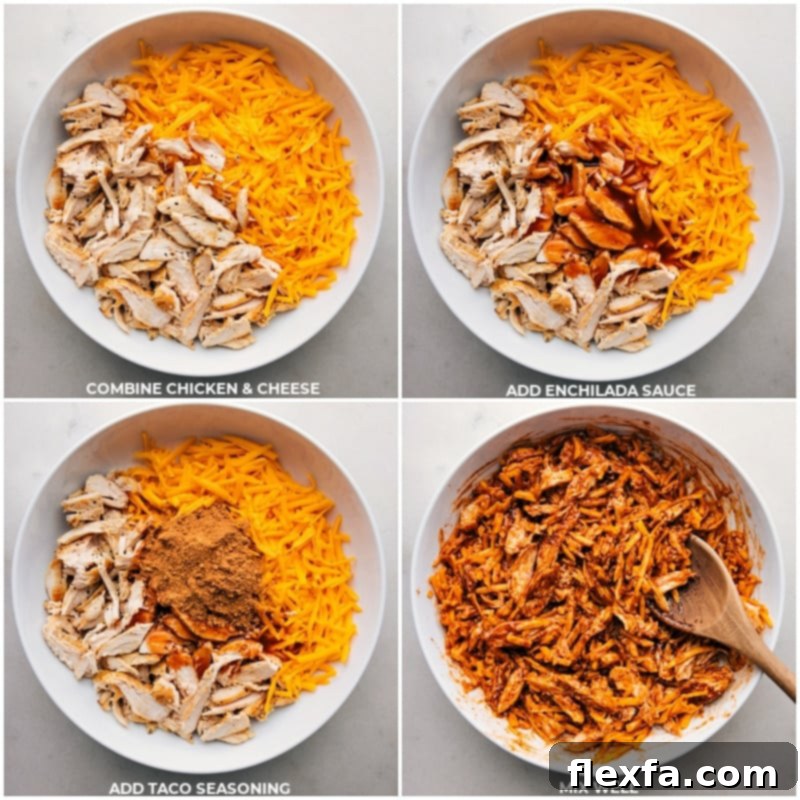
In a large mixing bowl, combine the cooked shredded chicken, taco seasoning, mild enchilada sauce, and freshly shredded sharp Cheddar cheese. Stir these ingredients gently with a wooden spoon or spatula until they are thoroughly combined and the chicken is evenly coated. Taste the mixture and season with additional salt and pepper if needed, keeping in mind the inherent saltiness of your chosen taco seasoning.
-
Arrange the large flour tortillas flat on a clean work surface. Divide the refried beans evenly among the centers of the 6 tortillas (this will be approximately a heaping 1/4 cup per tortilla). Next, evenly distribute the prepared chicken and cheese filling on top of the refried beans in the center of each tortilla (about 1/2 cup of the mixture per tortilla). Carefully fold each tortilla like a packet, following the detailed instructions provided in ‘Note 6’ (this involves folding the sides first, then the bottom edge up, and finally the top edge down to seal). Microwave each assembled wrap individually for 20-30 seconds to efficiently warm the filling and begin melting the cheese.
-
After microwaving each wrap, generously spray all sides of it with olive oil cooking spray. Heat a non-stick skillet over medium-high heat. Carefully place the wraps into the hot skillet, ensuring the seam side is facing down. This crucial step helps to seal the wrap during cooking. Cook 2 or 3 wraps at a time to avoid overcrowding the skillet. Allow them to cook for 1-2 minutes until they turn a beautiful golden brown and develop a crispy texture. Then, use tongs to rotate and cook all sides, ensuring each side achieves that desirable golden brown and crispy finish. Continue this process until all wraps are perfectly crisped to your liking.
-
Serve the crispy chicken wraps immediately, straight out of the skillet, with your favorite toppings. For a delightful, cooling crema, I highly recommend mixing 2 tablespoons of sour cream with 1 tablespoon of fresh lime juice – it adds a bright, tangy balance. A generous slice of ripe avocado or a scoop of homemade guacamole, along with fresh pico de gallo, also makes for an excellent and refreshing accompaniment!
Recipe Notes
Note 2: Taco Seasoning Selection: Choose a high-quality, store-bought taco seasoning that you already know and enjoy the flavor of, and ensure its spice level suits your personal preference and that of your family.
- For a Homemade Blend: You can easily create your own taco seasoning by combining 1 tablespoon ground chili powder, 1 teaspoon each of ground cumin, paprika, and 1/2 teaspoon each of onion powder, garlic powder, dried oregano, fine sea salt, and black pepper.
Note 3: Enchilada Sauce Variation: The flavor and heat of enchilada sauce can vary quite significantly by brand. I highly recommend Old El Paso® mild red enchilada sauce for its balanced profile and consistent quality. If you can’t find this specific brand, always taste your chosen sauce first to confirm you like its flavor and spice level before incorporating it into the filling.
Note 4: Cheese Matters: For a more pronounced and richer flavor, sharp or extra-sharp Cheddar cheese offers significantly more depth than mild varieties. For a smoother, creamier melt and superior texture, always shred your own cheese. Pre-shredded options often contain anti-caking agents that can interfere with proper melting and create a less desirable texture.
Note 5: Optional Toppings: To enhance your wraps, consider adding your favorite toppings such as cool sour cream, a refreshing squeeze of fresh lime juice, creamy guacamole or sliced avocado, and vibrant salsa or chunky pico de gallo. These additions bring fresh textures and complementary flavors.
Note 6: How to Fold a Packet Wrap:
- Lay the tortilla flat on your work surface and spoon the filling onto the center, ensuring a generous border remains around all edges. This space is vital for a clean fold.
- Fold both the left and right sides of the tortilla into the center, partially covering the filling. Make sure these folds are snug.
- Next, fold the bottom edge of the tortilla (the one closest to you) tightly over the filling and the previously folded-in sides. Press down gently to compact the filling.
- Finally, grasp the remaining top edge of the tortilla. While keeping it taut, pull it over to the other side, rolling it firmly to fully enclose the filling, thereby creating a neat, sealed packet.
Storage: If you plan to store leftover wraps, it is best to avoid crisping them in the skillet initially. After microwaving to warm the filling, let them cool completely to room temperature. Then, wrap each individually in foil or plastic wrap and refrigerate for 3–4 days, or freeze for up to 3 months. Follow the detailed reheating instructions provided in the main storage section above for best results.
Nutrition
Nutrition information is automatically calculated and should be used as an approximation only.
Love this recipe? Leave a comment and rating below!