
There’s nothing quite like the aroma and taste of freshly baked pizza, especially when it starts with a truly exceptional crust. This Homemade Pizza Dough Recipe is surprisingly straightforward to prepare and delivers a flavor and texture that far surpasses anything you’ll find in a store. Get ready for a pizza crust that’s wonderfully crispy on the outside, delightfully chewy on the inside, and absolutely bursting with homemade goodness!

Mastering the Art of Homemade Pizza Dough
Pizza holds a special place in many hearts – it’s a universal comfort food that brings people together. While quick fixes like store-bought dough or Naan Pizza can satisfy a craving when time is short, there’s an undeniable magic in creating your own pizza from scratch. This particular recipe is a tried-and-true favorite, perfected over countless pizza nights. It consistently produces a crust that even the pickiest eaters rave about, earning it the title of “the best pizza ever” from my own kids!
Why Choose Homemade Pizza Dough Over Store-Bought?
The difference between homemade and store-bought pizza dough is monumental. While convenient, pre-made options often lack the depth of flavor, nuanced texture, and satisfying chewiness that a well-crafted homemade dough offers. When you make your own pizza dough, you control every ingredient, ensuring freshness and quality. This allows you to avoid unwanted preservatives and tailor the dough to your exact preferences, whether you desire a thin, crispy crust or a thicker, more robust base. Plus, the process itself, from activating the yeast to kneading the dough, is incredibly rewarding and a fantastic activity for the whole family.
This recipe focuses on creating an oven-baked pizza dough, designed for a perfectly chewy interior and a golden, slightly crisp exterior. This differs from wood-fired pizzas, which achieve a distinct charred flavor and extreme crispness due to very high, direct heat. Our method brings that pizzeria-quality experience right into your home kitchen, ensuring a consistently delicious result every time.
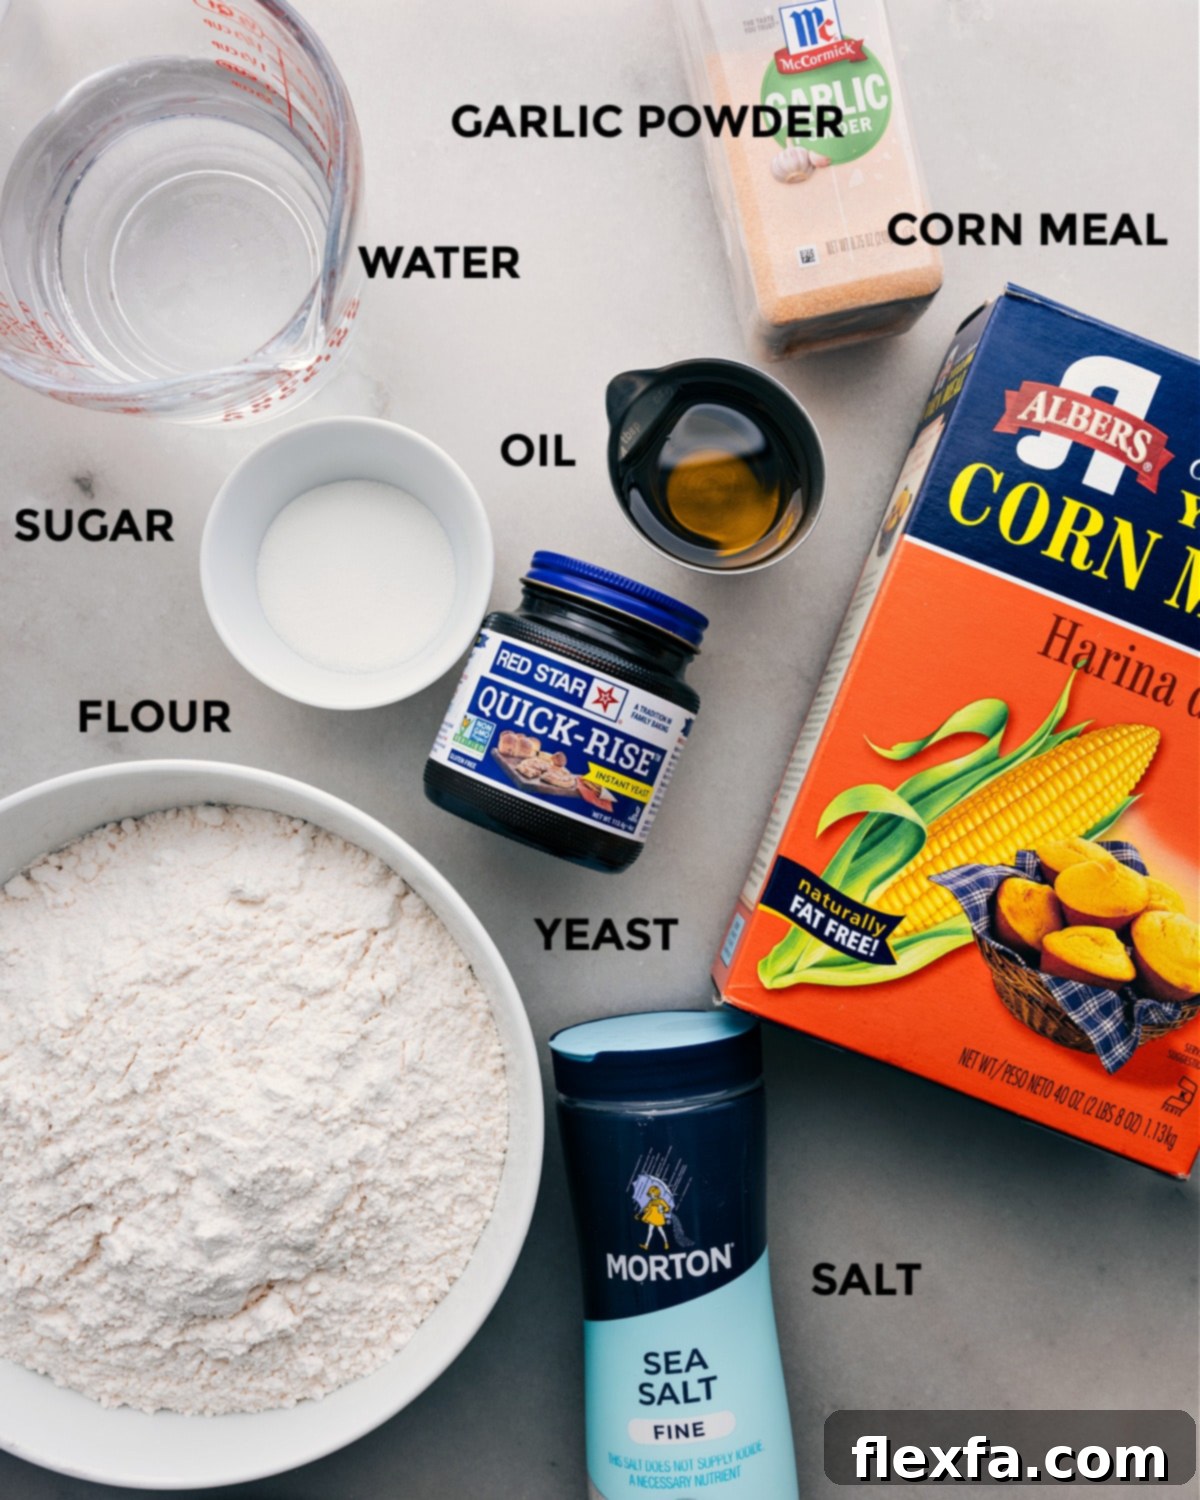
Essential Ingredients for Your Perfect Pizza Dough
Crafting phenomenal pizza dough begins with simple, high-quality ingredients. Here’s what you’ll need and why each component plays a crucial role in achieving that ideal texture and flavor:
- Instant Yeast: This magical ingredient is what makes your dough rise, creating a light and airy texture. Dissolving it in warm water first is a vital step to ensure it’s active and ready to work its magic. Look for “instant yeast” as it can be directly added to dry ingredients, though pre-activating it as described provides extra assurance.
- Warm Water: The ideal temperature for activating yeast is around 105-115°F (40-46°C). Water that’s too cold won’t activate the yeast, while water that’s too hot can kill it. This warm environment allows the yeast to thrive and produce the gases needed for a beautiful rise.
- Sugar: Just a touch of sugar acts as food for the yeast, helping it activate more quickly and vigorously. It also contributes to the beautiful golden-brown color of your crust during baking and adds a subtle sweetness that balances the savory flavors of your pizza.
- Flour: The backbone of your dough. All-purpose flour is perfectly suitable for a great pizza crust. However, for an extra chewy, classic pizzeria-style crust, consider using bread flour, which has a higher protein content. Weighing your flour (around 590g for this recipe) is more accurate than cup measurements, leading to consistent results.
- Salt: Far more than just a flavor enhancer, salt plays a critical role in controlling yeast activity and strengthening the gluten structure in the dough, which contributes to its elasticity and chewiness. Don’t skip it!
- Garlic Powder: An optional but highly recommended addition! A small amount of garlic powder kneaded into the dough infuses the crust with a subtle, aromatic flavor that elevates the entire pizza experience.
- Olive Oil: Extra virgin olive oil adds richness to the dough, contributing to a tender crumb and a crispier crust. It also helps prevent the dough from sticking during mixing and rising, and a little extra is used to grease the bowl for the first rise.
- Cooking Spray: Used to grease your pizza pans, ensuring your pizza slides off easily after baking.
- Cornmeal: This is a secret weapon for achieving a perfectly crispy pizza bottom. Sprinkling it on the pan before adding the dough creates a non-stick surface and a delightful crunch that mimics brick-oven pizzas. It’s a small step that makes a big difference!
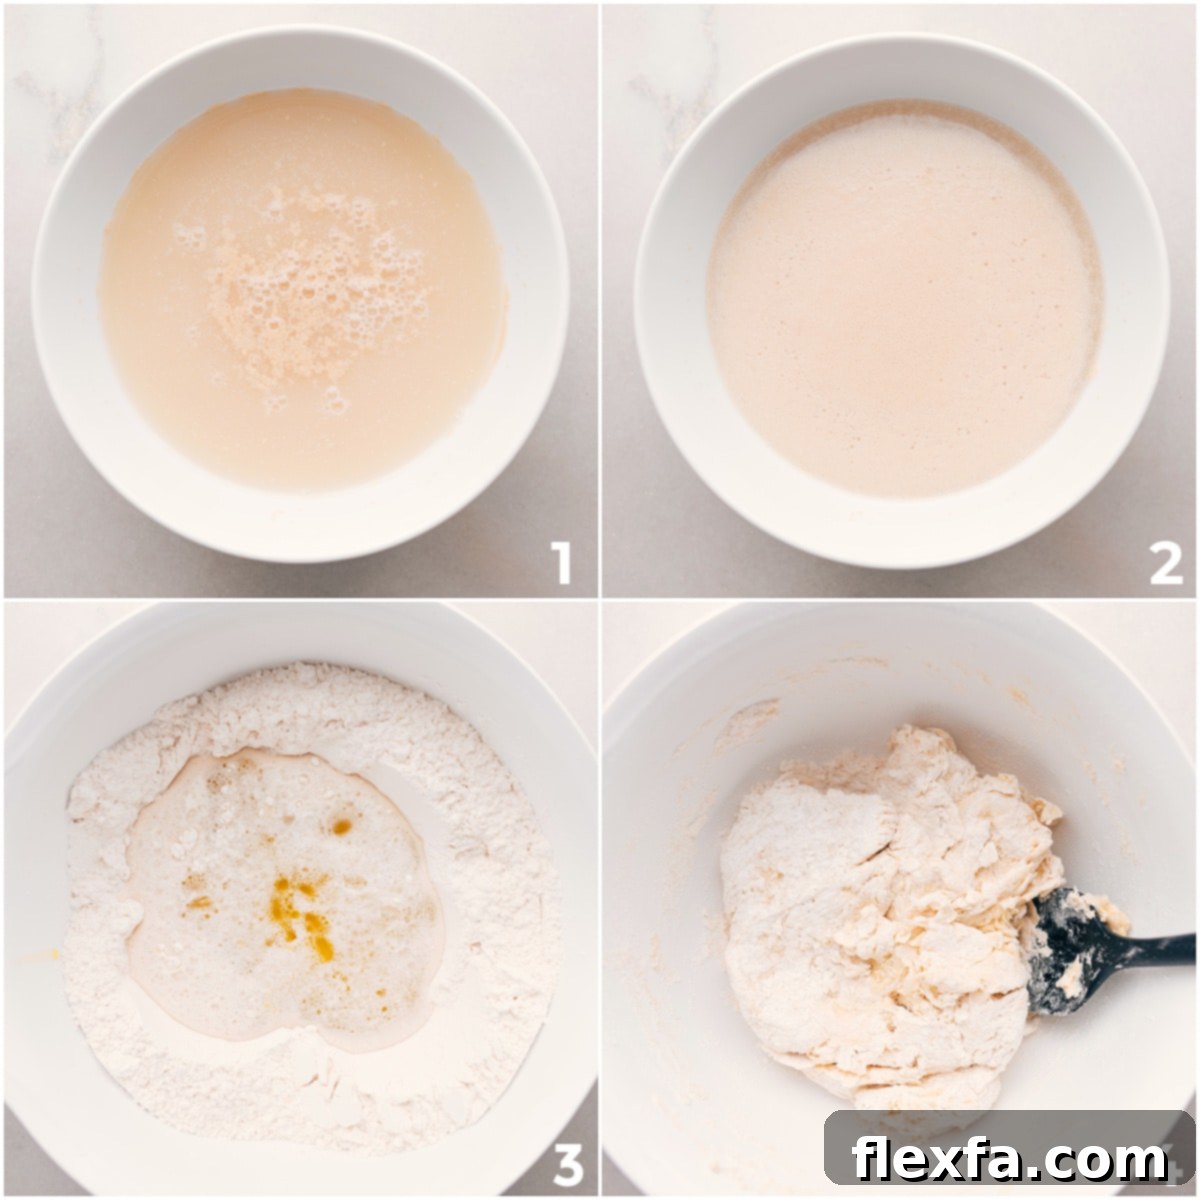
Step-by-Step Guide to Crafting Your Homemade Pizza Dough
Creating homemade pizza dough is a culinary journey that’s easier and more satisfying than you might imagine. Follow these detailed steps to achieve a perfectly pliable and flavorful dough:
1. Activating the Yeast: The Foundation of Your Dough
Begin by combining the instant yeast, a touch of sugar, and warm water in a medium bowl. Give it a gentle whisk and let it rest for about 5 minutes. This crucial step activates the yeast; you’ll know it’s working if the mixture becomes creamy or foamy on top. If there’s no activity, your water might have been too hot or too cold, or your yeast may be expired. It’s best to discard and start fresh if you don’t see foam.
2. Mixing the Dry & Wet Ingredients: Bringing it All Together
In a large mixing bowl, whisk together your flour, salt, and garlic powder (if using). Create a small well in the center of the dry ingredients. Pour the activated yeast mixture and olive oil into this well. Stir everything together using a sturdy spoon or spatula until a thick, shaggy dough begins to form. At this stage, it won’t be perfectly smooth, but it should come together.
3. Kneading for Elasticity: Developing Gluten
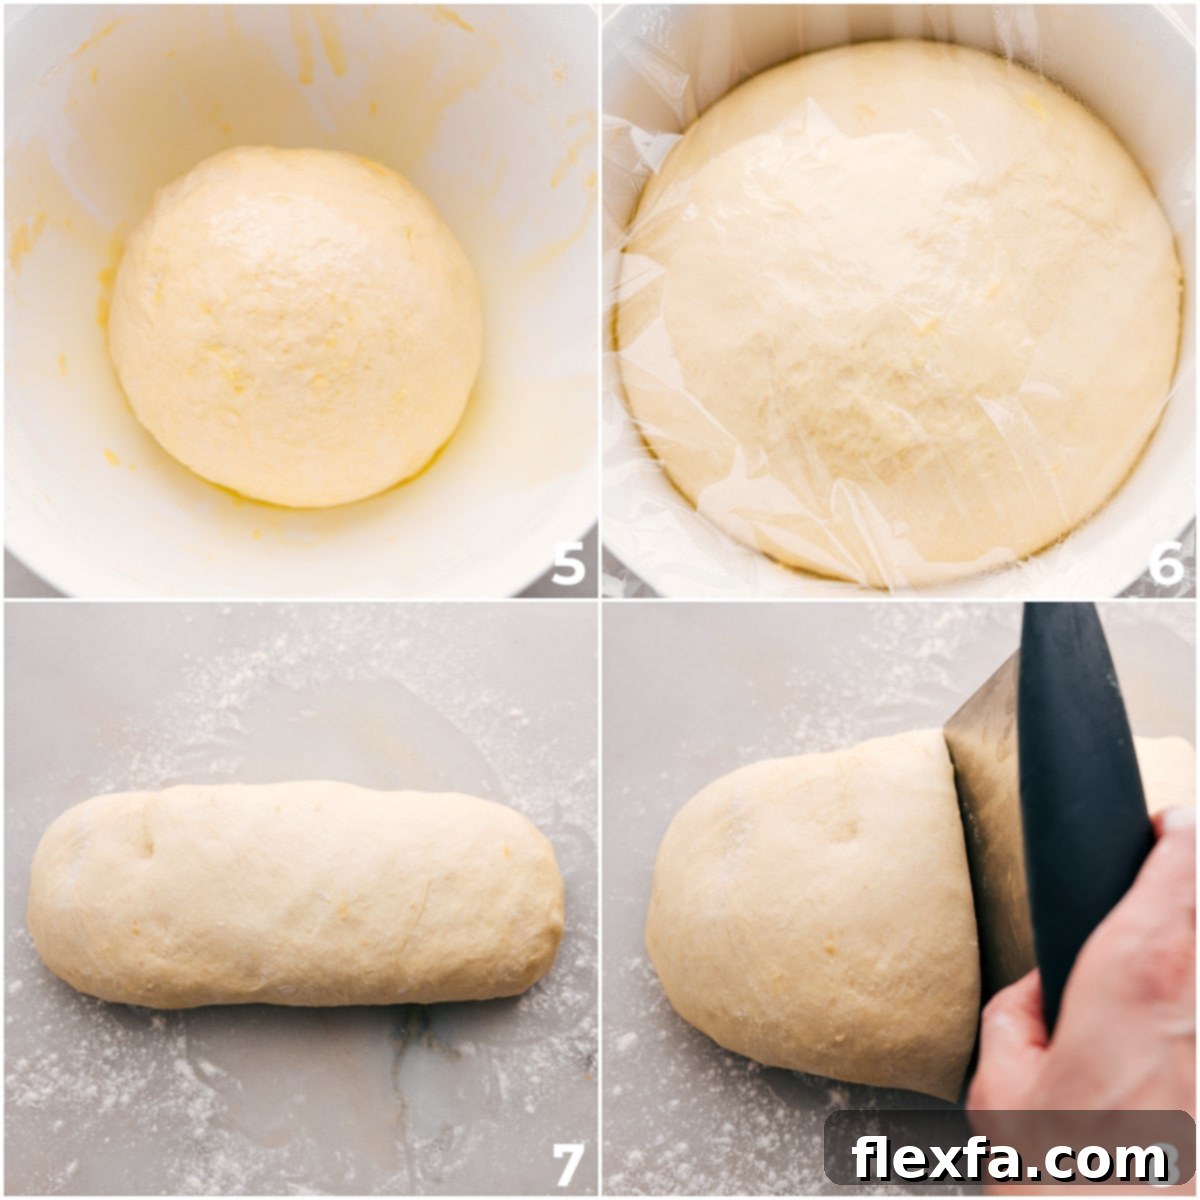
Lightly flour your work surface (a clean countertop works perfectly). Turn the dough out onto the floured surface. Now comes the kneading! Knead the dough for 5–6 minutes. This process is essential for developing the gluten strands in the flour, which gives your pizza dough its characteristic elasticity and chewiness. You’ll notice the dough transform from sticky and rough to smooth, supple, and springy. If you’re new to kneading, check out this helpful video on kneading techniques.
4. The First Rise: Building Flavor and Volume
Drizzle a little olive oil into the bowl you used earlier for mixing the dough, ensuring the entire interior is coated. Place your kneaded dough ball into the greased bowl and turn it once to coat it lightly with oil. Cover the bowl tightly with plastic wrap or a clean kitchen towel. Find a warm spot in your kitchen (like near a sunny window or in a slightly warm, turned-off oven) and let the dough rise until it has doubled in size. This typically takes 1–2 hours, depending on the warmth of your environment.
5. Dividing and Shaping for Individual Pizzas
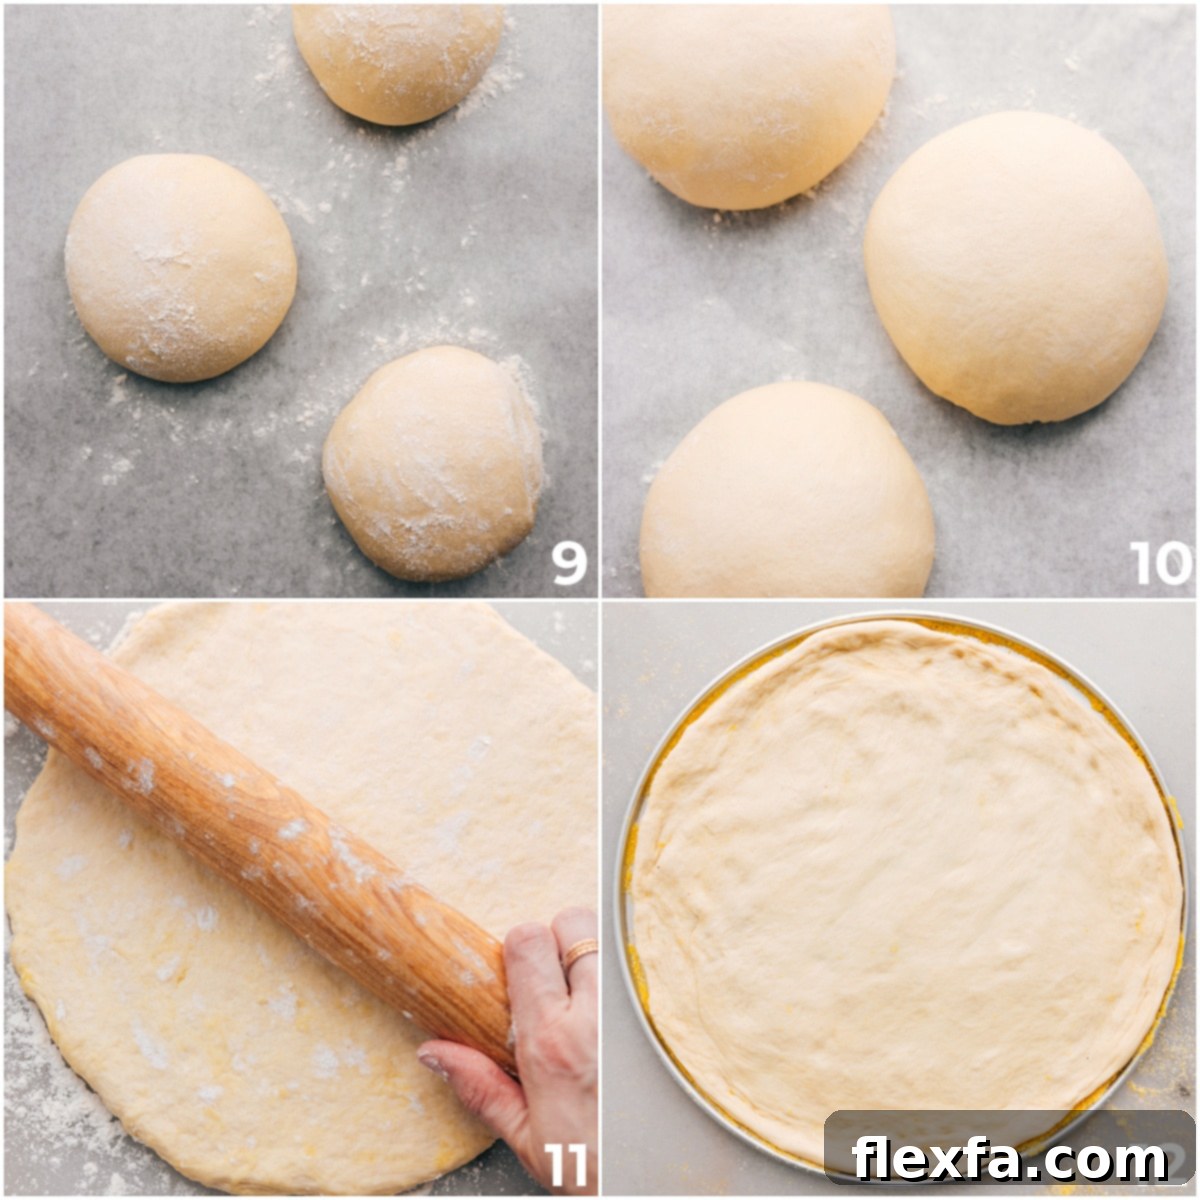
Once the dough has completed its first rise, gently turn it out onto a lightly floured work surface. Roll the dough into a cylinder shape. Using a sharp knife or a dough scraper, divide the cylinder into three equal parts. For precision, a food scale is excellent here! Form each portion into a smooth ball. Arrange these dough balls on a lightly floured or parchment-lined baking sheet, ensuring they are well-spaced. Lightly dust the tops with a little flour and cover them with a damp towel. Allow these individual dough balls to rise again for about 1 hour, or until doubled in size.
6. Preheat Your Oven: The Secret to a Crispy Crust
About 30-45 minutes before you plan to bake your pizzas, position an oven rack in the top third of your oven. Preheat your oven to its highest setting, typically 550°F (288°C). A very hot oven is key to achieving a beautifully crisp crust and quickly cooking your toppings without overbaking the dough.
7. Shaping the Dough: From Ball to Base
Lightly flour your work surface again. Take one dough ball (keep the others covered) and gently begin to press and stretch it outwards with your fingertips, working from the center to the edges. Aim for a roughly 12-inch circle, leaving a slightly thicker edge for the crust. Avoid overworking the dough. If it springs back too much, let it rest for 5-10 minutes before continuing. A rolling pin can be used as a last resort if you’re struggling, but using your hands often results in a better texture.
8. Preparing the Pan & Adding Toppings: Build Your Masterpiece
Lightly grease a 12-inch pizza pan with cooking spray and then sprinkle a generous amount of cornmeal evenly over the bottom. Carefully transfer your stretched pizza dough to the prepared pan, pressing it gently to fill the pan evenly. Now, it’s time for the fun part: toppings! Spread a very thin layer of your chosen pizza sauce over the dough, followed by your thinly sliced mozzarella cheese, a light dusting of Parmesan, and any other desired toppings. Remember, less is often more when it comes to toppings to prevent a soggy pizza!
9. Baking to Perfection: Golden Brown & Bubbling
Place one pizza at a time into your preheated oven. Bake for 9–12 minutes, or until the crust is beautifully golden brown, and the cheese is melted and bubbling. To check if the bottom is fully baked, gently lift an edge with a metal spatula. If it’s golden and firm, it’s done! Baking one pizza at a time ensures even cooking and optimal results for each one.
10. Serve & Enjoy!
Carefully remove the hot pizza from the oven. For an extra touch of flavor and sheen, you can add a light drizzle of olive oil over the top immediately after baking (optional). Let it cool for a minute or two, then slice it into wedges and serve right away. Repeat the process with your remaining dough balls to create two more equally delicious pizzas.
Perfecting Your Pizza Toppings: Flavor & Technique
Once your beautiful homemade pizza dough is ready, the possibilities for toppings are endless! Here are some tried-and-true methods and ingredient choices I recommend for a truly exceptional pizza:
The Sauce: The Flavor Foundation
- Pizza Sauce: I’m a big fan of using a high-quality jarred pizza sauce like Rao’s. It’s a fantastic shortcut that tastes genuinely homemade. The key is to use less sauce than you think you need. An overly generous application can lead to a soggy crust, diminishing all your hard work on the dough. A thin, even layer is all it takes to impart delicious tomato flavor.
Cheese Selection: The Melty Heart of Your Pizza
- Mozzarella: For the best melt and coverage, I prefer slicing a block of fresh, high-quality mozzarella as thinly as possible. Arrange these slices evenly across the sauce. This method often melts more consistently and beautifully than grated mozzarella, creating a smooth, enticing cheese layer.
- Parmesan: A final flourish of freshly grated Parmesan using a microplane adds a wonderful salty tang and an extra layer of savory flavor. A light sprinkle is all you need to elevate the overall taste.
Inspiring Pizza Topping Combinations
Get creative with your pizza toppings! Here are some popular and delicious ideas to get you started, ranging from classic to adventurous:
- Classic Margherita: Simple yet sublime, with fresh mozzarella, ripe tomato slices, and fragrant basil leaves added after baking.
- Pepperoni Perfection: A timeless favorite featuring thinly sliced pepperoni scattered over a generous layer of mozzarella.
- BBQ Chicken: Tender shredded chicken tossed in a tangy BBQ sauce, complemented by thinly sliced red onions and a sprinkle of fresh cilantro.
- Veggie Lover’s Delight: A vibrant mix of colorful bell peppers, sweet onions, earthy mushrooms, fresh spinach, and briny olives.
- Hearty Meat Lover: Indulge with a combination of savory pepperoni, crumbled sausage, crispy bacon, and diced ham for a truly robust flavor.
- Tropical Hawaiian: A controversial but beloved choice, pairing savory ham with sweet, juicy fresh pineapple chunks.
- Spicy Buffalo Chicken: Shredded chicken coated in spicy buffalo sauce, paired with crumbly blue cheese and creamy mozzarella for a fiery kick.
- Luxurious Four Cheese: A rich blend of mozzarella, sharp cheddar, savory Parmesan, and mild provolone for ultimate cheesy goodness.
- Mediterranean Medley: Crumbly feta cheese, Kalamata olives, fresh spinach, tender artichoke hearts, and sweet sun-dried tomatoes for a taste of the Aegean.
Quick Tip: Don’t Overload Your Pizza!
Remember, less is often more when it comes to toppings on this pizza dough recipe! Overloading your pizza or using too many wet ingredients (like excessive sauce or watery vegetables) can lead to a soggy crust. Aim for an even, moderate distribution of toppings to allow the crust to bake beautifully and remain crispy.
Expert Tips for Pizza Dough Success
Even with a reliable recipe, a few insider tips can elevate your pizza-making game from good to extraordinary. Keep these pointers in mind for a consistently perfect pizza night:
- Achieving the Perfect Dough Consistency:
- Weigh Your Ingredients: For the most accurate and consistent results, especially with flour, using a food scale is highly recommended. Measuring cups can vary widely.
- Adjusting Dough Hydration: If your dough feels too sticky during kneading, add flour gradually, a tablespoon at a time, until it reaches a smooth, non-sticky consistency. Conversely, if the dough is too dry and crumbly, add warm water in small increments (half a teaspoon at a time) until it becomes pliable.
- Understanding Rise Times: Yeast activity is highly dependent on temperature. In a warmer kitchen, your dough will rise faster, while in a cooler environment, it will take longer. Always look for the visual cue (doubled in size) rather than strictly adhering to time estimates.
- Bake One Pizza at a Time: Resist the temptation to cram multiple pizzas into your oven simultaneously. Baking one pizza at a time ensures even heat distribution, consistent cooking, and a perfectly crispy crust for each pizza. When multiple pizzas compete for heat, they tend to cook unevenly, leading to subpar results.
- Pizza Stone or Steel: For an even crispier crust and better heat transfer, consider investing in a pizza stone or steel. Preheat it in your oven while the oven comes to temperature, and then slide your pizza directly onto it.
- Don’t Overwork the Dough: After the first rise, handle the dough gently. Excessive handling can deflate the air bubbles, leading to a denser crust.
- Rest the Dough if it Resists: If your dough springs back and resists stretching while you’re shaping it, let it rest for 5-10 minutes. This allows the gluten to relax, making it easier to work with.
Storing and Making Pizza Dough Ahead
One of the beauties of this recipe is its versatility and the option to prepare it in advance, making weeknight pizza nights a breeze!
Make Pizza Dough Ahead of Time
After the first rise, instead of dividing and letting it rise again, you can cover the dough tightly with plastic wrap and store it in the refrigerator for up to 5 days. This slow, cold fermentation can actually develop more complex flavors in your dough. When you’re ready to make pizza, simply remove the dough from the fridge, form it into three balls, and let them rise at room temperature. Since the dough will be cold, allow a longer second rise time, typically 3-4 hours, until doubled in size.
Reheating Leftover Pizza Like a Pro
Don’t let leftover pizza go to waste! Here are the best ways to reheat it for optimal taste and texture:
- Stovetop (for a crispy base): Place individual slices in a non-stick skillet over medium-low heat. Cover with a lid (or foil) for a few minutes to steam the toppings and melt the cheese, then remove the lid to crisp up the bottom crust.
- Oven (for even heating): Preheat your oven to 350°F (175°C). Place slices directly on a baking sheet or wire rack and reheat for about 7-10 minutes, or until the cheese is bubbly and the crust is crisp.
- Microwave (quick, but less crisp): If you’re in a hurry, the microwave will heat slices quickly. However, be aware that the crust will likely become soft and less desirable.
Frequently Asked Questions (FAQ) About Pizza Dough
Got questions about making the perfect pizza dough? We’ve got answers!
Q: What’s the best type of flour for pizza dough?
A: All-purpose flour works wonderfully for a good everyday pizza crust. However, for a chewier, more authentic Neapolitan-style crust, bread flour (with its higher protein content) is an excellent choice as it helps develop stronger gluten.
Q: How do I know if my yeast is active?
A: When you mix yeast with warm water and a little sugar, it should become foamy or creamy after about 5 minutes. If it doesn’t foam, the yeast is likely dead, or your water temperature was off, and you’ll need to start again with fresh yeast.
Q: My dough is too sticky/dry. What should I do?
A: If your dough is too sticky, add flour one tablespoon at a time until it’s workable. If it’s too dry, add warm water half a teaspoon at a time until it comes together. Always make small adjustments.
Q: Can I use a stand mixer to knead the dough?
A: Absolutely! A stand mixer with a dough hook attachment makes kneading effortless. Knead on medium speed for about 5-7 minutes, or until the dough is smooth and elastic and pulls away from the sides of the bowl.
Q: How long does homemade pizza dough last in the fridge?
A: After its first rise, tightly covered dough can be stored in the refrigerator for up to 5 days. Remember to allow extra time for the cold dough to come to room temperature and complete its second rise before shaping.
Q: What oven temperature is best for pizza?
A: The hotter, the better for homemade pizza! Preheat your oven to its maximum temperature (usually 500-550°F or 260-288°C). This high heat helps to cook the crust quickly and achieve a crispy exterior.
Don’t Let Your Leftover Yeast Go to Waste! Explore More Delicious Recipes:
Now that you’ve mastered pizza dough, put that extra yeast to good use with these other fantastic bread and pastry recipes:
Appetizers
No-Knead Bread
Lunch
Easy Focaccia Recipe
Breakfast
Easy Cinnamon Rolls Recipe (No Knead)
Appetizers
Pretzel Bites

Print Recipe
Pizza Dough Recipe
Chelsea Lords
Making this homemade pizza dough recipe is easier than you think, and it beats store-bought every time! It’s perfectly crispy, chewy, and full of flavor!
This recipe is for oven-baked pizza dough, which cooks slower for a chewy texture, unlike the crispier, charred crust of wood-fired pizza.
20 minutes
12 minutes
3 hours
3 hours 32 minutes
3 12-inch pizzas
Video
Watch the full recipe video here: Pizza Dough Recipe Video

Equipment
- 3 pizza pans (12-inch)
Ingredients
- 2-1/4 teaspoons instant yeast
- 1-1/3 cup water (warm, 110℉)
- 1-1/2 tablespoons sugar
- 4 cups flour (plus more as needed, see note 1)
- 2 teaspoons salt
- 1/4 teaspoon garlic powder
- 1/4 cup olive oil (plus more for greasing bowl)
- Cooking spray
- 2 tablespoons cornmeal
- 1/3 cup pizza sauce
- Mozzarella cheese (thinly sliced, see note 2)
- Toppings as desired (see note 3)
Instructions
- In a medium bowl, whisk together the yeast, sugar, and warm water. Let sit for 5 minutes until the mixture becomes creamy or foamy. If it doesn’t foam, the yeast might be dead, or the water could be too hot. Start again if needed.
- In a large bowl, whisk together the flour, salt, and garlic powder. Make a well in the center, then pour in the activated yeast mixture and olive oil. Stir until a thick dough forms.
- Sprinkle 1 tablespoon of flour on a work surface. Pour out the dough and knead for 5–6 minutes until smooth. Shape into a ball.
- Drizzle olive oil in the bowl used to mix the dough, and brush it evenly inside. Place the dough ball in the bowl and turn to coat with oil. Cover with plastic wrap and let rise in a warm place until doubled in size, 1–2 hours.
- Sprinkle 1 tablespoon flour on your work surface. Turn the dough out and roll into a cylinder. Cut into three equal parts (a food scale is recommended for accuracy!). Shape each piece into a ball and place them on a lined sheet pan, well spaced apart. Lightly dust the tops with flour and cover with a damp towel. Let rise until doubled in size, about 1 hour.
- Move the oven rack to the top third of the oven. Preheat to 550°F (288°C).
- Sprinkle 1 tablespoon of flour on your work surface. Working with one dough ball at a time (keep the others covered), gently press and stretch it into a circle using your fingers. If needed, use a rolling pin as a last resort.
- Grease a 12-inch pizza pan with cooking spray and sprinkle evenly with cornmeal. Add the dough to the pan and press to fill it evenly.
- Spread a very thin layer of pizza sauce on the dough, followed by mozzarella, a sprinkle of Parmesan, and your chosen toppings (see note 3).
- Bake only 1 pizza at a time for 9–12 minutes, or until the crust is golden brown and the bottom is fully baked (gently lift with a metal spatula to check).
- Right out of the oven, I like to add a light drizzle of olive oil (optional). Cut into wedges and serve immediately.
- Repeat the process with the remaining dough balls to make 2 more pizzas, baking 1 pizza at a time.
Recipe Notes
Note 1: Flour Measurement. For the most accurate results, use a food scale to measure 590g of flour. All-purpose flour yields a good crust, but for extra chewiness, opt for bread flour.
Note 2: Cheese Tips. Slice high-quality mozzarella as thinly as possible and arrange in a single, even layer over the pizza sauce for a superior melt. Lightly grate Parmesan on top using a fine grater. Feel free to eyeball these cheese quantities to your preference!
Note 3: Topping Ideas. Choose from these delicious combinations:
- Classic Margherita: Mozzarella, tomato slices, basil.
- Pepperoni: Mozzarella, pepperoni slices.
- BBQ Chicken: Shredded chicken, BBQ sauce, red onions, cilantro.
- Veggie Lover: Bell peppers, onions, mushrooms, spinach, olives.
- Meat Lover: Pepperoni, sausage, bacon, ham.
- Hawaiian: Ham, fresh pineapple.
- Buffalo Chicken: Chicken, buffalo sauce, blue cheese, mozzarella.
- Four Cheese: Mozzarella, Cheddar, Parmesan, provolone.
- Mediterranean: Feta, olives, spinach, artichokes, sun-dried tomatoes.
Important Toppings Note: Avoid overloading your pizza dough. Too many toppings or excessively wet ingredients can lead to a soggy pizza. A lighter touch results in a crispier, more enjoyable crust!
Storage & Make Ahead: You can prepare the pizza dough in advance. After the first rise, cover it tightly and refrigerate for up to 5 days. When ready to bake, form the dough into 3 balls and allow them to rise again at room temperature for 3–4 hours, as the dough will be cold. For reheating leftover pizza: warm slices in a skillet on the stovetop for a crispy base, reheat in an oven at 350°F (175°C) for 7 minutes, or use a microwave for a quick but softer crust.
Nutrition Information
Serving: 1 serving | Calories: 687kcal | Carbohydrates: 115.4g | Protein: 15.9g | Fat: 17.7g | Sodium: 1333.8mg | Fiber: 4.6g | Sugar: 4g
Nutrition information is automatically calculated and should only be used as an approximation.
Like this recipe? We’d love to hear from you! Leave a comment below!