
Mastering Homemade French Bread: A Simple Guide to Bakery-Quality Loaves
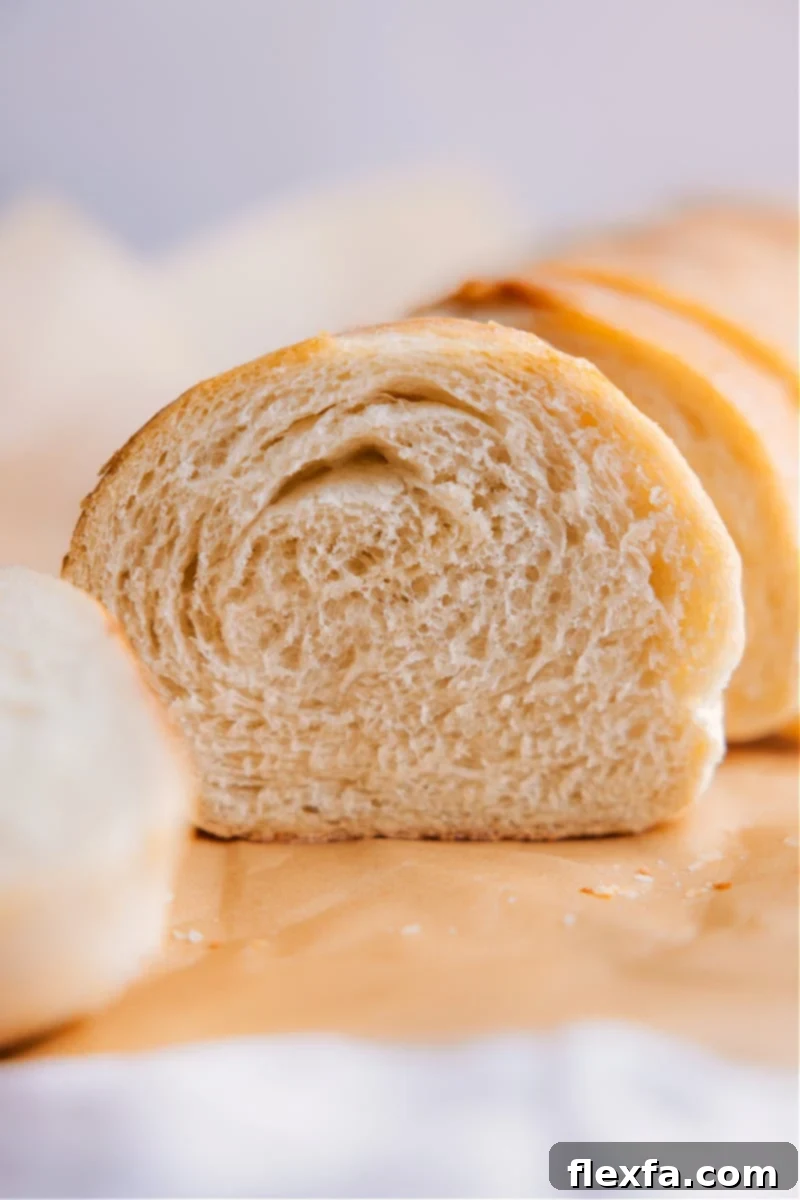
Imagine the aroma of freshly baked bread wafting through your home, filling every corner with its warm, inviting scent. That dream becomes a delicious reality with this simple yet sensational French Bread Recipe. Forget bland, store-bought loaves; this recipe guides you to create a light, fluffy interior and an irresistibly crispy crust that will rival any professional bakery.
Once you experience the joy and satisfaction of making bread from scratch, it’s truly hard to go back. The process is therapeutic, and the results are incredibly rewarding. If you’re ready to dive deeper into the world of homemade bread, consider trying other delightful recipes like this easy Focaccia, the fuss-free No-Knead Bread, or a wholesome Honey Whole Wheat Bread next!
Why Bake Your Own French Bread? The Unbeatable Taste of Homemade
Growing up, French bread was a staple in our household. It was the versatile hero of countless meals, whether enjoyed as a simple snack, transformed into a quick Margherita French Bread Pizza, or generously dipped into a comforting bowl of Broccoli Cheddar Soup. While readily available in stores, nothing truly compares to the fresh, vibrant taste and texture of a homemade loaf.
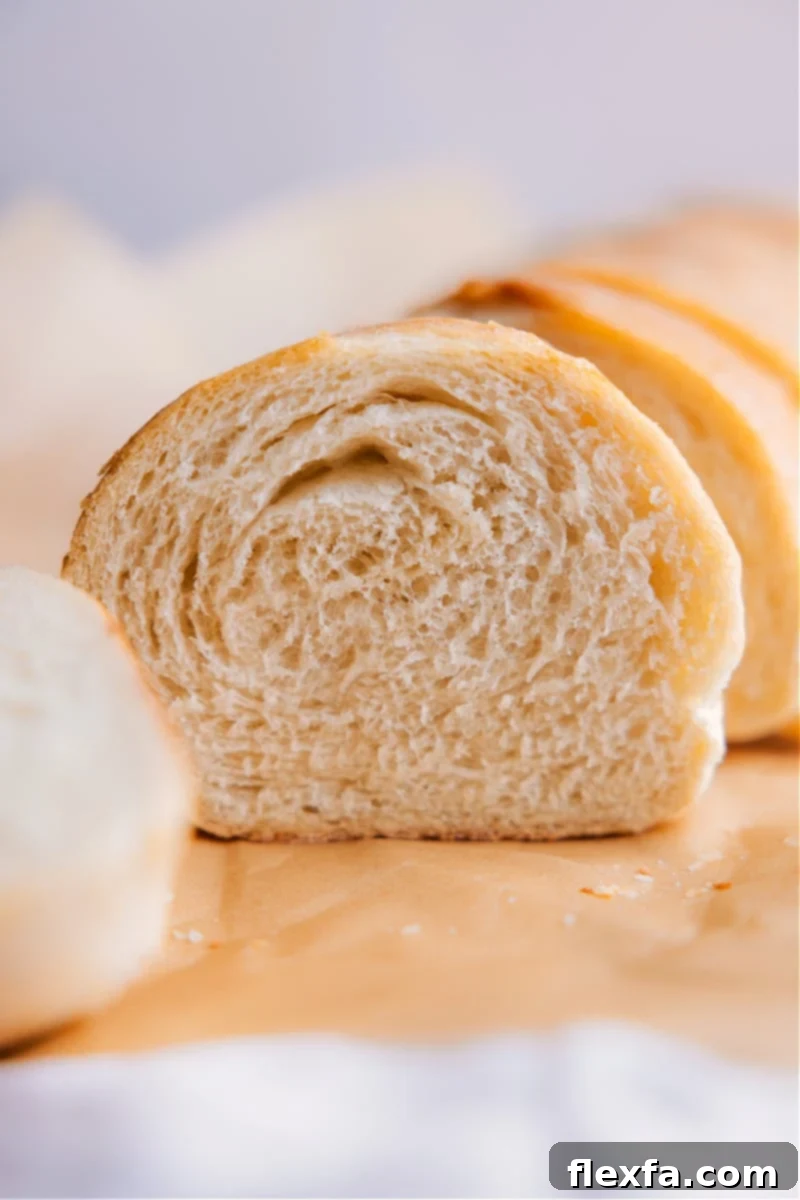
This particular French bread recipe stands out for its simplicity and reliability. It’s often easier than many other bread recipes, making it perfect for both novice bakers and seasoned pros seeking a quick win. To ensure your success, we’ve packed this guide with detailed instructions, helpful notes, and step-by-step photos that illuminate every stage of the bread-making process. The result? A bread with a wonderfully light and soft interior complemented by an incredibly delicious, crispy crust – truly a cut above the rest!
Understanding the Essentials: Key Ingredients for Perfect French Bread
Crafting exceptional French bread begins with understanding the role of each ingredient. Quality and correct measurements are paramount for achieving that desired texture and flavor.
- Warm Water: This is the crucial element for activating your yeast. The ideal temperature is around 105-115°F (40-46°C). A simple “wrist test” can help: if it feels comfortably warm, like bathwater, it’s just right. Water that’s too hot will kill the yeast, while water that’s too cold will prevent it from activating properly, leading to a dough that won’t rise.
- Yeast: The magical leavening agent that makes your dough rise and become airy. This recipe works beautifully with both active dry yeast and instant yeast. We’ll discuss how to ensure your yeast is active shortly.
- All-Purpose Flour: The foundation of your bread. Standard plain all-purpose flour provides the perfect balance of protein for a tender crumb. While bread flour can be used in a pinch for a slightly chewier texture, all-purpose is typically preferred for the classic French bread texture.
- Honey: Not just for sweetness, honey serves a vital purpose: it provides food for the yeast, helping it to grow and produce gas more vigorously. It also contributes a subtle depth of flavor to the final loaf, balancing the savory notes of the crust.
- Salt: Essential for flavor! Salt brings out the natural taste of the flour and yeast, preventing a bland loaf. It also helps to control yeast activity, preventing the dough from rising too quickly.
- Olive Oil: A small amount of olive oil in the dough contributes to its elasticity, making it easier to knead and allowing for a better rise. It also adds a delicate richness and enhances the overall flavor profile of the bread.
- Butter: Applied after baking, melted butter creates a beautiful sheen on the crust, softens it slightly, and adds a touch of luxurious flavor. It’s an optional but highly recommended finishing touch.
Quick Tip: Mastering Flour Measurement
Accurate flour measurement is critical in bread baking. The most precise method is to use a food scale, as scooping directly from a bag can result in too much flour. If you don’t have a scale, use the spoon-and-level method: spoon flour into your measuring cup until it overflows, then level it off with the straight edge of a knife. As you add flour, watch for these signs: the dough should gather around the mixer paddle or hook, becoming cohesive. It should feel slightly sticky, smooth, and tacky, but not so wet that it clings excessively to your fingers or the sides of the bowl. Adjust flour gradually until you achieve this perfect consistency.
The Heart of Your Loaf: Understanding Yeast Activation
Yeast is a living organism, and ensuring it’s active and healthy is the first step to a successful loaf. This process, known as “proofing” or “activating” yeast, confirms its viability before you commit to the rest of your ingredients. This recipe is adaptable for both active dry yeast and instant yeast, though the proofing step is primarily for active dry yeast. Instant yeast can often be mixed directly with dry ingredients, but proofing it ensures a robust rise.
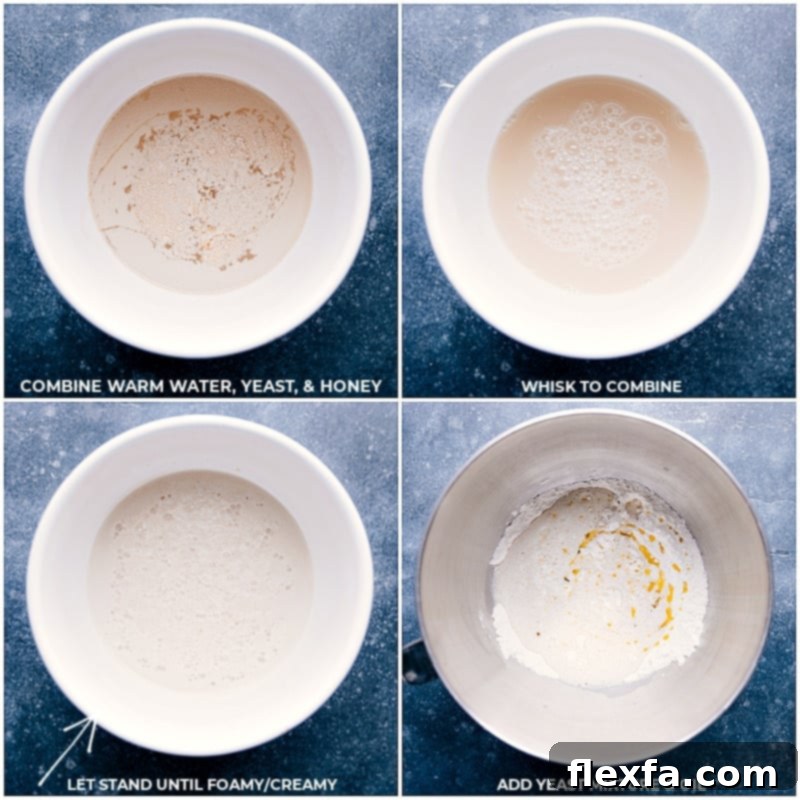
Before proceeding with the recipe, observe your yeast mixture carefully. Activated yeast will show clear signs of life: it will bubble, foam, and develop a creamy layer on the surface. This indicates that the yeast is feasting on the honey and producing carbon dioxide, which will make your bread light and airy.
Why didn’t my yeast activate? Common Troubleshooting
If your yeast doesn’t foam or bubble, don’t despair! This is a common issue with straightforward solutions:
- The yeast might be old or expired. Yeast loses its potency over time. Always check the expiration date, and if unsure, test a small amount with warm water and a pinch of sugar.
- The water could be too hot or too cold. As mentioned, water that’s too hot will kill the yeast, while water that’s too cold will keep it dormant. Aim for lukewarm, between 105-115°F (40-46°C).
- The environment might be too cold. Yeast thrives in warm conditions. If your kitchen is particularly chilly, it can slow down or inhibit activation. Try placing the bowl in a slightly warmer spot, like near a warm oven or in a sunny window.
If your yeast doesn’t activate, discard the mixture and start fresh with new yeast and correctly tempered water.
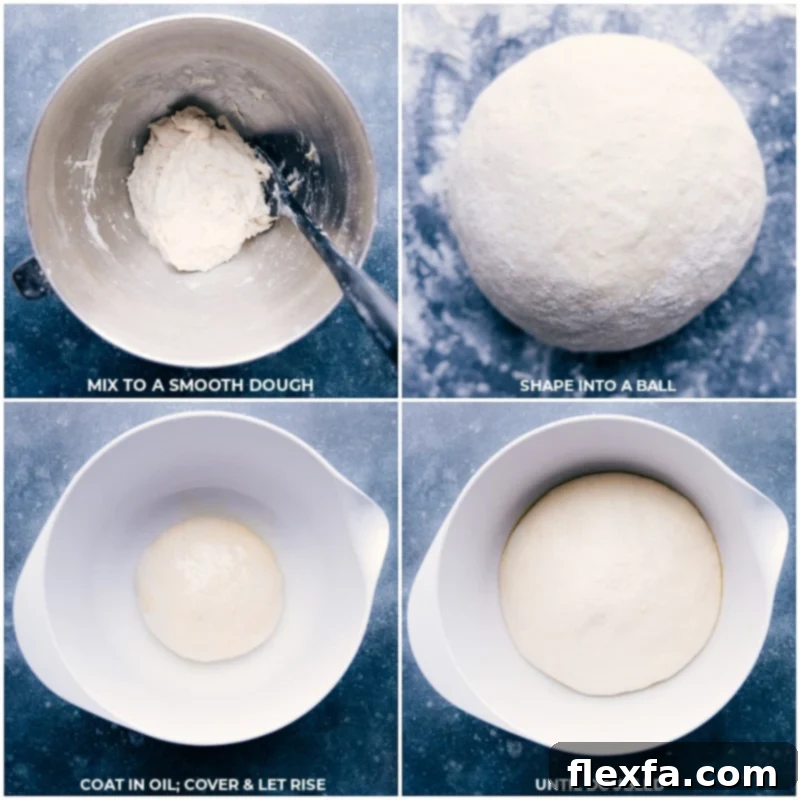
Crafting Your Loaf: Step-by-Step French Bread Instructions
Baking homemade French bread is a straightforward process when you follow these steps. Each stage is designed to build flavor and achieve the perfect texture.
- Activate the Yeast: In a medium bowl, combine the warm water, yeast, and honey. Stir gently and let this mixture sit for 5-10 minutes. It should become foamy and creamy, indicating the yeast is active and ready to work. If no foam appears, your yeast may be inactive, and you’ll need to restart this step.
- Prepare the Dry Ingredients & Mix the Dough: In the bowl of a stand mixer, whisk together the all-purpose flour and salt. Pour the activated yeast mixture and olive oil into the dry ingredients. Attach the paddle attachment (or dough hook, if preferred) and mix on low speed until the ingredients are just combined and a shaggy dough begins to form.
- Knead and Adjust Flour: Switch to the dough hook if not already using it. Continue mixing on low to medium speed. Gradually add additional flour, starting with about ½ cup, then another ¼ cup if necessary, until the dough gathers around the hook and pulls away from the sides of the bowl. The dough should feel smooth, elastic, and slightly tacky but not sticky to the touch. Knead for approximately 3-5 minutes on medium speed to develop the gluten. Avoid over-flouring, which can result in a tough loaf.
- First Rise (Bulk Fermentation): Lightly dust a clean work surface with a tablespoon of flour. Transfer the dough from the mixer bowl and gently knead it a few times to form a smooth, round ball. Lightly grease the mixer bowl (or another clean bowl) with a teaspoon of olive oil. Place the dough ball into the bowl, seam-side down, and turn it once to coat evenly with oil. Cover the bowl tightly with a clean kitchen towel or plastic wrap. Allow the dough to rise in a warm, draft-free spot for 30 minutes to 1 hour, or until it has visibly doubled in size.
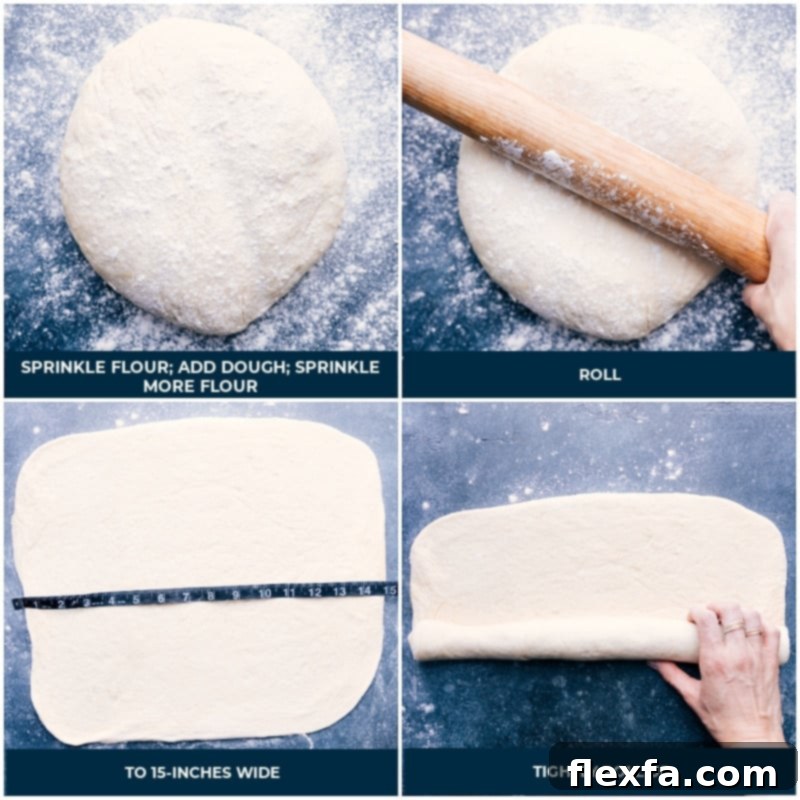
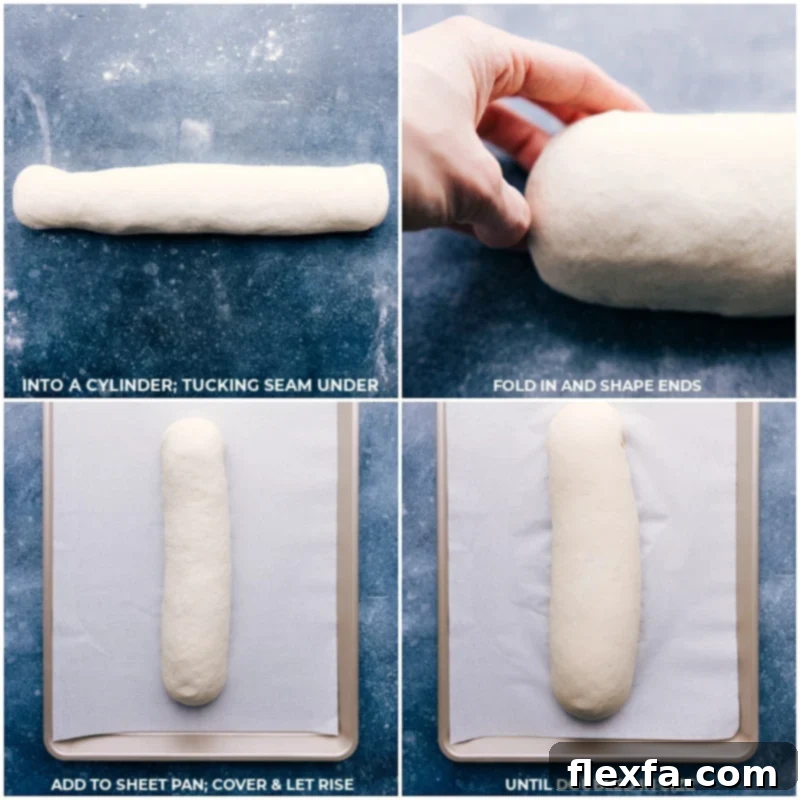
- Shape the Loaf: Gently punch down the risen dough to release the air. Transfer it to a lightly floured surface. Use a rolling pin to roll the dough into a large rectangle, roughly 15×12 inches (38×30 cm). Starting from one of the long sides, tightly roll the dough into a cylinder. As you roll, pinch the seams firmly to seal the loaf, and tuck the ends neatly underneath to create a classic French bread shape.
- Second Rise (Proofing): Carefully transfer the shaped loaf to a baking sheet lined with parchment paper, seam-side down. Cover it again with a kitchen towel and let it rise for another 30 minutes to 1 hour, or until it has nearly doubled in size once more. This second rise is crucial for a light and airy texture.
- Bake to Perfection: While the dough is on its second rise, preheat your oven to 400°F (204°C). Once the dough has completed its second rise, use a sharp paring knife or a bread lame to make 5-7 diagonal slits across the top of the loaf. These cuts allow the bread to expand properly in the oven and create that beautiful, rustic appearance.
- Create Steam for a Crispy Crust: Place the baking sheet with the loaf into the preheated oven. Immediately, and quickly, toss 5-6 ice cubes directly onto the bottom floor of your oven. Close the oven door quickly to trap the steam. This steam bath is key to achieving that signature crispy, golden-brown crust.
- Bake and Finish: Bake the French bread for 18-28 minutes, or until the crust is a deep golden brown and the loaf sounds hollow when tapped on the bottom. If the bread appears to be browning too quickly, loosely tent it with aluminum foil and reduce the oven temperature slightly to 375°F (190°C) to prevent over-browning.
- Cool and Serve: Once baked, remove the bread from the oven. Immediately brush the top of the hot loaf with 1-2 tablespoons of melted salted butter (optional, but highly recommended for flavor and a softer crust). Transfer the bread to a wire rack and allow it to cool for at least 15 minutes before slicing and serving. Cooling ensures the internal structure sets properly and prevents a gummy texture.
Recommended Tools for Effortless Bread Making
While not strictly essential, having the right tools can significantly enhance your bread-making experience, making it more efficient and enjoyable:
- Dough Scraper / Spatula: Invaluable for neatly scraping down the sides of your mixing bowl, dividing dough, and easily transferring sticky dough from your work surface to a bowl or baking sheet.
- Parchment Paper: Lining your baking sheet with parchment paper prevents sticking, promotes even browning, and makes cleanup a breeze. Always use parchment paper; avoid wax paper as it can melt in the oven, and foil may stick to the bread.
- Bread Lame or Sharp Paring Knife: Essential for making precise, clean slits on top of your dough just before baking. This allows the bread to expand beautifully and prevents uncontrolled tearing.
- Stand Mixer with Dough Hook: While hand kneading is possible, a stand mixer greatly simplifies and speeds up the kneading process, ensuring consistent gluten development for a perfectly structured French bread.
- Flour Sack Towels: Lightweight and breathable, these towels are ideal for covering your dough while it rises, protecting it from drafts without inhibiting its expansion.
- Measuring Tape or Ruler: Useful for ensuring your dough is rolled to the correct dimensions when shaping, contributing to consistent loaf size and baking.
- Food Scale: For ultimate precision in measuring flour and other ingredients, a digital food scale is highly recommended over volumetric cups.
Advanced Tips for Achieving French Bread Perfection
Elevate your homemade French bread from great to extraordinary with these expert tips:
- Mastering Oven Steam: The secret to a truly crusty French bread lies in creating a steamy environment in your oven during the initial baking phase. As instructed, tossing 5-6 ice cubes onto the bottom of the preheated oven (or into a cast iron pan placed on the bottom rack) immediately after placing the bread inside creates a burst of steam. This moisture keeps the crust soft and pliable, allowing the loaf to expand fully before it sets, resulting in a thin, crisp, and beautifully golden exterior. Close the oven door quickly to trap the steam.
- Proper Kneading Technique: Kneading is where gluten develops, giving your bread its structure and chewiness. Whether by hand or with a stand mixer, ensure you knead the dough until it is smooth, elastic, and passes the “windowpane test.” This means you can stretch a small piece of dough thin enough to see light through it without it tearing. Gradually incorporate flour as needed during kneading to prevent sticking, but avoid adding too much, which can make the bread dense and tough. The dough should still be slightly tacky.
- Flawless Loaf Shaping: The way you shape your dough significantly impacts the final texture and appearance. When rolling the dough into a rectangle and then a tight cylinder, ensure each roll is snug to eliminate large air pockets. Firmly pinch the seams shut along the length of the loaf and at the ends. This creates tension in the dough, which helps it hold its shape and achieve an even rise during baking, preventing blowouts.
- Optimal Rising Environment: Yeast loves warmth! For a consistent and efficient rise, place your covered dough in a warm, draft-free location. Ideal spots include a sunny windowsill, on top of a preheating oven (turned off, or just warm), or even in a microwave (turned off) with a cup of hot water alongside it to create a warm, moist environment. A good rise is crucial for a light and airy interior.
- Score with Confidence: The diagonal slits (scoring) on top of the loaf aren’t just for aesthetics. They guide the expansion of the bread in the hot oven, allowing steam to escape and preventing the crust from tearing in unpredictable places. Use a very sharp knife or a bread lame and make quick, confident cuts about 1/2 inch deep.
Storage Solutions for Your Homemade French Bread
To enjoy your homemade French bread at its best, proper storage is key.
- Immediate Enjoyment (Fresh): This French bread recipe truly shines on days one and two. For maximum crispiness on the first day, leave it uncovered with the cut side down on a cutting board. The exposed crumb helps maintain a crisp crust.
- Short-Term Storage: After the first day, or if you prefer a slightly softer crust, store the loaf in an airtight bread bag or container. While it may lose some of its initial crispness, it will remain delicious, especially when lightly toasted before serving.
- Long-Term Storage (Freezing): French bread freezes exceptionally well. For best results, slice the cooled loaf completely. Wrap each individual slice tightly in plastic wrap, then place the wrapped slices in a freezer-safe airtight bag or container. This method prevents freezer burn and makes it easy to grab just a few slices as needed. It can be stored in the freezer for up to 3 months. When ready to enjoy, simply toast the slices directly from the freezer until warmed through and crisp.
Creative Ways to Enjoy Your Freshly Baked French Bread
Your homemade French bread is incredibly versatile! Beyond simply slicing and serving with butter, here are some delightful ways to incorporate it into your meals:
Pasta And Pizza
Margherita French Bread Pizza
Transform leftover slices into a quick and satisfying pizza with fresh tomatoes, mozzarella, and basil.
Soups And Stews
Creamy Vegetable Soup
Pair a warm slice of French bread with a comforting bowl of creamy vegetable soup for a delightful meal.
Dinner
French Bread Taco Pizza
An exciting twist on taco night, this pizza uses French bread as a crispy base for your favorite taco toppings.
Dinner
Easy French Dip Sandwiches (Ready in 15 Minutes!)
The sturdy yet soft texture of homemade French bread is perfect for soaking up savory au jus in a French dip sandwich.
Print Recipe
Rating: 5 out of 5 stars (based on 2 votes)
French Bread Recipe
Chelsea Lords
This French Bread is one of my favorite yeasted breads and it’s straightforward to make—I’ve got a video tutorial to help you along the process! This bread has a light and soft crumb with a delicious crusty outside.
15 minutes
25 minutes
2 hours
2 hours 40 minutes
15 slices
Video Tutorial
This French Bread video tutorial provides visual guidance for each step of the baking process, ensuring perfect results every time.
Equipment
-
Stand mixer
-
Sheet pan (15″ x 10″)
-
Parchment paper
-
Sharp knife or bread lame
-
Wire rack
Ingredients
-
1
cup
warm water
(105-115℉), see note 1 -
1-1/2
teaspoons
instant yeast or active dry yeast -
2
teaspoons
honey -
2
cups
all-purpose flour
plus more as needed, see note 2 -
1-1/2
teaspoons
salt -
1
tablespoon
olive oil
plus more for greasing bowl -
5 to 6
ice cubes
see note 3 -
Salted butter
1-2 tablespoons, optional, for topping bread after baking
Instructions
-
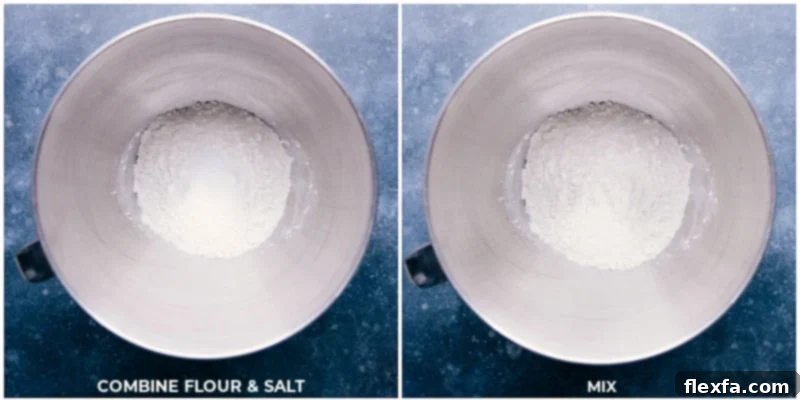
In the bowl of a stand mixer, combine the flour and salt. Stir briefly with a rubber spatula to ensure they are well mixed.
-
In a separate medium bowl, whisk together the warm water (105-115°F), yeast, and honey. Allow this mixture to sit undisturbed for 5–10 minutes, until it becomes visibly creamy or foamy on the surface. If it does not foam, the yeast is likely inactive, and you will need to start again with fresh yeast and appropriately warmed water.
-
Scrape the activated yeast mixture into the flour and salt mixture in the stand mixer bowl using a spatula. Add the 1 tablespoon of olive oil. Attach the paddle attachment (or dough hook) to the stand mixer and mix on low speed until all ingredients are just combined and a shaggy dough forms. Gradually add more all-purpose flour, starting with 1/2 cup (65g) and adding an additional 1/4 cup (30g) if needed, until the dough gathers around the paddle/hook and pulls cleanly away from the sides of the bowl. The dough should appear smooth and be slightly sticky but not excessively so. Be careful not to add too much flour, as this will result in tough bread. Once the dough has formed, switch to the dough hook (if not already using it) and knead the dough for 3 minutes on medium speed to develop gluten.
-
Lightly sprinkle approximately 1 tablespoon of flour onto a clean work surface. Transfer the kneaded dough from the mixer bowl to the floured surface. Sprinkle another tablespoon of flour on top of the dough. Knead the dough a few times by hand and shape it into a tight, round ball. Lightly grease the stand mixer bowl (or another clean bowl) with 1 teaspoon of olive oil, then place the dough ball back into the bowl, seam-side down. Turn the dough once to coat its surface with the oil. Cover the bowl securely with a clean kitchen towel or plastic wrap and allow it to rise in a warm, draft-free spot until it has doubled in size, which typically takes about 30 minutes to 1 hour, depending on your environment.
-
Gently punch down the risen dough to release the air. Sprinkle 1 tablespoon of flour on a clean surface and place the dough on top. Sprinkle another tablespoon of flour on the dough. Using a rolling pin, roll the dough into a large rectangle, approximately 15 x 12 inches (38 x 30 cm). Starting from one of the long sides, tightly roll the dough up into a cylinder. Firmly pinch the seams closed along the length of the loaf and tuck the ends neatly underneath to seal them. Place the shaped loaf, seam-side down, onto a baking sheet that has been lined with parchment paper. Cover the loaf again with a kitchen towel and let it undergo its second rise for another 30 minutes to 1 hour, or until it has almost doubled in size.
-
While the dough is on its second rise, preheat your oven to 400°F (204°C). Once the dough has completed its second rise, use a sharp paring knife or a bread lame to make 5 diagonal slits across the top of the loaf. Carefully place the baking sheet with the loaf into the preheated oven. Immediately, and quickly, toss 5–6 ice cubes onto the bottom floor of your oven to create steam. Close the oven door promptly. Bake for 18–28 minutes, or until the loaf is a beautiful golden brown and sounds hollow when tapped on the bottom. If the loaf begins to brown too quickly, lightly tent it with aluminum foil and reduce the oven temperature to 375°F (190°C) for the remainder of the baking time.
-
Remove the freshly baked bread from the oven. Immediately brush the top of the hot loaf with 1–2 tablespoons of melted salted butter (if desired). Transfer the bread to a wire rack and allow it to cool for at least 15 minutes before slicing and serving. This cooling time is essential for the bread’s internal structure to set, ensuring a perfect texture.
Recipe Notes
Note 2: Flour Measurement. The amount of flour needed can vary due to humidity and how packed the flour is. For the most accurate measurement, use a food scale. If measuring by cups, use the spoon-and-level method. Add flour slowly until the dough gathers around the mixer attachment and is smooth, elastic, and only slightly sticky.
Note 3: Steam for Crust. Adding ice cubes to the bottom of the oven creates steam, which is vital for developing a wonderfully crispy, crackly crust on your French bread. This steam allows the crust to remain pliable and expand before setting.
Note 4: Parchment Paper. Always use parchment paper to line your baking sheet. It prevents the bread from sticking and promotes even cooking. Do not substitute with wax paper, as it has a lower heat tolerance and will melt in the oven.
Storage: This homemade French bread is at its peak freshness on the first 2 days after baking. For day-one enjoyment and a crispy crust, leave it uncovered with the cut side down on a cutting board. After that, or for longer freshness, store the bread in an airtight bag or container. While it may lose some crispiness, it remains delicious, especially when toasted. To freeze, slice the bread completely and individually wrap each slice in plastic wrap. Store wrapped slices in an airtight freezer bag or container for up to 3 months. You can toast slices directly from the freezer without thawing.
Nutrition Information
Serving: 1 serving | Calories: 75 kcal | Carbohydrates: 14.1g | Protein: 1.9g | Fat: 1.1g | Sodium: 156.2mg | Fiber: 0.5g | Sugar: 0.8g
Nutrition information is automatically calculated and should be used as an approximation only.
Enjoyed this recipe? Share your thoughts in the comments below!