
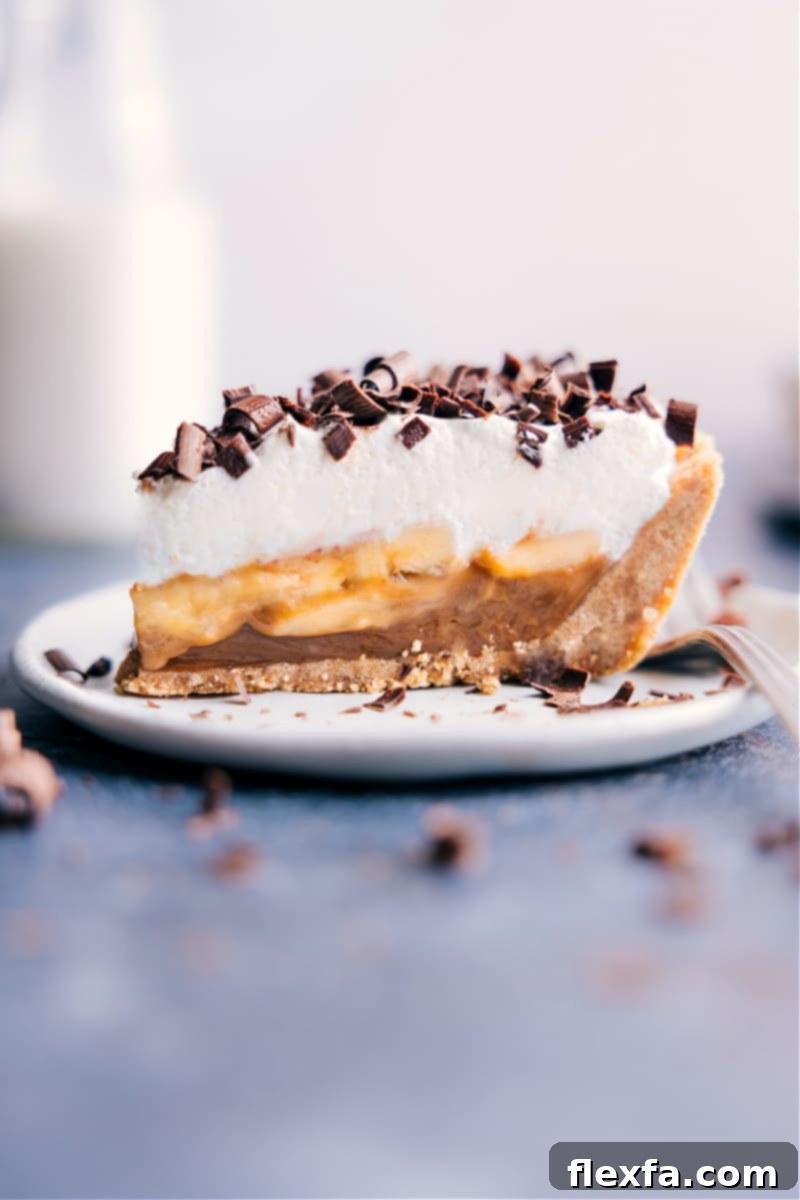
Indulge in pure dessert heaven with this incredible Banoffee Pie Recipe! A true crowd-pleaser, this iconic British dessert features a delightfully buttery cookie crust, generously layered with a thick, luscious dulce de leche, perfectly ripe sweet bananas, airy, fluffy whipped cream, and finished with delicate chocolate shavings. It’s a symphony of textures and flavors that will leave everyone craving another slice.
If you’re a fan of banana-based treats, you’ll also adore some of our other cherished recipes, such as these decadent Banana Cupcakes, the classic Banana Cream Pie, or the famous Magnolia Bakery-inspired Banana Pudding.
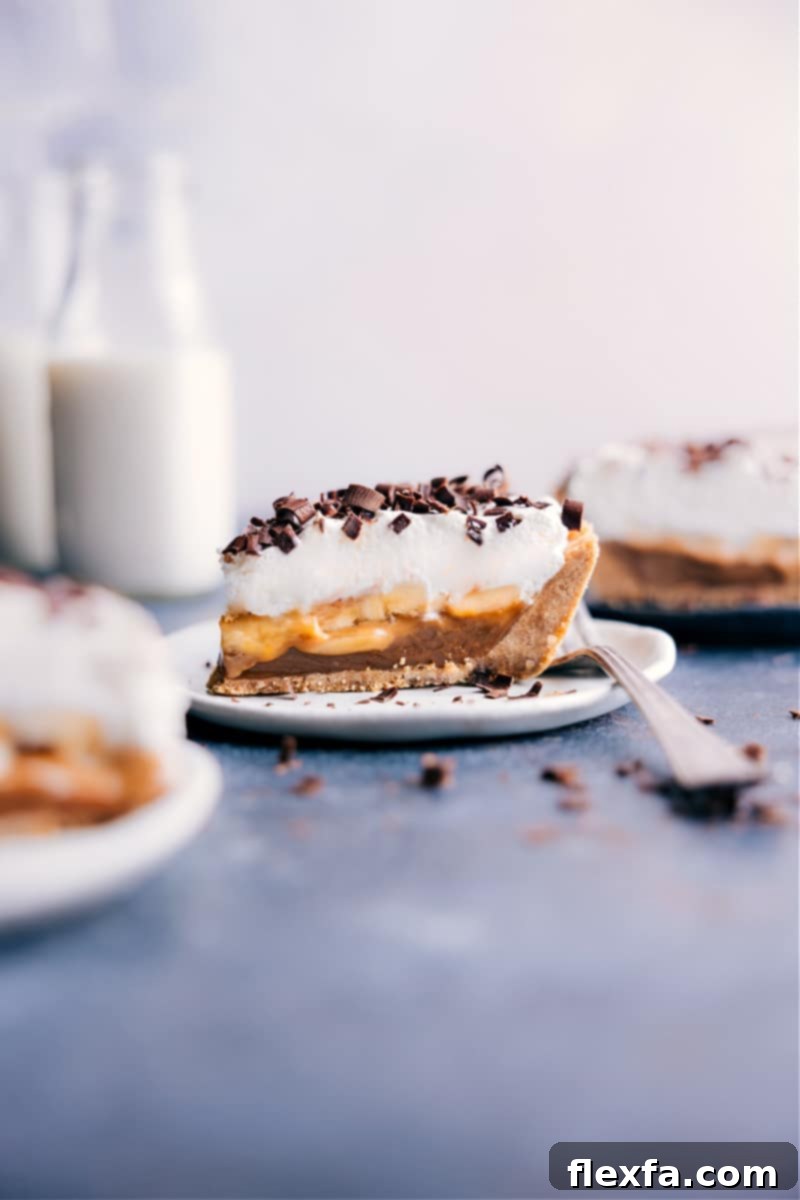
What is Banoffee Pie? A Classic British Delight
Banoffee Pie is a beloved British dessert pie renowned for its rich and irresistible combination of flavors and textures. Traditionally, it’s crafted with a buttery biscuit (cookie) base, which forms a delightful crunchy foundation. This is then generously topped with slices of fresh banana, a thick layer of creamy caramel (often dulce de leche), and a generous crown of light, fluffy whipped cream. While these are the core components, many variations exist, sometimes incorporating elements like chocolate, coffee, or a blend of both, adding an extra layer of complexity to this already spectacular treat.
My husband and I first experienced the magic of banoffee during a trip to the U.K. earlier this year. We ordered a banoffee trifle at a quaint restaurant, and it was, without a doubt, the undisputed favorite among all the culinary delights we sampled. That unforgettable taste lingered, and I knew I had to recreate it. Instead of the trifle’s layered presentation in individual dishes, I decided to adapt it into a more familiar pie format, perfect for sharing. The result? A pie so good, my oldest declared it “the best Banoffee Pie recipe” he’d ever tasted!
Now, the only challenge left is deciding which of our family’s favorite pies will grace our Thanksgiving dessert table this year. Will it be this heavenly Banoffee Pie, our creamy Coconut Cream Pie, or the comforting classic Apple Pie? According to my family, the only acceptable answer is, of course, all of them!
Quick Tip: Understanding the Name “Banoffee”
The whimsical name “Banoffee” is actually a clever portmanteau, combining the names of its two most prominent and delicious ingredients: banana and toffee. It’s a perfectly fitting name for a dessert that celebrates this sweet and fruity pairing so beautifully!
Your Top Questions About Banoffee Pie Answered
New to Banoffee Pie or just looking for some extra tips? Here are answers to common questions to help you master this delightful dessert.
What does Banoffee Pie taste like?
Banoffee Pie offers an exquisite taste experience, marrying the sweet, caramel-like richness of dulce de leche with the fresh, fruity notes of ripe bananas. This decadent filling rests upon a subtly salty and buttery graham cracker crust, all crowned with a cloud of creamy, vanilla-infused whipped cream. Each bite delivers a harmonious blend of sweet, rich, and fresh flavors, creating a truly unforgettable dessert that is both comforting and sophisticated.
Is Banoffee coffee or toffee?
Despite some common confusion, the “offee” in Banoffee pie refers to “toffee,” not “coffee.” The name is a delightful fusion of “bananas” and “toffee.” While our recipe uses dulce de leche, which provides a rich, caramel-like flavor similar to traditional toffee, some versions of this dessert might incorporate a hint of coffee for an added layer of flavor. However, the core identity is built around the banana and toffee (or caramel) pairing.
How do you keep bananas from turning brown in Banoffee pie?
Preventing banana browning is key to a beautiful Banoffee Pie. The most effective method is to cover the banana slices promptly with whipped cream, which significantly reduces their exposure to air. For an extra layer of protection, you can lightly brush the banana slices with a small amount of club soda (avoid tonic water, which can impart a bitter flavor). However, if you plan to consume the pie within 24 hours of assembly, the whipped cream covering is usually sufficient to maintain their fresh appearance.
How do I get clean slices of Banoffee Pie?
Achieving perfectly clean slices of Banoffee Pie enhances its presentation. The trick is to use a very sharp knife. For each slice, run your knife under hot water for a few seconds, then thoroughly dry it with a clean cloth. This warms the blade, allowing it to glide through the layers more smoothly, preventing sticking and smearing. Repeat this process for every single slice to ensure pristine cuts.
Should Banoffee Pie be refrigerated?
Absolutely, Banoffee Pie requires refrigeration. Due to its fresh banana and whipped cream components, it’s essential to store any leftovers in the refrigerator. Ensure the pie is tightly covered with plastic wrap or placed in an airtight container to maintain its freshness, prevent it from absorbing other food odors, and keep the cream firm. It’s best enjoyed chilled!
One of the best aspects of this Banoffee Pie Recipe is its relative simplicity and speed, especially if you opt for convenient store-bought dulce de leche and a pre-made crust. Even if you choose to make everything from scratch, the steps are straightforward and rewarding. Here’s a quick overview of the key stages involved in crafting this delightful dessert:
How To Make Banoffee Pie: Step-by-Step Guide
Creating this irresistible Banoffee Pie is a joyful process. Follow these steps for a perfectly layered and delicious dessert:
- Prepare the Dulce de Leche: This rich caramel layer is the heart of your Banoffee Pie. You have a few options:
- Make it entirely from scratch using milk and sugar for the most authentic flavor.
- Utilize a simplified method by cooking a can of sweetened condensed milk (we’ll detail this later in the post!).
- For ultimate convenience, purchase a can of high-quality store-bought dulce de leche. Ensure it’s fully cooled before use.
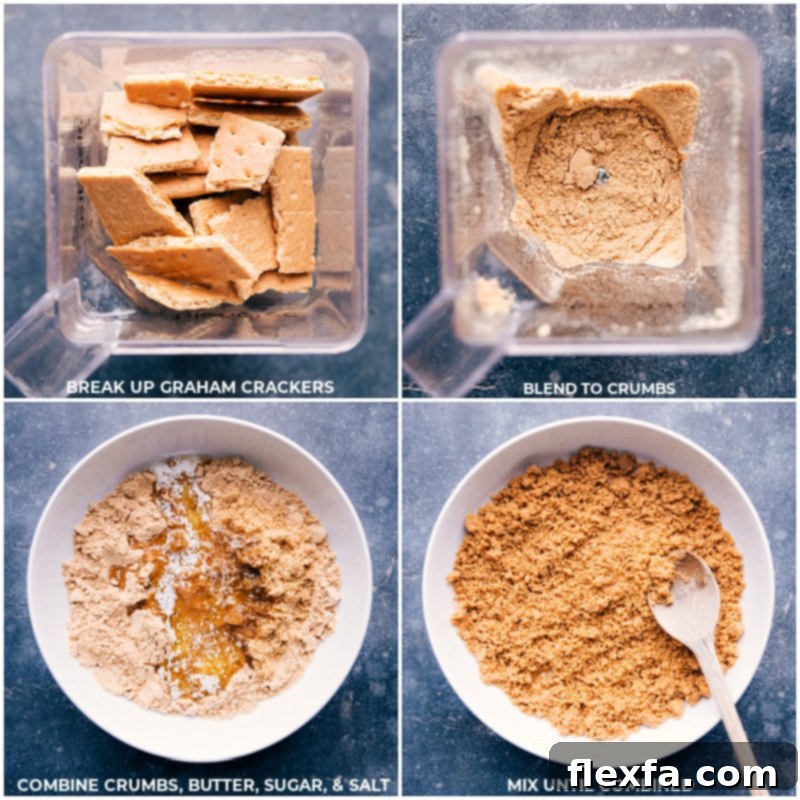
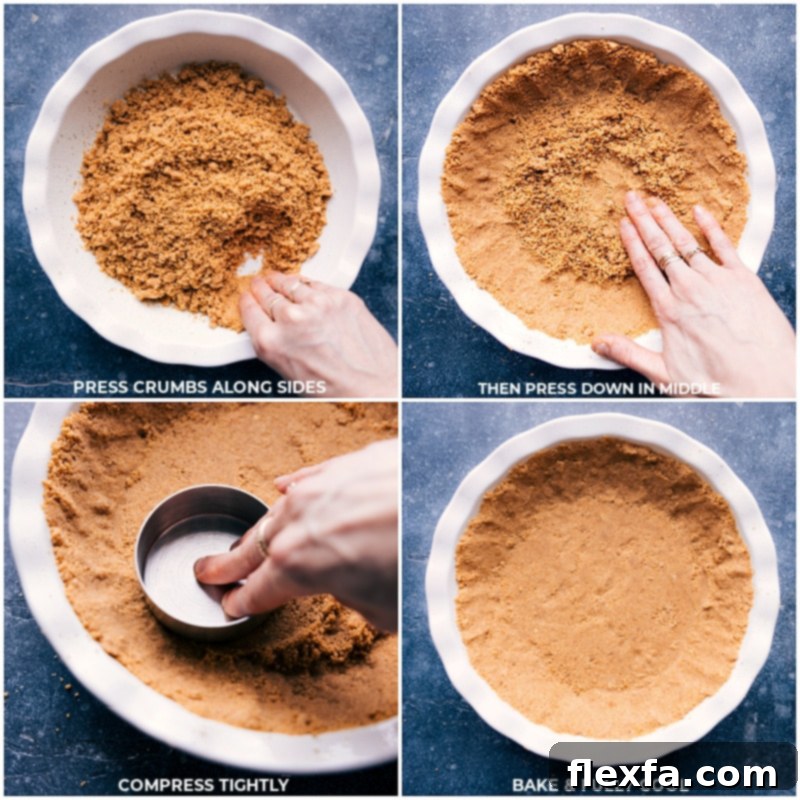
- Craft the Graham Cracker Crust: A robust and flavorful crust is crucial. While you can certainly buy a pre-made one, I highly recommend making your own buttery Graham Cracker Crust. It’s simple to prepare and makes a significant difference in taste and texture. Refer to my dedicated post for detailed tips and tricks for a perfect crust every time. Bake and then allow it to cool completely.
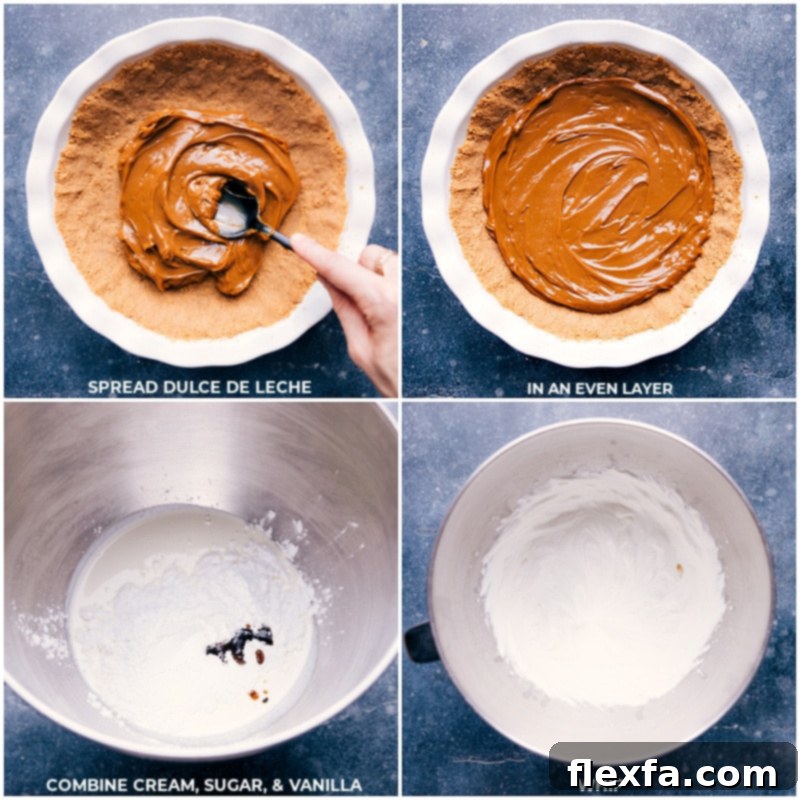
- Whip the Cream to Perfection: The ethereal topping for your pie. Pour heavy cream, powdered sugar, and vanilla into a stand mixer. A stand mixer will whip this to a perfect, airy consistency in just a few minutes. Be careful not to over-beat, or you’ll end up with butter!
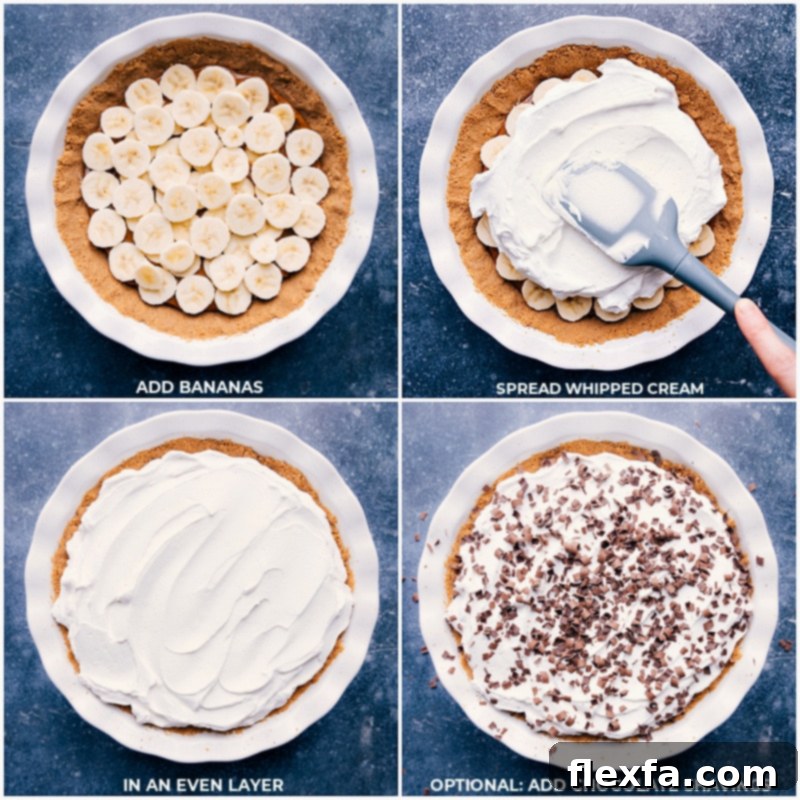
- Assemble the Layers: This is where the magic comes together. First, ensure both your crust and dulce de leche are completely cooled – this prevents the layers from melting into each other. Spread the dulce de leche evenly over the crust, then arrange your freshly sliced bananas. Finally, generously top with the whipped cream, spreading it gently to cover the bananas.
- Chill and Garnish: Place the assembled pie in the refrigerator to chill for at least 2 hours. This allows the layers to set properly, making for cleaner slices. Just before serving, if desired, elevate its appearance and flavor with elegant chocolate shavings or a sprinkle of crunchy English Toffee Baking bits.
Ultra-Easy Banoffee Pie Tip
For an exceptionally quick and truly easy Banoffee Pie recipe, consider using a store-bought graham cracker crust. This ingenious shortcut means you won’t even need to turn on your oven, saving you time and effort while still delivering a fantastic dessert!
Homemade Dulce de Leche from Sweetened Condensed Milk: A Simple Method
If you’re looking to add a touch of homemade goodness to your Banoffee Pie and prefer to make your own dulce de leche, it’s surprisingly easy and requires just one key ingredient! This method transforms a humble can of sweetened condensed milk into rich, creamy caramel with minimal effort. Here’s how to do it in the oven:
- Choose Your Ingredient: Begin with one 14-ounce can of full-fat sweetened condensed milk. It’s crucial to use condensed milk, not evaporated milk, as they are very different products.
- Prepare for Baking: Preheat your oven to 425 degrees F (220°C). Empty the entire contents of the sweetened condensed milk can into a 9-inch pie pan or an oven-safe dish. Cover the pan very tightly with aluminum foil, ensuring no steam can escape.
- Create a Water Bath: Place your foil-covered pie pan into a larger baking pan with raised sides. This larger pan will serve as a water bath. Carefully pour hot water into the larger pan until it reaches about 1 inch up the sides of the pie pan.
- Bake and Monitor: Carefully transfer the entire setup to the preheated oven. Bake for approximately 2 hours. During this time, check the water level occasionally and add more hot water if needed to prevent it from evaporating completely. Continue baking until the dulce de leche achieves a beautiful golden-brown color and a thick, spreadable consistency.
- Cool and Whisk: Once baked, carefully remove the pans from the oven. Remove the foil from the dulce de leche. Let it cool slightly, then whisk vigorously to smooth out any lumps and achieve a silky texture. Allow the dulce de leche to cool completely at room temperature before refrigerating. It will thicken even further as it cools, making it perfect for your Banoffee Pie.
Using this method guarantees a rich, deeply flavored caramel that elevates your Banoffee Pie to gourmet status, all with the satisfaction of a homemade component.
Tips for a Perfect Banoffee Pie Every Time
Crafting an unforgettable Banoffee Pie is easier with a few expert tips:
- Choose the Right Bananas: Opt for firm, ripe bananas. Avoid overripe bananas (the ones with many brown spots) as they can be too soft and might seep liquid, making the pie watery.
- Chill is Key: Ensure your crust and dulce de leche are completely cooled before assembly. This prevents premature melting of layers and helps maintain the pie’s structure.
- Don’t Over-Beat the Cream: Whip your heavy cream until medium peaks form – it should hold its shape but still be soft and airy. Over-beating will result in grainy, stiff cream or even butter.
- Immediate Assembly: Once bananas are sliced, layer them quickly and cover with whipped cream to minimize air exposure and prevent browning.
- Sharp Knife for Serving: For elegant, clean slices, always use a sharp knife warmed under hot water and wiped dry between each cut.
- Garnish Just Before Serving: Add chocolate shavings, cocoa powder, or toffee bits right before serving for the freshest appearance and best texture.
Storage and Make-Ahead Tips for Banoffee Pie
Can you Make Banoffee Pie The Day Before?
Yes, you can! The graham cracker crust can be prepared 1-2 days in advance. Simply bake it, let it cool completely, then tightly cover it with plastic wrap and store it in the refrigerator. The fully assembled pie, with all its delicious layers, can also be made up to 1 day in advance. Store it, tightly covered, in the fridge until you’re ready to serve. This makes Banoffee Pie a fantastic option for entertaining, allowing you to get ahead on your dessert prep.
Can You Freeze Banoffee Pie?
Unfortunately, this Banoffee Pie recipe does not freeze and thaw very well, and we generally do not recommend it. Freezing tends to compromise the delicate textures: the crust can become too soft and soggy, the bananas will likely seep liquid and turn unappetizingly brown upon thawing, and the whipped cream can become watery and lose its fluffy consistency. For the best experience, enjoy your Banoffee Pie fresh and well-chilled!
Why You’ll Love This Banoffee Pie Recipe
This Banoffee Pie isn’t just a dessert; it’s an experience. Here’s why it will quickly become a cherished recipe in your kitchen:
- Irresistibly Delicious: The combination of sweet bananas, rich caramel, crunchy crust, and light cream is simply divine. It hits all the right notes for a satisfying sweet treat.
- Relatively Easy to Make: Despite its impressive appearance, this pie is surprisingly straightforward. Especially with store-bought components, it’s a minimal-effort, high-reward dessert.
- Perfect for Any Occasion: Whether it’s a casual family dinner, a festive holiday gathering, or a special celebration, Banoffee Pie always makes a statement and delights guests.
- Customizable: While classic, the recipe allows for creativity. Experiment with different biscuit bases, add a sprinkle of sea salt to the dulce de leche, or try different chocolate garnishes.
- A Taste of British Tradition: Bring a touch of the UK’s beloved dessert to your home. It’s a classic for a reason!
More Delicious Desserts to Explore:
- Cronut: A heavenly croissant-donut hybrid made with delicate puff pastry dough.
- How to Make Crepes: Master the art of thin, delicate French crepes with a recipe straight from a French bakery!
- Churros: Crispy, sweet fried dough pastries, perfect for dipping in warm dulce de leche or rich chocolate sauce!
- Magic Cookie Bars: These delightful bars feature a thick, buttery graham cracker crust topped with a medley of sweet ingredients.
- Banana Chocolate Chip Cake: A moist and flavorful cake generously frosted with a creamy luscious chocolate buttercream frosting.
Classic Banoffee Pie Recipe
Chelsea Lords
This homemade Banoffee Pie is an absolute favorite! Featuring a rich, buttery graham cracker crust, a decadent layer of dulce de leche, fresh banana slices, and a generous topping of fluffy whipped cream with chocolate shavings, it’s a dessert that guarantees smiles.
25 minutes
10 minutes
2 hours
2 hours 35 minutes
8 servings

Equipment
- 9-inch Pie Pan
- Blender or Food Processor
- Stand Mixer
Ingredients
For the Crust:
- 1-3/4 cups graham cracker crumbs (from about 12 sheets, or digestive biscuit crumbs – see note 1)
- 6 tablespoons unsalted butter, melted
- 1/4 cup light brown sugar, lightly packed
- 1/8 teaspoon salt
For the Filling:
- 1 (13.4-ounce) can dulce de leche sauce (see note 2)
- 2 firm and ripe bananas (not overripe), thinly sliced
For the Topping:
- 1-1/2 cups heavy cream
- 1/4 cup powdered sugar
- 1/2 teaspoon vanilla bean paste or 1 teaspoon vanilla extract
- 1/8 teaspoon salt
- 1 dark chocolate bar, optional (for shavings)
Instructions
- Prepare the Crust: Preheat oven to 350°F (175°C). Lightly grease a 9-inch pie pan with cooking spray. In a microwave-safe bowl, melt 6 tablespoons of butter and let it cool for 5 minutes. In a blender or food processor, blend graham crackers into fine crumbs. Measure out 1-3/4 cups of crumbs and place them in a large bowl. Add the brown sugar and 1/8 teaspoon of salt. Mix in the melted butter until thoroughly combined.
- Form and Bake the Crust: Pour the crumb mixture into the prepared pie pan. First, press the crumbs firmly along the sides of the pan, then spread and press them into the bottom. Use your fingers to shape, then use the bottom of a flat 1-cup measuring cup to compress the crumbs firmly and evenly, forming a solid crust. Bake for 10 minutes, then remove from the oven and let cool completely. For quicker cooling, place it in the fridge. You can prepare and bake the crust up to 24 hours in advance; cover with plastic wrap and store at room temperature.
- Whip the Cream: In the bowl of a stand mixer (or using a hand mixer), combine the heavy cream, 1/4 cup powdered sugar, vanilla bean paste (or extract), and 1/8 teaspoon of salt. Begin whisking on low speed, then gradually increase to high speed. Continue to whisk until medium peaks form (the cream should hold its shape but still be soft and airy, not stiff). Be very careful not to over-beat the cream, as it can quickly turn grainy or into butter.
- Assemble the Pie: Once the crust is fully cooled, spread a smooth, even layer of dulce de leche across the bottom of the crust. Thinly slice the 2 ripe bananas and arrange them in two overlapping layers on top of the dulce de leche. Immediately spoon or pipe the whipped cream over the bananas, gently smoothing it with a spatula or the back of a large spoon to cover them completely.
- Chill and Serve: Place the uncovered pie in the refrigerator to chill for at least 2 hours. This step is crucial for the pie to set properly, making it easier to slice. You can store it in the fridge for up to a day in advance. Just before serving, garnish the pie with elegant chocolate curls if desired. To make chocolate curls, simply use a vegetable peeler to shave a dark chocolate bar directly over the pie. To serve, use a sharp knife, running it under hot water and drying it off before each cut for clean, neat slices.
Recipe Notes
Note 1: Graham Cracker Alternatives: If graham crackers are not available, you can use finely blended digestive biscuit crumbs as a substitute. The other crust ingredients remain the same. If using digestive biscuits, you may need to bake the crust for 3-6 minutes longer, so watch it carefully to prevent burning.
Note 2: Dulce de Leche Options: For the dulce de leche, you have several choices:
- Make it completely from scratch for the most authentic flavor.
- Follow the instructions provided in this blog post (under “Homemade Dulce de Leche from Sweetened Condensed Milk”) to easily make it from a can of sweetened condensed milk.
- For ultimate convenience, purchase a can of high-quality, prepared dulce de leche from the store.
Storage: Store any leftover Banoffee Pie tightly covered in the refrigerator for 3-4 days. Be aware that the texture will naturally soften and the filling may weep slightly over time. The graham cracker crust can be prepared 1-2 days in advance (bake, cool, cover tightly, and store in the fridge). The fully assembled pie can be made 1 day in advance and stored in the fridge until ready to serve. This recipe does not freeze and thaw well; the crust becomes too soft, bananas brown significantly, and the whipped cream loses its consistency and becomes watery.
Nutrition
Serving: 1 serving | Calories: 373 kcal | Carbohydrates: 33 g | Protein: 3 g | Fat: 27 g | Saturated Fat: 16 g | Polyunsaturated Fat: 1 g | Monounsaturated Fat: 7 g | Trans Fat: 0.3 g | Cholesterol: 73 mg | Sodium: 173 mg | Potassium: 192 mg | Fiber: 1 g | Sugar: 20 g | Vitamin A: 937 IU | Vitamin C: 3 mg | Calcium: 54 mg | Iron: 1 mg
Nutrition information is automatically calculated, so should only be used as an approximation.