

Irresistible Golden Oreo Truffles: The Ultimate No-Bake Dessert
Welcome to the world of effortless indulgence with our **Golden Oreo Truffles**! These delightful, no-bake treats are a game-changer for anyone craving a simple yet show-stopping dessert. Imagine finely crushed Golden Oreo cookies mixed with rich cream cheese, rolled into perfect spheres, then generously coated in smooth white chocolate and adorned with your favorite decorations. They’re not just easy; they’re incredibly delicious, making them an instant crowd-pleaser at any gathering.

Recently, I served these golden delights at a party, and the feedback was overwhelmingly positive! Many guests commented that these were the **”very best cake balls”** they had ever tasted. What’s truly surprising is that without knowing the base is Golden Oreos, they genuinely taste like premium cake balls – but with an even more delightful flavor and texture. If you’ve tried traditional cake balls in the past and weren’t completely won over, this recipe might just become your new go-to favorite treat!
Pro Tip for a Stunning Dessert Spread
While these Golden Oreo Truffles are absolutely amazing on their own, consider preparing a beautiful platter featuring both these vanilla-flavored truffles and classic Chocolate Oreo Truffles. The contrasting colors and complementary flavors create a truly stunning and elegant dessert presentation that will impress all your guests!
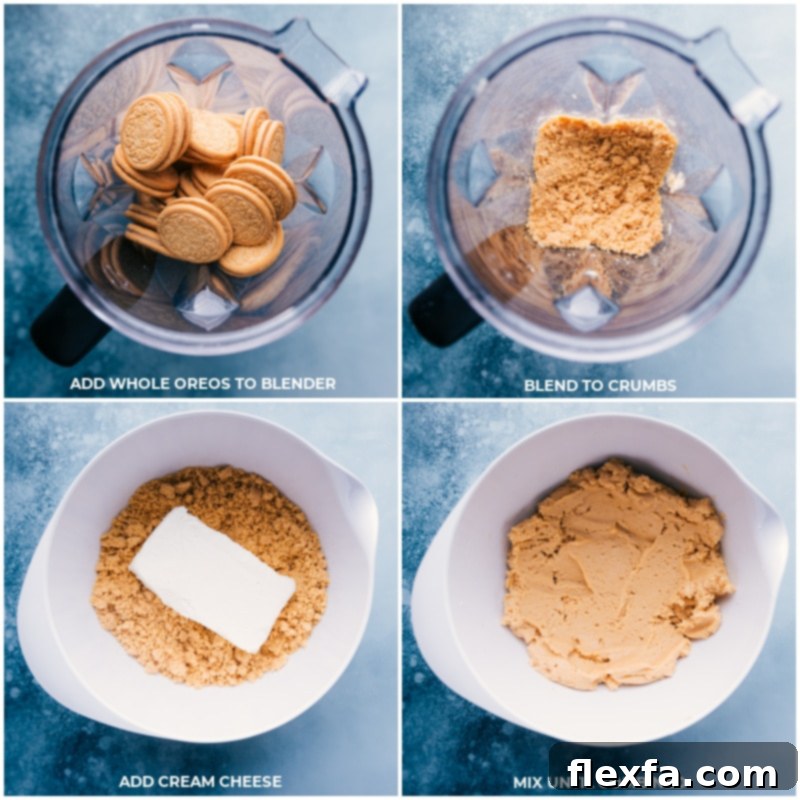
How to Master Golden Oreo Truffles: A Simple Step-by-Step Guide
Creating these heavenly Golden Oreo Truffles is surprisingly simple and requires no baking whatsoever. Follow these straightforward steps to achieve perfect, melt-in-your-mouth results every time.
- Finely Crush the Cookies: The first crucial step is to crush your Golden Oreos into very fine crumbs. Large chunks of cookie will disrupt the smooth, uniform texture of your truffles, so aim for a powdery consistency. There’s no need to separate the creme from the cookie; simply blend it all together for maximum flavor and ease. A food processor or high-speed blender works perfectly for this task.
- Combine with Cream Cheese: Once your cookie crumbs are perfectly fine, transfer them to a large bowl. Add the softened cream cheese. Mix these two ingredients thoroughly until you achieve a thick, slightly sticky, and homogenous dough. You can knead the mixture with your hands for a more tactile experience or use a stand mixer with a paddle attachment for convenience. Ensure there are no streaks of unmixed cream cheese.
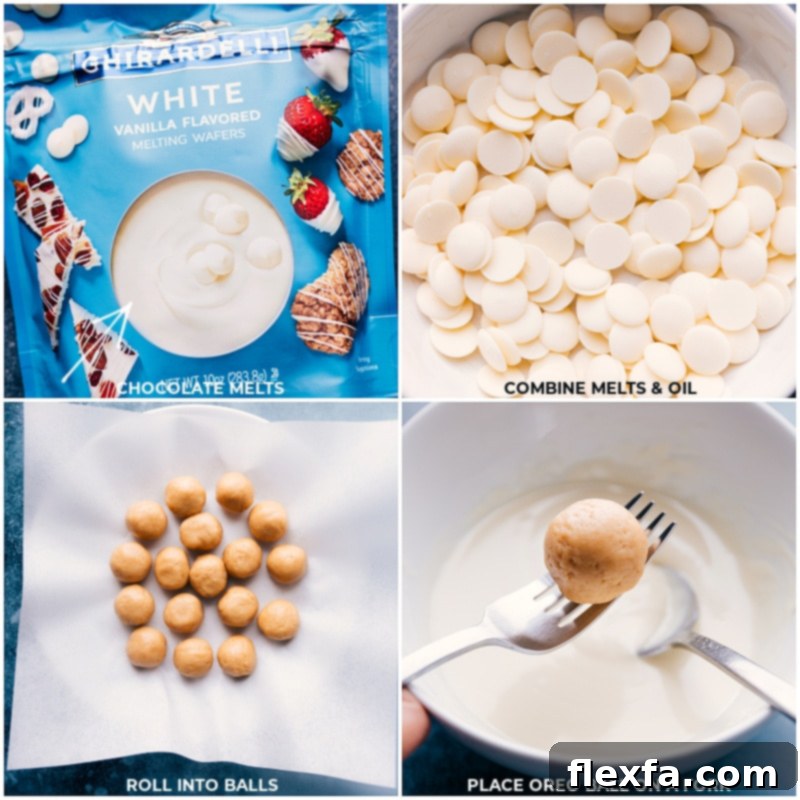
- Roll into Uniform Balls: Using a tablespoon measuring spoon helps ensure each truffle is consistently sized, which is ideal for even dipping and a professional appearance. Roll the portioned dough into smooth, tight balls. If the mixture feels a bit too sticky or oily to roll easily, don’t worry! A quick 15-20 minute chill in the refrigerator will firm it up, making the rolling process much smoother and less messy.
- Chill Before Dipping: Arrange the rolled balls on a parchment-lined tray and refrigerate them again for at least 15-30 minutes. This chilling step is vital! Firm, cold truffle balls are much easier to dip in melted chocolate, preventing them from crumbling or losing their shape. Once they are sufficiently firm, they’re ready for their chocolate bath.
- Melt Chocolate and Dip: Gently melt your chosen white chocolate wafers. We recommend using a microwave, heating in short 30-second bursts, stirring well between each burst to prevent scorching. Once the chocolate is smooth and fluid, it’s time to dip! Submerge each chilled truffle ball, ensuring it’s fully coated. Decorate immediately if desired, then allow the chocolate to harden completely before serving. Room temperature is often best for hardening, as the fridge can sometimes cause chocolate to “bloom” or develop streaks.
Essential Ingredients for Perfect Golden Oreo Truffles
Crafting the perfect Golden Oreo Truffles starts with selecting the right ingredients. Each component plays a crucial role in achieving that ideal flavor and texture. Here’s what you’ll need and why specific choices matter:
- Family-Size Golden Oreos: While our classic chocolate Oreo balls recipe often calls for a standard-size package of regular Oreos, for these vanilla-flavored truffles, we’ve found that a **family-size package** of Golden Oreos (typically 18.12 ounces, yielding about 48 cookies) works best. The larger quantity ensures the perfect cookie-to-cream-cheese ratio, preventing the mixture from becoming too wet or soft, which can happen with smaller packages.
- Full-Fat, Brick-Style Cream Cheese: This is non-negotiable for the best results. The rich fat content in full-fat, brick-style cream cheese provides the necessary structure and creamy texture for the truffle base. Lower-fat options or cream cheese from a tub often have higher water content and different stabilizers, which can make your truffle mixture too loose and difficult to roll. Ensure it’s at room temperature for smooth blending.
- High-Quality White Chocolate Melting Wafers: Many truffle recipes suggest expensive baking bars, but for ease and excellent results, we highly recommend quality white chocolate melting wafers. Brands like Ghirardelli offer a rich, indulgent flavor and, more importantly, are designed to melt smoothly without tempering. This saves you the hassle of chopping chocolate and ensures a silky, even coating that hardens beautifully. You’ll be amazed at how simple the dipping process becomes with these wafers!
- Coconut Oil (Optional but Recommended): Adding just a touch of coconut oil (or shortening) to your melted chocolate makes a significant difference. It helps to thin the chocolate slightly, creating a smoother, more fluid consistency that coats the truffles effortlessly. If you find your chocolate is too thick and isn’t coating the balls nicely, simply stir in an additional 1/2 teaspoon of coconut oil until the desired consistency is achieved.
The Art of Dipping: Achieve a Flawless Chocolate Coating
Achieving a perfectly smooth and even chocolate coating on your Golden Oreo Truffles is easier than you think with this simple technique:
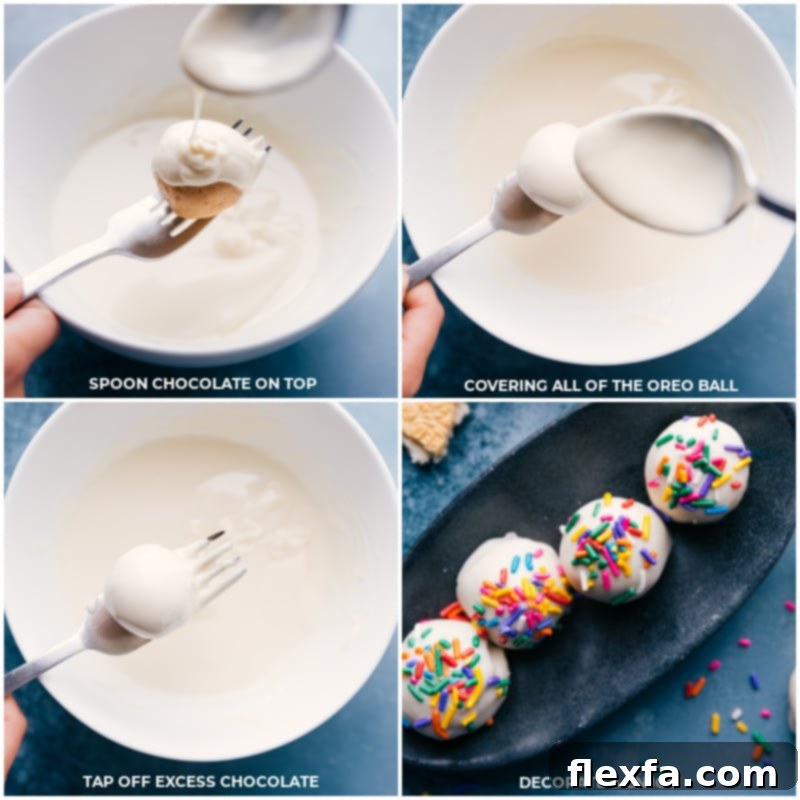
1. Dip a fork (a regular dinner fork works well) into the melted white chocolate, allowing a small amount to adhere.
2. Place a **chilled** truffle ball directly on top of the chocolate-dipped fork.
3. With your other hand, use a spoon to generously pour melted chocolate over the entire ball, ensuring full coverage.
4. Gently tap the fork against the edge of your bowl a few times. This helps to smooth out any excess chocolate and remove air bubbles, resulting in a sleek finish.
5. Carefully slide the bottom of the fork against the edge of the bowl to scrape off any remaining excess chocolate.
6. Finally, use a table knife to gently nudge and slide the coated ball off the fork and onto a parchment-lined tray. This allows them to harden without sticking. Repeat this process until all your truffles are beautifully dipped!
Elevate Your Truffles: Creative Decoration Ideas (Optional)
While Golden Oreo Truffles are utterly delicious on their own, adding a decorative touch can transform them into stunning, gourmet-looking treats. Here are some fantastic ideas to jazz them up:
- Elegant Chocolate Drizzle: For a sophisticated look, add a drizzle of melted milk, semi-sweet, or dark chocolate. If you want a crisp, distinct drizzle, wait until the white chocolate coating has completely set before adding it. For a softer, “bled-in” effect where the chocolates merge slightly, apply the drizzle immediately after dipping the ball in white chocolate, while it’s still wet.
- Crushed Oreo Topping: Enhance the Oreo flavor and texture by sprinkling some finely crushed Golden Oreo crumbs on top. Do this while the white chocolate is still wet to ensure the crumbs adhere beautifully. You can even mix in a few chocolate Oreo crumbs for a striking contrast!
- Vibrant Sprinkles & Nuts: Add a pop of color and extra crunch with mini chocolate chips, finely chopped nuts (like pecans or almonds), or colorful sprinkles. These are perfect for themed parties or holidays. Remember to add them immediately after dipping, before the chocolate hardens.
Time-Saving Decoration Tip
White chocolate hardens remarkably quickly, so efficiency is key when decorating! Ensure all your chosen decorations (sprinkles, crushed cookies, melted drizzle chocolate in a piping bag) are prepped, laid out, and ready to go *before* you start dipping the truffles. This way, you can add them immediately to the wet chocolate, guaranteeing they stick perfectly.
Storage and Make-Ahead Brilliance
Because these Golden Oreo Truffles contain cream cheese, proper storage is essential for both safety and freshness. Always keep them refrigerated when not actively serving. If left out for an extended period, they can become unsafe to eat. Store these delectable treats in an airtight container in the refrigerator, where they will maintain their deliciousness and texture for 5-7 days. This makes them an ideal make-ahead dessert for parties, holidays, or simply to enjoy throughout the week!
Explore More Irresistible No-Bake Desserts
Love the ease and deliciousness of no-bake treats? Dive into our collection of other fantastic desserts that require no oven time, perfect for satisfying your sweet tooth with minimal effort:
- No Bake Brownie Bites with a decadent chocolate coating
- Muddy Buddies a classic chocolate and peanut butter snack mix
- Trail Mix Five diverse and delicious recipes!
- Edible Cookie Dough safe and scrumptious, without eggs!
- Chocolate Covered Strawberries elegant and simple, with a delicate chocolate drizzle

★
★
★
★
Golden Oreo Truffles
Chelsea Lords
25
20
45
36
Oreo Balls
Video
Equipment
-
Blender
or food processor -
Hand mixer
or stand mixer -
Large sheet pan (15″ x 21″)
Ingredients
-
1
(18.12-ounce) package
Golden Oreos
48 cookies (family-sized package), finely crushed, see note 1 -
1
(8-ounce) package
cream cheese
full-fat, brick-style, at room temperature -
1
(10-ounce) package
white chocolate melting wafers
about 2 cups, see note 2 -
2
teaspoons
coconut oil
optional
Instructions
-
Place whole Golden Oreo cookies (no need to separate cookie from creme) in a blender or food processor. Pulse until they are very fine crumbs. Ensure there are no large pieces and transfer to a large bowl or stand mixer.
-
Add the softened cream cheese (should be at room temperature, not too cold but not melted) to the Oreo crumbs. Using a hand mixer or the whisk attachment on a stand mixer, beat until ingredients are well combined and smooth. (Alternatively, knead with your hands until smooth and combined.)
-
Use a 1-tablespoon measuring spoon to portion out even-sized dough balls. (If the mixture is too wet and hard to shape, chill the mixture, uncovered, for 15–20 minutes before rolling). Place balls on a large parchment-lined sheet pan and chill for another 15 minutes to firm them up. You should yield approximately 36 balls.
-
When the balls are almost done chilling, add the white chocolate melts and 2 teaspoons coconut oil to a microwave-safe bowl. Melt in the microwave in bursts of 30 seconds, stirring thoroughly between each burst for 15 seconds (see note 3). Be patient during microwaving to avoid burning the chocolate—much of the melting actually occurs outside the microwave as you stir.
-
Once the chocolate is melted and smooth, coat the cookie balls. I recommend dipping a fork in the chocolate, then taking a chilled ball from the lined pan and placing it on the dipped fork. With a spoon in my other hand, I spoon the melted chocolate over the ball. Tap the fork a few times against the bowl to smooth the chocolate and drag the fork across the edge of the bowl to remove excess. Use a table knife to gently push the ball off the fork and back onto the lined sheet pan. Repeat until all the balls have been dipped. Allow dipped truffles to harden at room temperature (not in the fridge/freezer, which can cause cracking or blooming). See note 4 for troubleshooting tips.
-
If desired, add any toppings immediately before the chocolate sets (work quickly—white chocolate hardens fast!). Let them set completely, and then they’re ready to enjoy! Store any leftovers in an airtight container in the fridge for up to a week.
Recipe Notes
Note 2: Chocolate chips or baking morsels often contain stabilizers that prevent them from melting completely smooth, leading to a grainy texture. For the best coating, I strongly recommend using chocolate specifically made for melting, such as good quality baking bars (like Baker’s, Lindt, or Ghirardelli) or good quality melting wafers (such as Ghirardelli). Both bars and melts can be found in the baking aisle of most grocery stores – I prefer melting wafers for their incredible ease of use!
Note 3: To prevent scorching or seizing the chocolate, heat it in short bursts and stir frequently. A significant amount of melting happens from residual heat after it’s removed from the microwave. Aim for warm, not hot, chocolate and let it cool slightly to room temperature once smoothly melted for optimal dipping.
Note 4: TROUBLESHOOTING: If the chocolate is too thick and not coating the cookie ball well, add 1/2 teaspoon additional coconut oil, stirring until smooth. If the chocolate begins to harden while you are still dipping, simply reheat the melted chocolate in the microwave in short bursts, stirring well. Depending on how quickly you work and how fast the chocolate hardens, you might need to re-melt the chocolate a few times during the process.
Storage: Store Golden Oreo Truffles in an airtight container in the fridge for 5–7 days.
Nutrition
Serving:
1
serving
|
Calories:
126
kcal
|
Carbohydrates:
15
g
|
Protein:
1
g
|
Fat:
7
g
|
Saturated Fat:
4
g
|
Polyunsaturated Fat:
1
g
|
Monounsaturated Fat:
2
g
|
Cholesterol:
6
mg
|
Sodium:
72
mg
|
Potassium:
20
mg
|
Fiber:
0.2
g
|
Sugar:
11
g
|
Vitamin A:
76
IU
|
Calcium:
9
mg
|
Iron:
0.3
mg
Nutrition information is automatically calculated, so should only be used as an approximation.
Enjoyed this recipe? Leave a comment below!