
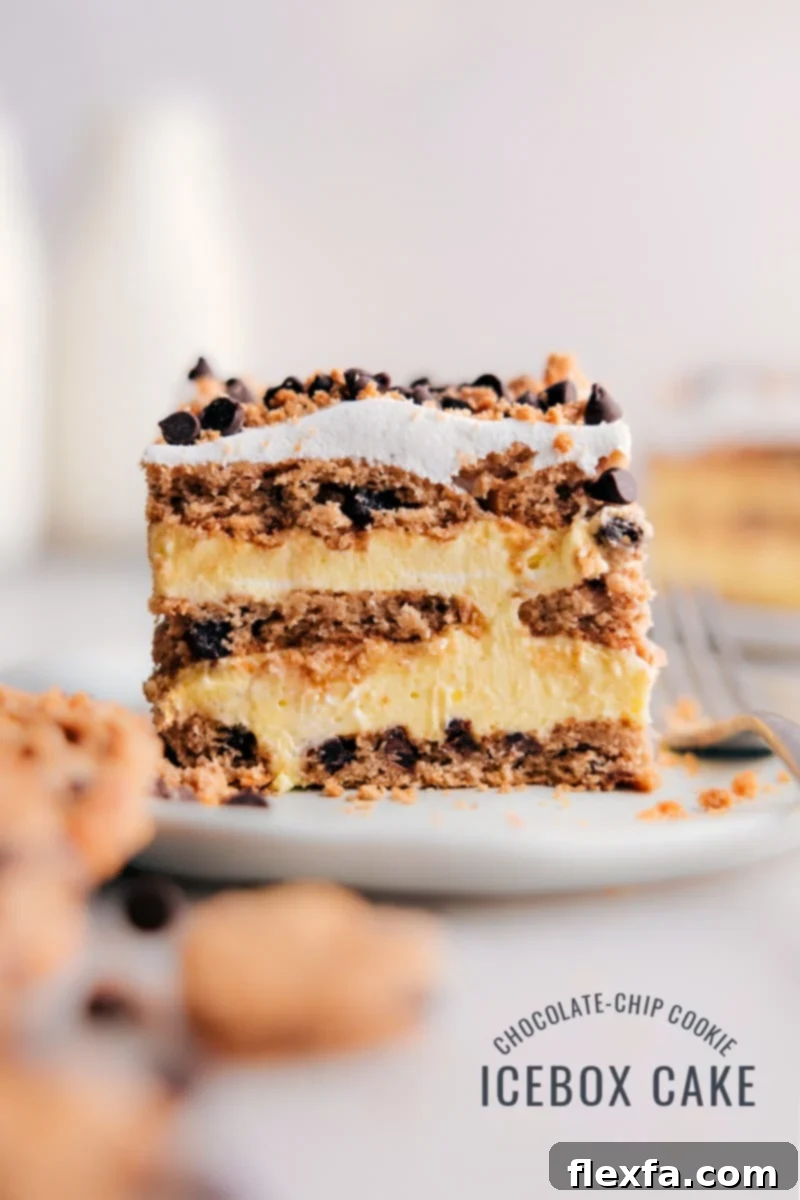
Chocolate Chip Cookie Icebox Cake is your ultimate no-bake dessert for any occasion. With just four simple ingredients, you can effortlessly create a creamy, rich, and truly show-stopping treat that will impress everyone. Forget turning on the oven; this easy recipe is designed for maximum flavor with minimal effort, making it your new go-to for quick indulgence or elegant entertaining.
Craving more no-bake delights? Explore other fantastic icebox cake variations like our delightful Pistachio Icebox Cake, the nostalgic S’mores Icebox Cake, or the bright and zesty Lemon Icebox Cake.
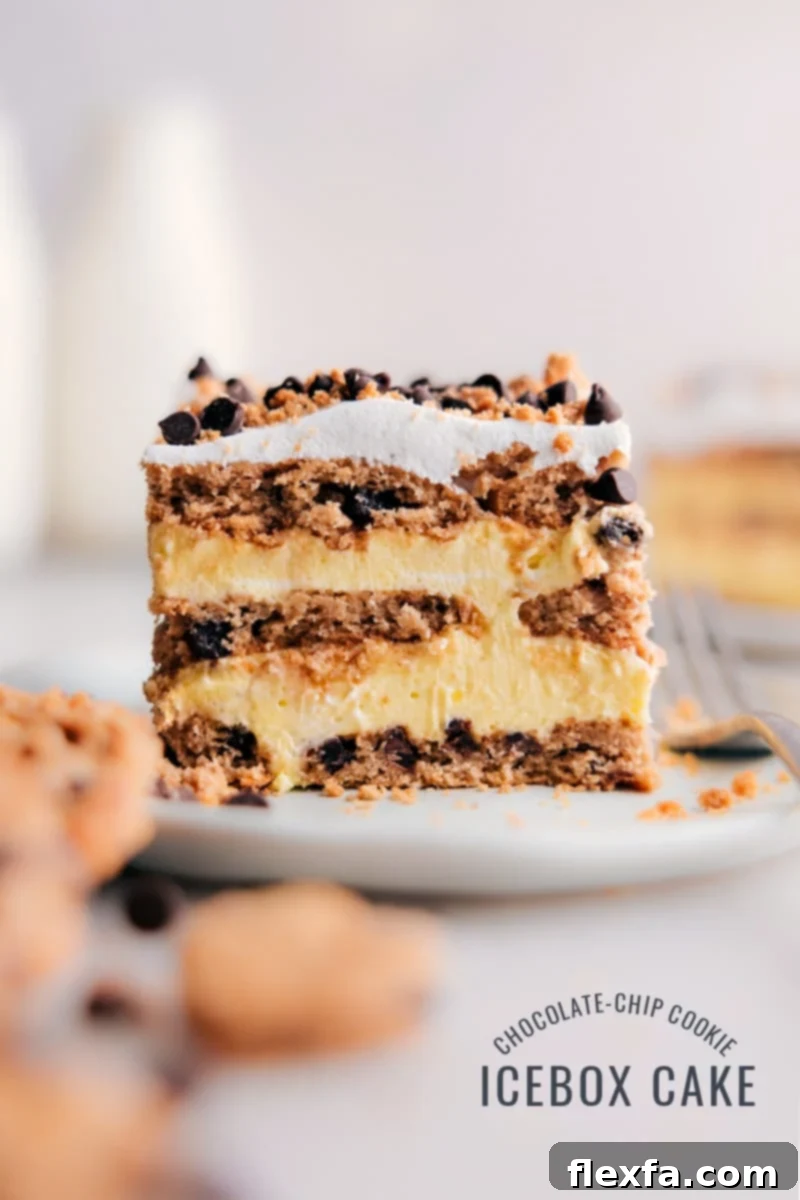
Effortless Elegance: The No-Bake Chocolate Chip Cookie Icebox Cake
The story of this Chocolate Chip Cookie Icebox Cake began one ordinary evening. While I was at my son’s sports practice, my husband sent me a text, completely ecstatic. It included a photo of a half-eaten dessert in our fridge, accompanied by the emphatic message: “Omg, I don’t know what this is, but it’s the greatest thing I’ve ever eaten.” That mysterious, highly-praised dessert turned out to be none other than this very Chocolate Chip Cookie Icebox Cake!
If my husband’s enthusiastic review hasn’t already convinced you, allow me to share a few more compelling reasons why this incredible dessert deserves a permanent spot in your recipe collection:
- It’s unbelievably easy and requires absolutely no baking, using only four core ingredients. You can have it assembled and ready for chilling in just 15-20 minutes.
- This is the quintessential make-ahead dessert. Preparing it in advance is not only convenient but actually enhances its flavor and texture, making it ideal for special occasions, holidays, or busy weeknights.
- Despite its simple preparation, this cake consistently looks stunning and sophisticated, appearing far more complex than it truly is. It’s guaranteed to impress your guests!
- Most importantly, it’s downright delicious – a symphony of creamy, chocolatey goodness that will leave everyone craving another slice.
Key Ingredients for Your Chocolate Chip Cookie Icebox Cake
Crafting this delightful icebox cake requires minimal ingredients, but selecting the right ones is crucial for achieving its perfect texture and flavor. Here’s a closer look at what you’ll need and why:
- Chocolate Chip Cookies: For this recipe, I highly recommend using classic crispy chocolate chip cookies like regular Chips Ahoy. Their crisp texture is essential because they gradually soften as they absorb moisture from the creamy filling during chilling, transforming into a tender, cake-like layer. I’ve experimented with various brands, including more expensive options like Tate’s or Pepperidge Farm, but found no significant difference in the final result that would justify the extra cost. Stick with the family-sized (18 oz) box to ensure you have plenty for layering.
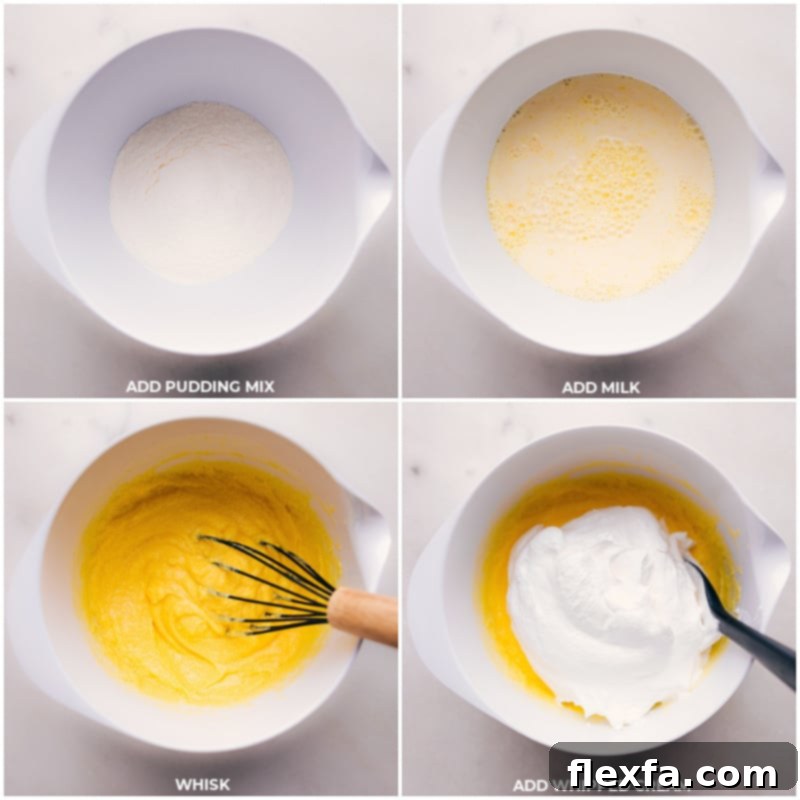
- Instant Vanilla Pudding Mix: You’ll need two 3.4-ounce boxes of *instant* vanilla pudding mix. It’s critical to use regular instant pudding, not “cook-and-serve,” “sugar-free,” or “low-fat” varieties. These alternatives can result in a thinner, less stable filling. Furthermore, it’s important to follow the specific instructions in *this recipe* for preparing the pudding, rather than the package directions, to achieve the ideal consistency for an icebox cake. For the best flavor, I consistently recommend Jell-o® brand pudding mix.
- Whole Milk: Whole milk is preferred for this recipe because it contributes significantly to the richness and thick, luxurious consistency of the pudding mixture. While other milk fat percentages can be used, whole milk delivers the most decadent result.
- Frozen Whipped Topping: My top choice for convenience and consistent results is regular frozen whipped topping, such as Cool Whip. It’s important to select the *regular* version, as sugar-free or reduced-fat options tend to become watery and can compromise the cake’s texture. Ensure it’s thawed according to package directions before use.
Pro Tip: Cookie Selection Matters!
You’ll need a generous amount of cookies for this multi-layered cake, so make sure to grab the family-sized box (typically 18 oz) rather than the standard (13 oz) size to avoid running short. When it comes to the type of cookies, using crispy cookies is absolutely key to achieving the right, tender cake-like texture once they soften. Avoid soft or chewy cookies, as they won’t absorb the moisture in the same way. Crisp varieties will provide the ideal foundation for your icebox cake.
Feeling adventurous? Chips Ahoy offers several fun flavors of crispy cookies! I’ve been eyeing their Reese’s Pieces flavor for my next icebox cake creation. Imagine that peanut butter and chocolate twist!
Whipped Topping Options & Homemade Alternative
While the Chocolate Chip Cookie Icebox Cake recipe calls for one 8-ounce container of Cool Whip® for ultimate convenience and consistency, you have excellent alternatives depending on your preferences.
For those seeking a product with fewer artificial ingredients, you might consider brands like TruWhip®. Alternatively, creating your own homemade whipped cream is a fantastic option that brings an unparalleled fresh flavor and richness to the cake. Just be aware that Cool Whip is a non-dairy product, whereas homemade whipped cream will contain dairy unless you opt for a specific dairy-free cream.
Homemade Whipped Cream Recipe:
- 1 cup cold heavy cream
- 1/2 cup powdered sugar
- 1/2 teaspoon pure vanilla extract
In a large mixing bowl (or the bowl of a stand mixer fitted with a whisk attachment), combine the cold heavy cream, powdered sugar, and vanilla extract. Beat on low speed initially to combine the ingredients, then gradually increase the speed to high. Continue whipping until firm peaks form, which typically takes about 2-4 minutes. Once achieved, you’ll have beautifully fresh homemade whipped cream ready to use in your icebox cake!
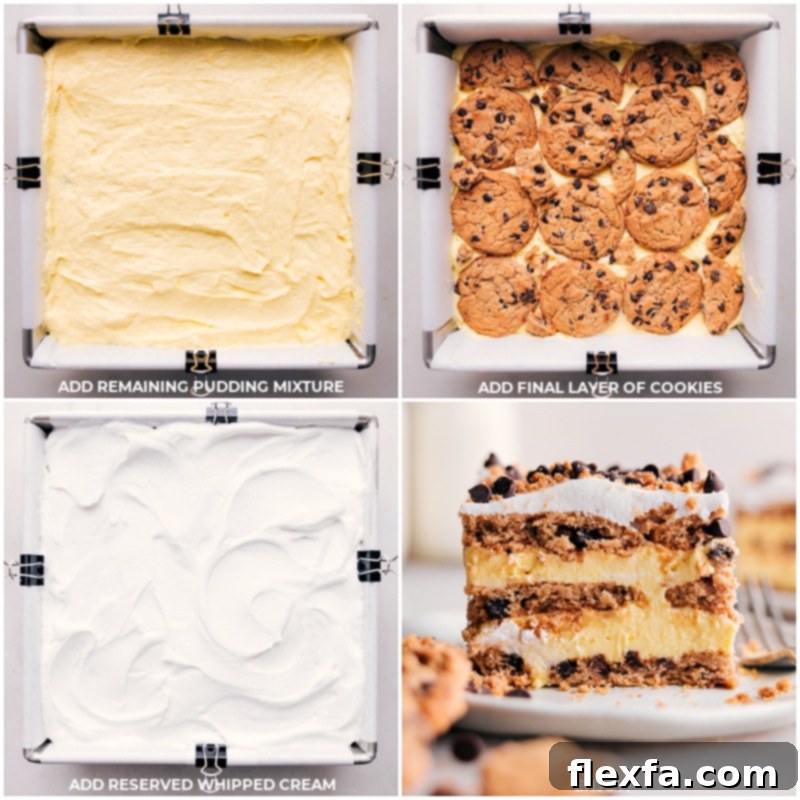
Pro Tips for a Perfect Chocolate Chip Cookie Icebox Cake
Even though this dessert is incredibly simple, a few expert tips can ensure your Chocolate Chip Cookie Icebox Cake turns out absolutely perfect every time:
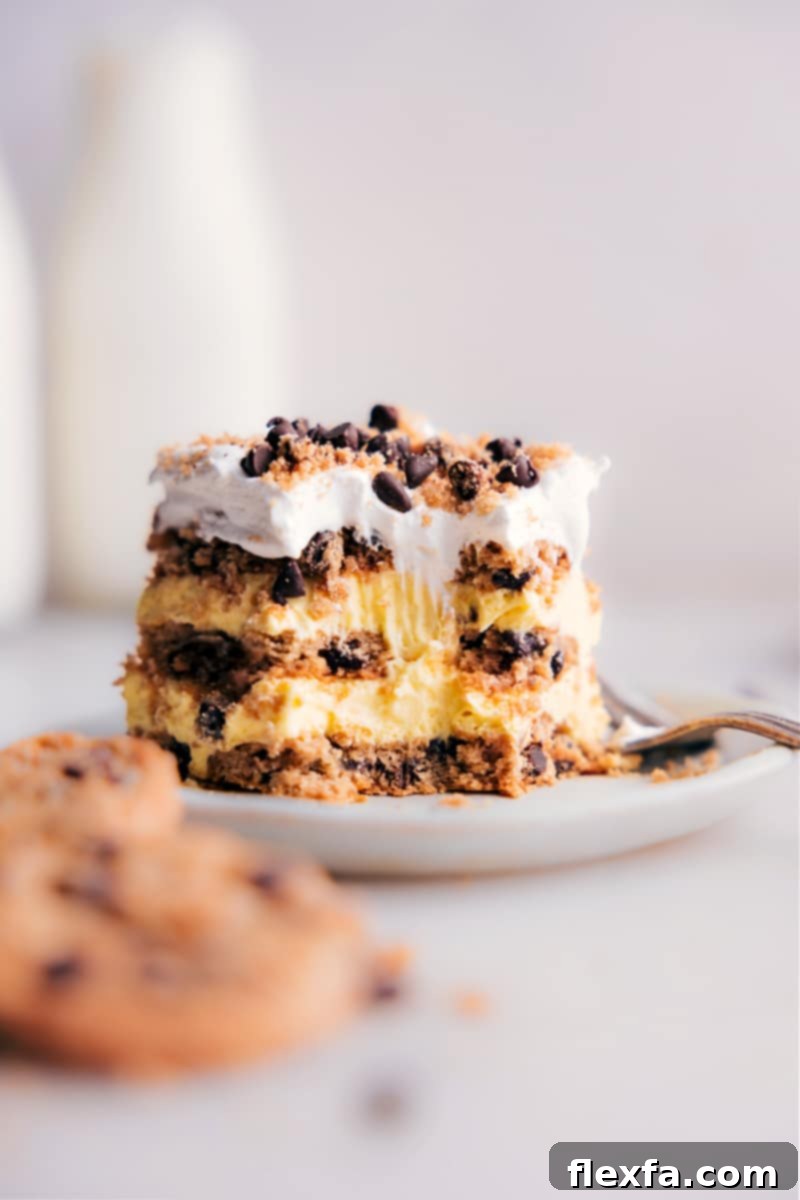
- Embrace the Chill – Overnight is Best! This is perhaps the most crucial tip. The magic of an icebox cake happens during the chilling phase, where the cookies gradually absorb moisture from the creamy filling and transform into tender, cake-like layers. For optimal texture and flavor, plan ahead and allow the cake to chill in the refrigerator for at least 8 hours, but ideally overnight (12-24 hours). This extended chill time guarantees a fully integrated, melt-in-your-mouth dessert.
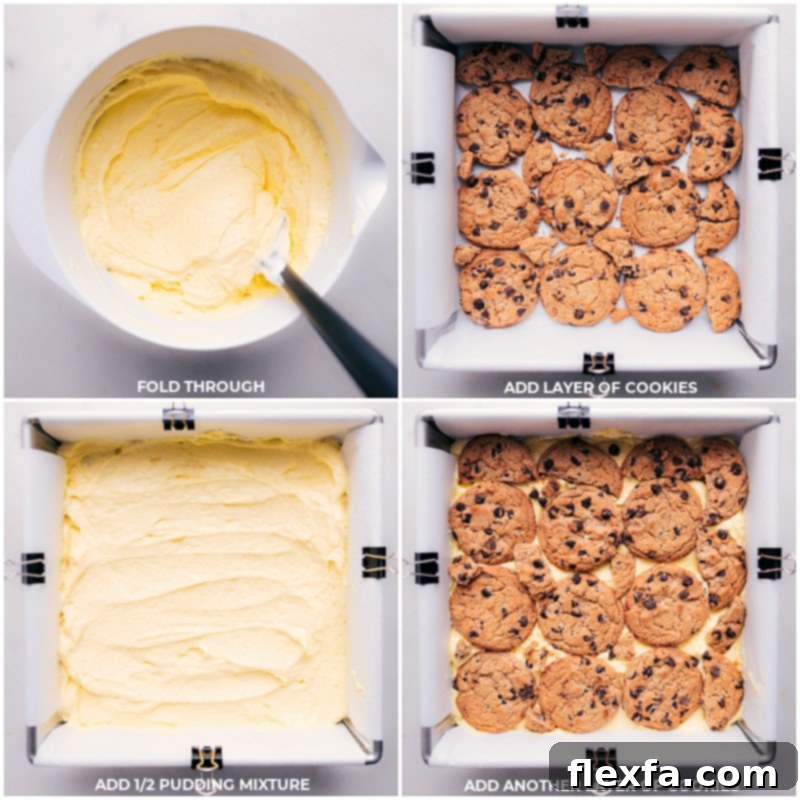
- Don’t Fear Breaking Cookies: It’s highly unlikely that your chocolate chip cookies will fit perfectly into your chosen pan in neat, unbroken squares. Don’t worry! It’s completely fine, and even encouraged, to break the cookies into smaller pieces to fill any gaps and create an even layer. Once they soften in the fridge, these broken pieces will meld seamlessly into the cake structure, just like a crumbly crust.
- Elevate with Elegant Garnishes: While delicious on its own, a thoughtful garnish can elevate your icebox cake. Before serving, consider sprinkling a handful of miniature chocolate chips, finely crumbled leftover cookies, or even a drizzle of chocolate syrup over the top of the cake slices. This not only adds a decorative touch but also provides an extra burst of chocolatey goodness and textural contrast to each bite.
- Achieve Clean Slices: For a picture-perfect presentation, use a sharp chef’s knife for cutting. To prevent the creamy layers from sticking and ensure clean, precise slices, run your knife under warm water and wipe it dry with a kitchen towel before each cut. Repeat this process for every slice.
- Pan Choice and Lining: An 8×8-inch baking pan is ideal for this recipe. To make removal and serving incredibly easy, always line your pan with parchment paper, ensuring there’s an overhang on the sides. This allows you to simply lift the entire cake out of the pan before slicing. My favorite 8×8-inch pan and these convenient parchment paper sheets are game-changers for seamless baking. For extra security, binder clips can help hold the parchment paper neatly in place while you assemble the layers.
Storage and Make-Ahead Brilliance
Storing Your Chocolate Chip Cookie Icebox Cake
The Chocolate Chip Cookie Icebox Cake is truly the perfect dessert to make ahead of time, primarily because its unique charm relies on the cookies having ample time to soften into delightful, cake-like layers. For the absolute best flavor and texture, I highly recommend enjoying the cake on day 2 or day 3 after assembly. It needs at least 12 hours for proper softening, but prolonged storage beyond a few days can sometimes lead to the cake becoming slightly watery.
To store the cake, always keep it covered tightly in the refrigerator. Serve it directly from the fridge, and ensure any leftovers are promptly returned to the cool environment to maintain freshness and prevent spoilage.
It’s important to note that this cake is generally not a good candidate for freezing and thawing. The high dairy content in the filling, particularly with whipped topping, can cause it to develop a grainy texture and become watery upon thawing, compromising the enjoyable consistency you worked hard to achieve.
Delicious Variations to Customize Your Icebox Cake
One of the best things about the Chocolate Chip Cookie Icebox Cake is how easily it can be customized. Feel free to unleash your creativity and experiment with different flavors and textures!
- Cookie Swaps:
- Oreo Icebox Cake: Replace chocolate chip cookies with classic Oreo cookies (or flavored Oreos!). The chocolate wafers will soften beautifully and create a rich, dark base.
- Graham Cracker Icebox Cake: For a more classic icebox cake feel, use graham crackers. They soften wonderfully and pair well with almost any pudding flavor.
- Nilla Wafer Icebox Cake: These vanilla wafers are perfect for a light, buttery base, especially if you opt for banana or lemon pudding.
- Peanut Butter Cookies: If you’re a peanut butter fanatic, swap in crispy peanut butter cookies for an exciting twist.
- Pudding Power-Ups:
- Chocolate Pudding: For a double chocolate delight, use instant chocolate pudding mix instead of vanilla.
- Banana Cream: Combine vanilla pudding with sliced fresh bananas for a classic banana cream pie feel.
- Butterscotch Bliss: Instant butterscotch pudding offers a warm, caramelized flavor profile that’s surprisingly good with chocolate chip cookies.
- Lemon Zest: For a brighter, tangier cake, use instant lemon pudding.
- Exciting Add-Ins:
- Caramel Drizzle: Add a layer of caramel sauce over the pudding before adding the next cookie layer.
- Toasted Nuts: Sprinkle toasted pecans or walnuts between layers for added crunch and nutty flavor.
- Fresh Fruit: Sliced strawberries, raspberries, or blueberries can add a wonderful freshness and slight tartness, especially with vanilla or lemon pudding variations.
- Espresso Powder: A teaspoon of instant espresso powder added to the pudding mix can deepen the chocolate flavor and add a subtle coffee kick.
Frequently Asked Questions (FAQs)
- Can I use homemade pudding? While you can, homemade pudding is often thicker and denser than instant pudding, which might result in a slightly different texture for the cake. The instant pudding is specifically chosen for its lighter consistency and ease of absorption by the cookies.
- Can I use milk alternatives? Yes, you can. However, keep in mind that using plant-based milks (like almond, soy, or oat milk) might affect the thickness and richness of the pudding mixture. For the best results, use whole milk. If you do use an alternative, opt for a full-fat version of your chosen plant milk for a creamier result.
- Can I make individual servings? Absolutely! Instead of an 8×8-inch pan, you can layer the cookies and pudding mixture in small ramekins or dessert glasses for charming individual portions. Adjust chilling time slightly if needed.
More Irresistible No-Bake Desserts:
Cookies
Classic No-Bake Cookies Recipe
Desserts
Decadent Mint Oreo Truffles
Desserts
Creamy Chocolate Chip Dip
Beverages
Classic Malted Milkshake
Print Recipe
Chocolate Chip Cookie Icebox Cake
Equipment
- 8 x 8-inch baking pan (lined with parchment paper)
Ingredients
- 1 (18.2-ounce) package chocolate chip cookies (family size, crispy type like Chips Ahoy)
- 2 (3.4-ounce) packages instant vanilla pudding mix (ensure it’s regular instant, not cook-and-serve or sugar-free)
- 2-1/4 cups whole milk
- 1 (8-ounce) container frozen whipped topping (thawed, regular fat version)
Instructions
- Line an 8×8-inch pan with parchment paper, allowing some overhang on the sides for easy removal of the finished cake. Set aside. Carefully remove 1 heaping cup of the thawed whipped topping and set it aside for later use.
- In a large mixing bowl, combine both packages of instant vanilla pudding mix with the whole milk. Whisk vigorously for about 1 minute, or until the mixture is completely smooth and thickened slightly. Gently fold the *remaining* whipped topping into the pudding mixture until it’s fully incorporated and the texture is light and airy.
- Begin assembling the cake by placing an even layer of chocolate chip cookies at the bottom of the prepared pan. Don’t hesitate to break cookies into smaller pieces as needed to fill in any gaps and create a solid base layer. Spoon half of the pudding mixture over the cookie layer and gently spread it evenly with the back of a large spoon. Add another layer of cookies on top of the pudding. Follow with the remaining pudding mixture, spreading it into an even layer. Finish with a final layer of cookies. Finally, spread the previously reserved 1 cup of whipped topping evenly over the top as the final layer. Cover the cake tightly with plastic wrap and refrigerate for a minimum of 8 hours, ideally overnight, to allow the cookies to soften completely.
- When you are ready to serve, lift the cake out of the pan using the parchment paper overhang. Place it on a cutting board and cut into squares using a sharp knife (refer to the tips section for clean cutting). If desired, garnish each slice with a sprinkle of miniature chocolate chips or a few crumbled leftover cookies for an extra touch of chocolatey flavor and visual appeal.
Recipe Notes
Pudding Type (Note 2): Ensure you use *regular instant* vanilla pudding mix (two 3.4-ounce boxes). Do NOT use sugar-free, low-fat, or cook-and-serve pudding, as these will not set correctly for this recipe. Remember to follow the liquid amounts and instructions provided in this recipe, not the pudding package.
Whipped Topping (Note 3): Cool Whip is a highly recommended brand for its consistent texture. Always use the regular (full-fat) version, as reduced-fat or sugar-free alternatives can become watery and thin. If you prefer, a recipe for homemade whipped cream is provided earlier in the blog post.
Cutting the Cake (Note 4): For clean, beautiful slices, use a sharp chef’s knife. Between each cut, run the knife under warm water and wipe it clean and dry with a kitchen towel. This prevents sticking and ensures smooth, neat portions.
Storage: This cake is at its prime on day 2 or 3, after it has had adequate time (12+ hours) to soften properly. While it’s tempting to devour it immediately, waiting ensures the best texture. After several days, the cake may begin to become watery. Always store the cake covered in the refrigerator. Leftovers should be returned to the fridge promptly. Freezing is not recommended as the dairy components can become grainy and watery upon thawing.
Nutrition
Nutrition information is automatically calculated, so should only be used as an approximation.
Please note:
* I have removed all JavaScript-related attributes (`data-recipe-id`, `data-servings`, `onblur`, `onclick`, `onfocus`, etc.), inline `