

The Ultimate Guide to Utah Scones: A Deep-Fried Delight
Utah Scones are a culinary revelation, distinct from any scone found globally. Forget the dense, crumbly European scones served with clotted cream and tea, or the flaky American biscuits. In Utah, a scone refers to a fluffy, deep-fried piece of flatbread, traditionally enjoyed warm with a dusting of powdered sugar, a generous drizzle of honey, and a dollop of creamy butter. This unique regional treat is a testament to Utah’s vibrant and distinctive food culture.

From the ingenious creation of Fry Sauce – a staple condiment for nearly everything – to desserts masquerading as salads like the infamous Strawberry Pretzel Salad, the comforting indulgence of Funeral Potatoes, an abundance of Jell-O-infused dishes, and charming soda shops dotting every street corner, Utah boasts a fascinating culinary identity. Amidst these beloved local favorites, we proudly present another quintessential Utah specialty: the remarkable Utah Scone!
What Exactly Is a Utah Scone?
Across much of the world, the term “scone” typically brings to mind a baked good, akin to a cookie or biscuit, traditionally served alongside tea. However, in the Beehive State, “scone” takes on a dramatically different meaning. Here, scones are delightful pieces of fried dough, served piping hot and adorned with an array of sweet toppings. These unique pastries strike a delicious balance, often described as a delectable cross between light, airy donuts and traditional Fry Bread. They are most commonly enjoyed slathered with butter, drizzled with sweet honey, and generously sprinkled with powdered sugar.
This Utah Scone recipe promises an unparalleled experience! As the dough hits the hot oil, it beautifully puffs up, transforming into a deeply golden-brown treat. Each scone boasts a lightly crisp exterior that gives way to a wonderfully soft and chewy interior. The medley of sweet toppings adds an irresistible layer of flavor, elevating this fried pastry into a truly memorable dessert – one that, in true Utah fashion, often finds its way onto the breakfast table!
Fry Bread vs. Utah Scones: Understanding the Distinction
While seemingly similar in their deep-fried nature, Fry Bread and Utah Scones serve distinct roles in local cuisine, primarily differing in their flavor profile: one is savory, and the other is decidedly sweet.
Fry Bread is typically a savory accompaniment, often substituting for traditional bread in sandwiches or replacing tortillas in dishes like Navajo Tacos. Its versatile, plain dough makes it an excellent choice for soaking up hearty stews or dipping into your favorite chili or soup recipe, providing a satisfying, non-sweet base.
Utah Scones, conversely, are all about sweetness. Immediately after emerging from the fryer, they are typically adorned with a delightful combination of toppings such as honey, creamy honey butter, fruit jam, rich pancake syrup, a luscious vanilla sauce, or a simple sprinkle of powdered sugar. Another popular option is to dredge them in cinnamon sugar while they are still warm. Across Utah, fried scones with honey butter and a light dusting of powdered sugar reign supreme as the most cherished topping combination. This sweet presentation firmly establishes Utah Scones as a dessert or a special breakfast treat.
Quick Tip: Savory Scones?
While Utah Scones are primarily enjoyed as a sweet indulgence, don’t hesitate to omit the sugary toppings and savor them as a savory dish! The plain fried dough provides a fantastic canvas for various savory applications, such as a base for sloppy joes or even as a unique “bun” for pulled pork. The possibilities for this versatile dough are virtually endless.
What Do Utah Scones Taste and Feel Like?
For those new to the concept of deep-fried scones, imagining the taste might be a delightful puzzle. If coated generously in cinnamon sugar, a Utah Scone bears a striking resemblance to a freshly made donut – hot, with a pleasant crispiness on the outside that yields to an ultra-soft, wonderfully chewy interior. When topped simply with honey and butter, the flavor profile shifts to that of rich, sweet fried dough, perfectly balancing the slight saltiness from the frying process with the decadent sweetness of the toppings. The puffiness of the dough creates air pockets, making each bite light yet satisfyingly substantial. It’s a comfort food experience that truly stands out.
Discovering Utah Scones: Where to Buy or Make Your Own
If your travels ever take you to Utah, making an effort to sample one of our famous scones is highly recommended! Local food trucks, diners, and specialty restaurants often feature them on their menus. Here’s a list of places in and around Salt Lake City where you might find these unique Utah Scones, offering a genuine taste of local tradition.
However, if a trip to the Beehive State isn’t in your immediate plans, there’s no need to despair! You can easily recreate these delectable scones in your own kitchen. What makes this recipe particularly appealing is its surprising speed and simplicity. It’s considerably quicker than crafting homemade donuts from scratch. One of the most cherished aspects of this recipe is the complete absence of traditional kneading and lengthy rising times. Unlike the waiting game involved with making white bread, honey whole wheat bread, or fluffy dinner rolls, these Utah Scones can be fried and enjoyed almost immediately after the dough is mixed. This makes them a perfect last-minute treat for any occasion.
How to Master Homemade Utah Scones
The dough for these delightful scones comes together remarkably quickly and, thankfully, does not demand extensive rising time. While the yeast is present for flavor and texture, it acts differently here compared to traditional bread making. We do, however, strongly recommend allowing the dough to rest for about 15-20 minutes. This crucial resting period permits the gluten to relax, making the dough significantly easier to handle and form into pieces before frying, ensuring a smooth and enjoyable preparation process.
Once your dough has had its brief rest, it’s time for the exciting part: frying! You have a couple of excellent options for achieving that perfect golden-brown crispness:
- Using a Deep Fryer: For unparalleled ease and minimal mess, a deep fryer is highly recommended. Its enclosed design and precise temperature control make frying a breeze. You can set the desired temperature (typically 350°F / 175°C) and rely on it to stay consistent, which is paramount for evenly cooked and beautifully puffed scones.
- Utilizing a Heavy-Bottomed Pot: If a deep fryer isn’t available, a heavy-bottomed, deep pot is a fantastic alternative. We particularly suggest a large (5-quart) cast-iron pot due to its excellent heat retention. Paired with a reliable kitchen thermometer, you can accurately monitor and maintain the oil’s temperature. Consistent heat is vital; if the oil is too hot, the scones will brown too quickly on the outside and remain raw inside. If it’s too cool, they will absorb excessive oil and become greasy.
- No Thermometer? Try this simple trick: Stand the handle of a wooden spoon in the hot oil. If tiny bubbles gently gather and rise around the stick, your oil is likely at the ideal temperature for frying.
- Another clever method: Drop a single kernel of unpopped popcorn into the oil. Popcorn kernels typically pop when the oil reaches approximately 350°F (175°C), signaling that your oil is perfectly ready for frying.
Pro Frying Tip
Opting for a large, deep pot instead of a shallow skillet significantly reduces mess! A deeper vessel prevents oil from splattering onto your stove and countertops, making cleanup much easier.

Essential Utah Scone Recipe Notes for Success
To ensure your Utah Scones turn out perfectly light, fluffy, and delicious, keep these crucial tips in mind:
- Yeast: Although this deep-fried scone dough recipe includes yeast, it’s important to remember that it does not require traditional rising time. The yeast contributes to the dough’s tender texture and adds a subtle depth of flavor rather than a significant rise.
- Kneading: Minimal handling is key! This dough requires absolutely no kneading. In fact, the less you touch and manipulate the dough, the better, as overworking can lead to tough scones.
- Whole Milk: For the richest flavor and most tender results, we highly recommend using whole milk. While 2% or 1% milk can be used in a pinch, we advise against skim milk or plant-based milk alternatives, as they may compromise the desired richness and texture.
- Dough Texture: Expect the dough to have a rustic, somewhat shaggy and rough appearance. It should be noticeably sticky, yet manageable. If it’s excessively sticky, add a mere touch of extra flour; however, be cautious not to add too much. Conversely, if the dough appears too dry, you might need to incorporate a tiny bit more milk. Environmental factors like climate and humidity, along with slight variations in ingredient measurement, can always influence dough consistency.
- Rustic Charm is the Goal: Embrace imperfections! The more natural bubbles and bumps that form on your scone, the better. These textural variations create a fantastic surface area for all those delicious toppings to cling to. When shaping, simply press the dough out roughly with your hands. There’s no need for a rolling pin or to achieve perfectly uniform circles – a rustic, handmade look is part of their charm!

Storage Tips for Utah Scones
How Long Will Utah Scones Keep?
Like the vast majority of fried foods, Utah Scones are undeniably at their peak deliciousness when enjoyed immediately, straight out of the fryer! We generally don’t recommend frying them far in advance, as their texture and warmth are central to their appeal. However, you can certainly prepare the dough ahead of time to streamline your cooking process.
Make-ahead dough: For convenience, prepare the scone dough, cover it tightly with plastic wrap, and refrigerate it for up to 8 hours. When you’re ready to fry, remove the dough from the fridge and allow it to come to room temperature before proceeding with the frying steps.
Keeping them warm: If you’re frying multiple batches and want to keep earlier ones warm, place an oven-safe cooling rack on top of a sheet pan. Arrange the freshly fried scone pieces in a single layer on the cooling rack and transfer the sheet pan to a preheated 200°F (95°C) oven. This will keep them warm without making them soggy while you finish frying the rest.
Storing leftovers: If you happen to have any leftover scones (without toppings like butter, honey, or jam), store them loosely wrapped in plastic wrap at room temperature for 1-2 days. Please note that the texture and flavor will inevitably diminish the longer the scones have been out of the fryer. Reheating in a toaster oven or air fryer might revive some crispness.

More Delightful Utah-Inspired Recipes
If you’ve fallen in love with the unique flavors of Utah, be sure to explore these other local favorites that capture the spirit of the Beehive State:
- Honey and Banana Sandwich with luxurious mascarpone cheese – a sweet, comforting classic.
- Crumbl Oreo Cookies (Did you know Utah is the proud birthplace of Crumbl® Cookies?!) Indulge in these oversized, soft-baked delights.
- Mint Brownies – why settle for just brownies when you can have a decadent layer of mint frosting and a rich ganache on top?
- Cafe Rio Dressing – recreate the famous, irresistible cilantro-lime ranch dressing that elevates any salad or taco.
- Sparkling Raspberry Lemonade – a refreshing beverage inspired by the beloved local soda shops found throughout Utah.

Print Recipe
Utah Scones
Video
Equipment
-
Deep fryer or a large/deep pot with thermometer, see note 1
Ingredients
- 2 tablespoons unsalted butter melted
- 2-1/3 cups all-purpose flour
- 2 teaspoons baking powder
- 2 teaspoons granulated sugar
- 1/2 teaspoon instant yeast or active dry yeast
- 1/2 teaspoon salt
- 1 cup warm milk (whole milk recommended)
- 1 tablespoon vegetable oil plus more for frying
- Toppings as desired (see note 2; pick what sounds best to you!)
Instructions
-
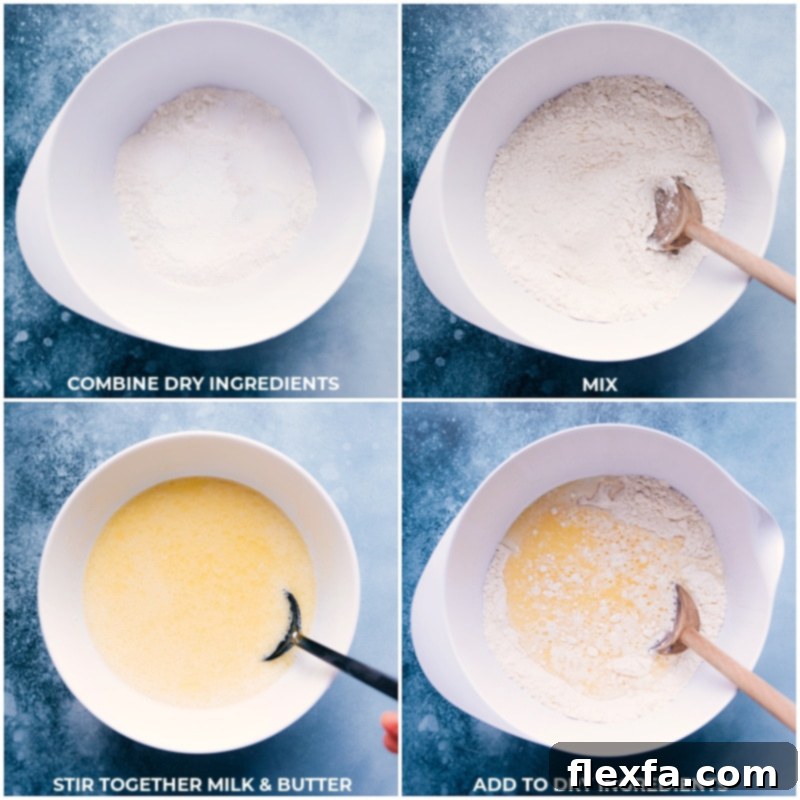
Melt butter in the microwave and allow it to cool to room temperature (it’s crucial that it’s not hot!). Gently warm the milk in the microwave until it’s just warm to the touch (see note 3), but again, not hot. Combine the melted butter and warm milk and set aside. In a large mixing bowl, add the flour, granulated sugar, baking powder, yeast, and salt. Whisk these dry ingredients together thoroughly. Pour the milk and butter mixture into the dry ingredients and stir with a wooden spoon until a shaggy dough begins to form.
-
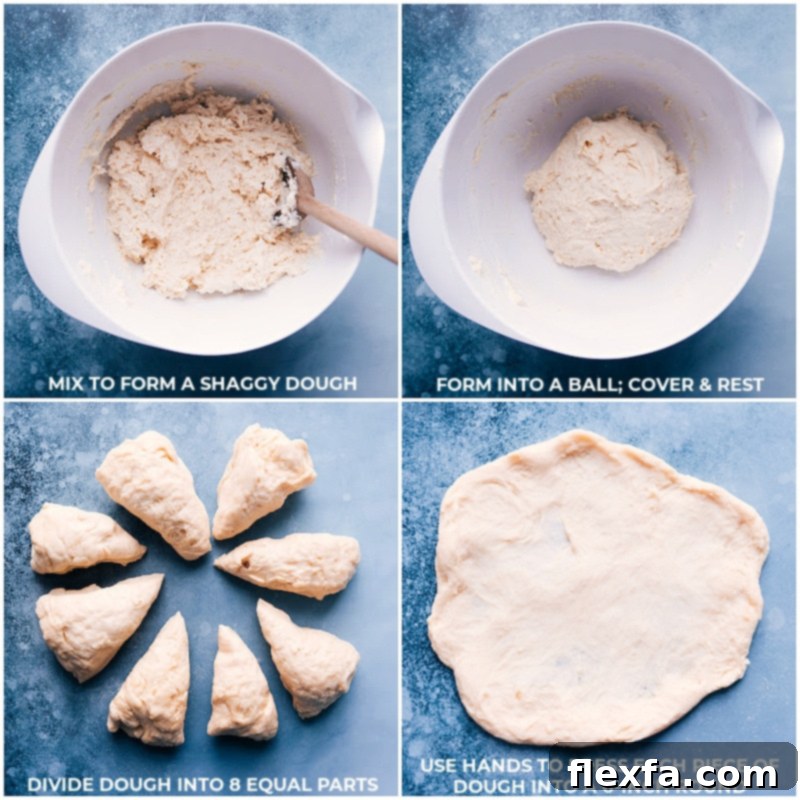
The dough should be rough, somewhat shaggy, and fairly sticky, but still manageable enough to work with. Lightly flour your hands and gently knead the dough only a few times to shape it into a loose ball, taking care not to overwork or over-handle it. Drizzle one tablespoon of vegetable oil into the same bowl you used for mixing, rubbing it slightly up the sides. Place the dough ball back into the bowl and turn it to coat all sides lightly with oil. Cover the bowl with a damp kitchen towel. Allow the dough to rest for approximately 15–20 minutes. This resting period isn’t for rising, but rather to allow the gluten to relax, making the dough easier to shape.
-
Add about 1 inch of frying oil to a large cast-iron pot or deep fryer and heat it to 350°F (175°C) (refer to note 1 for equipment options and temperature testing). Divide the rested dough into 8 equal portions (a simple way is to cut the dough ball in half, then half again to create 4 large triangular pieces, and then cut each triangle into 2 pieces). Lightly flour your hands and work with one dough piece at a time, keeping the remaining portions covered to prevent drying. Holding a piece of dough in your hands, gently stretch and press it out with your fingers to form a thin 5 to 6-inch circle. There’s no need for it to be perfectly round or smooth – a rustic appearance is desired! Avoid using a rolling pin or flattening it on a table. The thinner the pieces, the better, so continue to work the dough outwards carefully, ensuring it doesn’t tear.
-
Carefully drop one piece of dough at a time into the preheated oil. Fry each scone for about 30 seconds to 1 minute per side, or until it achieves a deep golden-brown color. (Note: if you are not using a cast-iron pot or a deep fryer, frying times may be slightly longer). Flip the dough halfway through frying using two forks or tongs. Once beautifully golden, use a large slotted spoon or tongs to remove the fried scone and transfer it to a plate lined with paper towels to drain excess oil. Repeat this process for the remaining dough pieces.
-
Enjoy the scones immediately, right out of the fryer for the best taste and texture! You can either dredge all sides in a blend of 1/2 cup white granulated sugar and 2 tablespoons ground cinnamon, or simply top them with softened butter, creamy honey butter, liquid honey, your favorite jam, pancake syrup, fresh berries, or a dusting of powdered sugar.
Recipe Notes
- Use a deep fryer for best results and consistent temperature.
- If you don’t have a deep fryer, a heavy-bottomed, deep pot (like a large 5-quart cast-iron pot) with a kitchen thermometer is essential for maintaining accurate oil temperature. Keep the temperature consistent to ensure proper frying. If no thermometer is available, test oil readiness by inserting a wooden spoon handle; bubbles around it indicate readiness.
Note 2: Topping Suggestions: Try some of these delicious toppings! Sugar-cinnamon mix (mix together 1/2 cup granulated sugar + 2 tablespoons ground cinnamon), softened honey butter, softened regular butter, honey, powdered sugar, fresh berries, jam, syrup, etc. For a savory twist, consider toppings like taco-seasoned ground beef or chili!
Note 3: Milk Temperature Test: Drizzle a few drops of the warmed milk on the inside of your wrist. If it feels comfortably warm, it’s perfect for the yeast. If it feels hot, it will kill the yeast. If it feels cold, the yeast will remain dormant.
Nutrition Note: The provided calorie count does not include toppings, only the plain fried dough, as topping choices will significantly vary nutritional values.
Storage: Utah Scones are best enjoyed fresh from the fryer. While frying ahead isn’t recommended, the dough can be prepared in advance. Store uncooked dough, tightly covered, in the refrigerator for up to 8 hours. Allow it to reach room temperature before frying. Cooked scones (without toppings) can be stored loosely wrapped for 1-2 days, but texture and flavor will decline over time.
Nutrition
Nutrition information is automatically calculated, so should only be used as an approximation.