

Welcome to the definitive guide for recreating the legendary Red Lobster Cheddar Bay Biscuits right in your own kitchen! These famous cheesy, fluffy, melt-in-your-mouth biscuits, generously slathered in a savory garlic butter, have captivated hearts for decades. Forget waiting for a restaurant visit; with this meticulously crafted copycat recipe, you can enjoy hot, fresh, irresistible biscuits anytime you desire. Prepare to elevate your home dining experience with a side dish that often steals the show!
For those eager to explore other delightful biscuit variations, you might also enjoy my Classic Drop Biscuits recipe or this quintessential American Biscuit recipe, perfect for any meal.


Author’s Note
Fluffy, Golden, Gone in Seconds!
It’s no secret why Red Lobster’s biscuits have garnered such immense fame. They are the epitome of comfort food: perfectly cheesy, wonderfully fluffy, served warm, and utterly drenched in that irresistible garlic butter. It’s a combination that’s truly hard to beat.
My own love affair with these biscuits began in college. On a student budget, frequent trips to Red Lobster were a luxury, but fate intervened during my sophomore year. I had a roommate who possessed a magical touch, crafting incredible copycat Red Lobster Biscuits using a simple Bisquick® mix. The aroma alone was enough to send us sprinting to the kitchen as soon as they emerged from the oven! Between her amazing biscuits and her “famous” No-Bake Oreo Truffles, we truly felt like the luckiest roommates on campus.
Years have passed, but that craving for those warm, buttery, cheesy delights has never faded. Naturally, I dedicated myself to perfecting my own homemade version, aiming for a recipe that was not only delicious but also quick, easy, and made entirely from scratch. The result is a biscuit that brings all the nostalgia and flavor of the original, ready to be enjoyed in your own home. Trust me, you’ll want to give this recipe a try!
Essential Ingredients for Your Red Lobster Biscuits
Crafting these iconic biscuits starts with selecting the right ingredients. Each component plays a vital role in achieving that distinct Red Lobster flavor and texture. Here’s a detailed look at what you’ll need:
- Unsalted Butter (Melted) & Cold Buttermilk: This dynamic duo is fundamental. When cold buttermilk meets melted butter, the butter solidifies into tiny flecks, creating pockets of moisture and steam during baking. This process is key to developing those desirable flaky layers and tender crumbs. Using unsalted butter allows you to control the overall saltiness of the biscuits.
- All-Purpose Flour: The foundation of our biscuits. Proper measuring is crucial – spoon flour into your measuring cup and level it off rather than scooping directly from the bag to avoid over-packing, which can lead to dense biscuits.
- Baking Powder: Our primary leavening agent, responsible for giving the biscuits their lift and fluffy texture. Ensure your baking powder is fresh for optimal results.
- Granulated Sugar: A touch of sugar balances the savory notes and helps achieve that beautiful golden-brown crust, without making the biscuits sweet.
- Salt: Essential for enhancing all the other flavors.
- Old Bay® Seasoning: This is where the magic happens and the distinct Red Lobster flavor truly shines. Old Bay is a unique blend of herbs and spices, including celery salt, paprika, black pepper, and red pepper flakes, adding a depth of savory, slightly spicy flavor that is irreplaceable. Don’t skip this!
- Garlic Powder: Infuses the biscuits themselves with a subtle garlic aroma and taste, and forms a key component of the buttery topping.
- Dried Parsley: Adds a hint of herbaceous freshness and visual appeal. While dried works perfectly, you can opt for 1 tablespoon of fresh minced parsley if you prefer a brighter flavor.
- Ground Cayenne Pepper (Optional): For those who appreciate a gentle kick of heat, a small amount of cayenne pepper can be added. Feel free to adjust or omit based on your spice preference.
- Sharp Cheddar Cheese: The heart of the “cheddar bay” experience! Using sharp or extra-sharp cheddar is highly recommended for a robust, pronounced cheese flavor that stands out.
Quick Tip for Superior Cheese Melt!
While this Red Lobster biscuit recipe is designed for simplicity, a little extra effort can yield significantly better results. Always grate your own sharp cheddar cheese from a block. Pre-grated cheeses often contain anti-caking agents and preservatives that prevent them from melting smoothly, resulting in a less creamy, less integrated cheese texture within your biscuits. Freshly grated cheese melts beautifully, contributing to an extra-cheesy, gooey interior.
Step-by-Step Guide: How To Make These Iconic Biscuits
Making these Red Lobster copycat biscuits is surprisingly straightforward. Follow these steps for flaky, flavorful results:
- Prepare Your Workspace and Ingredients: Start by preheating your oven to 450°F (232°C) and adjusting the oven rack to the middle position. Line a large baking sheet with parchment paper or a silicone baking mat for easy cleanup and to prevent sticking. Alternatively, generously butter a large oven-safe cast-iron pan. Next, melt the unsalted butter in the microwave and set it aside for 3-4 minutes to cool slightly. While it cools, measure out your cold buttermilk from the fridge.
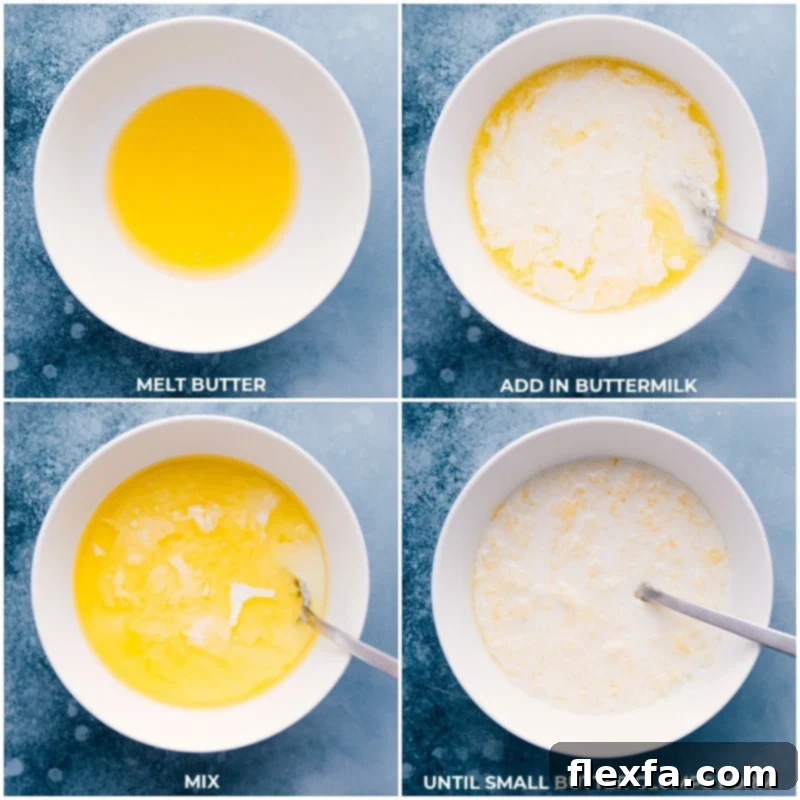
- Create the Buttermilk-Butter Mixture: Pour the cold buttermilk directly into the slightly cooled melted butter. Stir with a spoon until you observe small, pea-sized clumps of butter forming in the buttermilk. This intentional curdling is a crucial technique for tender, flaky biscuits, as these butter pieces will create steam pockets during baking. Set this mixture aside.
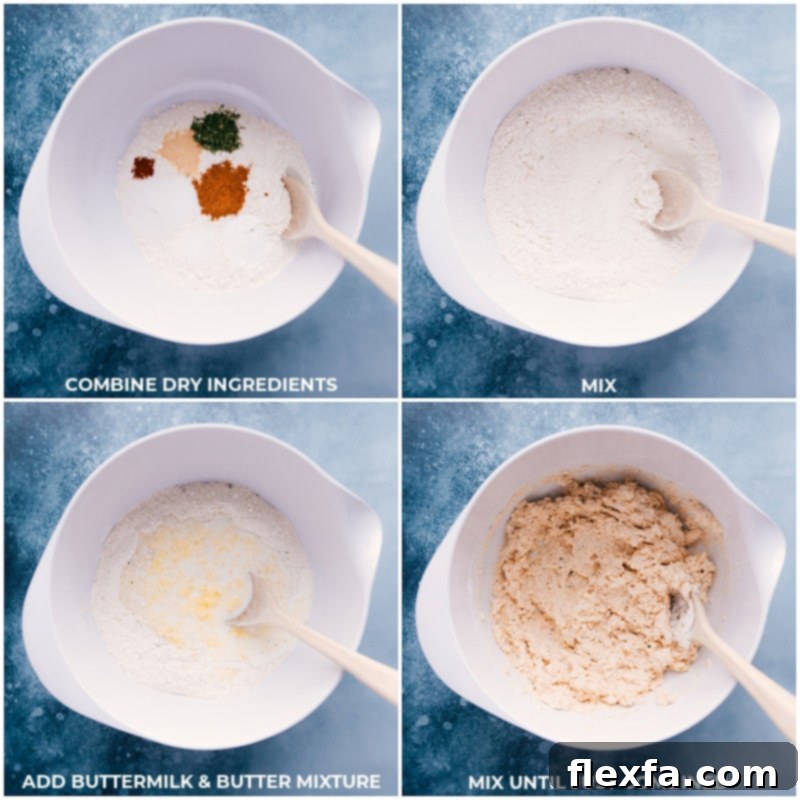
- Combine Dry Ingredients and Form Dough: In a large mixing bowl, whisk together the all-purpose flour, baking powder, granulated sugar, salt, Old Bay seasoning, garlic powder, dried parsley, and cayenne pepper (if using). Create a well in the center of the dry ingredients. Pour the entire buttermilk-butter mixture into this well. Using a wooden spoon or a spatula, gently mix the dough together. Be careful not to overmix! Mix just until the ingredients are incorporated and no dry streaks of flour remain. Overmixing develops gluten, leading to tough biscuits. Finally, gently fold in the shredded sharp cheddar cheese until evenly distributed.
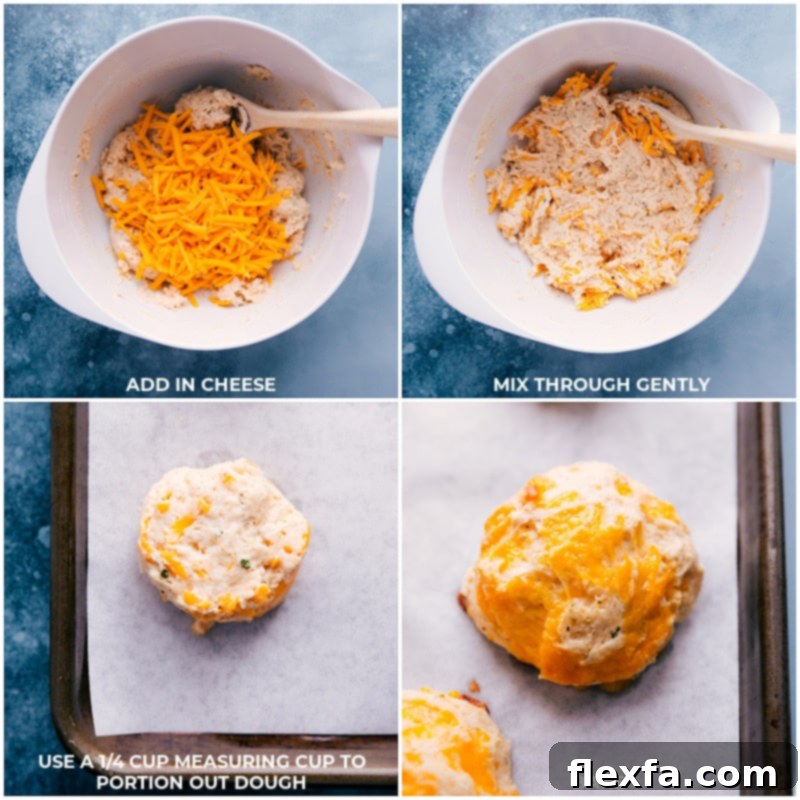
- Scoop, Chill & Bake: Lightly spray a 1/4-cup measuring cup with non-stick spray – this helps the dough release easily. Scoop the biscuit batter into the measuring cup and drop mounds onto your prepared baking sheet, leaving about 1½ inches of space between each biscuit. Once all the dough is on the pan, place the entire sheet into the fridge for 10 minutes. Chilling the dough before baking helps the biscuits hold their shape and prevents the butter from melting too quickly in the oven, ensuring maximum flakiness. Bake for 12-15 minutes, or until the tops and bottoms are a beautiful light golden brown and they sound hollow when gently tapped.
- Prepare and Apply the Garlic Butter Topping: While your biscuits are baking, prepare the iconic garlic butter topping. In a small bowl, melt the remaining 3 tablespoons of unsalted butter. Stir in ½ teaspoon of garlic powder, ¼ teaspoon of salt, and 2 tablespoons of finely chopped fresh parsley. Once the biscuits are out of the oven, let them cool on the baking pan for 5 minutes. This allows for some carryover cooking and helps the structure set. Then, transfer them to a wire cooling rack and generously brush the warm garlic butter mixture over the tops of each biscuit.
- Serve Warm and Enjoy: These biscuits are truly at their peak when enjoyed warm, fresh out of the oven! The flavors are vibrant, and the texture is unmatched. Serve immediately and watch them disappear!
Expert Tips for Perfect Red Lobster Biscuits Every Time
Achieving bakery-quality biscuits at home is easier than you think with a few key techniques. Here are some essential tips to ensure your Red Lobster copycats turn out perfectly:
- Keep Ingredients Cold: This is perhaps the most important rule for flaky biscuits. Ensure your buttermilk is straight from the fridge and as cold as possible. When cold fats (from the butter) hit a hot oven, they create steam, which is what gives biscuits their distinct layers and lift.
- Measure Flour Correctly: Avoid scooping flour directly from the bag with your measuring cup, as this compacts it, leading to an excess of flour and consequently, dry, dense biscuits. Instead, spoon the flour into your measuring cup until it’s overfilled, then use the back of a knife or a flat edge to level it off. This “fluff and spoon” method ensures an accurate measure.
- Don’t Overmix the Dough: Gentle mixing is key! Once the wet and dry ingredients are just combined, stop mixing. Overmixing develops gluten, which can lead to tough, chewy biscuits instead of light, tender ones. A few lumps in the dough are perfectly fine.
- Chill the Dough: Don’t skip the 10-minute chilling step before baking. This brief time in the fridge helps the butter firm up again, ensuring it doesn’t melt too quickly in the oven. This leads to better rise and flakier texture.
- Monitor Bake Time Closely: Ovens vary, so keep a close eye on your biscuits, especially during the last few minutes. They should be golden brown on top and bottom and sound hollow when tapped. Over-baking can quickly dry them out.
- Allow for Resting After Baking: Once removed from the oven, let the biscuits sit on the pan for about 5 minutes before transferring to a cooling rack. Then, brush with the garlic butter and let them stand for another 5-10 minutes. This resting period allows the internal steam and residual heat to finish cooking the centers, ensuring they are fully baked through and perfectly tender without being gummy.
- Use Fresh Baking Powder: Baking powder loses its potency over time. To check if yours is still active, add a teaspoon to half a cup of hot water. If it fizzes vigorously, it’s good to go!

Storage and Reheating
These biscuits are undeniably at their absolute best when eaten fresh, warm out of the oven. However, if you find yourself with leftovers (a rare occurrence!), they can be stored and enjoyed later.
Storage: Store cooled leftover biscuits in an airtight container or a sealed freezer bag in the refrigerator for up to 3 days. For longer storage, they freeze exceptionally well for 2-3 months.
Reheating Tips:
- Microwave: For a quick reheat, microwave individual biscuits for 15-30 seconds until warm. Be careful not to overheat, as they can become rubbery.
- Oven/Toaster Oven: For best results, reheat biscuits in a preheated oven at 300°F (150°C) for 5-10 minutes, or until warmed through and slightly crisp on the outside. A toaster oven works great for one or two biscuits.
- Air Fryer: Reheat in an air fryer at 300°F (150°C) for 3-5 minutes, checking frequently. This method can restore a lovely crispy exterior.
Freezing Instructions: To freeze, allow freshly baked biscuits to cool completely. Wrap each biscuit individually in plastic wrap, then place them all into a heavy-duty freezer bag. Thaw frozen biscuits in the refrigerator overnight, or reheat directly from frozen using the oven or air fryer methods, adding a few extra minutes to the reheating time.
Perfect Pairings: What to Serve with Your Biscuits
These garlic cheddar biscuits are incredibly versatile and make a fantastic accompaniment to a wide variety of meals, not just seafood! Their savory, buttery profile complements many dishes beautifully. Here are some ideas to inspire your next meal:
Dinner
Hearty Baked Ziti Recipe
The rich, saucy goodness of baked ziti is perfectly balanced by the light, cheesy biscuits.
Soups And Stews
Easy Zuppa Toscana Soup
Dip these savory biscuits into a creamy, flavorful Zuppa Toscana for a comforting meal.
Soups And Stews
Creamy Chicken Noodle Soup
A classic pairing: warm, rich chicken noodle soup with a fluffy, cheesy biscuit on the side.
Dinner
Authentic Spaghetti Bolognese
Scoop up every last bit of rich bolognese sauce with a tender, cheesy biscuit. A match made in heaven!

Red Lobster Biscuit Recipe
By Chelsea Lords
Whip up these incredible copycat Red Lobster Biscuits at home! Fluffy, cheesy, and brushed with savory garlic butter, they bring all the famous restaurant flavor in under an hour.
Prep Time: 15 minutes
Cook Time: 15 minutes
Chilling Time: 10 minutes
Total Time: 40 minutes
Servings: 12 biscuits
Equipment
- Large sheet pan (15″ x 21″) or large, cast-iron (oven-safe) pan
- Parchment paper or silicone baking mat
- Cooling rack
Ingredients
- 6 tablespoons unsalted butter, melted
- 1 cup buttermilk, cold
- 2 cups all-purpose flour (see Note 1)
- 1 tablespoon baking powder
- 1 tablespoon granulated sugar
- 1 teaspoon salt
- 2 teaspoons Old Bay seasoning
- 1/2 teaspoon garlic powder
- 1 teaspoon dried parsley
- 1/8 teaspoon ground cayenne pepper (optional)
- 1 cup shredded sharp Cheddar cheese
For the topping
- 3 tablespoons unsalted butter, melted
- 1/2 teaspoon garlic powder
- 1/4 teaspoon salt
- 2 tablespoons finely chopped fresh parsley
Instructions
- Adjust the oven rack to the middle position and preheat your oven to 450°F (232°C). Line a large sheet pan with parchment paper or a silicone baking mat. Alternatively, generously butter a large oven-safe cast-iron pan. Melt 6 tablespoons of butter in the microwave and set it aside to cool for 3–4 minutes.
- Pour the cold buttermilk, straight from the fridge, into the slightly cooled melted butter. Stir with a spoon until small clumps of butter begin to form. Set this mixture aside.
- In a large bowl, whisk together the all-purpose flour, baking powder, granulated sugar, salt, Old Bay seasoning, 1/2 teaspoon garlic powder, dried parsley, and cayenne pepper (if using). Make a well in the center of the dry ingredients. Use a spatula to scrape every bit of the buttermilk-and-butter mixture into the well. Use a wooden spoon to mix the dough together just until the ingredients are incorporated and no dry flour remains. Be careful not to overmix. Gently fold in the shredded sharp Cheddar cheese until evenly distributed.
- Lightly spritz a 1/4 cup (66g) measuring cup with non-stick spray. Scoop the biscuit batter into the measuring cup and drop mounds onto the prepared sheet pan, leaving approximately 1½ inches of space between each biscuit. Place the sheet pan with the raw biscuits in the fridge for 10 minutes to chill.
- Bake the biscuits for 12–15 minutes, or until their tops and bottoms are a light golden brown and they sound hollow when gently tapped.
- While the biscuits are baking, prepare the topping. In a small bowl, combine the remaining 3 tablespoons of melted unsalted butter, 1/2 teaspoon garlic powder, 1/4 teaspoon salt, and 2 tablespoons of finely chopped fresh parsley. Mix well. Remove the baked biscuits from the oven and let them cool on the pan for 5 minutes. Transfer them to a wire cooling rack and generously brush the melted garlic butter topping over the biscuits (see Note 2). Serve and enjoy warm—these are truly best the same day, right out of the oven!
Recipe Notes
Note 1: Accurate Flour Measurement: To avoid dense or dry biscuits, it’s crucial to measure flour correctly. Do not press a measuring cup directly into a bag of flour, as this compacts it, packing in too much. Instead, use a spoon to lightly scoop the flour into the measuring cup until it’s overfilled. Then, use the flat back of a table knife or a straight edge to level off the top of the measuring cup. This method ensures you get the right amount of flour, leading to lighter, fluffier biscuits.
Note 2: The Importance of Resting Biscuits: Once you remove the biscuits from the oven, it’s vital to allow them to stand for about 5–10 minutes before breaking into them. The residual heat and trapped steam inside will continue to cook the biscuits, ensuring the insides are fully baked through and achieve that perfect tender texture. This prevents a doughy or gummy center.
Storage: While biscuits are always best enjoyed on the day they are made, any leftovers can be stored. Place cooled biscuits in an airtight container or a sealed bag and refrigerate for up to 3 days. For longer preservation, they can be frozen for 2–3 months. Refer to the “Storage and Reheating” section above for detailed reheating and freezing instructions.
Nutrition
Serving: 1 biscuit | Calories: 217kcal | Carbohydrates: 20.4g | Protein: 5.5g | Fat: 12.7g | Cholesterol: 34.6mg | Sodium: 112.3mg | Fiber: 0.6g | Sugar: 4.2g
Nutrition information is automatically calculated and should only be used as an approximation.
Like this? Leave a comment below! Share your experience or any questions you have about making these delightful Red Lobster Biscuits at home. We love hearing from you!