

Homemade Fish Sticks Recipe: Crispy, Healthy & Delicious!
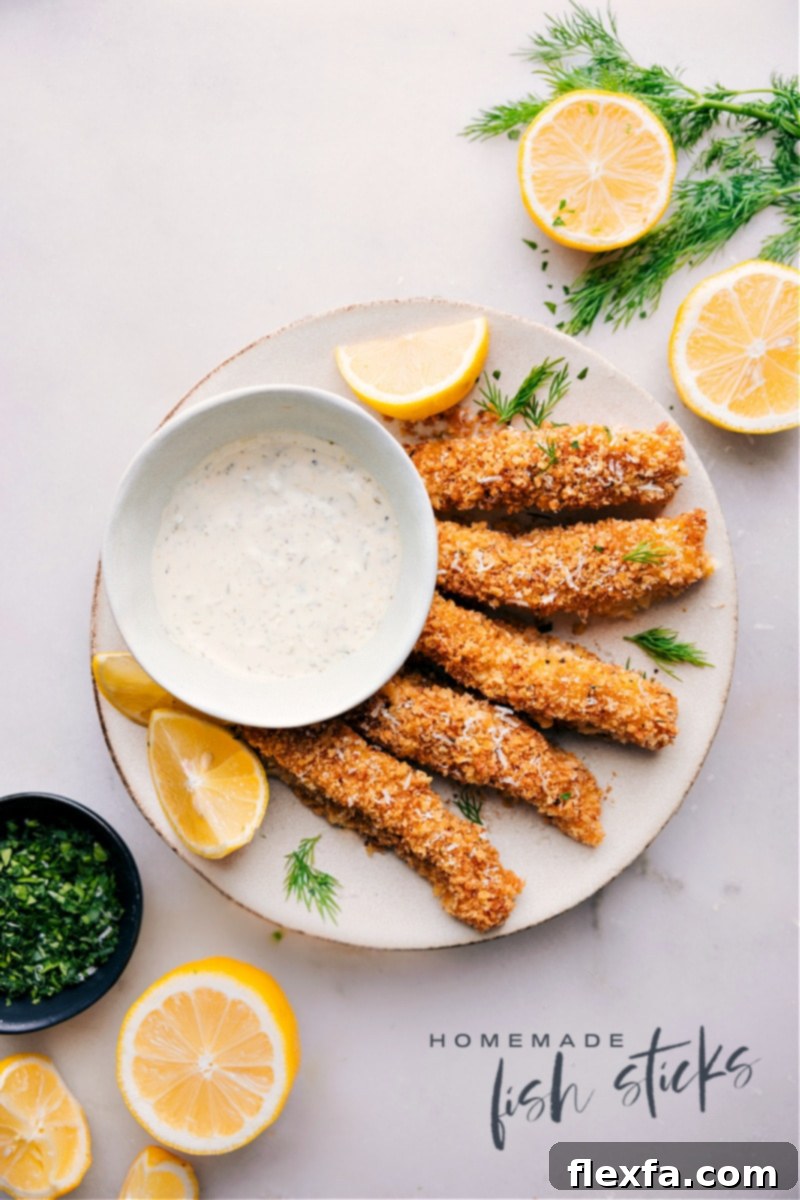
This Homemade Fish Sticks Recipe brings a delightful gourmet upgrade to a beloved childhood classic. Crafted with fresh, flaky cod, a perfect blend of savory spices, and a golden, ultra-crispy Panko breading, these fish sticks are a delicious, healthier, and truly satisfying alternative to the processed frozen versions. Prepare for a family-friendly meal that’s so much better than anything from a box!
Rediscovering a Childhood Favorite: The Homemade Fish Sticks Difference
Like many, my childhood memories are filled with the comforting presence of fish sticks on the dinner plate. They were a quick, easy, and undeniably nostalgic meal. However, as I embarked on my own culinary journey and started preparing meals for my family, I began to scrutinize ingredient labels more closely. The long, often unrecognizable list of components found in typical store-bought frozen fish sticks quickly became a concern. It was clear that to truly enjoy this nostalgic dish without compromise, a homemade solution was necessary.
After a period of dedicated experimentation and refinement, I finally cracked the code! This recipe for homemade fish sticks is not only surprisingly simple to execute but also bursts with fresh, authentic flavors. It’s the quintessential weeknight dinner that the entire family will wholeheartedly approve of, often asking for seconds. Forget the bland, rubbery, and processed versions you might remember from your youth. These fish sticks are crafted with succulent fresh cod, infused with a vibrant array of savory spices, enriched with a touch of Parmesan cheese, and coated in an irresistibly crispy layer of Panko breadcrumbs. This isn’t just a meal; it’s a delightful culinary transformation that elevates a childhood staple into a wholesome, flavorful, and truly gourmet experience.
The Secret to Ultimate Crispiness: Fish Stick Breading
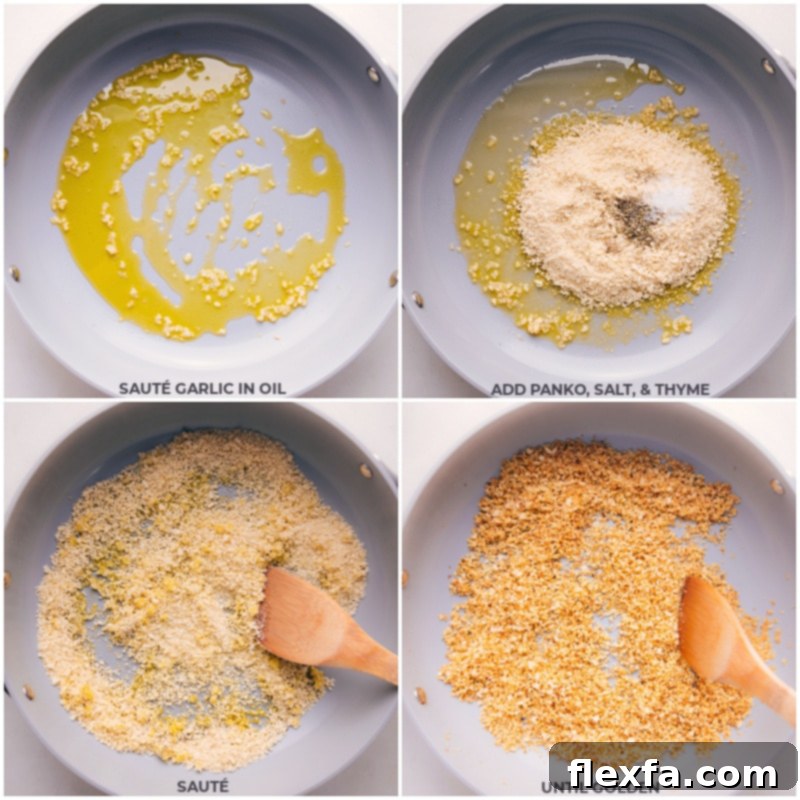
The hallmark of an exceptional fish stick is its unparalleled crispiness, and for this, Panko breadcrumbs are truly indispensable. Unlike conventional breadcrumbs, Panko is made from crustless white bread that is coarsely ground into light, airy, and distinctively flaky crumbs. This unique structure is key to its superior performance; it allows Panko to absorb less oil during cooking, resulting in a remarkably light, crunchy, and enduringly crispy coating that retains its texture beautifully, whether baked in the oven or crisped in an air fryer.
Panko breadcrumbs provide the ideal texture for these homemade fish sticks, ensuring each piece of cod is evenly coated and bakes up with an incredibly satisfying crunch. You can readily find Panko in most major grocery stores; typically, it’s located either in the breadcrumb aisle alongside traditional varieties or within the international foods section. Forgoing Panko for regular breadcrumbs would mean compromising on that signature, irresistible crispiness, so it’s a substitution best avoided for optimal results!
Quick Tip for Ultra-Crispy Fish Sticks
To achieve fish sticks with an extraordinary level of crispness without resorting to deep frying, incorporate a simple yet powerful step: toast the Panko breadcrumbs in a skillet before coating the fish! This technique not only imparts a beautiful golden hue to the breading but also deepens its flavor, adding a richer, nuttier dimension. The pre-toasting process ensures that the breading sets up with an unparalleled crunch, guaranteeing a perfectly crispy exterior that beautifully contrasts with the tender, flaky fish inside – all while keeping the meal healthier and mess-free without any need for deep-frying.
Elevating Flavor: The Perfect Fish Stick Batter
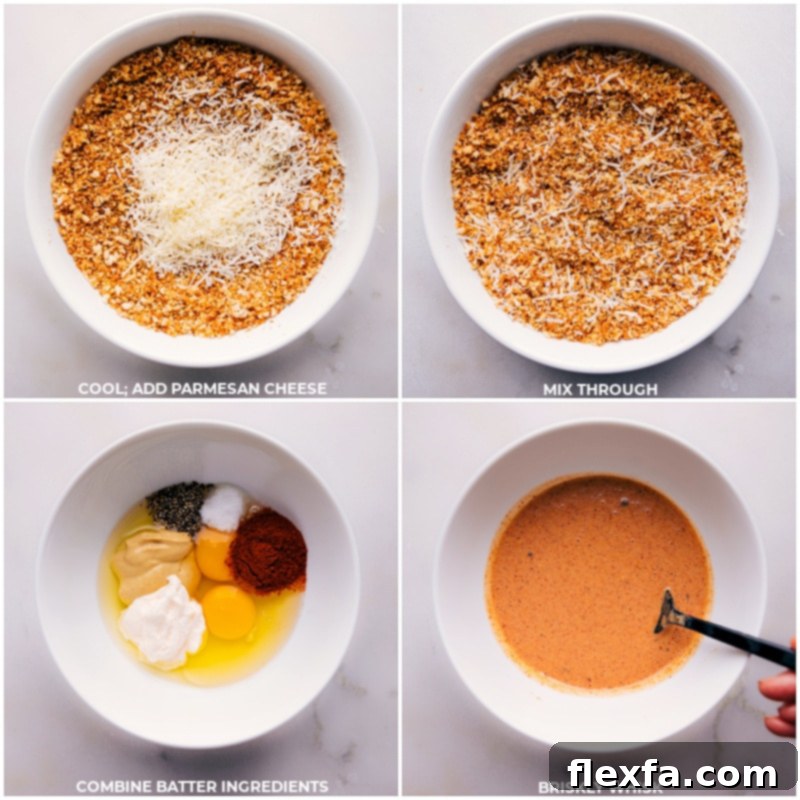
While the crispy breading undoubtedly plays a starring role, the luscious and flavorful batter is what truly elevates these homemade fish sticks, ensuring they are tender and juicy from the inside out. This carefully crafted batter is designed to provide a rich foundation of flavor while simultaneously acting as an ideal adhesive for the Panko coating, making sure every bite is perfectly seasoned and wonderfully moist.
The harmonious combination of Dijon mustard and mayonnaise forms the backbone of our exceptional batter. Dijon mustard introduces a subtle yet distinct tangy kick and a hint of sophisticated spice that perfectly complements the mild, delicate flavor of fresh cod. Mayonnaise, on the other hand, contributes a rich creaminess and essential fats, which are key to locking in moisture and ensuring the fish remains succulent and flaky throughout the cooking process. Together, these two ingredients create a robust flavor profile and a flawless binding agent for the breading.
- For the most vibrant and delicious results, I strongly advocate for using high-quality ingredients. My personal favorites include Hellman’s/Best Foods® mayonnaise, revered for its consistently rich and creamy texture, and Grey Poupon® Dijon mustard, celebrated for its bold, distinctive, and slightly pungent flavor. These premium choices genuinely make a noticeable difference in the overall taste and quality of your fish sticks.
- For those who enjoy a little extra zest, consider stirring in a dash of hot sauce for a subtle kick or a squeeze of fresh lemon juice to brighten the flavor of the batter even further.
Mastering Homemade Fish Sticks: Essential Tips for Perfection
Crafting perfectly crispy and deliciously flavorful fish sticks is an achievable feat when you follow a few expert tips. These guidelines are designed to help you produce a consistently superb batch of homemade fish sticks that are utterly irresistible and guaranteed to be a family favorite.
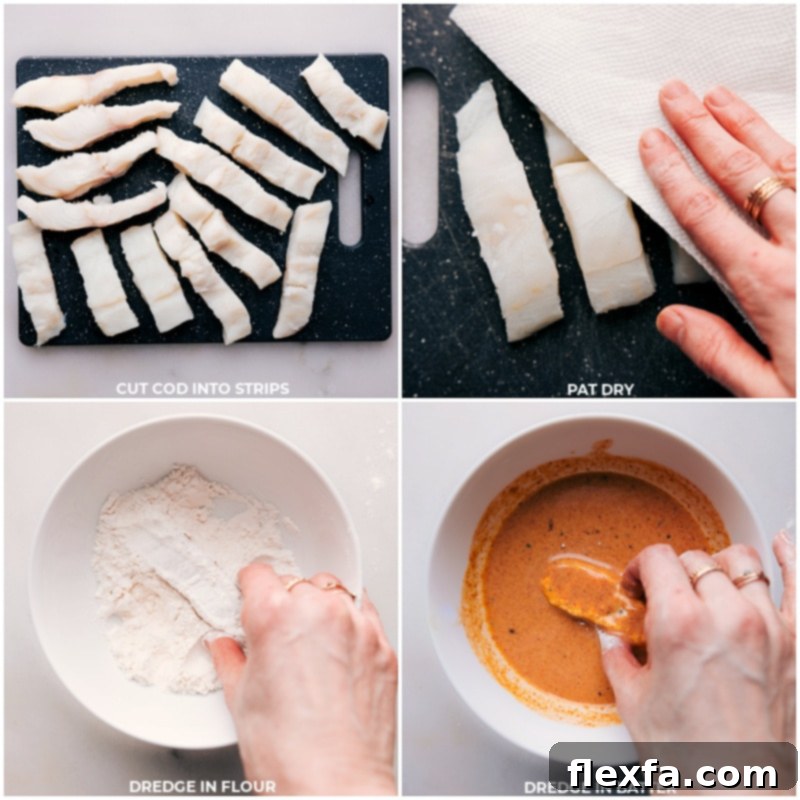
- Use Fresh or Thoroughly Thawed Cod: The foundation of truly excellent fish sticks is fresh, high-quality fish. Always prioritize fresh cod whenever possible. If you’re using frozen cod, ensure it is completely thawed by following the package directions carefully. Most importantly, after thawing, thoroughly pat the fish dry with paper towels. Excess moisture is the arch-nemesis of crispiness and will inevitably lead to soggy fish sticks. A perfectly dry surface allows the breading to adhere flawlessly and crisp up beautifully during cooking.
- Cut Fish Evenly for Uniform Cooking: Precision in cutting your fish fillets is crucial for consistent results. Aim to cut the cod into uniform strips, ideally around ¾ inch wide by 4½ inches long. Keeping the strips roughly the same size ensures that every piece cooks at an identical rate, preventing some from becoming overcooked and dry while others remain undercooked. This also helps achieve that classic, appealing fish stick shape.
- Bake on a Wire Rack for Optimal Airflow: To guarantee an all-around crispy crust and prevent the bottom of your fish sticks from becoming soggy, always bake them on a wire cooling rack placed over a standard baking sheet. This setup is a game-changer because it allows hot air to circulate completely around each individual fish stick, crisping the breading evenly on all sides and preventing moisture from accumulating underneath. It’s a simple trick with dramatic textural benefits!
- Give Them Space – Avoid Overcrowding: When arranging your breaded fish sticks on the baking sheet or in your air fryer basket, it’s vital to leave ample space between each piece. Overcrowding the pan restricts hot air circulation, causing the fish sticks to steam rather than crisp. By giving them enough room to breathe, you ensure they develop that desirable golden-brown, crunchy exterior.
- Check Doneness with a Thermometer: For both food safety and to ensure the fish is cooked to tender perfection without drying out, always verify its internal temperature. The thickest part of the fish should register 145°F (63°C) on a quick-read meat thermometer. This simple step guarantees delicious, flaky fish every time.
- Serve Immediately for Best Crispness: Homemade fish sticks are at their absolute best when enjoyed piping hot, directly out of the oven or air fryer, while their breading is at its peak crispiness. Enhance their flavor by serving them with fresh lemon wedges for a bright, zesty squeeze, and a generous dollop of your favorite homemade tartar sauce. These classic accompaniments truly complete the experience.
- Organize Your Dredging Station: To streamline the breading process and minimize mess, set up an organized “dredging station.” Use three shallow bowls: one for the all-purpose flour, one for the wet batter mixture, and one for the toasted Panko breadcrumbs. This systematic approach makes coating each fish stick quick, efficient, and much cleaner.
What To Serve With Homemade Fish Sticks: Crafting a Complete Meal
While a simple squeeze of fresh lemon and a generous serving of creamy tartar sauce are timeless pairings, there are countless delicious ways to build a well-rounded and exciting meal around these incredible homemade fish sticks. Here are some fantastic side dish ideas that beautifully complement their crispy texture and savory flavor, turning a simple meal into a memorable feast:
- Crispy Fries or Roasted Potatoes: You can never go wrong with a classic! Serve your fish sticks alongside perfectly golden french fries, rustic and savory potato wedges, or elegantly seasoned roasted potatoes. The crispy texture of the potatoes beautifully echoes the crunch of the fish sticks, creating a harmonious plate.
- Light and Crunchy Coleslaw: A vibrant and creamy coleslaw offers a refreshing and tangy contrast to the richness of the fish. Its crisp texture and zesty dressing provide a perfect balance, cutting through the richness and adding a delightful freshness to your meal.
- Sweet Potato Fries or Roasted Sweet Potatoes: For a delightful twist, introduce a touch of natural sweetness and added nutrients by swapping regular potatoes for irresistible sweet potato fries or tender, caramelized roasted sweet potatoes.
- Fresh Garden Salad: A simple yet elegant, crisp garden salad, lightly dressed with a zesty vinaigrette, is an excellent way to incorporate fresh vegetables and provide a light, refreshing counterpoint to your main course.
- Flavorful Roasted Vegetables: Effortlessly boost your vegetable intake with easy and delicious roasted options. Hearty roasted broccoli or savory Parmesan Brussels sprouts are fantastic choices that complement the fish without overwhelming its delicate flavor.
- Quick and Tasty Couscous: For a light, fluffy, and incredibly quick-to-prepare grain side, consider serving couscous. It absorbs flavors wonderfully and makes for a satisfying yet light accompaniment.
- Creamy Macaroni and Cheese: A true comfort food champion and a guaranteed crowd-pleaser, creamy macaroni and cheese offers an indulgent and satisfying side that pairs wonderfully with fish sticks, especially when catering to a family meal.
How To Air Fry These Crispy Fish Sticks for Ultimate Convenience
For those seeking an even quicker route to impeccably crispy fish sticks, or simply preferring to minimize oil and mess, the air fryer is an absolute game-changer. Air frying achieves a wonderfully crisp exterior that rivals deep-frying, but with significantly less fat and cleanup. It’s the perfect method for achieving that golden, crunchy perfection with minimal effort. Here’s how to cook your homemade fish sticks using this efficient appliance:
- Preheat Your Air Fryer: Begin by preheating your air fryer to 400°F (200°C). Allowing the air fryer to reach its target temperature before adding the food is essential for ensuring consistent cooking and promoting immediate crisping of the breading upon contact.
- Arrange in a Single Layer: Carefully place the prepared, breaded fish sticks in the air fryer basket. It is crucial to arrange them in a single layer, ensuring that no pieces are touching or overlapping. This allows for optimal hot air circulation around each fish stick, which is the key to effective air frying and achieving that desirable crispy texture. Lightly spray the fish sticks with cooking spray on all sides to encourage an even more golden-brown and extra-crispy finish.
- Cook to Golden Perfection: Cook the fish sticks for a total of 8-10 minutes. Make sure to flip them halfway through the cooking time to ensure even browning and crisping on both sides. Be mindful that cooking times can vary slightly depending on the thickness of your fish sticks and the specific model and wattage of your air fryer. To confirm doneness, you can carefully cut into one fish stick to ensure the fish is opaque and flaky throughout, or use a meat thermometer to verify it has reached an internal temperature of 145°F (63°C).
Air Frying Pro Tip for Success
It’s important to remember that air fryer cooking times can vary significantly based on your specific appliance model and the size/thickness of your fish sticks. To prevent overcooking and guarantee perfectly tender and crispy results, check your fish sticks frequently, especially towards the latter half of the cooking cycle. If you’re new to air frying and eager to master this versatile cooking method, a comprehensive Air Fryer Guide can provide invaluable tips, tricks, and troubleshooting advice.
Storing, Reheating, and Freezing Homemade Fish Sticks
Preparing a batch of delicious homemade fish sticks often means you’ll have some tasty leftovers, or you might wish to make them ahead of time for convenient future meals. Knowing the best practices for storing, reheating, and freezing ensures that you can savor their fantastic crispiness and flavor long after they’re initially cooked.
- Storing Cooked Leftovers: Any leftover cooked fish sticks can be stored in an airtight container in the refrigerator for up to 3-4 days. While they will naturally lose some of their initial crispness during refrigeration, their delicious flavor remains excellent.
- Reheating for Optimal Crispness: To revive that glorious, satisfying crunch, it is crucial to avoid reheating your fish sticks in the microwave, as this will render them soggy. Instead, preheat your oven to 375°F (190°C) and bake them for 10-15 minutes, or until they are thoroughly heated through and have regained their crispy texture. An air fryer or a toaster oven also performs wonderfully for reheating, often delivering a similar crisp texture in less time.
- Freezing for Future Meals: For the absolute best quality and texture when freezing, it is highly recommended to freeze your fish sticks *before* they are cooked. Arrange the breaded (but uncooked) fish sticks in a single layer on a parchment-lined baking sheet and freeze them until they are completely solid. Once frozen solid, transfer them to a freezer-safe bag or an airtight container. They will maintain their quality in the freezer for up to 2-3 months. When you’re ready to enjoy them, you can bake them directly from frozen, simply adding a few extra minutes to the conventional cooking time until they are golden brown, crispy, and thoroughly cooked through. This method expertly preserves their fresh taste and crispy potential for future enjoyment!
More Delicious Seafood Dinners
Dinner
Honey Garlic Shrimp
Dinner
Fish Tacos
Seafood
Favorite Salmon Burgers Recipe
Dinner
Lemon Garlic Shrimp
The Ultimate Homemade Fish Sticks Recipe Details
Fish Sticks Recipe
By Chelsea Lords
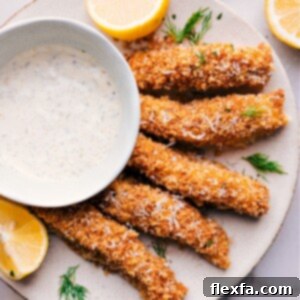
Upgrade your childhood favorite with this crispy homemade Fish Sticks Recipe! Fresh cod, savory spices, and crunchy Panko make them a delicious, better-than-boxed treat that’s perfect for any meal.
Prep Time: 25 minutes
Cook Time: 13 minutes
Total Time: 38 minutes
Servings: 3 servings (about 14 fish sticks)
Video Guide
Equipment You’ll Need
- Large nonstick skillet
- Sheet pan (15″ x 10″)
- Wire cooling rack (highly recommended for crispiness)
- Three shallow bowls for dredging
- Whisk
- Meat thermometer (optional, for checking doneness)
Ingredients
For the Fish
- 1 pound cod (see Note 1)
- Cooking spray
- Salt and pepper, to taste
For the Breading
- 3 tablespoons olive oil
- 2 teaspoons minced garlic
- 1-3/4 cup Panko breadcrumbs (see Note 2)
- 1/2 teaspoon dried thyme
- 1/3 cup freshly grated Parmesan cheese (see Note 3)
- 1/2 cup all-purpose flour
For the Batter
- 2 tablespoons Dijon-style mustard
- 2 tablespoons mayo (Hellmann’s/Best Foods recommended)
- 2 large eggs
- 2 teaspoons paprika
For Serving
- 1 lemon, cut into wedges
- Tartar sauce (for serving, see Note 4)
Instructions
- Prepare for Baking: Preheat your oven to 425°F (220°C). If you are using a wire cooling rack, place it atop a sheet pan and generously grease the rack with cooking spray to prevent sticking and encourage all-around crispiness.
- Create the Crispy Breading Mixture: In a large nonstick skillet, heat the olive oil over medium heat. Add the minced garlic and sauté for about 15 seconds until it becomes fragrant. Immediately add the Panko breadcrumbs, dried thyme, and ¼ teaspoon of salt. Stir continuously until the Panko breadcrumbs turn a beautiful golden-brown color, which typically takes about 4–6 minutes. Remove the skillet from the heat and promptly transfer the toasted Panko mixture into a large shallow bowl. Allow it to cool completely before stirring in the freshly grated Parmesan cheese. Set this mixture aside. In a separate, shallow bowl, place the ½ cup all-purpose flour.
- Whisk the Flavorful Batter: In a small bowl, whisk together all the batter ingredients: the Dijon mustard, mayonnaise, large eggs, and paprika until the mixture is smooth and thoroughly combined. Season the batter to your preference; I usually add ½ teaspoon of salt and ¼ teaspoon of pepper.
- Prepare the Cod Fillets: Carefully cut the cod fillets into even strips, aiming for pieces approximately ¾ inch thick by 4½ inches long. Maintaining uniform size is crucial for ensuring that all fish sticks cook evenly. After cutting, thoroughly pat the fish strips dry with paper towels to remove any excess moisture, a vital step for achieving a truly crispy crust.
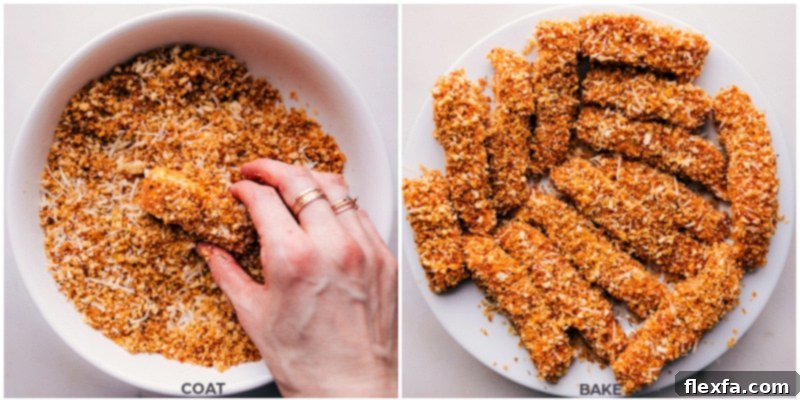
- Breading the Fish Sticks: Set up your organized dredging station with the bowl of flour, the bowl containing the wet batter, and the bowl with the cooled Panko mixture. First, gently dredge each piece of cod in the all-purpose flour, ensuring it is completely coated. Be generous, as most of the flour should be used up in this step. Next, dip each floured piece into the batter mixture, allowing any excess batter to drip off. Finally, carefully dredge each battered piece into the toasted Panko breadcrumbs, using your hands to gently press the crumbs onto the fish to ensure they adhere firmly. By the end of this process, all three mixtures should be largely consumed.
- Arrange and Bake: Place the breaded fish sticks on your prepared sheet pan (or wire cooling rack), making sure there is ample space between each stick. Do not overcrowd the pan, as this will prevent proper air circulation and result in steaming rather than crisping. Generously spray the tops of the fish sticks with cooking spray to promote an extra golden-brown and crispy finish. Bake the fish sticks in the preheated oven for 9–13 minutes, or until the fish is cooked through, and the breading is golden brown and delightfully crispy. The internal temperature of the fish should register 145°F (63°C). While the fish is cooking, you can take the opportunity to prepare your tartar sauce (see Note 4).
- Serve Immediately: Serve your homemade fish sticks hot out of the oven, accompanied by fresh lemon wedges for a bright citrusy lift, and a generous amount of your homemade tartar sauce. Enjoy every crispy, flavorful bite!
Recipe Notes
- Note 1 – Choosing Your Cod: For the finest flavor and texture in this recipe, fresh cod is highly recommended. If opting for frozen cod, ensure it is fully thawed before use by following the package directions explicitly. A crucial step is to thoroughly dry the fish with paper towels after thawing; any residual moisture will lead to soggy fish sticks instead of beautifully crispy ones!
- Note 2 – Panko for Perfection: Panko breadcrumbs are absolutely essential for achieving that perfectly light and crispy coating. Their unique flaky texture creates a superior crunch compared to standard breadcrumbs. You can typically find Panko in the breadcrumb aisle or the international section of most grocery stores.
- Note 3 – Freshly Grated Parmesan: For an accurate measurement and superior, richer flavor, it is always best to use a block of Parmesan cheese and grate it yourself using the small holes of a grater. Pre-grated Parmesan often contains anti-caking agents that can negatively affect both texture and how it melts.
- Note 4 – Homemade Tartar Sauce: Tartar sauce is an absolute must-have accompaniment for these homemade fish sticks. The good news is, you can easily prepare the sauce ahead of time; in fact, its flavors often deepen and improve as it sits! Here’s my favorite quick homemade tartar sauce recipe (feel free to omit the dill if you’re in a hurry for quicker prep):
- In a small bowl, stir everything together until smooth: 2 tablespoons fresh lemon juice, ½ cup mayonnaise (Best Foods/Hellmann’s is excellent), 1½ tablespoons sweet pickle relish, 1 tablespoon finely chopped fresh dill (optional), ½ teaspoon Dijon mustard, ½ teaspoon Worcestershire sauce, and ⅛ teaspoon each of salt and pepper.
- Note 5 – Air Fryer Instructions Recap: For a quick and delightfully crispy alternative, simply follow these air fryer steps: Preheat your air fryer to 400°F (200°C). Arrange fish sticks in a single layer in the basket, ensuring they do not touch, and generously spray them with cooking spray. Cook for 8–10 minutes, flipping them halfway through, until they are golden brown and cooked through (internal temperature 145°F / 63°C).
- Note 6 – Storage & Reheating: Store any cooked leftover fish sticks in an airtight container in the refrigerator for up to 3 days. To reheat and restore their crispness, bake them in the oven or air fryer at 375°F (190°C) for 10-15 minutes. Avoid using the microwave for reheating to maintain their crisp texture. For freezing uncooked fish sticks, arrange them on a parchment-lined baking sheet, freeze until solid, then transfer them to a freezer bag for up to 2-3 months. Bake directly from frozen, adding extra cooking time as needed.
Nutrition Information (Approximate)
Nutrition information is automatically calculated and should only be used as an approximation.
| Serving Size: | 1 serving |
|---|---|
| Calories: | 412 kcal |
| Carbohydrates: | 32.9g |
| Protein: | 31g |
| Fat: | 16.7g |
| Cholesterol: | 149.9mg |
| Sodium: | 666.1mg |
| Fiber: | 2.1g |
| Sugar: | 2g |