

Welcome to the world of effortless culinary excellence with this game-changing Instant Pot Risotto recipe! Say goodbye to endless stirring and the misconception that creamy, restaurant-quality risotto is reserved for fine dining or hours spent at the stovetop. This innovative method allows you to create an incredibly indulgent and perfectly cooked risotto in just six minutes of pressure cooking, delivering a heartwarming dish the entire family will adore.
Once you master this surprisingly simple technique, you might want to explore another delightful variation: Sweet Potato Risotto.
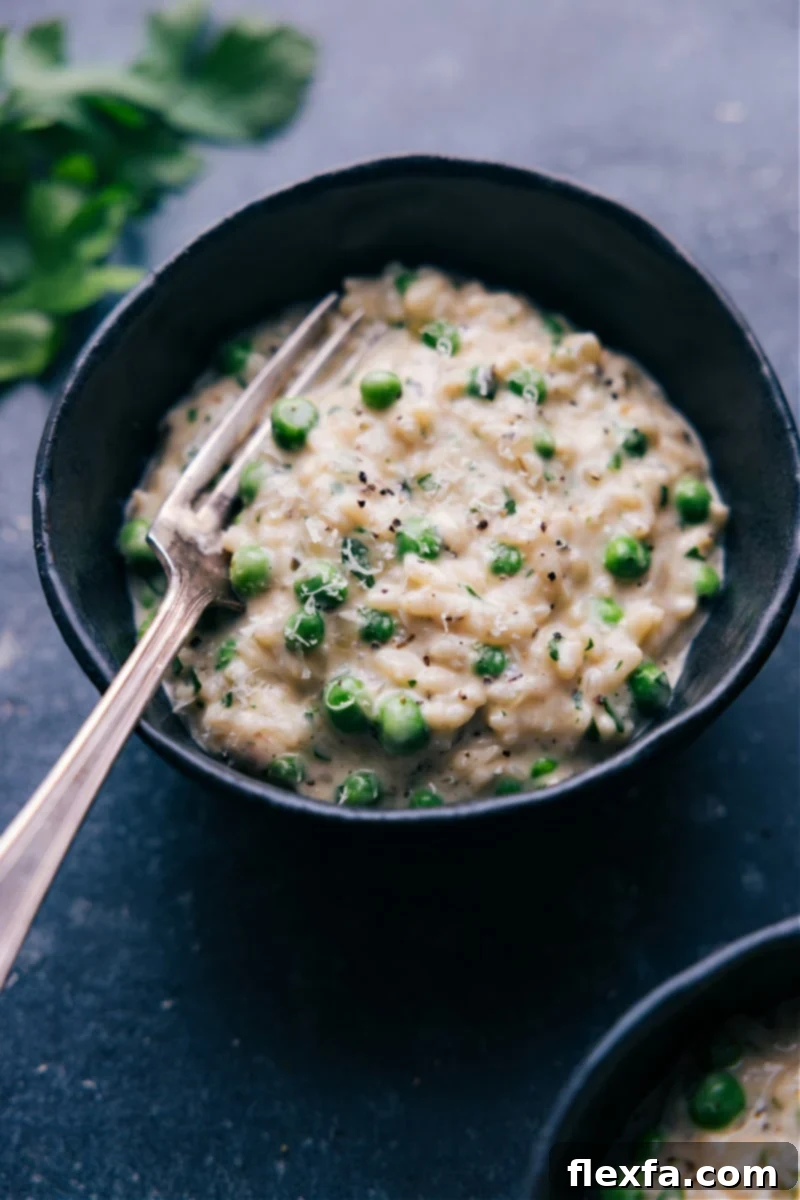
Transform Your Kitchen: Yes, You Can Make Risotto in an Instant Pot!
Absolutely! The Instant Pot isn’t just a kitchen gadget; it’s a culinary revelation, especially when it comes to notorious dishes like risotto. For years, home cooks shied away from making risotto due to its reputation for being labor-intensive, requiring constant attention and stirring. But with the advent of the Instant Pot, all that has changed. Here’s a detailed look at why this modern pressure cooker is perfectly suited for crafting the silkiest, most delicious risotto you’ve ever tasted:
- One-Pot Wonder: The Instant Pot truly shines as a multi-functional appliance. You can begin by sautéing your aromatic ingredients like onions and garlic directly in the pot. This crucial step builds a rich flavor foundation for your risotto, all before the main cooking even begins. No extra pans to wash, just pure convenience and concentrated flavor.
- High-Pressure Efficiency: The most remarkable advantage of the Instant Pot is its ability to dramatically cut down cooking time. Traditional stovetop risotto demands 18-20 minutes of gradual liquid absorption and stirring. In contrast, the Instant Pot leverages high-pressure cooking to achieve the same creamy, al dente perfection in a mere 6 minutes. This incredible speed makes weeknight risotto a reality, not just a weekend luxury.
- Rapid Pressure Management: Beyond quick cooking, the Instant Pot excels in its efficient pressure build-up and immediate release capabilities. This precision is vital for risotto. The pressure builds rapidly, ensuring an even and thorough cook, and then releases immediately after, preventing any overcooking or a gummy texture that can plague traditional methods.
- Consistently Incredible Results: The sealed environment of the Instant Pot ensures that moisture is retained and heat is evenly distributed, leading to consistently perfect results every time. This method yields a risotto that is wonderfully creamy and incredibly indulgent, yet surprisingly light and never overly heavy. It’s a hands-off approach that guarantees success, even for beginner cooks.
Quick Tip: Embrace the Instant Pot Revolution!
If you’re still contemplating whether to join the Instant Pot craze, this Instant Pot Risotto recipe is the ultimate persuader. Its ease and delicious outcome will undoubtedly convert you! If you’re already a fan, explore some of our other beloved pressure cooker favorites like this mouth-watering Salsa Verde Chicken, hearty Instant Pot Beef Stew, or comforting Instant Pot Chicken Tortilla Soup. These recipes showcase the versatility and time-saving power of your pressure cooker.
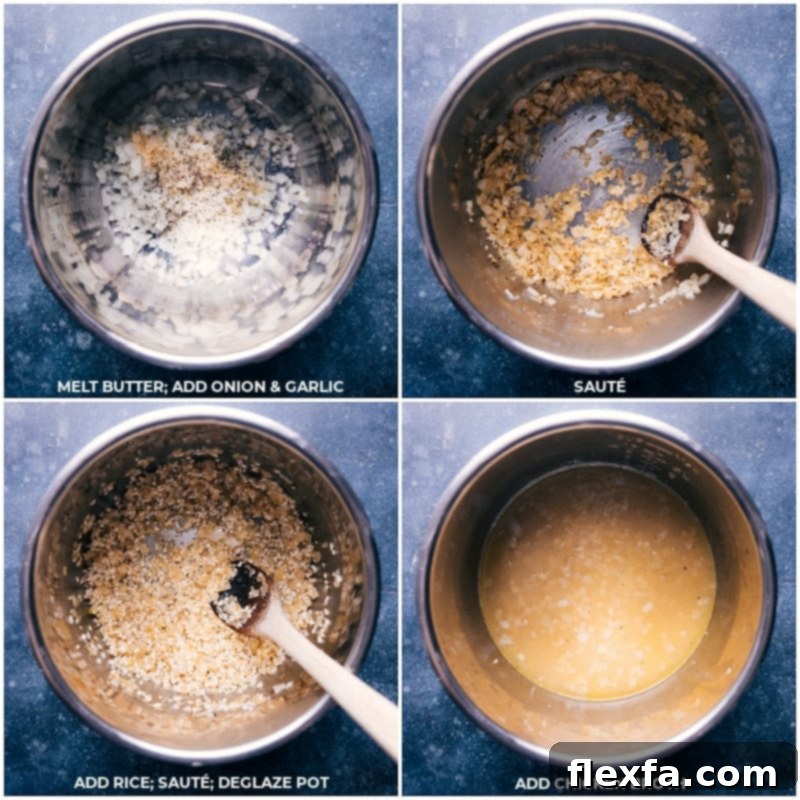
Simplified & Savory: How to Cook Risotto in an Instant Pot
Traditional risotto, when prepared flawlessly, is renowned for its **creamy** consistency, **rich** flavor, and perfectly **al dente rice**. Infused with fresh vegetables and fragrant herbs, few rice dishes can compete with the savory depth of a well-made risotto (though our Curry Rice certainly offers some healthy competition!). Historically, risotto has been perceived as a highly temperamental dish, prone to error and requiring constant vigilance. That is, **until now, with this revolutionary recipe**!
The Instant Pot completely eliminates all the guesswork and delivers impeccable risotto in an astonishing **SIX minutes** of pressure cooking time. Even better, it’s an almost entirely **hands-off process**. You simply seal the uncooked rice and other ingredients within the pressure cooker, and then let it work its remarkable magic. This truly is *Risotto Instant Pot Magic* – transforming a complex culinary endeavor into a simple, enjoyable task!
The Secret to Success: What Rice Makes the Best Risotto?
When it comes to crafting exceptional risotto, the type of rice you use is not just a detail; it’s the most critical element for success. Risotto relies exclusively on Arborio rice. This distinct short-grain Italian rice is uniquely suited for risotto due to its remarkably high starch content, particularly amylopectin. As Arborio rice cooks and absorbs liquid, it slowly releases these starches into the cooking broth, creating the signature creamy, velvety texture that defines classic risotto.
It is crucial to understand that Arborio rice is fundamentally different from standard long-grain rice or any other common rice varieties you might use for side dishes or pilafs. Its unique starch composition is what gives risotto its characteristic richness without being heavy.
For this Instant Pot Risotto recipe to achieve its intended creamy, al dente perfection, there are absolutely no workable substitutes for Arborio rice. Using any other type of rice will not yield the desired creamy texture and could result in a mushy or overly chewy dish.
Fortunately, Arborio rice is widely available and typically easy to find. Look for it in the rice or international foods aisle of your local grocery store. Occasionally, larger stores or specialty food markets might even carry it in their bulk section, offering a cost-effective option for serious risotto enthusiasts.

Creative Twists: Delicious Instant Pot Risotto Variations
Bring your culinary creativity to life with these exciting variations to customize your Instant Pot Risotto:
- Add Protein for a Heartier Meal: Elevate your risotto to a full entrée by incorporating a protein. Serve it alongside slices of tender rotisserie chicken for a quick meal, or stir in perfectly sautéed shrimp right at the end (creating a delightful Instant Pot Risotto Shrimp!). For a more prepared option, try serving it with our flavorful Italian Chicken Marinade or spicy Blackened Chicken, either atop or on the side.
- Veggie Swaps Beyond Peas: If you’re not a fan of traditional Instant Pot Risotto with Peas, don’t worry! Easily substitute them with another tender vegetable you love. Frozen corn kernels make a great alternative, or for a touch of elegance, stir through some diced Roasted Asparagus or perfectly cooked broccoli florets at the end.
- Savory Sausage Risotto: For a robust and flavorful meal, prepare Instant Pot Risotto Sausage. Simply cook your favorite smoked sausage (such as Italian sausage or kielbasa) by browning it in a skillet before you start the risotto. Once the risotto is cooked, stir the browned sausage pieces through it for an incredible depth of flavor.
- Earthy Mushroom Instant Pot Risotto: Transform your risotto into a sophisticated mushroom masterpiece. Sauté a medley of your favorite mushrooms (cremini, shiitake, or wild mushrooms work wonderfully) with a touch of garlic and herbs. You can even try roasting mushrooms for concentrated flavor. Stir these savory mushrooms into the risotto just before serving for an umami-rich experience.
- Lemony Herb Risotto: For a bright and zesty flavor, increase the amount of fresh lemon juice and zest. Add a generous amount of fresh parsley, chives, or even dill for a truly vibrant and aromatic dish.
- Sun-Dried Tomato & Spinach Risotto: Add finely chopped sun-dried tomatoes (oil-packed for extra flavor) along with the onions in the sauté step. Stir in fresh spinach leaves at the very end; they will wilt beautifully into the hot risotto.
These variations are just starting points. Feel free to experiment with your favorite ingredients to make this Instant Pot Risotto truly your own!
Your Questions Answered: Instant Pot Risotto FAQs
No, it is highly recommended not to wash Arborio rice before using it for risotto. The unique creamy texture of risotto comes from the release of starches from the rice grains during cooking. Washing the rice removes these essential starches, which would prevent your risotto from achieving its classic creamy consistency. Additionally, adding extra liquid from washing can throw off the delicate liquid-to-rice ratio, impacting the final texture.
Risotto can become “gluggy” (overly thick, sticky, or glue-like) if it absorbs too much liquid or if it sits for too long after cooking. Arborio rice is designed to absorb liquid and release starches, but if overcooked or left to cool without immediate serving, the grains can split, releasing too much starch and creating a dense, sticky texture. To revive gluggy risotto, simply stir in a splash of warm chicken or vegetable stock (or even a bit more cream) until it reaches your desired velvety consistency. Remember, risotto is best enjoyed immediately after preparation.
Traditionally, Arborio rice cooked on the stovetop requires 18-20 minutes of simmering and constant stirring to reach an al dente texture. However, thanks to the magic of pressure cooking, this Instant Pot Risotto recipe cooks the Arborio rice to perfection in just 6 minutes under high pressure. This dramatic reduction in cooking time is one of the biggest advantages of using an Instant Pot for risotto.
Absolutely not! The Instant Pot is designed to fully cook the Arborio rice from its raw state. There is no need for any pre-cooking or parboiling. All ingredients, including the uncooked rice, go into the pot, and the pressure cooker handles the entire cooking process. Risotto is a dish that truly shines when served fresh, immediately after preparation, as its creamy texture can change if made too far in advance.
No, it is strongly recommended not to use regular long-grain or medium-grain rice for risotto. As highlighted earlier, Arborio rice contains a unique type and amount of starch that is essential for creating the characteristic creamy texture of risotto. Regular rice varieties will not release starches in the same way, resulting in a dish that lacks the desired creaminess and may be watery or mushy instead of velvety.
The quality of your broth significantly impacts the final flavor of your risotto. A high-quality chicken stock or broth, like Swanson®, is highly recommended for its rich, savory notes. If you’re preparing a vegetarian version of Instant Pot Risotto, be sure to use a good quality vegetable stock or broth. Always use low-sodium options if you want more control over the seasoning.
Leftover risotto can be stored in an airtight container in the refrigerator for up to 3-4 days. While risotto is always best fresh, you can reheat it gently on the stovetop or in the microwave. When reheating, you might find it has thickened significantly. To restore its creamy consistency, add a splash of warm chicken stock, vegetable stock, or even a little cream or milk, stirring until it becomes smooth and heated through. Be careful not to overcook it during reheating.

Unlock Perfection: The Essential Tricks to Making Good Risotto
Achieving truly great risotto, even with the Instant Pot’s assistance, comes down to a few critical techniques. These final steps make all the difference between good and absolutely spectacular:
- Release Pressure Immediately: This step is non-negotiable for perfectly textured risotto. As soon as the cooking cycle finishes, perform a quick release of the pressure. If you allow the rice to sit in the Instant Pot under pressure for any extended period, it will continue to cook and absorb too much moisture, inevitably leading to a gummy, overcooked texture. Prompt release is key to achieving that desirable al dente bite.
- Stir Vigorously After Cooking: Once the pressure is released and the lid is open, don’t just gently fold. Stir the risotto vigorously for at least a minute or two. This energetic stirring is crucial because it helps to further release the remaining starches from the Arborio rice grains, emulsifying them with the liquid to create that signature, luscious creaminess that defines perfect risotto.
- Don’t Skip the Butter: Butter is not merely an ingredient; it’s a vital component for both flavor and texture in your Instant Pot Risotto. Adding a generous knob of butter at the end contributes significantly to the creamy mouthfeel and enriches the overall taste. For the best possible flavor, opt for high-quality unsalted butter. The better the butter, the better your risotto will taste!
- Add Cheese Last, and Gradually: The timing and method of adding Parmesan cheese are paramount. Fat, particularly from cheese, has a tendency to break down and become stringy or oily when exposed to high, sustained heat. This is precisely why we remove the Instant Pot insert from direct heat to begin the cooling process before incorporating the Parmesan. Add the freshly grated cheese gradually, 2-3 tablespoons at a time, stirring gently until each addition melts smoothly into the risotto. This technique ensures that the cheese emulsifies beautifully, giving your risotto that classic, light, and silky texture, rather than a clumpy or stringy mess.
- Finishing Touches Make a Big Difference: Never underestimate the power of fresh additions at the very end. A squeeze of fresh lemon juice adds a bright, acidic counterpoint that cuts through the richness and livens up the entire dish, enhancing all the other flavors. Freshly chopped herbs like flat-leaf parsley or chives add an aromatic flourish and a burst of color. Just a little bit of these fresh elements goes a long way in elevating your risotto from delicious to truly unforgettable.
Explore More Delicious Rice Recipes
If you’ve fallen in love with the versatility of rice, you’ll want to try these other fantastic recipes that celebrate this humble grain:
- Pesto Rice: A vibrant, herbaceous dish made conveniently in just ONE pot.
- Rice and Beans: A quick, satisfying, and wholesome meal that comes together in under 20 minutes.
- Meatballs and Rice: A comforting, savory classic prepared easily in ONE pot for minimal cleanup.
- Mexican Rice Recipe: Featuring a secret blend of the best seasonings for an authentic, flavorful side.
- Butternut Squash Wild Rice Pilaf: An elegant and hearty pilaf, perfectly roasted on a single sheet-pan for ease.

Print Recipe
Creamy Instant Pot Risotto
Video
Equipment
-
Instant Pot (6-quart or larger)
Ingredients
- 4 tablespoons unsalted butter divided
- 1-1/2 cups finely diced yellow onion (about 1 large onion)
- 2 cloves garlic minced
- Salt and freshly ground black pepper
- 1 teaspoon Italian seasoning
- 1/4 teaspoon dried thyme optional, but recommended for depth
- 1 cup Arborio rice (see Note 1: absolutely essential)
- 2-1/3 cups chicken stock or broth, divided (see Note 2: use good quality)
- 1/2 cup heavy cream
- 1 cup frozen peas
- 1/2 cup freshly grated Parmesan cheese (see Note 3: fresh is best)
- 3 tablespoons finely chopped flat-leaf parsley or chives, optional, for garnish
- 1 lemon (optional, for fresh juice and zest)
Instructions
-
Sauté Aromatics: Set your 6-quart Instant Pot to the “sauté” function (normal or medium heat). Add 2 tablespoons of unsalted butter to the inner pot. Once the butter is mostly melted and shimmering, add the finely diced yellow onion and minced garlic. Season with 1/2 teaspoon each of salt and freshly ground black pepper. Cook, stirring frequently with a wooden spoon or silicone spatula, until the onions become translucent and softened, which typically takes about 3–5 minutes. Stir in the Italian seasoning and, if using, the dried thyme, and cook for another 30 seconds until fragrant.
-
Toast Rice & Deglaze: Add the 1 cup of uncooked Arborio rice to the pot. Cook, stirring constantly, for 1 minute to lightly toast the rice grains. This step helps to develop a nutty flavor and ensures the rice absorbs liquid evenly. Pour in 1/3 cup of chicken stock. Immediately use your wooden spoon to scrape the bottom of the pot thoroughly, dislodging any browned bits that may have stuck. This crucial “deglazing” step prevents a “burn” warning during pressure cooking. Continue to cook for about 1 more minute until this liquid is mostly evaporated.
-
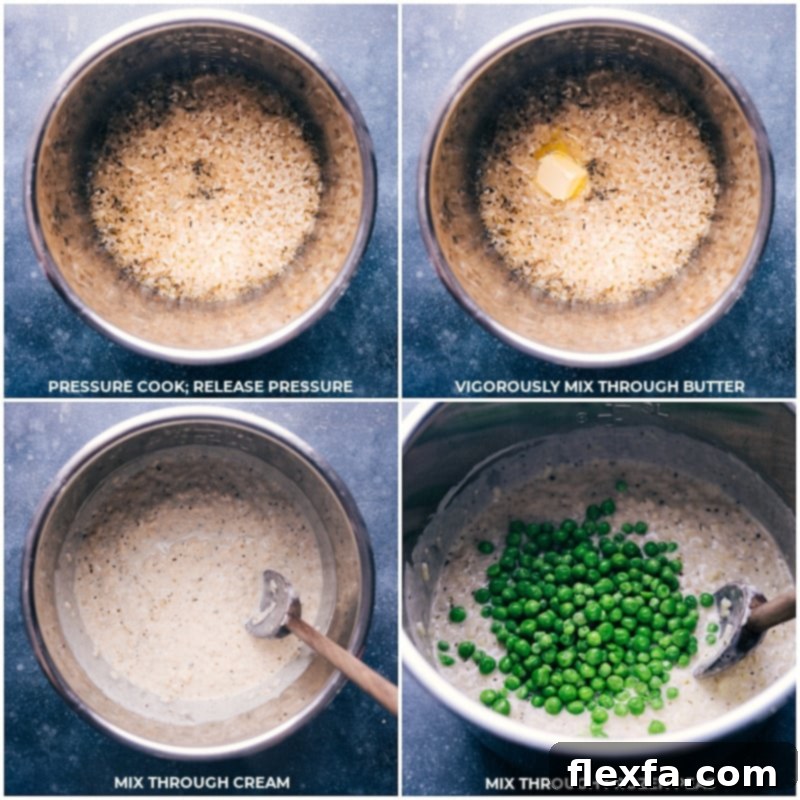
Pressure Cook: Pour in the remaining 2 cups of chicken stock into the pot. Give it a good stir to ensure all ingredients, especially the rice, are submerged in the liquid. Press “cancel” to turn off the sauté function. Secure the lid on your Instant Pot and set the steam release knob to the “sealed” position. Select the “manual” or “pressure cook” setting and set the cooking time to 6 minutes on high pressure.
-
Quick Release & Finish: Once the 6 minutes of pressure cooking are complete, immediately perform a quick release of the pressure by carefully venting the knob to the “venting” position. Be cautious of the hot steam. As soon as the pressure is fully released and the float valve drops, open the Instant Pot lid. Do not allow the risotto to sit under pressure for any longer than necessary, as this can lead to an overcooked, gummy texture.
-
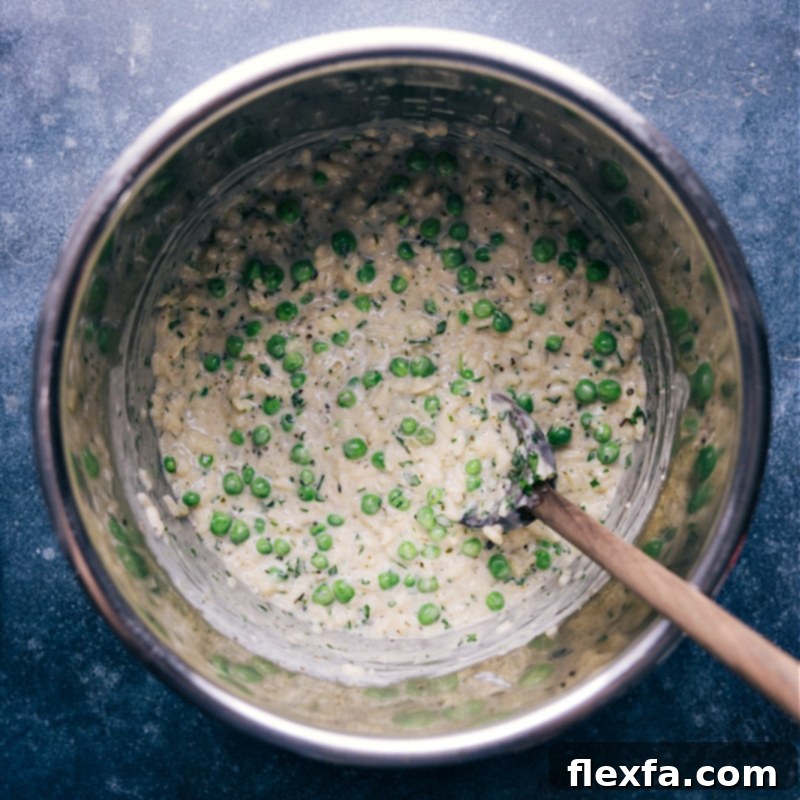
Final Stirring & Additions: Carefully remove the Instant Pot inner pot and place it on a heat-safe surface, like a heating pad or trivet, to stop the cooking process. Add the remaining 2 tablespoons of unsalted butter and stir vigorously until it is fully melted and incorporated, contributing to the risotto’s creaminess. Stir in the heavy cream until it’s fully combined and the risotto looks lusciously smooth. Add the frozen peas and gently stir for about 30 seconds to warm them through. Gradually add the freshly grated Parmesan cheese, about 2–3 tablespoons at a time, stirring gently after each addition until it melts seamlessly into the rice (see Note 4 for best results).
-
Season & Serve: If desired, stir in the finely chopped flat-leaf parsley (or chives) and 1–2 teaspoons of fresh lemon juice for brightness. Taste the risotto and adjust seasonings as needed; I often find myself adding another 1/4–1/2 teaspoon of salt and 1/4 teaspoon of pepper to taste. The risotto should have a beautifully creamy, porridge-like consistency. It is always best served immediately, as risotto can become gluggy (see Note 5 for explanation) if left to sit. If it does get too thick, stir in a splash of warm chicken stock or cream to loosen it. Spoon into warm serving bowls, garnish with extra Parmesan cheese and fresh herbs if desired, and enjoy without delay!
Recipe Notes
Note 2: Broth Quality Matters: The quality of your chicken stock or broth will significantly impact the flavor of your finished risotto. Investing in a good quality brand (like Swanson®) makes a noticeable difference. For a vegetarian Instant Pot Risotto, simply use a high-quality vegetable stock or broth instead.
Note 3: Fresh Parmesan for Best Results: For the best flavor and melting consistency, use freshly grated Parmesan cheese. A block of Parmesan grated using the small holes of a grater, or pre-packaged finely shredded Parmesan cheese, works wonderfully. Avoid using Parmesan from a can, as it is often too salty and contains anti-caking agents that prevent it from melting properly into the rice.
Note 4: Why Add Parmesan Last: Adding cheese too early or to a very hot pot can cause the fat in the cheese to separate, resulting in a stringy or oily texture instead of a smooth, creamy one. By removing the Instant Pot insert from the heating element and allowing the risotto to cool slightly before gradually adding the Parmesan in multiple additions, you ensure a perfectly emulsified, silky finish.
Note 5: Understanding Glugginess: “Gluggy” risotto refers to a sticky, dense, or gluey texture that occurs when the rice has absorbed too much liquid, causing the grains to split and release excessive starch. This often happens if risotto is left to sit for too long after cooking without immediate serving. Nobody wants gluggy rice! If your risotto becomes too thick upon standing, a splash of warm stock or cream can usually rescue its texture.
Storage & Reheating: Store any leftover Instant Pot Risotto in an airtight container in the refrigerator for up to 3-4 days. To reheat, gently warm it on the stovetop over low heat, stirring occasionally, or in the microwave. Add a splash of warm chicken or vegetable stock (or a little cream) while reheating to restore its creamy consistency.
Nutrition Information
Nutrition information is automatically calculated and should only be used as an approximation. It may vary based on specific ingredients and brands used.