
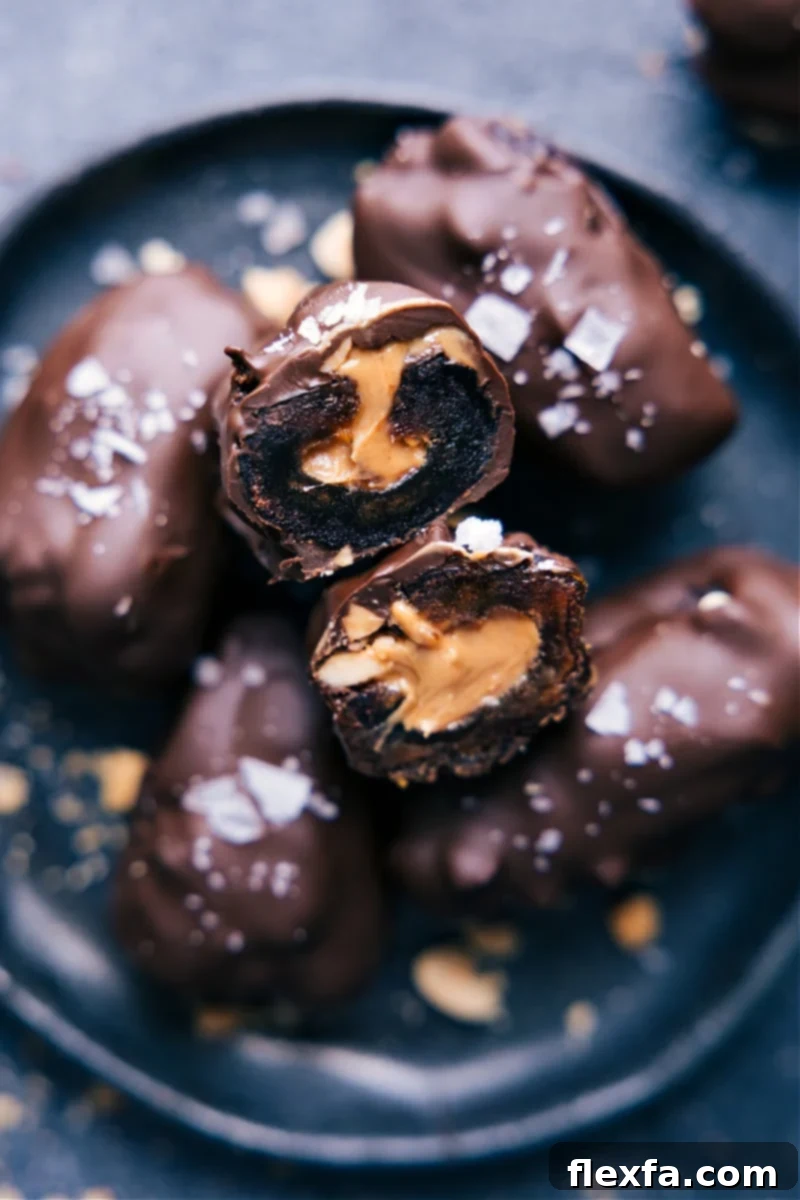
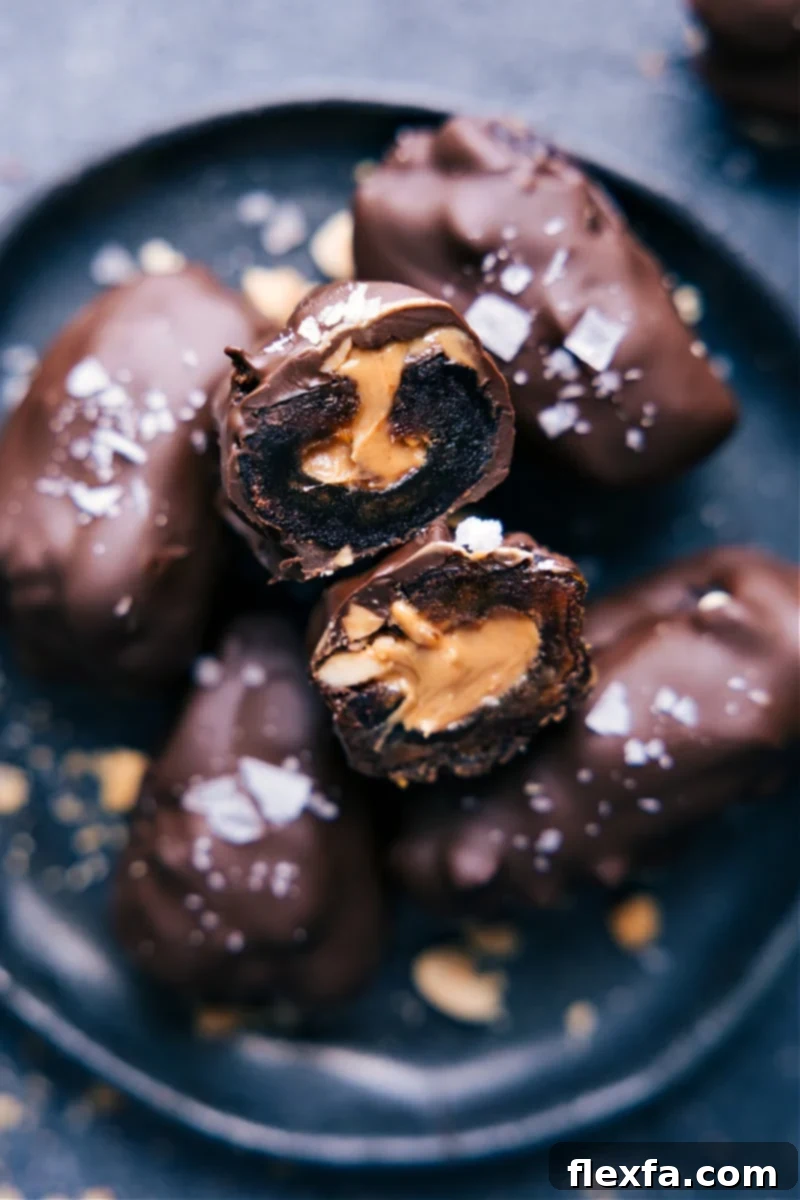
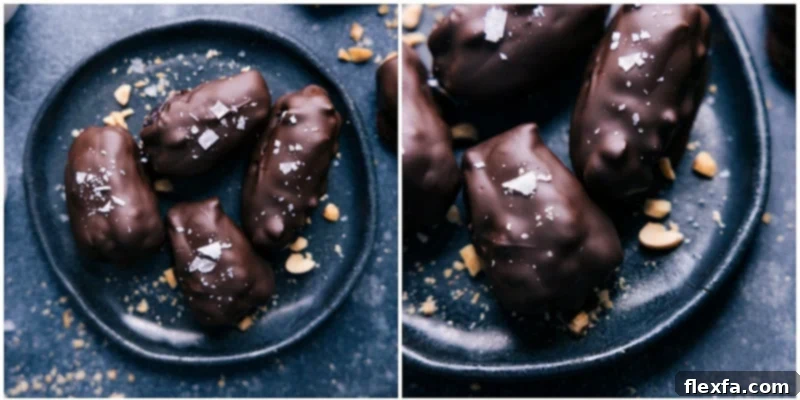
Chocolate-Covered Dates are an exquisite blend of natural sweetness, creamy texture, and rich chocolate indulgence. Perfect as a quick snack, a delightful treat, or an elegant dessert, these homemade delights prove that healthy can also be incredibly delicious. Made with wholesome ingredients, they are designed to satisfy your sweet tooth without the common sugar hangover, offering a truly gratifying experience.

Author’s Note
Dubai-Inspired Chocolate-Covered Stuffed Dates: A Culinary Journey!
During a memorable trip to Dubai with my husband, we were utterly captivated by the city’s vibrant culinary scene, particularly the omnipresence of date shops. These weren’t just any date shops; they were veritable treasure troves, brimming with trays of dates prepared in every conceivable manner – stuffed, dipped, and elaborately coated. Naturally, as avid food explorers (and with the noble excuse of “research”), we sampled a vast array of these exquisite treats. Among all the delightful variations, one combination emerged as our absolute favorite: dates generously stuffed with creamy nut butter and enveloped in a luxurious layer of chocolate.
This recipe is a heartfelt tribute to those unforgettable Emirati delicacies. It captures the perfect harmony of sweet, salty, and wonderfully chewy textures that made us fall in love with them. The process is surprisingly simple: start with plump Medjool dates, carefully stuff them with your favorite nut butter and a sprinkle of crushed nuts for added crunch. Next, dip them into a pool of rich, melted chocolate, ensuring every surface is perfectly coated. A final flourish of flaky sea salt elevates the flavors, creating a gourmet-quality treat right in your own kitchen.
Not only are these dates incredibly satisfying, but they also offer a wholesome alternative to conventional candy bars, packing natural sugars, healthy fats, and fiber into every bite. They are an ideal choice for anyone seeking a guilt-free indulgence that truly hits the spot.
What Do These Irresistible Chocolate-Covered Dates Taste Like?
Imagine the exotic allure of Dubai’s dessert dates fused with the nostalgic comfort of a classic candy bar. That’s precisely the experience you get with these chocolate-dipped stuffed dates. Many describe their flavor profile as remarkably reminiscent of a Snickers bar, but with a more sophisticated, naturally derived sweetness.
At their core, the dates themselves are incredibly sweet and gooey, offering a melt-in-your-mouth texture that is naturally rich and almost caramel-like. This natural sweetness is beautifully complemented by deep, nutty, and subtly buttery notes, creating a complex flavor base. Each date is lovingly stuffed with a generous dollop of creamy peanut butter (or almond butter for a different twist), which provides a smooth, rich counterpoint to the date’s chewiness. This creamy filling is then studded with lightly salted crunchy peanuts, adding a crucial textural contrast and a delightful hint of savory saltiness.
Finally, every element is enveloped in a generous layer of velvety, melted dark chocolate. This chocolate coating not only adds a decadent finish but also provides a slight bitterness that balances the overall sweetness, making each bite a symphony of flavors and textures – sweet, salty, creamy, chewy, and crunchy. It’s a truly indulgent treat that feels incredibly satisfying yet surprisingly light, leaving you feeling good rather than overly full or sluggish.
Let’s Delve into the Wonderful World of Dates
It’s a common misconception, but did you know dates are actually a fresh fruit, not dried? While often found in the dried fruit section, particularly Medjool dates (the preferred variety for this recipe), they are harvested and sold in their fresh, natural state. This is why they retain their incredible moisture, stickiness, and characteristic gooey texture that sets them apart from truly dried fruits.
For those who already appreciate dates, you’re well aware of their sticky, intensely sweet, and uniquely gooey nature. This natural sweetness is profoundly satisfying, offering a depth of flavor that processed sugars simply cannot match. Beyond their delightful taste and texture, dates are also packed with impressive health benefits. They are a fantastic source of dietary fiber, which aids digestion and promotes a feeling of fullness. Dates also provide essential minerals like potassium, magnesium, and copper, as well as various antioxidants that contribute to overall well-being. These nutritional advantages make these little treats even more gratifying – a true guilt-free pleasure!
However, it’s important to note: if you’re not particularly fond of dates to begin with, this recipe, delightful as it is, might not convert you. After all, they are prominently dates!
Essential Tips for Working with Dates
To create the best chocolate-covered dates, selecting and preparing your dates correctly is key. Here are some indispensable tips for working with this naturally sweet fruit:
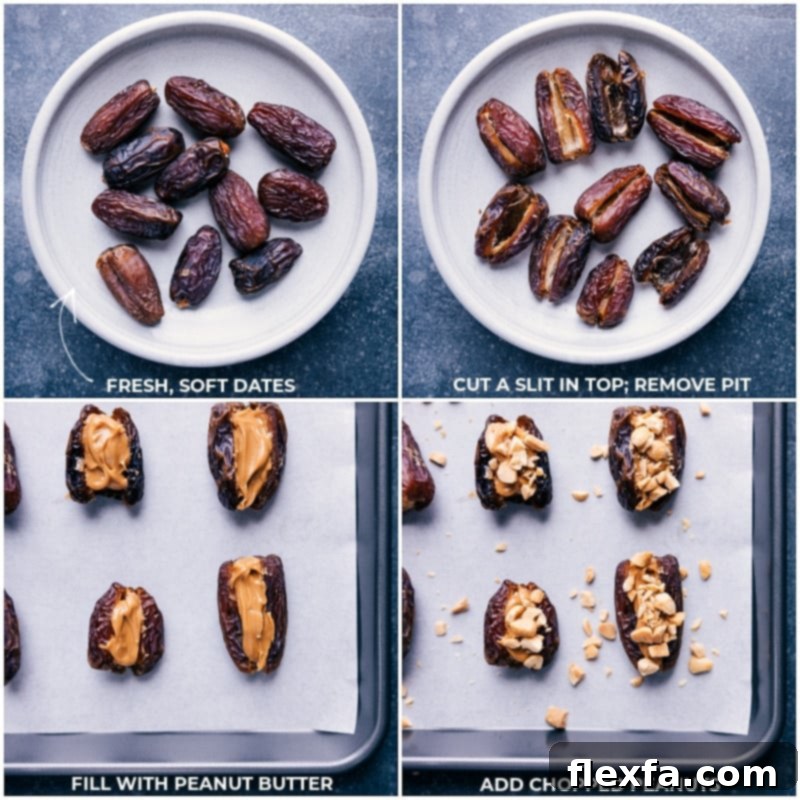
- Choosing the Right Dates: For this recipe, fresh, soft Medjool dates are paramount. Their large size, natural moisture, and tender flesh make them ideal for stuffing. Look for them in the produce section, often near other specialty fruits, or sometimes in the dried fruit and nut aisle. I personally recommend Natural Delights Medjool Dates for their consistent quality.
- Softening Dates if Needed: If your dates feel a bit firm or dry, don’t despair! Hard dates will be difficult to stuff and less enjoyable to eat. You can easily revive them:
- Quick Microwave Method: Place the dates in a microwave-safe bowl with a tablespoon or two of water. Heat on high for 15-30 seconds. The steam will soften them nicely.
- Hot Water Soak: Alternatively, soak them in hot water for about 10-15 minutes, then drain and pat dry. This method is gentler and often results in perfectly pliable dates. Here’s a great guide to reviving stale dates.
- Pitting Your Dates: Some dates come pre-pitted, which saves a step. However, many Medjool dates are sold with their pits intact. Always make sure to check and carefully remove any pits before you begin stuffing. The easiest way is to use a small paring knife to slice a lengthwise slit into one side of the date, then gently pry open and remove the elongated pit. Be careful not to cut the date completely in half, as you want to maintain a pocket for the filling.
- Handling Sticky Dates: Dates are naturally sticky! To make handling easier, you can lightly dampen your fingers with water or a tiny bit of coconut oil when stuffing them.
Quick Tip: Maximize Your Dates!
If you find yourself with a surplus of dates after making these chocolate-covered delights, don’t let them go to waste! Dates are incredibly versatile and can add natural sweetness and chewiness to a variety of recipes. Consider incorporating them into these delicious treats:
- No-Bake Easy Dark Chocolate Pistachio Granola Bars: Dates act as a fantastic binder and natural sweetener.
- Cauliflower Smoothies: A surprising ingredient that adds sweetness without overpowering other flavors.
- Healthy and Flourless Zucchini Muffins: Dates enhance moisture and sweetness in these wholesome muffins.
They can also be chopped and added to oatmeal, energy bites, or simply enjoyed on their own as a healthy snack!
Crafting Your Own Chocolate-Covered Dates: A Simple Guide
Making these indulgent chocolate-covered dates is a straightforward process that yields impressive results. Here’s a detailed breakdown of the steps and key considerations for success:
- Prepare Your Workspace and Ingredients: Before you even start melting chocolate, ensure your dates are pitted and stuffed, and your nuts are chopped. Line a baking sheet or large plate with parchment paper, wax paper, or foil. This non-stick surface is crucial for preventing the chocolate-dipped dates from sticking as they set. Have all your ingredients measured and ready to go for a seamless process.
- Mastering Chocolate Melting: The key to a smooth, dippable chocolate coating is proper melting.
- Microwave Method (Easiest): Place your chocolate chips or wafers and coconut oil (if using) in a microwave-safe bowl. Heat in short bursts, typically 20-30 seconds at a time, stirring thoroughly after each interval. It’s vital to stir even if the chocolate doesn’t look fully melted, as residual heat will continue the melting process. This prevents scorching. Continue until the chocolate is smooth and glossy.
- Double Boiler Method (Classic): For ultimate control, use a double boiler. Place chocolate and coconut oil in a heatproof bowl set over a saucepan of simmering water (ensure the bowl doesn’t touch the water). Stir continuously until smooth. This method provides gentle, even heat.
- The Importance of Quality Chocolate: The flavor of your finished dates heavily relies on the quality of chocolate you choose. Brands like Ghirardelli or Guittard are excellent choices as they contain good cocoa butter content, which not only provides a richer taste but also melts more smoothly and sets with a beautiful sheen. While dark chocolate is recommended for its deeper flavor and health benefits, you can certainly experiment with milk chocolate or even white chocolate if you prefer.
- Avoid Moisture at All Costs: Chocolate and water are not friends during the melting process! Even a single drop of water or steam can cause chocolate to “seize” – meaning it will instantly thicken, become lumpy, and lose its smooth, fluid consistency, making it unusable for dipping. Ensure your bowl, spatula, and any utensils are completely dry.
- The Art of Dipping:
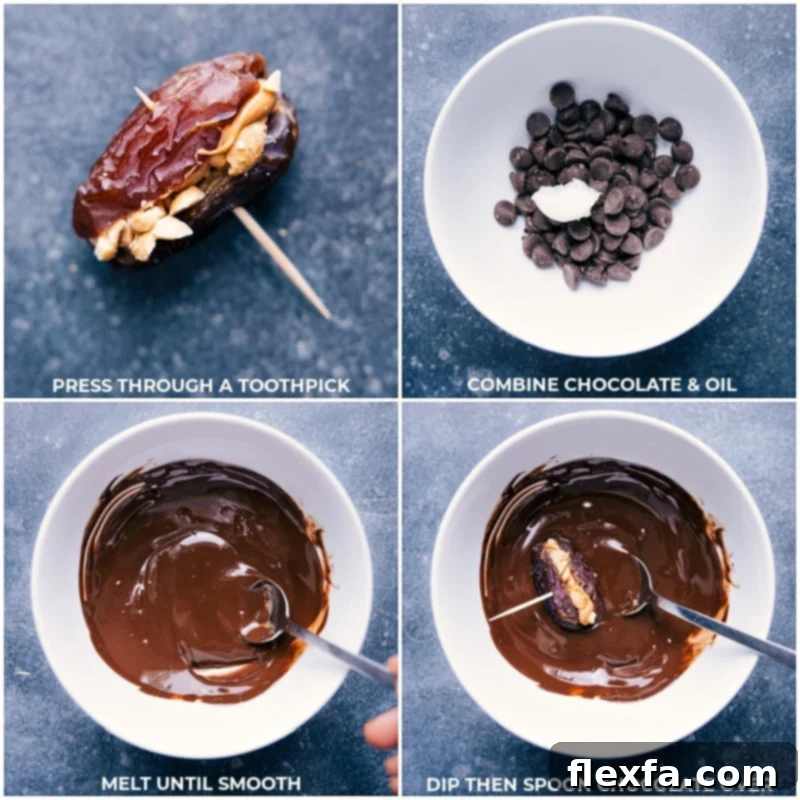
- Insert a toothpick lengthwise through each stuffed date. This provides a clean handle for dipping.
- Submerge the date completely into the melted chocolate. For an even coating, rotate the date gently.
- Lift the date, holding it over the bowl, and gently tap the toothpick against the rim of the bowl. This allows excess chocolate to drip off, preventing puddles at the bottom and ensuring a thin, even coating.
- Carefully transfer the chocolate-covered date to your prepared parchment-lined tray. Use a second toothpick or a small knife to gently coax the date off the first toothpick, smoothing any imperfections in the chocolate if needed.
- Setting the Chocolate: Allow the chocolate to harden completely. This can be done at room temperature (about 1 hour) or, for quicker results, in the refrigerator (about 30 minutes). Once set, the chocolate will be firm to the touch and ready to enjoy.
Creative Variations to Elevate Your Dates
While the classic chocolate-covered date with nut butter and peanuts is divine, don’t hesitate to get creative with toppings and fillings! Here are some ideas to inspire you:
- Salty-Sweet Perfection: As recommended in the main recipe, a small sprinkle of flaky sea salt (like Maldon) on the chocolate coating before it hardens is a game-changer. It beautifully contrasts and enhances the sweetness.
- Diverse Nut Fillings & Toppings: Experiment with different nuts! Instead of peanuts, try almonds, pistachios, walnuts, pecans, or even a mixed nut butter. For toppings, finely chopped pistachios or walnuts add a gourmet touch. Lightly toast nuts before chopping for enhanced flavor.
- Coconut Lover’s Dream: Roll the freshly dipped dates in shredded coconut (toasted or untoasted) for an exotic, tropical flair.
- Spices and Zest: A tiny pinch of cinnamon, cardamom, or even a touch of chili powder (for a kick!) can be mixed into the nut butter or sprinkled on top of the wet chocolate. A bit of orange or lemon zest can also add a bright note.
- Beyond Nut Butter: For an even richer experience, try stuffing dates with a small amount of cream cheese mixed with a touch of vanilla, or a piece of candied ginger. For a Middle Eastern twist, a dollop of tahini before adding nuts can be delightful.
- Alternative Chocolates: While dark chocolate is robust, milk chocolate offers a sweeter, creamier coating, and white chocolate can be dyed with food coloring for festive occasions.
- Fun Sprinkles: For a more playful look, especially for parties or children, add colorful sprinkles to the wet chocolate.
The possibilities are endless, allowing you to tailor these treats to your personal preferences or seasonal themes!
Storage Solutions for Your Chocolate-Covered Dates
Keeping Your Delights Fresh and Ready
Proper storage ensures your chocolate-covered dates remain fresh and delicious for future enjoyment:
These dates maintain their optimal freshness and texture when stored in an airtight container in the refrigerator. They will keep beautifully for up to a week. Storing them in the fridge also helps the chocolate stay firm and prevents it from getting too soft or sticky, especially in warmer climates.
Can you freeze chocolate dates? Absolutely! Freezing is an excellent option for long-term storage, allowing you to enjoy these treats for months. Here’s how to freeze them effectively:
- Pre-freeze on a baking sheet: Arrange the chocolate-covered dates in a single layer on a baking sheet lined with parchment paper. This prevents them from sticking together.
- Freeze until firm: Place the baking sheet in the freezer for about 30 minutes to an hour, or until the dates are fairly frozen and the chocolate is completely solid.
- Transfer to an airtight container: Once frozen, transfer the dates to an airtight freezer-safe container or a heavy-duty freezer bag. Removing as much air as possible will help prevent freezer burn.
- Return to freezer: Store in the freezer for up to 3 months.
To enjoy frozen dates: You can either thaw them in the refrigerator for a few hours until softened, or, for a firmer, almost ice-cream like texture, enjoy them directly from the freezer!
More Easy No-Bake Treats to Love:
If you’re a fan of simple, delicious, and convenient desserts that require no oven time, you’ll adore these other no-bake creations. They’re perfect for satisfying cravings without the fuss of baking!
Desserts
Date Brownies
Experience the rich, fudgy goodness of brownies, naturally sweetened with dates for a healthier twist. These are incredibly satisfying and deeply flavorful.
Snacks
Homemade Peanut Butter Cups
Recreate your favorite candy store treat with this simple recipe for rich chocolate and creamy peanut butter cups, made fresh at home.
Desserts
No Bake Brownie Bites
Indulge in these rich, fudgy, and super easy no-bake brownie bites. They are quick to prepare and a delightful way to satisfy chocolate cravings.
Cookies
No Bake Cookies Recipe
A classic and beloved recipe for no-bake cookies, featuring a comforting blend of oats, cocoa, and peanut butter. A timeless favorite!

Print Recipe
Chocolate-Covered Dates
Video
Watch the video tutorial to see how easy it is to make these delicious chocolate-covered dates!
Equipment
- Sheet pan (15″ x 10″) lined with parchment paper or foil
- Toothpicks
- Microwave-safe bowl or double boiler
- Spoon or spatula for stirring and coating
Ingredients
- 10 Medjool dates see note 1
- Creamy peanut butter or almond butter, see note 2
- 3 tablespoons chopped roasted peanuts or almonds
- 3/4 cup dark chocolate melting wafers or dark chocolate chips, see note 3
- 1 teaspoon coconut oil
- Flaky sea salt optional, for sprinkling
Instructions
-
Carefully cut a slit lengthwise into the top of each date, being careful not to slice all the way through. Gently remove the pit and discard it. Coarsely chop your chosen roasted peanuts or almonds and set them aside in a small bowl. Line a large sheet pan or a sturdy plate with parchment paper, foil, or wax paper, and set this aside as your prepared surface for the dipped dates.
-
Take each pitted date and fill the cavity with a generous 1/2 teaspoon of creamy peanut butter or almond butter. Use the back of a small spoon to gently smooth the nut butter into the date’s opening. Sprinkle a small amount of the crushed peanuts or almonds on top of the nut butter filling. Lightly press the nuts down into the butter to secure them. Carefully insert a toothpick through the center of each date, ensuring it’s secure enough to hold the date for dipping. Set these prepared dates aside on your lined sheet pan.
-
Combine the dark chocolate melting wafers (or chocolate chips) and coconut oil in a clean, dry microwave-safe bowl. Heat the mixture in short bursts of 20 seconds. After each burst, remove the bowl from the microwave and stir thoroughly for 20-25 seconds, even if the chocolate doesn’t appear fully melted. The residual heat will continue to melt the chocolate. Repeat this process until the chocolate is completely smooth and glossy, making sure not to overheat it, which can cause burning or seizing.
-
Working with one date at a time, hold onto the toothpick and dip the date into the melted chocolate, ensuring the bottom is well coated. Use a spoon to drizzle and coat the top and sides of the date until it is completely enveloped in chocolate. While still holding the toothpick, gently tap the date against the rim of the bowl a few times. This allows any excess chocolate to drip back into the bowl, ensuring a clean, even coating. Carefully transfer the coated date to your prepared sheet pan or plate. Use a second clean toothpick or a small knife to gently coax the date off the dipping toothpick, leaving it neatly on the parchment.
-
Before the chocolate coating sets, immediately sprinkle any remaining crushed peanuts or almonds, along with a pinch of flaky sea salt, on top of each chocolate-covered date. Once all dates are coated and topped, place the sheet pan in the refrigerator for approximately 30 minutes to allow the chocolate to fully set and harden. Alternatively, you can let them harden at room temperature for about an hour, depending on the ambient temperature. Once set, remove the toothpicks if desired and enjoy your gourmet treats!
Recipe Notes
Note 2: The choice of nut butter significantly impacts the flavor. Be sure to use a high-quality, creamy nut butter that you genuinely enjoy – preferably one that is roasted and lightly salted, as this adds depth and balances the sweetness of the date and chocolate. Peanut butter is classic, but almond, cashew, or even sunflower seed butter are delicious alternatives.
Note 3: I recommend dark chocolate for its rich flavor and slightly lower sugar content, contributing to a more wholesome treat. However, feel free to use your favorite type of chocolate here. Milk chocolate will yield a sweeter, creamier result, while semi-sweet chocolate offers a good balance. Ensure you use melting wafers or high-quality chocolate chips designed for melting for the best coating consistency.
Storage: Keep leftover chocolate-covered dates in an airtight container in the fridge for up to a week. For longer storage, freeze them for up to 3 months. (We often keep them in the freezer for a quick, cool treat!)
Nutrition Information
Nutrition information is automatically calculated and should be used as an approximation. Actual values may vary based on specific ingredients and brands used.
Love this recipe? Leave a comment below and share your experience!