
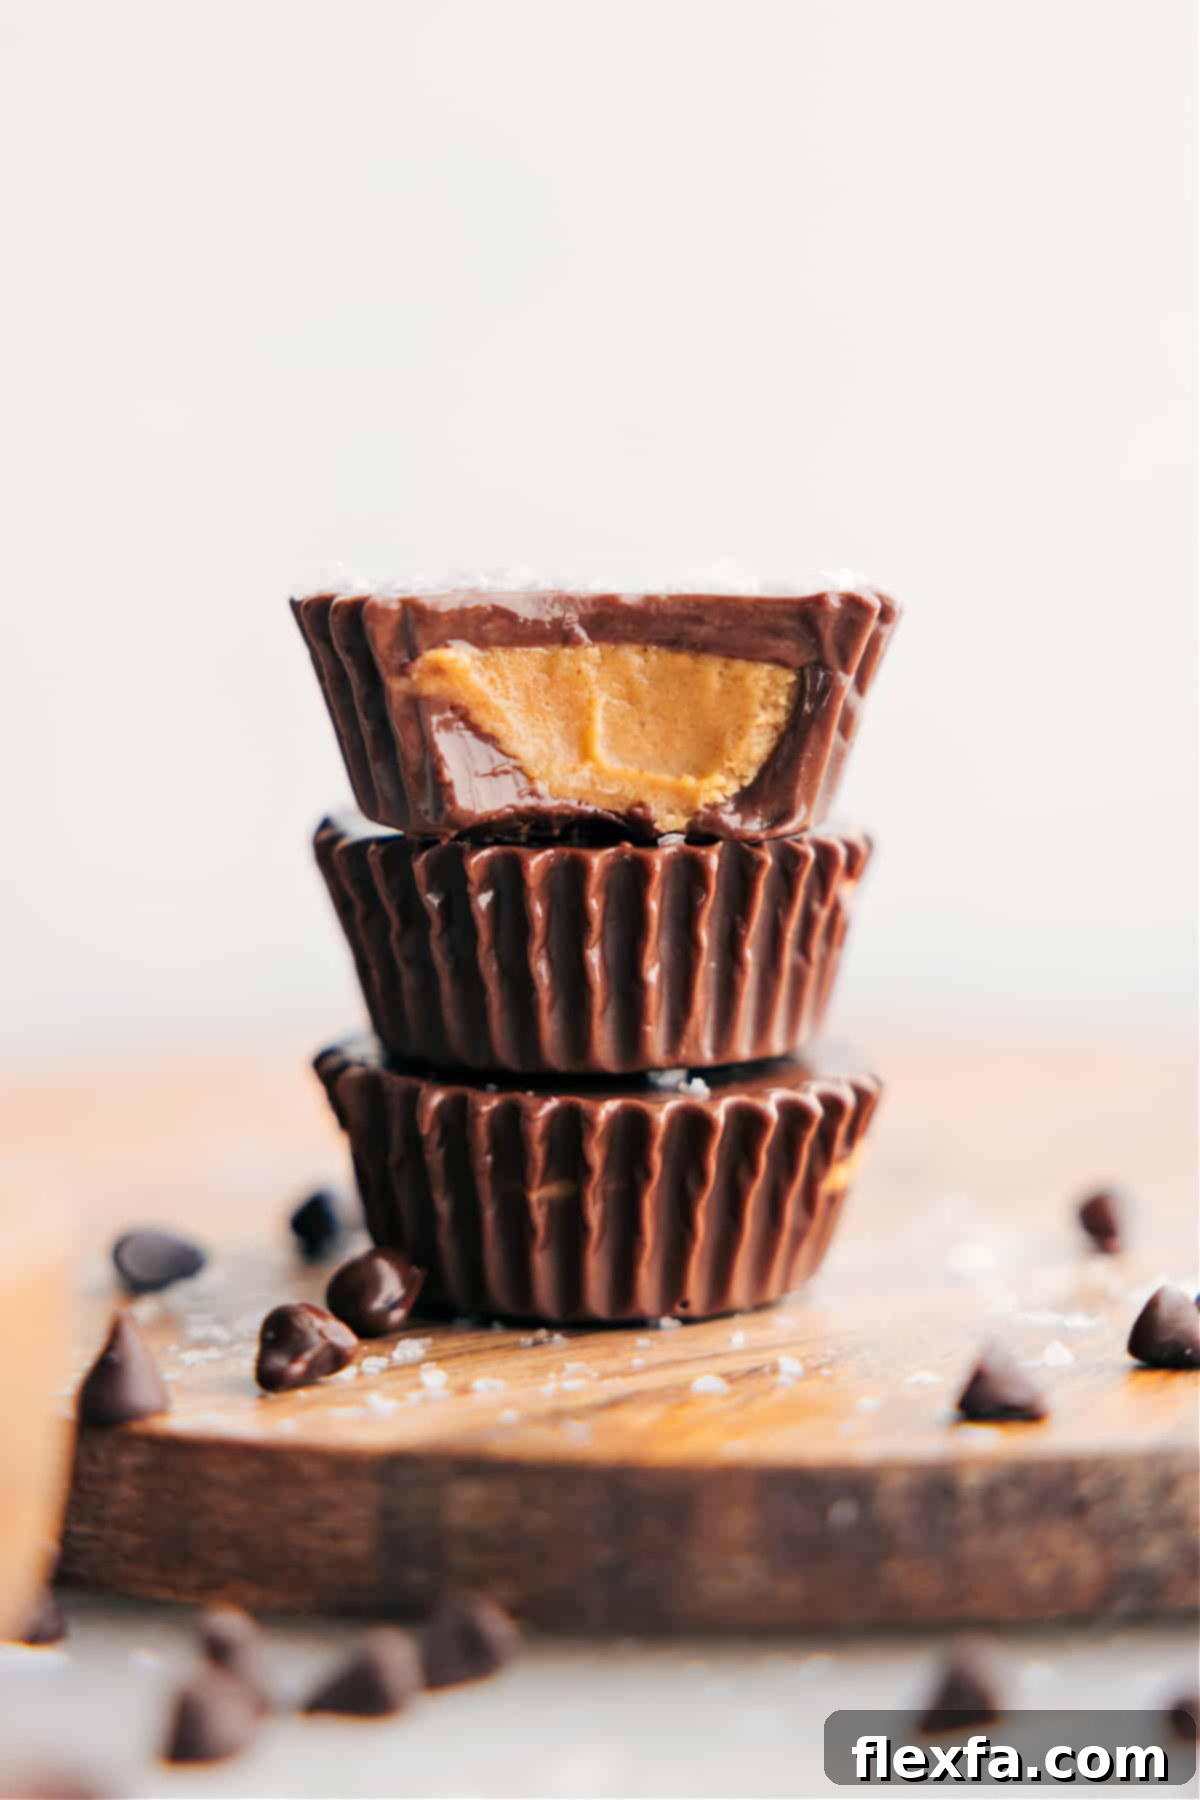
Homemade Peanut Butter Cups are a delightful dream come true for any chocolate and peanut butter enthusiast. Imagine a velvety smooth, rich peanut butter filling perfectly encased in a luscious, decadent chocolate coating. This isn’t just a simple treat; it’s an experience that far surpasses anything you can find in a store-bought package, even those beloved Reese’s cups. Get ready to elevate your dessert game with this irresistible, easy-to-make recipe that promises pure bliss in every bite.
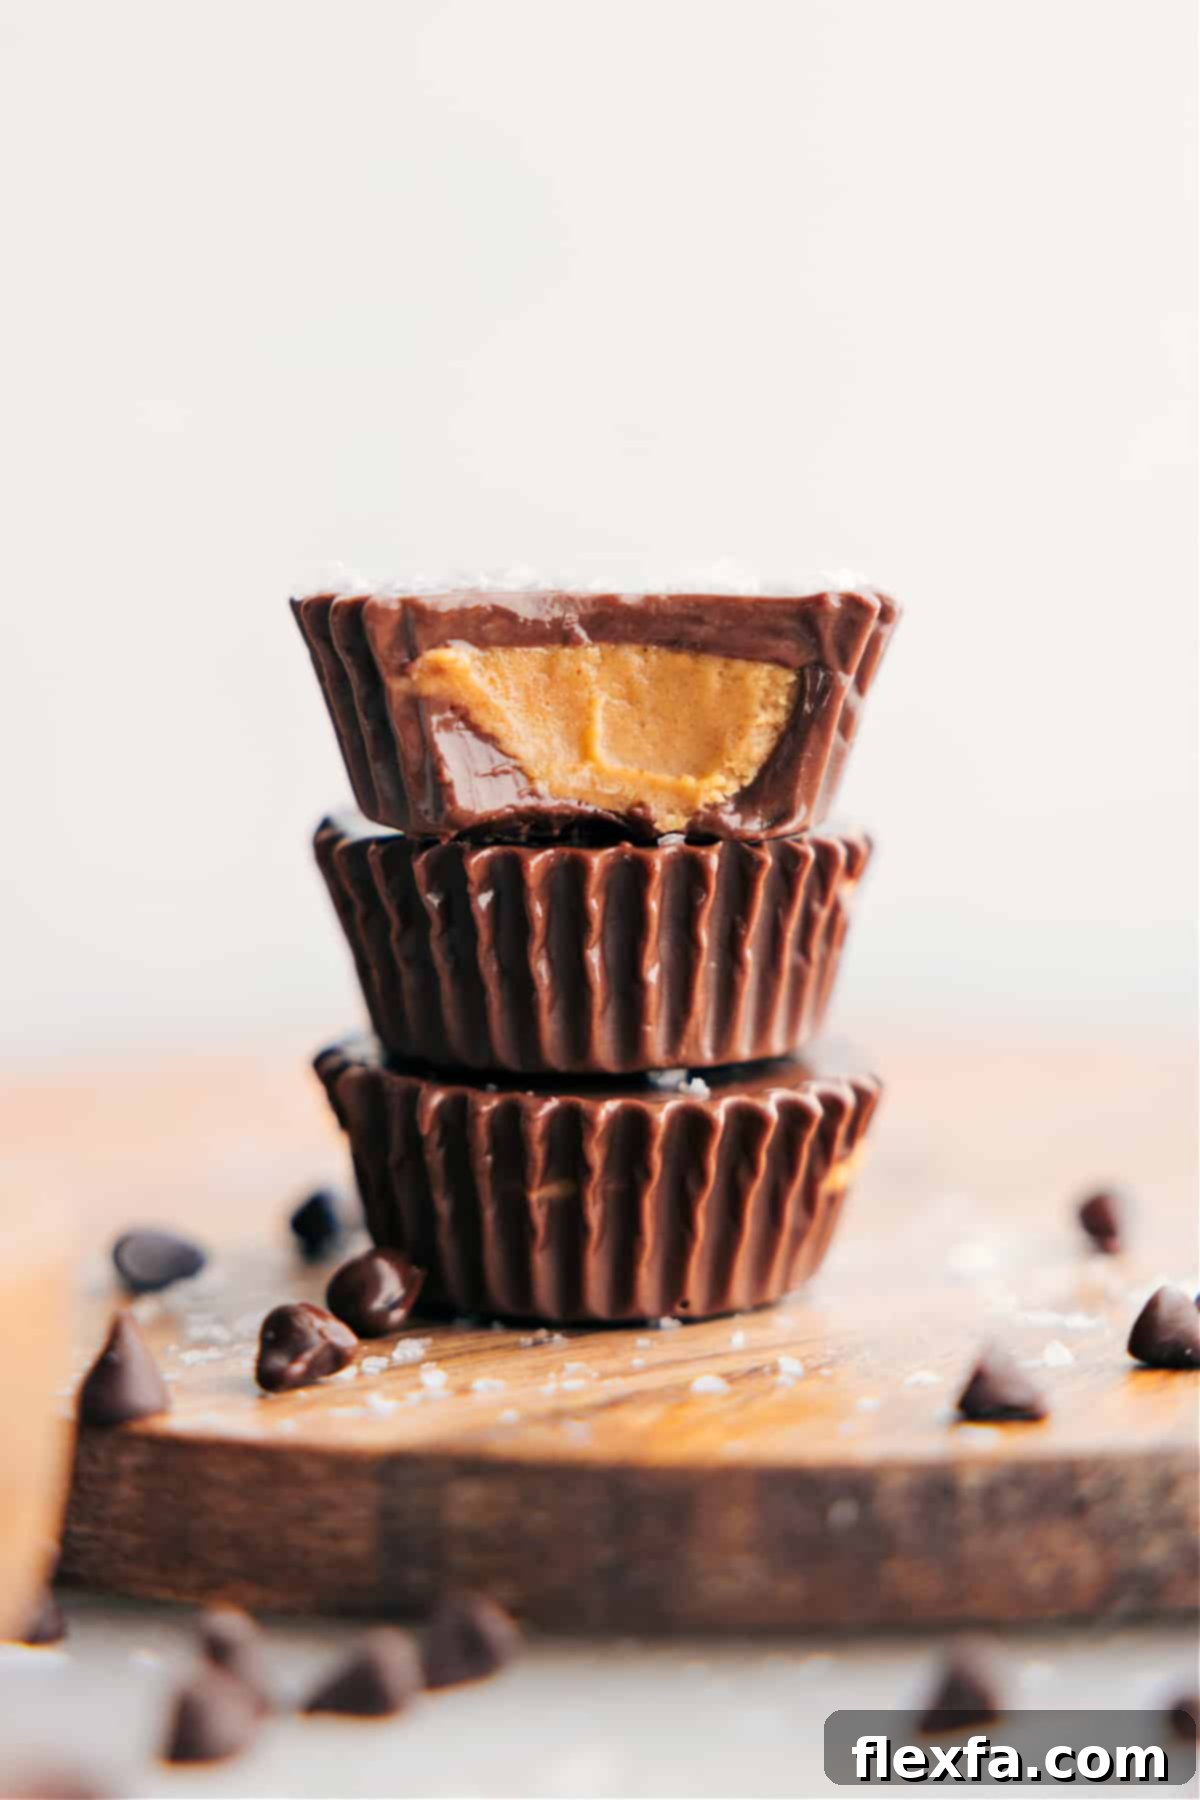

Author’s Note
My Family’s Favorite Sweet Obsession!
As someone who believes chocolate and peanut butter are the ultimate culinary pairing, I’ve dedicated a good portion of my kitchen adventures to perfecting this dynamic duo. My website is practically a shrine to this glorious combination, featuring delights like my chocolate peanut butter muffins and the ever-popular chocolate peanut butter pie. There’s just something magical about how these two flavors come together. Every Halloween, my kids know the drill: I patiently wait for them to finish trick-or-treating, then claim at least one of their Reese’s cups as my “tax.” But even as a lifelong fan of the classic, I’m here to tell you, with absolute conviction, that nothing beats the homemade version.
Crafting your own peanut butter cups opens up a world of possibilities. You have complete control over every element, from selecting your favorite chocolate—whether it’s creamy milk, intense dark, or sweet white—to fine-tuning the exact peanut butter-to-chocolate ratio that satisfies your craving. Want a thicker chocolate shell? Done. Prefer a mountain of peanut butter filling? Absolutely. You can even experiment with gourmet touches like a sprinkle of flaky sea salt to enhance the flavor, or a delicate drizzle of white chocolate for an elegant finish. The personalization is endless, allowing you to create a treat that is uniquely yours.
My children are utterly obsessed with these homemade marvels. They’ve become so proud that they often boast to their friends, “My mom makes Reese’s that are even better!” Their excitement and those sweet, beaming faces are just another reminder of why taking the time to make these from scratch is so incredibly rewarding. This recipe isn’t just about making candy; it’s about creating joyful memories and sharing a truly special treat with loved ones.
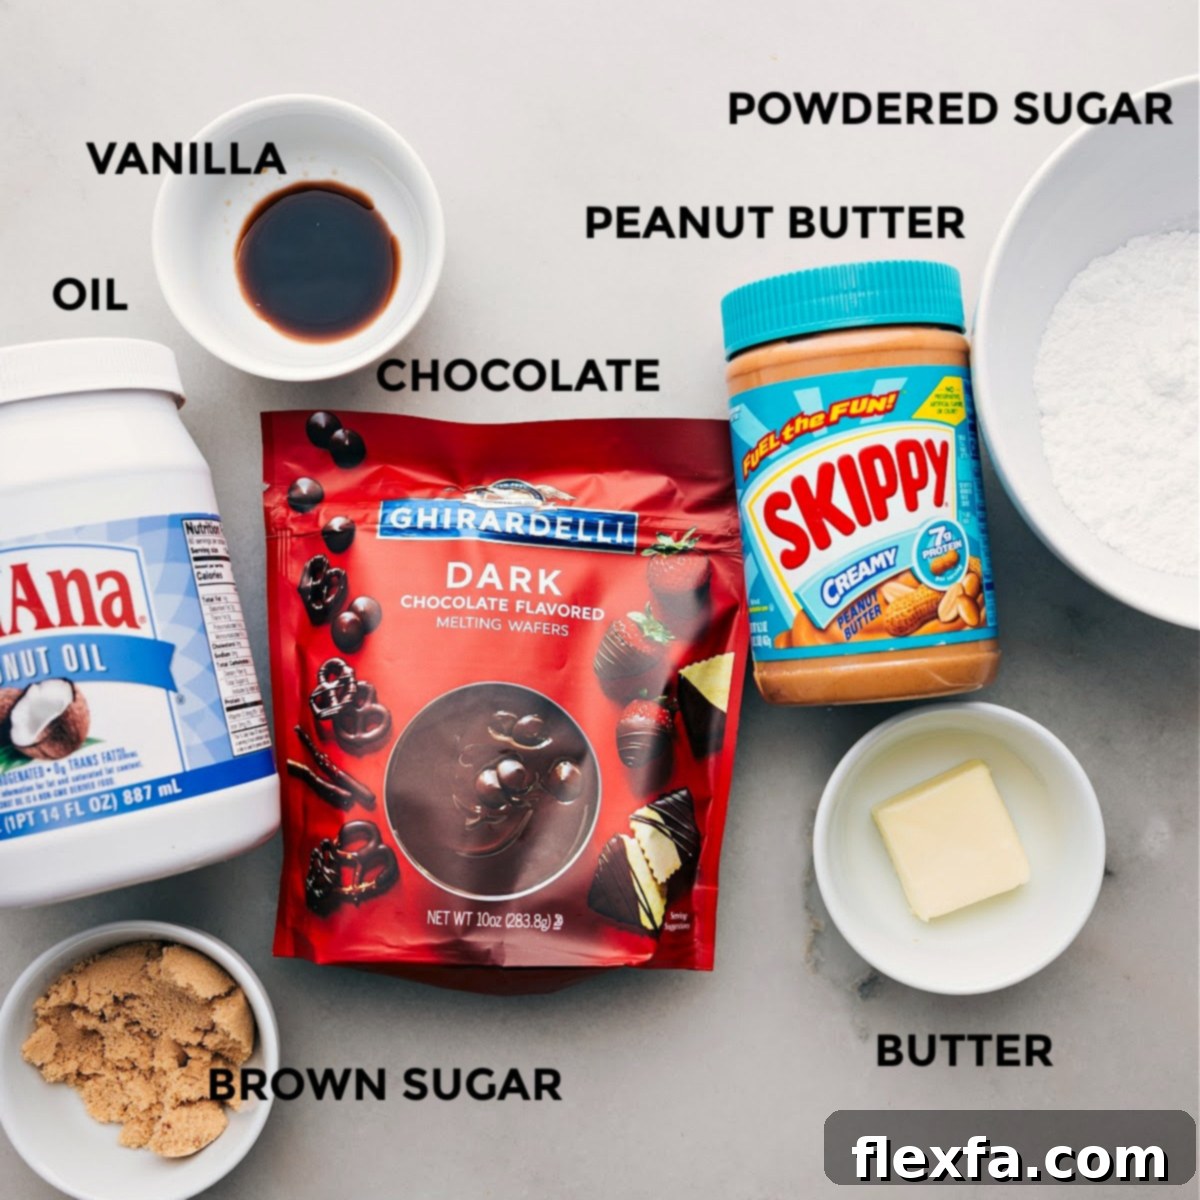
Key Ingredients for the Perfect Homemade Peanut Butter Cups
Creating these delightful peanut butter cups requires a few simple, high-quality ingredients. Each component plays a crucial role in achieving that perfect balance of creamy and rich flavor that makes homemade truly shine. Here’s a closer look at what you’ll need:
- Creamy Peanut Butter: The heart of your filling! Opt for a smooth, creamy peanut butter, such as Skippy or Jif, for the silkiest texture. If you prefer using natural peanut butter, ensure you stir it exceptionally well before measuring to prevent separation and ensure a consistent, non-oily filling. The goal is a uniform, luscious peanut butter core.
- Unsalted Butter: Butter adds richness and helps bind the peanut butter filling. Using unsalted butter allows you to control the overall saltiness of your treat, ensuring it complements the sweetness without overpowering it.
- Light Brown Sugar: This provides a deeper, more caramel-like sweetness compared to white sugar, enhancing the overall flavor profile of the peanut butter filling. Make sure to pack the brown sugar firmly into your measuring spoon or cup to get the precise amount for optimal sweetness and texture.
- Salt: A small pinch of salt is absolutely essential. It doesn’t just add a salty note; it masterfully balances the sweetness of the sugar and chocolate, making all the flavors pop and preventing the cups from being overly cloying. This touch truly elevates the taste.
- Vanilla Extract: A splash of pure vanilla extract infuses the peanut butter filling with a warm, aromatic depth that complements both the peanut butter and chocolate beautifully. Don’t skip this for an extra layer of gourmet flavor.
- Powdered Sugar (Confectioners’ Sugar): This fine sugar is crucial for achieving a smooth, melt-in-your-mouth texture in the peanut butter filling. If your powdered sugar is lumpy, make sure to sift it thoroughly before adding it to the mixture to avoid any gritty bits.
- Chocolate Melting Wafers: The quality of your chocolate makes a significant difference. High-quality melting wafers (like Ghirardelli or Guittard) are specifically designed to melt smoothly and evenly, creating a glossy, crack-free chocolate shell. They also offer a superior flavor compared to standard chocolate chips.
- Coconut Oil: Just a small amount of coconut oil works wonders. It helps thin out the melted chocolate slightly, making it easier to pour and spread smoothly. More importantly, it contributes to a beautiful, shiny finish and a satisfying snap when you bite into the chocolate shell.
Creative Variations
Personalize Your Peanut Butter Cups: Delicious Variations
While the classic homemade peanut butter cup is perfection, don’t hesitate to get creative! These variations allow you to customize your treats to suit any preference or dietary need, making them even more special:
- Experiment with Different Nut Butters: The world of nut butters offers exciting alternatives. Try using creamy almond butter for a slightly different nutty profile, smooth cashew butter for a milder, sweeter flavor, or even sunflower seed butter (SunButter) for a nut-free option that’s just as delicious. Ensure any alternative butter you choose is smooth and well-stirred.
- Change the Chocolate Type: The chocolate shell is your canvas! Instead of classic milk chocolate, opt for rich dark chocolate for an intensely bittersweet contrast with the sweet peanut butter, or use sweet white chocolate for a creamy, milder flavor, reminiscent of these peanut butter meltaways. You can even use a combination, creating swirl effects or distinct layers.
- Add a Sprinkle of Sea Salt: For those who adore the salty-sweet combination, a delicate sprinkle of flaky sea salt on top of the chocolate before it sets is a game-changer. It enhances the chocolate and peanut butter flavors, adding a sophisticated crunch and a burst of savory goodness that truly makes the treat unforgettable.
- Mix-ins for the Filling: Stir finely chopped pretzels, mini chocolate chips, or even a sprinkle of crushed candy into the peanut butter filling for added texture and flavor surprises.
- Flavor Extracts: A tiny drop of peppermint extract in the chocolate or a hint of almond extract in the peanut butter can totally transform the flavor profile, perfect for holiday-themed treats.
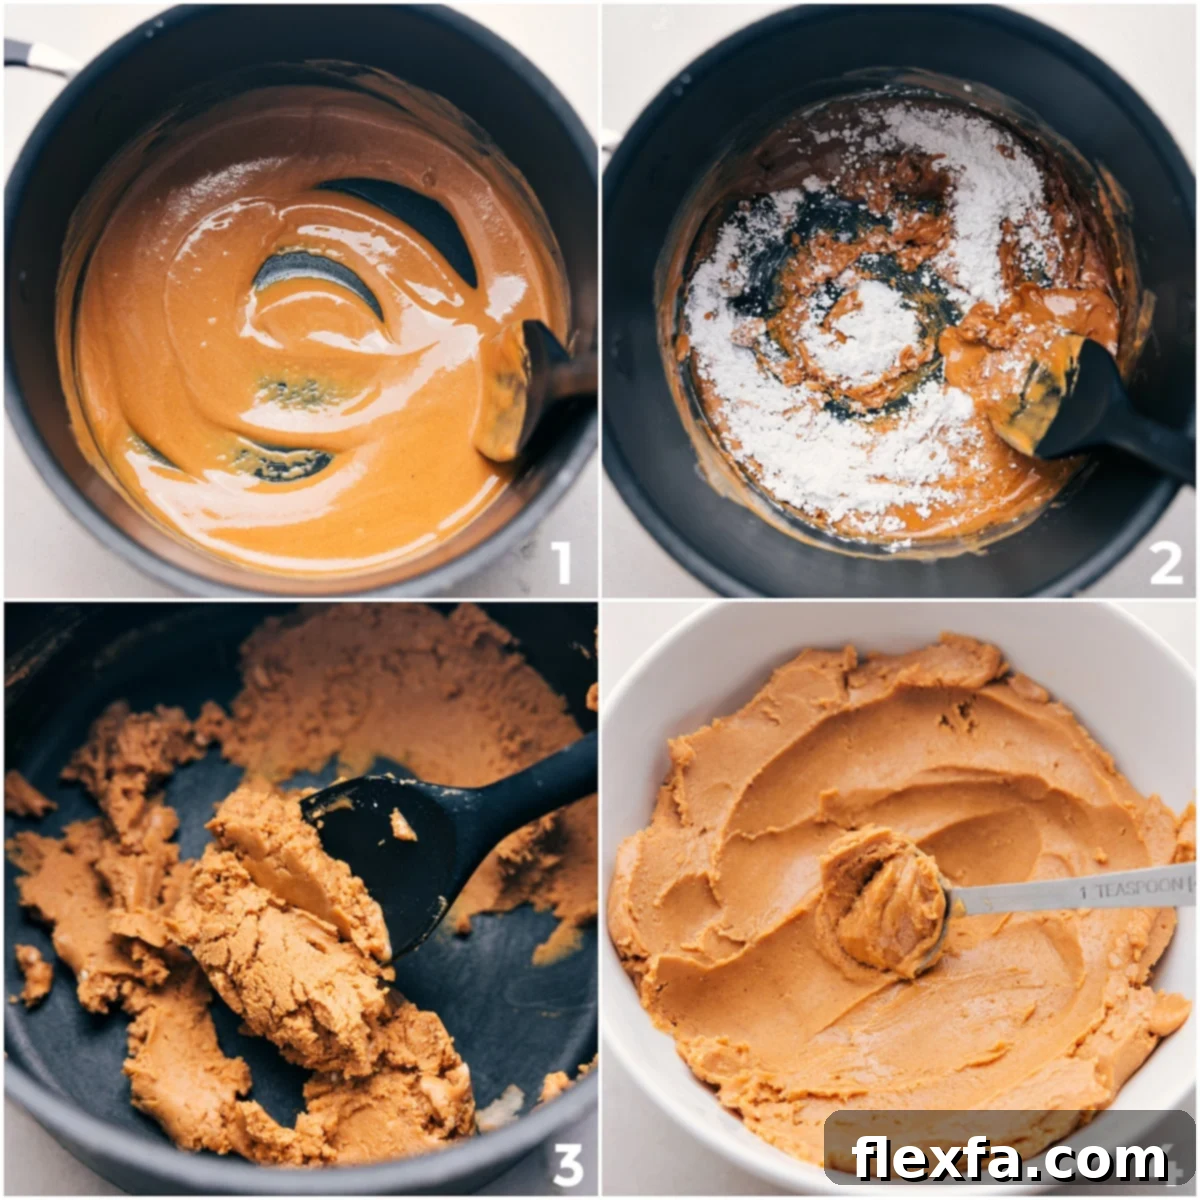
Crafting Perfection: How To Make Homemade Peanut Butter Cups
Making your own peanut butter cups is a surprisingly straightforward and incredibly rewarding process. With just a few simple steps, you’ll go from basic ingredients to a gourmet treat that will impress everyone. Here’s a detailed guide to creating these delectable delights:
- Prepare Your Muffin Tin: Start by lining a mini muffin tin with paper liners. This crucial first step ensures your peanut butter cups will release easily and maintain their classic shape. Having them ready makes the assembly process seamless.
- Whip Up the Creamy Filling: In a small saucepan, gently melt together the creamy peanut butter, unsalted butter, light brown sugar, and a tiny pinch of salt over medium heat. Stir constantly until the mixture is smooth and just begins to bubble. Remove from the heat and stir in the vanilla extract, which adds a wonderful depth of flavor. Gradually incorporate the powdered sugar, stirring vigorously until the mixture is completely smooth and free of any lumps. If you notice any stubborn clumps, use a spatula to press them out against the side of the pot. Once smooth, transfer this delicious peanut butter mixture to a bowl and chill it in the refrigerator until it’s firm enough to handle and shape, typically about 15-20 minutes. This chilling step is key for easy shaping.
- Melt the Decadent Chocolate: While your filling chills, melt half of the chocolate melting wafers with half of the coconut oil. Do this in a microwave-safe bowl, heating in short 30-second bursts. Stir well after each interval until the chocolate is completely smooth and glossy. Be careful not to overheat, as chocolate can seize quickly.
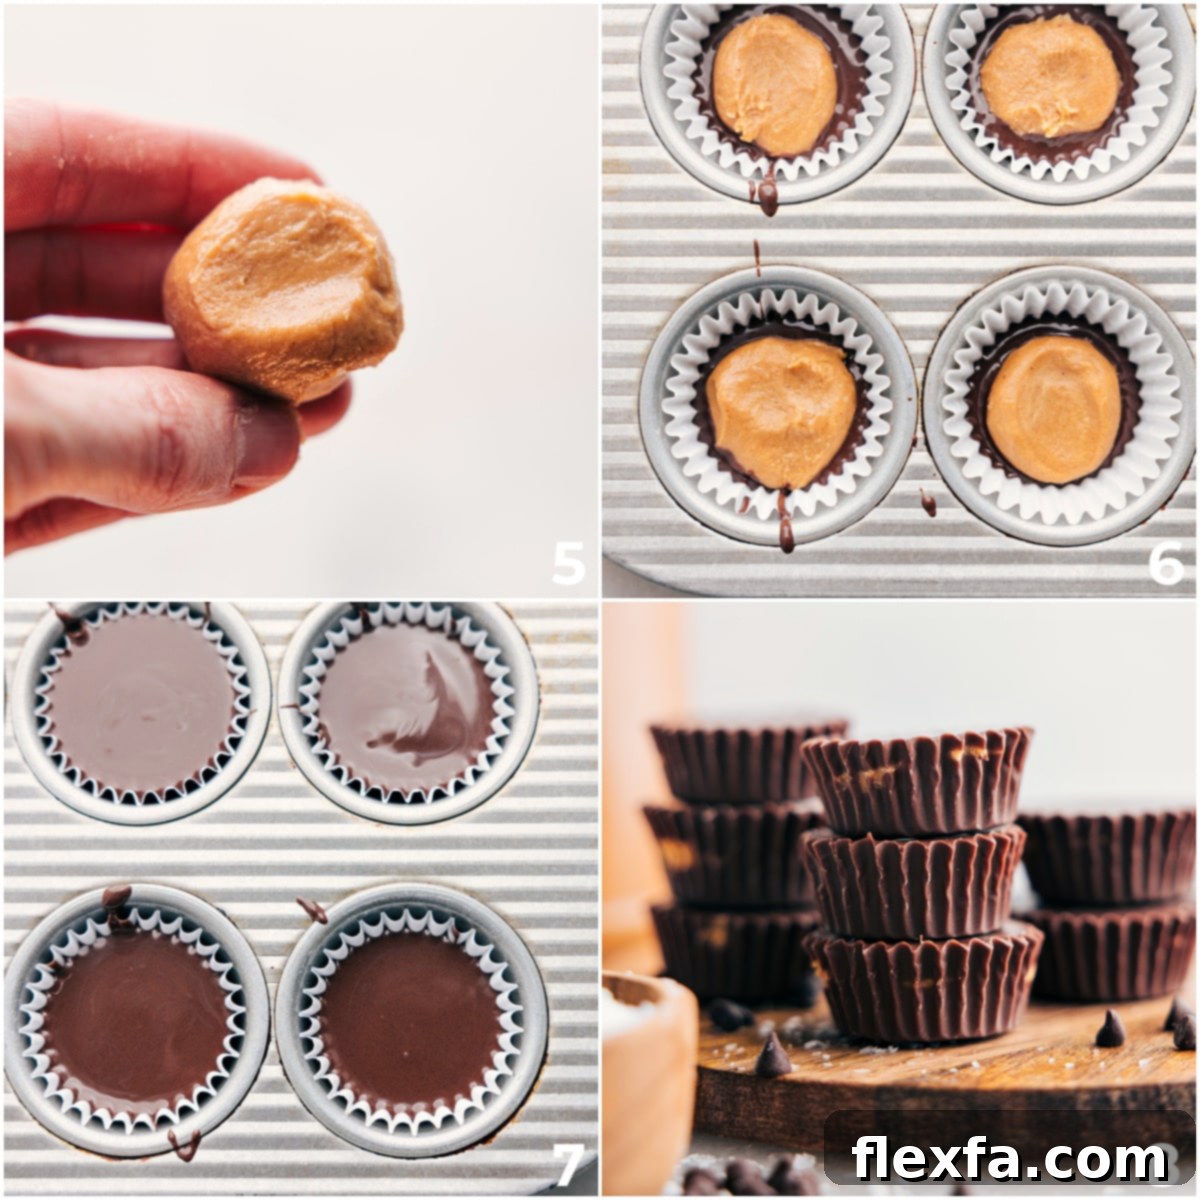
- Assemble Your Masterpiece: Spoon about a teaspoon of the melted chocolate into the bottom of each prepared paper liner, just enough to create a thin base layer. Gently tap the muffin pan on your counter a few times; this helps the chocolate spread evenly and removes any trapped air bubbles for a perfectly smooth bottom. Next, take a teaspoon of your chilled peanut butter filling, roll it into a neat ball, and then gently flatten it into a disc slightly smaller than the diameter of your muffin cup. Place this peanut butter disc precisely in the center of each chocolate-lined cup. Finally, pour approximately 1 to 1½ teaspoons of the remaining melted chocolate over each peanut butter disc, ensuring it’s completely covered. Tap the pan again to level the top chocolate layer. If you run out of melted chocolate, simply melt the remaining chocolate wafers and coconut oil as before.
- Chill and Savor: Once assembled, place the muffin tin back into the refrigerator. Chill the peanut butter cups until the chocolate has completely set and hardened, usually about 20-30 minutes. Once firm, carefully remove them from their paper liners, and they are ready to be devoured!
Pro Tips for Perfect Peanut Butter Cups Every Time
Achieving bakery-quality homemade peanut butter cups is easier than you think with these expert tips:
- Ensure the Filling is Fully Chilled: This is a game-changer! A well-chilled peanut butter mixture will be much firmer and less sticky, making it incredibly easy to scoop, roll, and flatten into perfect discs. If it’s too soft, it will be messy and difficult to work with. Don’t rush this step!
- Tap the Pan Gently: After pouring each layer of chocolate, gently tap the muffin pan on your counter. This simple action helps the chocolate spread evenly to coat the bottom and top of the cups, and crucially, it releases any hidden air bubbles, resulting in a smooth, professional-looking finish.
- Invest in Quality Chocolate: The flavor of your chocolate shell directly impacts the overall taste of your peanut butter cups. Opt for high-quality chocolate melting wafers. They melt more smoothly, have a richer flavor, and set with a beautiful snap, far superior to standard chocolate chips.
- Avoid Overheating the Chocolate: When melting chocolate, patience is key. Heat it in short, 30-second bursts in the microwave, stirring thoroughly after each interval. Chocolate can burn or seize very easily if overheated, becoming grainy and unusable. Low and slow is the way to go for a perfectly smooth, silky chocolate.
- Don’t Overfill the Liners: Resist the urge to add too much chocolate or peanut butter. Overfilling can make the cups difficult to remove from the liners and might result in a less defined shape. Stick to the recommended amounts for ideal proportions.
- Even Peanut Butter Discs: Try to make your peanut butter discs uniform in size and thickness. This ensures each peanut butter cup has a consistent filling and cooks/sets evenly.
Storage Solutions
Proper storage ensures your delicious homemade peanut butter cups stay fresh and enjoyable for longer:
Store your homemade peanut butter cups in an airtight container in the refrigerator. This keeps the chocolate firm and prevents the peanut butter filling from becoming too soft. They will remain fresh and delightful for up to two weeks.
For even longer storage, you can absolutely freeze them! Arrange the peanut butter cups in a single layer on a baking sheet to freeze individually. Once solid, transfer them to an airtight freezer-safe container, layering them between sheets of parchment paper to prevent sticking. They will keep well in the freezer for up to three months. When you’re ready to enjoy them, simply thaw in the refrigerator for a few hours or enjoy them frozen for a delightfully chilly treat!
More Irresistible Peanut Butter Treats:
If you’re a true peanut butter connoisseur, you’ll love exploring these other fantastic recipes that celebrate the magic of this versatile ingredient. From crispy delights to creamy pies, there’s something here to satisfy every craving.
Desserts
Peanut Butter Rice Krispie Treats
Pies
Creamy Peanut Butter Pie
Desserts
Peanut Butter Cup Brownies
Homemade Peanut Butter Cups
Chelsea Lords
20 minutes
30 minutes
50 minutes
20
peanut butter cups
Video
Equipment
-
Mini muffin pan
-
Mini cupcake liners
-
Small pot
Ingredients
-
1/2
cup
creamy peanut butter
like Skippy -
2
tablespoons
unsalted butter -
2
tablespoons
light brown sugar
firmly packed -
1/8
teaspoon
salt
-
1/2
teaspoon
vanilla extract
-
1/2
cup
powdered sugar
-
2
cups
chocolate melting wafers
divided -
1
teaspoon
coconut oil
divided
Instructions
-
Line a mini muffin pan (24 cavities) with paper liners. Set aside.
-
In a small pot, combine peanut butter, butter, brown sugar, and a pinch of salt. Cook over medium heat, stirring constantly, until melted and the mixture starts to bubble gently. Remove from heat and stir in vanilla extract. Gradually add powdered sugar, stirring vigorously until fully incorporated and smooth. Press out clumps with a spatula until smooth.
-
Transfer to a bowl and place in the fridge until chilled through (about 15-20 minutes).
-
Melt half the chocolate wafers with half the coconut oil in the microwave, heating in 30-second intervals and stirring between each interval until smooth.
-
Spoon about 1 teaspoon of melted chocolate into the bottom of each prepared liner, just enough to coat the bottom. Tap the pan on the counter a few times to level the chocolate. Scoop a teaspoon of the chilled peanut butter filling, roll it into a ball, and flatten it slightly into a disc smaller than the muffin cup’s diameter. Place the disc in the center of each liner on top of the chocolate layer. Repeat with the remaining filling. Pour about 1-1/2 teaspoons of melted chocolate on top of each peanut butter disc to cover it completely. Tap the pan again to level the chocolate. If needed, melt the remaining chocolate and coconut oil.
-
Refrigerate the peanut butter cups until the chocolate is set (about 20-30 minutes). Once set, remove the paper liners and enjoy!
Recipe Notes
Nutrition
Serving:
1
serving
|
Calories:
153
kcal
|
Carbohydrates:
14.2
g
|
Protein:
2.4
g
|
Fat:
10.1
g
|
Cholesterol:
6.4
mg
|
Sodium:
57.8
mg
|
Fiber:
0.4
g
|
Sugar:
13.4
g
Nutrition information is automatically calculated, so should only be used as an approximation.
Love this recipe? Leave a comment below!
Your feedback helps others discover delicious treats!