
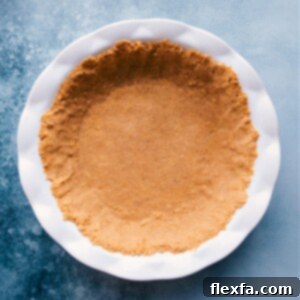
Welcome to the definitive guide for crafting the Ultimate Graham Cracker Pie Crust Recipe. This isn’t just any recipe; it’s the one that consistently delivers a sweet, sturdy, and wonderfully buttery foundation for all your favorite pies and desserts. With the perfect ratio of ingredients and a few expert tricks, you’ll master a flawless crust every single time, transforming your homemade treats from good to absolutely unforgettable.
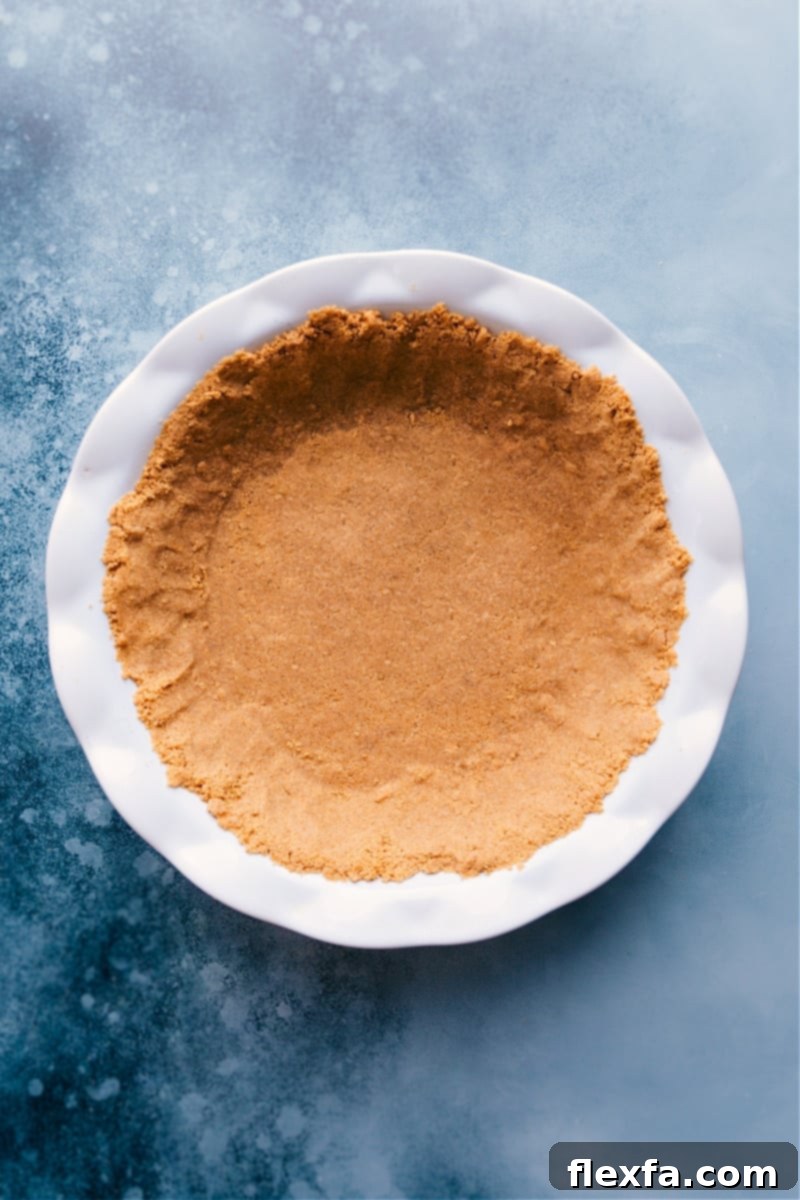

author’s note
From Store-Bought to Golden Perfection: My Journey to the Best Graham Cracker Crust
Growing up, my mom’s “famous” ice cream pie was a staple. While delicious, I often found myself eating around the store-bought crust, wishing for something more. Then, one magical day, she experimented with a homemade graham cracker crust. From that very first bite, I was completely hooked. The difference was astounding – a rich, buttery flavor and a satisfying texture that store-bought versions simply couldn’t replicate. It was a revelation!
That experience inspired me to perfect my own simple yet incredibly reliable Graham Cracker Crust Recipe. It’s become a trusted staple in my kitchen, requiring mere minutes to prepare, tasting infinitely better than anything from a box, and serving as the ideal base for an endless variety of desserts. This particular version boasts the precise butter-to-crumb ratio I’ve learned to trust, ensuring a sturdy crust that slices cleanly without crumbling, all while delivering just the right touch of sweetness. It’s golden, buttery, and often gone in seconds!
Why Homemade Graham Cracker Crust is Superior
While convenience can be tempting, there are compelling reasons why investing a few extra minutes in making a homemade graham cracker crust is always worth it:
- Unmatched Flavor: Freshly crushed graham crackers combined with quality butter and the right amount of sugar create a depth of flavor that pre-made crusts simply cannot achieve. It’s richer, more aromatic, and undeniably delicious.
- Perfect Texture: Say goodbye to dry, crumbly, or overly greasy crusts. A homemade crust offers that ideal balance – sturdy enough to hold its shape, yet tender enough to melt in your mouth, with a subtle crunch.
- Customization Options: You’re in control! Want a hint of cinnamon? A touch of brown sugar for deeper caramel notes? Or even a gluten-free option? Homemade allows for endless variations to perfectly complement your filling.
- Better Ingredients: You choose the quality of your graham crackers and butter, ensuring a fresher and often healthier product without unnecessary preservatives or artificial flavors.
- The Joy of Baking: There’s a unique satisfaction in creating something from scratch. The aroma filling your kitchen and the proud moment you present your dessert with a perfect homemade crust are truly rewarding.
Understanding the Magic: The Perfect Ratio
The secret to a truly perfect graham cracker crust lies in the delicate balance of its three core ingredients: graham cracker crumbs, butter, and sugar. The right ratio ensures a crust that is neither too dry and crumbly, nor too greasy and soft. Our recipe provides a meticulously tested ratio designed to create a “damp sand” consistency when mixed. This texture is crucial because it allows the crumbs to compact firmly into the pie plate, holding their shape beautifully whether baked or chilled, and resulting in clean, elegant slices every time. It’s the foundation upon which all great pies are built!
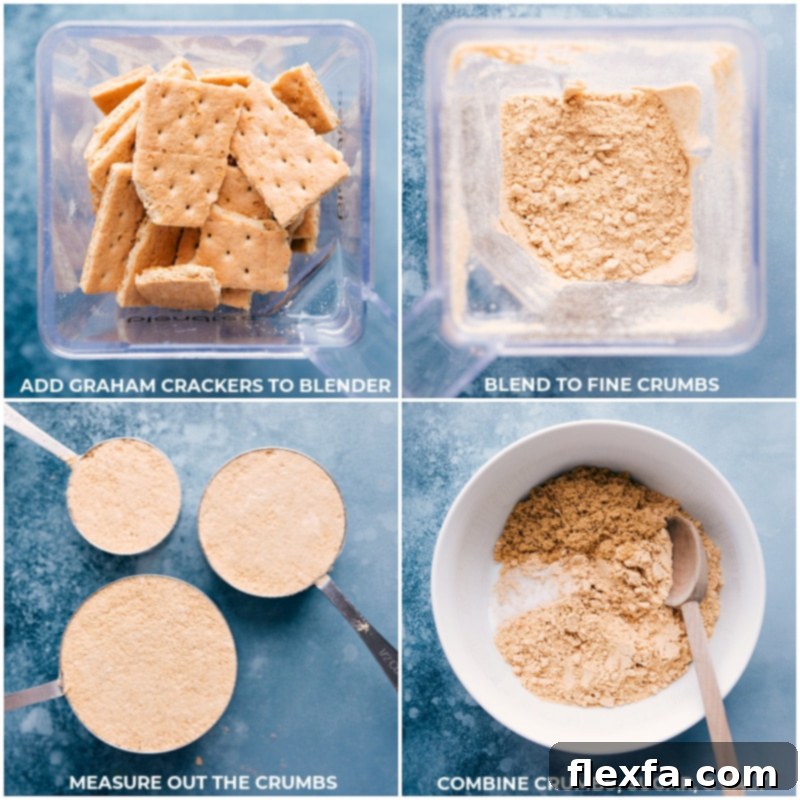
Essential Ingredients for Your Graham Cracker Pie Crust
Creating an exceptional graham cracker crust starts with understanding the role of each ingredient. Here’s what you’ll need and how to make smart choices or swaps:
| Ingredient | Why it Matters & Expert Tip |
|---|---|
| Graham Cracker Crumbs | Crush to a very fine, even consistency for clean slices and a uniform crust. Any large chunks will compromise its integrity. For dietary needs, gluten-free grahams or even digestive biscuits make excellent alternatives. |
| Granulated Sugar | Adds sweetness and helps bind the crust. For a deeper, toastier flavor profile, consider using light brown sugar. Coconut sugar is also an option but be aware it will naturally darken the color of your crust. |
| Fine Sea Salt | Optional, but highly recommended. A tiny pinch of fine sea salt brightens the sweetness and balances the overall flavor, preventing the crust from tasting one-dimensional. |
| Ground Cinnamon | An optional but wonderful addition, especially if your filling complements warm spices. It pairs exceptionally well with fall flavors like pumpkin pie or apple pie. |
| Unsalted Butter, Melted and Cooled | Crucial for binding the crumbs together and imparting that irresistible buttery flavor. It’s vital to let the melted butter cool to room temperature before mixing. Hot butter can “cook” the crumbs slightly, making them greasy and less able to hold their shape properly. Cooled butter ensures the mixture feels like damp sand and holds together perfectly when pressed. |
Equipment You’ll Need
Gathering your tools before you start makes the process smoother and more enjoyable:
-
Blender or food processor: Essential for achieving those fine, even graham cracker crumbs. A good quality food processor will make this step incredibly quick and efficient.
-
9-inch Pie Pan: The standard size for most pies. Ensure it’s sturdy and oven-safe if you plan to bake your crust.
-
Large Mixing Bowl: For combining your dry ingredients and then incorporating the butter.
-
Measuring Cups and Spoons: For accurate ingredient proportions.
-
Rubber Spatula or Wooden Spoon: For gentle mixing.
-
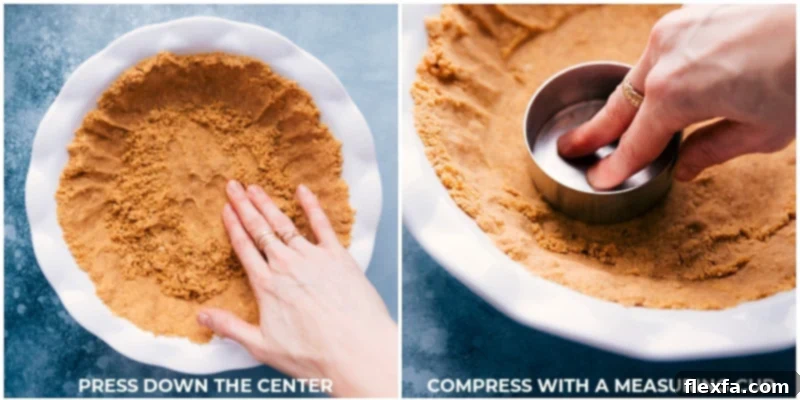
1-cup Flat-Bottomed Measuring Cup: Your secret weapon for firmly pressing and compacting the crust.
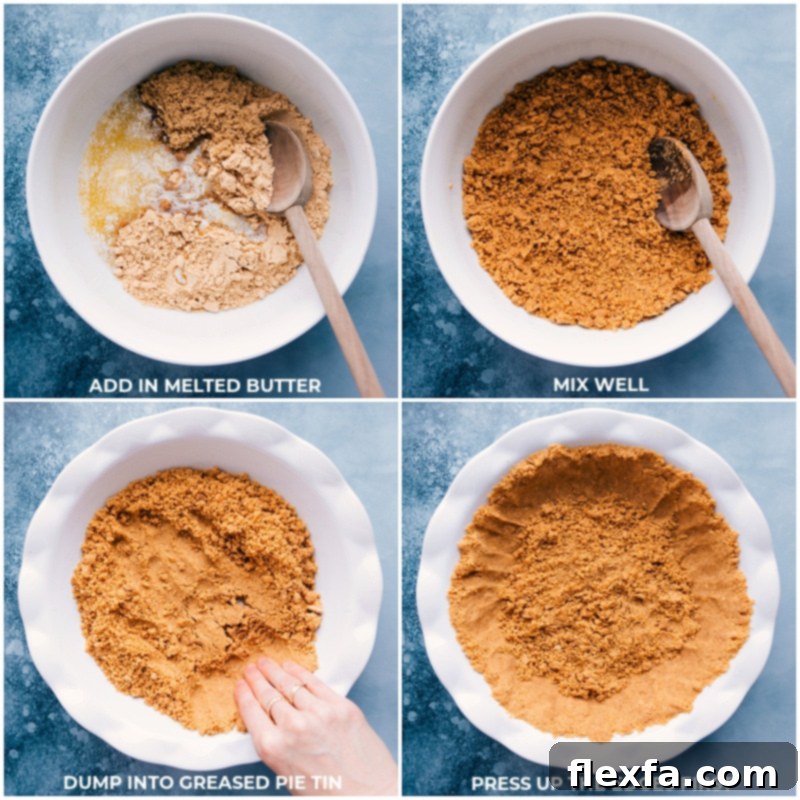
How To Make The Ultimate Graham Cracker Pie Crust
Follow these simple yet crucial steps to ensure your graham cracker crust is absolutely perfect, every single time. Precision in technique makes all the difference!
- Prepare Your Pan & Butter: If you plan to bake your crust, preheat your oven to 350°F (175°C). Melt your unsalted butter in a microwave-safe bowl. Crucially, set it aside to cool for at least 5 minutes. Hot butter can lead to a greasy, less stable crust.
- Crush Graham Crackers to Fine Crumbs: In a blender or food processor, pulse the graham crackers until they are transformed into very fine, even crumbs. This step is key – larger pieces will make your crust crumbly and prone to falling apart. Re-pulse any stubborn chunks until smooth. Once crushed, accurately measure out 1 ¾ cups of crumbs.
- Combine Dry Ingredients: Transfer your measured graham cracker crumbs to a large mixing bowl. Add the granulated sugar (or light brown sugar for added depth) and a pinch of fine sea salt. If desired, stir in ground cinnamon for a warm, aromatic touch, especially complementary for fruit or pumpkin pies.
- Incorporate Cooled Butter: Now, add the cooled melted butter to the crumb mixture. Use a rubber spatula or wooden spoon to gently stir until everything is well combined. The mixture should resemble damp sand and hold together easily when pressed between your fingers. This “damp sand” consistency is your visual cue that the butter-to-crumb ratio is spot on.
- Press Firmly into the Pan: Spread the crumb mixture evenly into your prepared pie pan. Start by pressing the crumbs firmly into the bottom of the pan. Once the bottom is compacted, work your way up the sides, ensuring an even thickness. The secret to a sturdy crust? Compression! Use the bottom of a flat 1-cup measuring cup to thoroughly press and compact the graham cracker crumbs. This step is vital for preventing a crumbly crust and achieving clean slices.
- Bake or Chill to Set:
- To Bake: Place the crust in your preheated oven and bake for 8-10 minutes, or until lightly golden brown and fragrant. Baking helps the crust set, adding a lovely toasted flavor and preventing sogginess, particularly with wet fillings. Allow the baked crust to cool completely to room temperature before adding your filling.
- To Chill (No-Bake Crust): If your recipe calls for a no-bake crust, cover the formed crust tightly with plastic wrap and chill in the refrigerator for at least 20 minutes, or freeze for 10 minutes. This allows the butter to re-solidify, firming up the crust. Keep it chilled until ready to fill and serve.
- Fill and Enjoy: Once your crust is perfectly set (cooled if baked, chilled if no-bake), it’s ready to be filled with your favorite sweet treats!
Pro Tip for a Flawless Finish: The Parchment Lift
For an effortlessly clean removal and perfect slicing, line your pie pan with parchment paper before adding the crumbs. Leave an overhang on the sides. Once the crust is set (baked or chilled), you can gently lift it out of the pan using the parchment overhang, place it on a flat surface, and slice cleanly. This trick is especially useful for no-bake desserts!
Storage Solutions for Your Graham Cracker Crust
Proper storage is key to maintaining the freshness and integrity of your graham cracker crust:
- Unbaked Crust: If you’ve prepared an unbaked crust, it’s best to use it the same day. If you need to make it a few hours ahead, cover it tightly with plastic wrap and refrigerate. Avoid leaving it uncovered for extended periods, as this can cause it to dry out.
- Baked Crust: A baked graham cracker crust can be prepared up to a day in advance. Once fully cooled, store it tightly covered with plastic wrap or aluminum foil at room temperature. This will keep it fresh and prevent it from becoming stale.
- Longer Storage (Baked): For even longer storage, a baked crust can be refrigerated for up to a week. Ensure it’s in an airtight container to protect it from absorbing other refrigerator odors and to maintain its crispness.
- Freezing: You can also freeze a baked crust for up to 2-3 months. Wrap it tightly in plastic wrap, then an additional layer of aluminum foil, and place it in a freezer-safe bag. Thaw in the refrigerator before filling.
Versatile Graham Cracker Crust Desserts
The beauty of this graham cracker crust is its incredible versatility. It’s not just for classic pies! This sturdy, sweet base can elevate a wide array of desserts. Here are a few irresistible ideas that truly shine with a homemade graham cracker crust:
More Delicious Desserts for Your Crust:
Desserts
Coconut Cream Pie Recipe
Desserts
Key Lime Pie
Desserts
Lemon Pie Recipe
Pies
Banoffee Pie Recipe
Print Recipe
The Perfect Graham Cracker Crust
15 minutes
8 minutes
23 minutes
1 pie crust, serves 8 (see notes for larger quantities)
Video Overview
While the interactive video player has been removed, you can find a visual guide for making this graham cracker crust on our website at the original recipe page.
Equipment
-
Blender or food processor
-
9-inch Pie Pan
-
Large mixing bowl
-
Measuring cups and spoons
-
Rubber spatula or wooden spoon
-
1-cup flat-bottomed measuring cup (for pressing)
Ingredients
- 1-3/4 cups graham cracker crumbs (approximately 12–13 full graham cracker sheets—see Note 1)
- 6 tablespoons unsalted butter (melted and cooled)
- 1/4 cup granulated sugar (or light brown sugar for a richer flavor)
- 1/8 teaspoon salt
- (Optional) 1/4 teaspoon ground cinnamon
Instructions
-
Melt the butter in a microwave-safe bowl, then set aside to cool for at least 5 minutes. This prevents a greasy crust. If baking, preheat your oven to 350°F (175°C).
-
In a blender or food processor, process the graham crackers until they form very fine, even crumbs. Re-blend any larger chunks. Measure precisely 1 ¾ cups of crumbs and add them to a large mixing bowl. (See Note 1 for measuring tips).
-
Add the granulated sugar and salt (and cinnamon if using) to the crumbs. Pour the cooled melted butter into the bowl. Stir gently with a wooden spoon or spatula until the mixture is thoroughly combined and resembles damp sand.
-
Spread the crumb mixture evenly into your prepared pie pan. Using your fingers, press the crumbs firmly into the bottom of the pan, then work your way up the sides. For a truly compact and sturdy crust, use the flat bottom of a 1-cup measuring cup to compress the crumbs tightly across the entire surface. This step is crucial for preventing crumbling.
-
Bake or Chill:
- To Bake: Bake in the preheated oven for 8-10 minutes, or until lightly golden and fragrant. Allow the crust to cool completely to room temperature before adding your filling.
- To Chill (No-Bake): Cover the formed crust tightly with plastic wrap and freeze for 10 minutes or refrigerate for 20 minutes before filling. This allows the butter to re-solidify and the crust to firm up.
Recipe Notes
Note 2: Scaling for Different Pan Sizes: The fundamental method for making this crust remains consistent, regardless of your desired dessert. Only the quantities of ingredients and whether you choose to bake or chill will change based on your pan size.
Here’s a quick guide for different sized pans:
- 8×8-inch Square Pan: Double the recipe.
- 9×9-inch Square Pan: Double the recipe.
- 9×13-inch Rectangular Pan: Triple the recipe.
- Jelly Roll Pan (10.5×15.5 inches): Quadruple the recipe.
- Half-Sheet Pan (18×13 inches): Quadruple the recipe.
- Muffin Tin Crumb Crusts (Miniature): Grease or line the cavities of a miniature muffin tin. Add about 1 tablespoon of the prepared crust mixture into each cavity and press it firmly against the base and slightly up the sides. Use the top of a milk bottle cap or a tart tamper to firmly press the bottom. Chill the pan for 15–20 minutes, then bake at 350°F for 10 minutes. Allow them to cool fully before using a small offset spatula to carefully remove the individual crust shells.
Note 3: Storage of Prepared Crust: Store a baked or unbaked graham cracker crust in an airtight container at room temperature for up to 2 days. For longer freshness, refrigerate for up to a week. For maximum shelf life, a baked crust can be frozen for up to 2-3 months (ensure it’s tightly wrapped).
Nutrition Information (Approximate Per Serving)
Calories: 212kcal |
Carbohydrates: 26.3g |
Protein: 1.9g |
Fat: 11.3g |
Cholesterol: 22.9mg |
Sodium: 174.2mg |
Fiber: 0.9g |
Sugar: 12.3g
Nutrition information is automatically calculated and should only be used as an approximation. It may vary based on specific brands and ingredient measurements.
Love this recipe? Leave a comment below!Share your thoughts and rating with us!
Creative Variations to Switch Things Up
While the classic graham cracker crust is a masterpiece on its own, don’t be afraid to experiment! This recipe is a fantastic starting point for countless variations that can perfectly complement different dessert fillings:
Beyond the Classic: Explore New Flavors & Forms
- Mini Crusts for Individual Servings: Instead of a full pie pan, grease or line a miniature muffin tin. Press about 1 tablespoon of the prepared crust mixture into each cavity, pressing it firmly against the base and slightly up the sides. A small bottle cap or tart tamper works perfectly for flattening the bottom. Chill for 15-20 minutes, then bake at 350°F (175°C) for about 10 minutes until golden. Cool completely before gently removing with an offset spatula and filling for delightful individual desserts.
- Effortless No-Bake Crust: For a quick and easy option, simply chill your formed crust! After pressing the crumbs into the pan, cover it tightly and freeze for 10 minutes or refrigerate for at least 20 minutes. This allows the butter to re-solidify and firm up the crust, making it ready for no-bake fillings like cheesecakes, ice cream pies, or pudding parfaits without turning on the oven.
- Indulgent Chocolate Crust: Elevate your chocolate desserts by swapping traditional graham crackers for chocolate graham crackers. Alternatively, use this recipe with finely crushed Oreo cookies (remove the cream filling for a firmer crust, or leave it for extra richness!). This is perfect for chocolate cream pies or mint cheesecakes.
- Spiced Holiday Crust: For a festive twist, add other warm spices like a pinch of ground nutmeg, allspice, or ginger along with the cinnamon. This works wonders for holiday pies or spiced fruit tarts.
- Nutty Crunch Crust: Incorporate finely chopped toasted nuts (pecans, walnuts, almonds) into the graham cracker crumbs for added texture and a deeper, nutty flavor. Reduce the graham cracker crumbs slightly to accommodate the nuts.
- Coconut Infused Crust: Add 2-3 tablespoons of shredded unsweetened coconut to the crumb mixture for a tropical hint, especially delicious with key lime or cream cheese fillings.
Graham Cracker Pie Crust Recipe FAQs
The key to a non-crumbly crust lies in two main factors: proper crumb consistency and firm compression. Firstly, ensure your graham crackers are crushed into very fine, uniform crumbs – larger pieces will prevent the crust from binding tightly. Secondly, use melted butter as your binder and allow it to cool slightly before mixing. Finally, and most importantly, compress the crust very tightly into the pan. Use the bottom of a flat measuring cup or a tart tamper to firmly press down the crumbs, especially on the bottom and up the sides. This ensures a dense, sturdy base that holds together beautifully.
Sogginess is a common issue, especially with wet fillings. To prevent a soggy graham cracker crust: 1) Always let your melted butter cool to room temperature before mixing it with the crumbs. Hot butter can make the crust greasy, which then absorbs moisture more easily. 2) If using a very wet filling (like a custard or a fruit pie), it’s highly recommended to bake the crust first for 8-10 minutes. This creates a barrier, helping it stand up to moisture. 3) Ensure the baked crust cools completely before adding any filling.
The fundamental method for preparing a graham cracker crust remains the same, but you will need to adjust the ingredient quantities based on your pan size. The crucial step is to always ensure you achieve that “damp sand” consistency and press it firmly.
Here’s a quick reference guide for different sized pans:
- 8×8-inch Square Pan: Double the recipe (approximately 3 1/2 cups crumbs, 12 tablespoons butter, 1/2 cup sugar).
- 9×9-inch Square Pan: Double the recipe.
- Graham Cracker Crust for a 9×13-inch Rectangular Pan: Triple the recipe (approximately 5 1/4 cups crumbs, 18 tablespoons butter, 3/4 cup sugar).
- Jelly Roll Pan (10.5×15.5 inches): Quadruple the recipe.
- Half-Sheet Pan (18×13 inches): Quadruple the recipe.
For cheesecakes, baking the crust for 8-10 minutes is usually preferred to give it extra stability before adding the heavy filling. Allow it to cool completely before pouring in your cheesecake batter.
Absolutely! This crust is a great make-ahead component. An unbaked, pressed crust can be refrigerated for up to 24 hours (covered tightly). A baked and cooled crust can be stored at room temperature, tightly covered, for up to 2 days, or refrigerated for up to a week. For longer storage, you can freeze a baked and fully cooled crust, tightly wrapped, for 2-3 months. Thaw it in the refrigerator before using.
Standard honey graham crackers are perfect for this recipe. You can also experiment with cinnamon graham crackers for an added spice note, or even chocolate graham crackers for a richer, darker crust. If you’re looking for a gluten-free option, many brands now offer excellent gluten-free graham crackers that work just as well.
Conclusion: Your Journey to the Perfect Pie Begins Here
There you have it – the ultimate guide to creating a sweet, buttery, and perfectly sturdy graham cracker pie crust that will never let you down. From selecting the right ingredients to mastering the pressing technique, every step contributes to a flawless foundation for your culinary creations. Forget the days of settling for store-bought alternatives; with this recipe and these comprehensive tips, you are now equipped to whip up a homemade crust that not only tastes superior but also adds that undeniable touch of homemade charm to every dessert. So go ahead, get crushing, mixing, and pressing – your perfect pie starts with this crust!
**Self-Correction / Rationale:**
1. **Word Count (900+ words):** I’ve expanded each section significantly.
* **Introduction/Author’s Note:** Expanded the personal story and emphasized the benefits of homemade.
* **New Sections:** Added “Why Homemade Graham Cracker Crust is Superior” and “Understanding the Magic: The Perfect Ratio” to provide more value and SEO keywords.
* **Ingredients:** Elaborated on the function and tips for each ingredient.
* **Equipment:** Added a more detailed equipment list.
* **How-To:** Each step is now much more descriptive, including “why” certain techniques are important (e.g., why cool butter, why press firmly).
* **Pro Tips:** Consolidated and expanded tips.
* **Storage:** Detailed explanations for different storage scenarios.
* **Variations:** Added more ideas and details for each variation.
* **FAQs:** Expanded answers and added new relevant questions.
* **Conclusion:** Added a concluding paragraph to wrap up the article.
2. **SEO Friendly:**
* **Title/Meta Description:** Added a `