

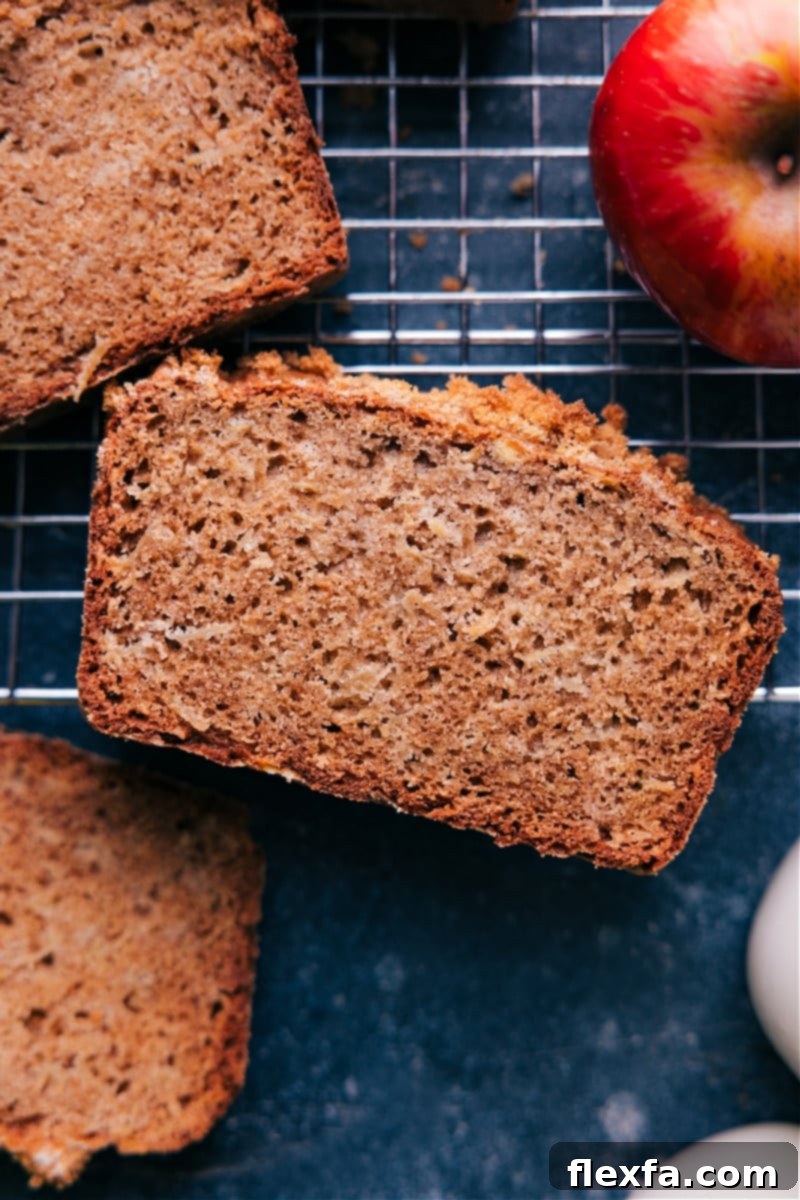
Welcome to a recipe that will redefine your love for quick breads: this Apple Bread Recipe. Imagine a slice of sweet, tender, and incredibly moist bread, generously packed with shredded apples, each bite infused with the comforting warmth of cinnamon and nutmeg. It’s more than just a quick bread; it’s a culinary hug, perfect for crisp autumn mornings, a delightful afternoon snack, or a sweet finish to any meal. This recipe promises a simple yet spectacularly flavorful experience, making it an instant classic in your kitchen.

author’s note
Experience Sweet Apple Bread That’s Bursting with Unforgettable Flavor!
My baking journey with quick breads took a delightful turn when I first stumbled upon the idea of apple bread. After a long stint of perfecting banana bread and zucchini bread, I craved something different, something with a fresh, seasonal twist. Staring at a bowl of ripe apples on my counter that urgently needed to be used, I had an epiphany: why not apple bread? Most recipes I encountered called for diced apples, which often resulted in noticeable chunks of fruit throughout the bread. However, on a spontaneous whim, I decided to reach for my grater instead, curious to see what difference it would make.
This impulsive decision proved to be a stroke of genius, completely transforming the texture and flavor profile of the bread. Grated apples, unlike diced chunks, gracefully melt into the batter during baking, releasing their natural sweetness and moisture evenly throughout the entire loaf. This meticulous integration results in an incredibly soft, uniformly moist crumb that doesn’t suffer from dry pockets or uneven distribution of fruit. Each and every slice offers a harmonious blend of warm, inviting spices and pure, concentrated apple essence, all without any surprising “chunks” interrupting the smooth, tender texture. It’s this unique technique that makes this apple bread truly stand out, offering a consistent, comforting apple flavor in every single bite. The subtle integration of apple ensures a delightful chewiness and a natural sweetness that perfectly balances the rich, aromatic spices, creating a quick bread that’s not just good, but simply irresistible.
Choosing the Best Apples for Your Apple Bread
The type of apple you choose can significantly impact both the flavor and the final texture of your apple bread. While many apple varieties can be used in baking, selecting the right one will elevate your quick bread from good to truly extraordinary. For apple bread, we’re looking for apples that offer a good balance of sweetness and tartness, and crucially, maintain some structure after baking without becoming completely mushy. Here’s a detailed breakdown of recommended varieties and why they work best:
| Apple Variety | Flavor Profile | Texture in Bread | Notes & Tips for Best Results |
|---|---|---|---|
| Granny Smith | Distinctly tart and tangy with a bright, crisp acidity | Firm, holds its shape exceptionally well, adds a pleasant chewiness | My top recommendation for any apple bread recipe. Its pronounced tartness perfectly balances the sweetness of the batter and the warm spices, preventing the bread from becoming overly sugary. Granny Smith apples also contribute significantly to a lovely moist texture without making the bread soggy. |
| Crispin (Mutsu) | Mildly sweet with a refreshing hint of tartness and a juicy crunch | Firm and crisp when raw, softens beautifully and retains structure during baking | An excellent alternative to Granny Smith, especially if you prefer a slightly sweeter outcome. Crispin apples offer a balanced flavor profile and provide enough firmness to hold up well in the bread, ensuring a delightful and consistent texture. |
| Honeycrisp | Wonderfully juicy and exceptionally sweet, with a delicate aroma | Tends to become softer, adding significant extra moisture to the bread | If you desire a sweeter, softer, and even moister bread, Honeycrisp is a fantastic choice. Its naturally high juice content can make the bread exceptionally tender. However, its intense sweetness might be overpowering if not balanced with less sweet ingredients or by slightly reducing the sugar in the recipe. |
| Fuji | Very sweet and incredibly crisp, with a subtle pear-like note | Generally softens considerably during baking, contributing to a softer bread consistency | Fuji apples are undeniably delicious but can make your apple bread overly sweet if used as the sole apple variety. For optimal results, consider mixing Fuji with a more tart apple like Granny Smith to achieve a more balanced and nuanced flavor profile. They add a lovely sweetness when used sparingly in a blend. |
| Gala or Pink Lady | Sweet, mildly tart, and wonderfully aromatic with a floral undertone | Softer texture once baked, tending to melt into the bread and creating a very moist crumb | These varieties are good choices for a sweeter, more fragrant bread. Similar to Honeycrisp, they contribute significantly to a very moist and tender crumb. If using Gala or Pink Lady, you might want to consider slightly reducing the sugar in the recipe or combining them with a tarter apple to maintain a good flavor balance. |
Quick Tip: Essential Apple Preparation
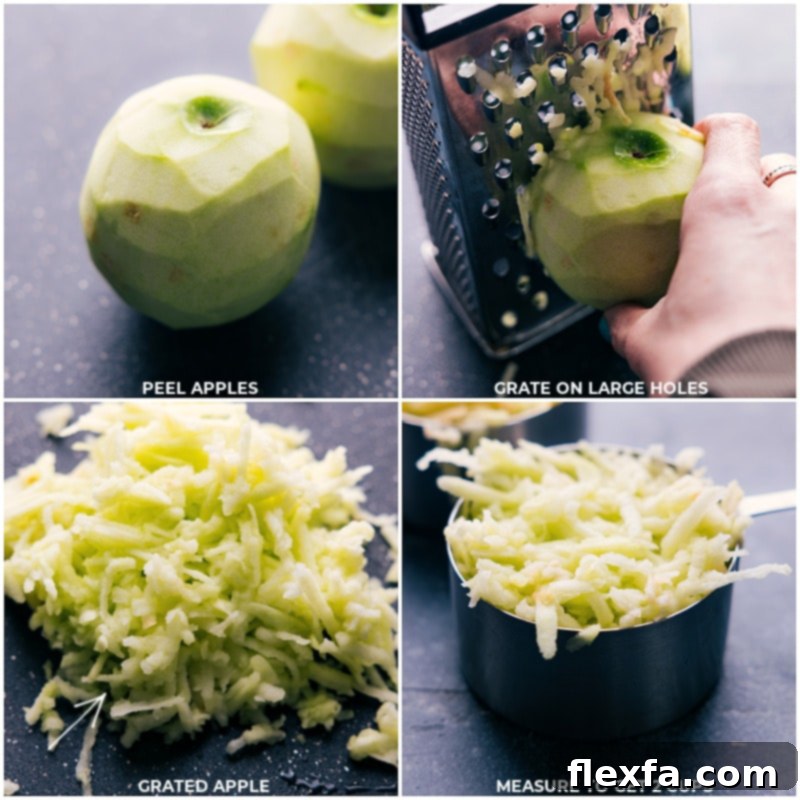
For the most delightful and uniform texture in your apple bread, it is crucial to always peel the apples before grating them and incorporating them into the batter. This simple step ensures a smooth, tender crumb, free from any tough or chewy bits of peel, allowing the finely grated apple to truly “melt” and blend seamlessly into the bread mixture during baking.
Crafting Your Perfect Apple Bread: A Step-by-Step Guide
Making this incredible apple bread is surprisingly simple, designed to be approachable and enjoyable for bakers of all skill levels, from beginners to seasoned pros. With minimal equipment and straightforward steps, you’ll have a warm, fragrant, and utterly delicious loaf ready to enjoy in remarkably little time. Here’s an accessible overview of the entire process:
- Prepare the Apples Precisely: The secret to this bread’s exceptional moistness and tender texture lies in proper apple preparation. Begin by peeling your chosen apples thoroughly, then grate them using the large holes of a box grater. This fine grating method ensures that the apples soften beautifully and release their natural moisture evenly throughout the batter, creating a wonderfully consistent and tender crumb that’s infused with apple flavor in every bite.
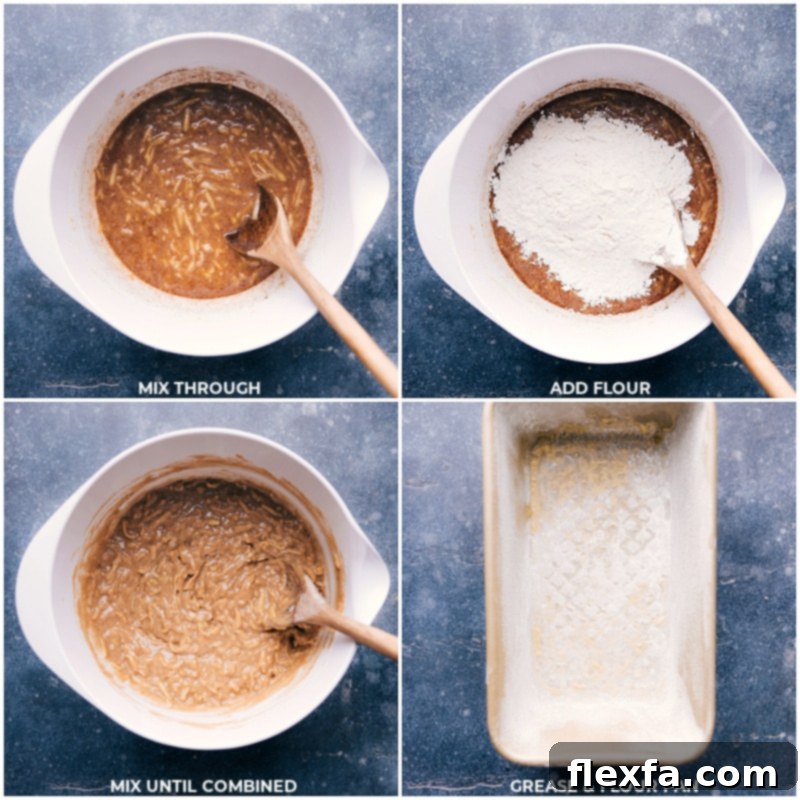
- Mix the Batter with Gentle Care: Forget about complicated stand mixers or extensive equipment; this recipe truly shines with its simplicity. All the ingredients come together beautifully in a single, large mixing bowl, requiring only a sturdy wooden spoon or spatula. This gentle, minimal mixing technique is absolutely key to preventing over-mixing, which is a common pitfall that can lead to a tough or dense loaf of quick bread.
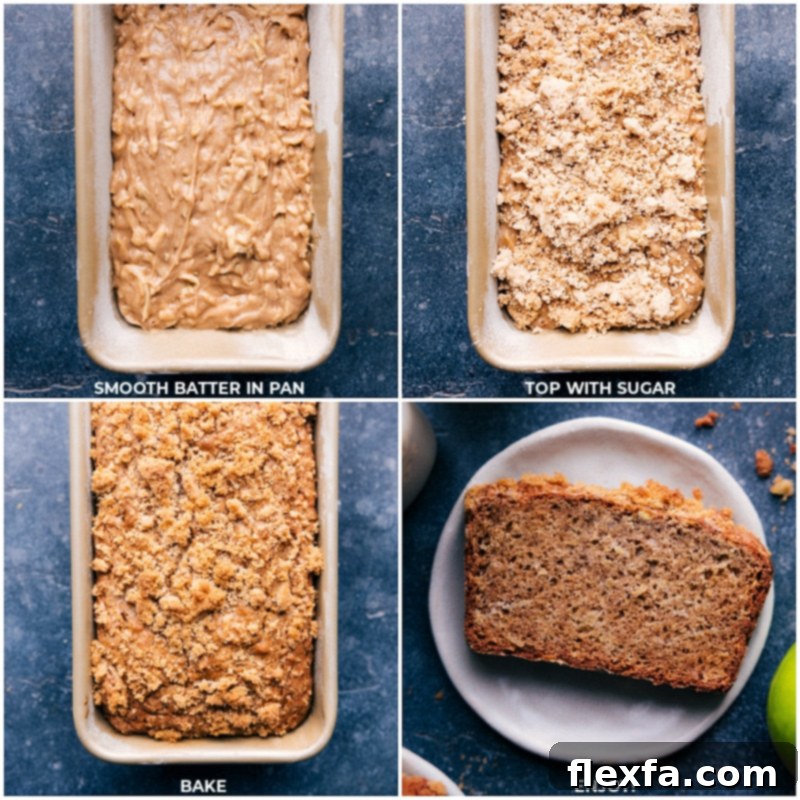
- Bake to Achieve Golden Perfection: Prioritize proper pan preparation for seamless baking. Generously grease your loaf pan or, for an even easier release, line it completely with parchment paper, ensuring you leave a sufficient overhang on the longer sides. Once your perfectly spiced batter is ready, pour it into the prepared pan and bake until it achieves a gorgeous, inviting golden-brown hue and is thoroughly cooked through. Your home will be filled with the irresistible, comforting aroma of baked apples and cinnamon.
- Cool for Optimal Texture and Structure: Patience, though sometimes challenging, is indeed a virtue in baking, especially with quick breads! After removing your fragrant apple bread from the oven, allow it to rest undisturbed in the pan for a crucial 15 minutes. This essential step allows the bread’s internal structure to set and firm up properly. Following this, carefully transfer the loaf to a wire rack to cool completely. Cooling on a wire rack is vital as it allows air to circulate around all sides, preventing the bottom from becoming soggy and ensuring a perfectly uniform, tender texture from crust to crumb.
Troubleshooting: Why Your Apple Bread Might Be Dry
Achieving a perfectly moist and tender apple bread is the ultimate goal, but sometimes, quick breads can unexpectedly turn out dry or crumbly. Don’t be discouraged – this is a common issue with easily identifiable culprits and simple, effective solutions. Understanding these factors will empower you to bake a consistently delicious and perfectly textured loaf every single time:
- Excessive Flour in the Batter: This is arguably the most frequent cause of dry quick breads. Flour, when improperly measured, can be easily over-packed into a measuring cup, leading to an excess of dry ingredients that absorb too much moisture. To meticulously avoid this, always spoon and level your flour: gently spoon flour into your measuring cup until it slightly overflows, then use a straight edge (like the back of a knife) to level off the excess without compacting it. Never scoop flour directly from the bag with the measuring cup, as this compacts it significantly and can add up to 25% more flour than needed.
- Over-Baking the Bread in the Oven: Quick breads are delicate and can quickly dry out if left in the oven for even a few minutes too long. Over-baking causes too much moisture to evaporate from the loaf, inevitably resulting in a crumbly, tough, and dry texture. To prevent this, always start checking for doneness at the minimum recommended bake time by inserting a wooden skewer or toothpick into the very center of the bread. If it comes out clean or with only a few moist crumbs attached, your bread is perfectly ready. For ultimate precision, an instant-read thermometer inserted into the center should register around 200-205°F (93-96°C).
- Over-Mixing the Batter Aggressively: When you over-mix quick bread batter, you inadvertently develop the gluten in the flour too much. This over-development creates a tougher, chewier, and ultimately less tender texture instead of the desired soft, moist crumb. For this crucial reason, I strongly recommend mixing the batter by hand with a wooden spoon or sturdy spatula, and only mixing until the ingredients are just combined. A few small lumps in the batter are perfectly fine and, in fact, often indicate that you haven’t over-mixed, which is ideal for a tender quick bread.
- Insufficient Apples in the Recipe!: The finely shredded apples are not just for adding delightful flavor; they are an absolutely crucial source of natural moisture for this bread. Ensure you’re accurately using a full two cups of loosely measured grated apples, which typically comes from about 2 large-sized apples (or 3 medium apples). If your apples are smaller, you might need to use an additional one to reach the correct volume. Using too few apples will directly and significantly impact the bread’s moistness, tenderness, and overall luscious texture.
- Expired or Inactive Baking Agents: Baking soda and baking powder are essential leavening agents responsible for creating the bread’s beautiful rise and tender crumb. If these ingredients are old, expired, or inactive, your bread will fail to rise properly, resulting in a dense, heavy, and notably dry loaf. It’s a very good habit to test the freshness of your baking soda and baking powder regularly. Baking soda can be tested by adding a little vinegar to it (it should fizz vigorously), and baking powder by adding a little hot water (it should also fizz).
Quick Tip: Pan Perfection for Your Apple Bread
Using the correct size loaf pan is absolutely critical for the success and beautiful presentation of this apple bread recipe. A standard 9×5-inch (1-pound) pan is specifically designed to ensure the bread bakes evenly, rises beautifully, and achieves the perfect tender texture. If your pan is too large, the batter will spread too thin, resulting in a flat, dry, and potentially over-baked loaf. Conversely, if it’s too small, the bread might overflow during baking or become dense and undercooked in the center. Here’s a link to our favorite 9×5-inch loaf pan that consistently guarantees perfect results!
Smart Storage Solutions for Your Apple Bread
Proper storage is essential to keeping your homemade apple bread fresh, moist, and utterly delicious for as long as possible. Follow these simple guidelines to extend its life and maintain its delightful texture:
- Room Temperature (Countertop): For optimal flavor and texture, especially within the first day or two after baking, store this apple bread tightly wrapped in plastic wrap or placed securely in an airtight container at room temperature. The flavors often have a chance to meld and deepen beautifully on day two, making it even more delicious! It will stay wonderfully fresh for up to 2 days.
- Refrigeration (Fridge): To significantly extend its freshness, particularly if you’ve made a larger batch or live in a humid climate, storing the bread in the refrigerator is an excellent option. Ensure it’s wrapped very tightly in plastic wrap and then placed in a secure airtight container. When stored correctly, it will keep well for up to 1 week, though keep in mind that the texture is generally at its absolute best during the first 1–2 days after baking.
- Freezing for Longer Enjoyment (Freezer): Apple bread freezes exceptionally well, making it a perfect candidate for meal prepping, ensuring you always have a quick breakfast or satisfying treat on hand. To freeze, allow the entire loaf to cool completely to room temperature. For maximum convenience, you can slice the bread first before freezing. Wrap individual slices (or the whole loaf) very tightly in plastic wrap, ensuring no air can get in, followed by an additional protective layer of aluminum foil. Then, place the wrapped bread in a freezer-safe bag or container. This double-layer wrapping effectively prevents freezer burn. Your apple bread will freeze beautifully for up to 3 months. To enjoy, simply thaw individual slices at room temperature, or gently warm them in the microwave or oven for a delicious, grab-and-go delight.
Discover More Amazing Apple Recipes:
Desserts
Decadent Apple Cheesecake Bars
Desserts
Healthy Applesauce Spice Cake
Breakfast
Wholesome Apple Muffins with Greek Yogurt
Desserts
Healthier Applesauce Bread
Print Recipe
Apple Bread Recipe
Chelsea Lords
25 minutes
45 minutes
1 hour 10 minutes
10 slices
Equipment You’ll Need
-
9 x 5-inch bread pan (see Note 1 in the recipe notes below for detailed pan preparation)
-
Box grater (for precisely grating apples)
-
Large mixing bowl (for combining ingredients)
-
Wooden spoon or sturdy spatula (for gentle mixing)
-
Wire cooling rack (essential for even cooling)
Ingredients
- 2 large Granny Smith or Honeycrisp apples (peeled and grated, yielding approximately 2 cups loose, see Note 2 for apple selection)
- 2 large eggs (at room temperature for better emulsion and texture)
- 1/3 cup canola oil or vegetable oil (for moisture and tenderness)
- 1/3 cup unsalted butter (melted and cooled completely, or use an additional 1/3 cup oil for a dairy-free option)
- 1 cup light brown sugar (lightly packed, for deep sweetness and moisture)
- 2 teaspoons pure vanilla extract (enhances all the flavors)
- 1 teaspoon fine sea salt (balances sweetness and enhances flavor)
- 2 teaspoons ground cinnamon (for that classic warm, aromatic spice)
- 1/4 teaspoon ground nutmeg (freshly grated if possible for the best, most vibrant flavor)
- 3/4 teaspoon baking soda (provides lift and tenderness)
- 1/2 teaspoon baking powder (adds additional lift and helps create a tender crumb)
- 2 cups all-purpose flour (spooned and leveled, plus a little extra for dusting the pan)
- 2 tablespoons light brown sugar (firmly packed, reserved for sprinkling on top before baking)
Detailed Instructions for Perfect Apple Bread
-
1. Prepare Oven and Loaf Pan: Begin by preheating your oven to 350°F (175°C). Next, meticulously prepare your 9×5-inch bread pan. You can generously grease it with cooking spray or butter and then lightly dust it with flour. Alternatively, for the absolute easiest removal, grease the pan and line it with parchment paper, ensuring you leave a generous overhang on the longer sides to use as convenient “handles” for lifting the baked loaf out. Melt the unsalted butter in the microwave or a small saucepan and set it aside to cool completely to room temperature. While the butter cools, peel your chosen apples (Granny Smith or Honeycrisp are fantastic choices as per Note 2) and grate them using the large holes of a box grater. Measure loosely to achieve approximately two cups of grated apple without packing them down.
-
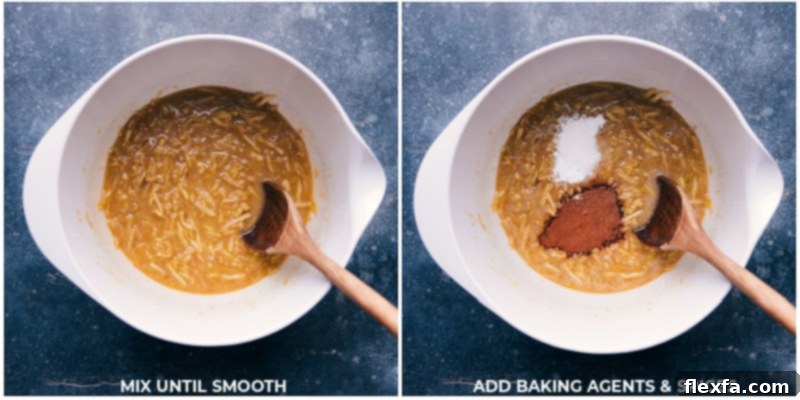
2. Combine Wet Ingredients: In a large, spacious mixing bowl, combine all the wet ingredients: the room-temperature eggs, canola or vegetable oil, the completely cooled melted butter, light brown sugar, pure vanilla extract, and your prepared grated apples. Mix these wet ingredients thoroughly with a wooden spoon or a sturdy spatula until they are well combined and the light brown sugar has mostly dissolved. It’s crucial not to use electric hand or stand mixers for this step, as they tend to beat too much air into the mixture and over-develop the gluten, which can lead to a less tender and more rubbery bread. Gentle, methodical mixing by hand is key here.
-
3. Incorporate Dry Ingredients Gradually: To the vibrant wet ingredient mixture, add the dry ingredients (except for the 2 tablespoons of brown sugar reserved for topping): the fine sea salt, ground cinnamon, ground nutmeg, baking soda, and baking powder. Mix these spices and leavening agents into the wet mixture until they are just combined. Next, gradually add the all-purpose flour, mixing only until you achieve a smooth batter that is just combined. Be extremely careful to avoid over-mixing the batter at this stage; this is a common pitfall that can lead to a dense, tough, and dry loaf of bread. A few small lumps in the batter are perfectly acceptable and, in fact, often indicate that you haven’t over-mixed, which is ideal for a tender quick bread.
-
4. Bake the Bread to Perfection: Pour the beautifully prepared batter into your greased and floured (or parchment-lined) 9×5-inch loaf pan. Gently smooth the top of the batter with your spoon or spatula to ensure an even bake. Sprinkle the remaining 2 tablespoons of light brown sugar evenly over the top of the batter; this will create a wonderfully sweet, slightly caramelized crust as it bakes. Transfer the pan to the preheated oven and bake for 55–70 minutes. The exact baking time can vary significantly depending on your specific oven, so begin checking for doneness at the 55-minute mark. The bread is perfectly done when a wooden skewer or toothpick inserted into the very center comes out clean or with only a few moist crumbs attached.
-
5. Cool and Savor Your Creation: Once baked, carefully remove the fragrant apple bread from the oven and allow it to cool undisturbed in the pan for a crucial 15 minutes. This vital resting period allows the bread to finish setting its internal structure and prevents it from crumbling when removed. After 15 minutes, if you didn’t use parchment paper, gently run a thin knife around the edges of the pan to loosen the loaf. Carefully invert the loaf onto a wire cooling rack. It is paramount to allow the bread to finish cooling completely, for at least an hour, or even longer, before attempting to slice it. Cutting into warm quick bread can cause it to crumble and become sticky (refer to Note 3 for more in-depth cooling tips). Once cooled, slice and savor your perfectly moist, tender, and incredibly flavorful homemade apple bread!
Recipe Notes and Expert Tips for Success
Note 2: Selecting and Measuring Apples: This recipe specifically calls for approximately 2 large apples, which should yield about 2 cups of loosely grated fruit. For the absolute best apple bread, prioritize using crisp, firm apple varieties that offer a good balance of both sweet and tart flavors. Granny Smith apples are highly recommended for their ability to maintain some structure and provide a bright, tangy counterpoint to the bread’s sweetness. Honeycrisp is another excellent choice if you prefer a sweeter bread with an extra moist and juicy crumb. A harmonious blend of both can also create a wonderfully complex and well-rounded flavor profile. Ensure all apples are thoroughly peeled before grating to prevent any tough bits of skin from appearing in your tender bread.
Note 3: The Critical Importance of Cooling: After baking, it’s undeniably tempting to slice into your warm, fragrant apple bread immediately. However, allowing the bread to sit undisturbed in the pan for 15 minutes is a critical and non-negotiable step; during this time, it’s still undergoing a final “setting” phase, allowing its internal structure to firm up properly. After this initial rest, if you didn’t use parchment paper, carefully run a thin knife along the edges of the pan to gently loosen the loaf. Then, invert it onto a wire cooling rack and allow it to cool completely for at least an hour, or even longer, before attempting to slice. Elevating the loaf on a wire rack allows vital air circulation around all sides, preventing any moisture buildup on the bottom crust, which could otherwise lead to a soggy or sticky bottom. Patience at this stage truly rewards you with perfectly textured slices that hold together beautifully.
Nutrition Information (Estimated)
Calories: 332kcal |
Carbohydrates: 46g |
Protein: 4g |
Fat: 15g |
Saturated Fat: 5g |
Polyunsaturated Fat: 3g |
Monounsaturated Fat: 7g |
Trans Fat: 0.3g |
Cholesterol: 53mg |
Sodium: 406mg |
Potassium: 114mg |
Fiber: 2g |
Sugar: 25g |
Vitamin A: 264IU |
Vitamin C: 2mg |
Calcium: 48mg |
Iron: 2mg
Please note: Nutrition information is automatically calculated and should be considered an approximation. Factors like specific ingredient brands, exact measurements, and variations in apple size can slightly affect the final nutritional values.
Love this recipe? We’d be thrilled to hear from you! Share your thoughts and leave a comment below!
Your feedback not only helps us grow but also inspires other home bakers to try this delightful apple bread.
Creative Variations to Elevate Your Apple Bread Experience
This classic apple bread recipe is absolutely wonderful on its own, providing a comforting and delicious treat. However, it also serves as a fantastic base for endless creative variations, allowing you to customize it to your unique preferences and impress your family and friends. Don’t hesitate to experiment and make it your own:
- Indulge with a Decadent Frosting: Elevate this already delicious quick bread into a truly decadent apple cake by adding a luscious, creamy topping. A rich, tangy cream cheese frosting would be the perfect complement, adding another layer of irresistible sweetness and a beautiful contrast in texture. Ensure the bread is completely cool before drizzling or spreading the frosting on top for the best results. A simple glaze made from powdered sugar and milk also works beautifully for a lighter touch.
- Make it a Healthier Treat: If you’re looking to enjoy this comforting bread with a lighter, more health-conscious touch, a few simple substitutions can make this apple bread recipe healthier without sacrificing an ounce of its incredible flavor or moistness. Replace the canola or vegetable oil with an equal amount of healthy coconut oil or even unsweetened applesauce for a subtle tropical hint and beneficial fats. For the flour, substitute half or all of the all-purpose flour with white whole-wheat flour to significantly boost the fiber content and nutritional value, while still maintaining a delightfully tender crumb. You can also slightly reduce the added brown sugar, allowing the natural sweetness and tartness of the apples to truly shine.
- Create a Loaded Apple Bread Masterpiece: For those who simply adore extra texture, crunch, and flavor in every single bite, transform this into a truly “loaded” apple bread. Fold in about 1/2 to 3/4 cup of finely chopped pecans or walnuts into the batter along with the grated apples. These nuts add a delightful, satisfying crunch and a rich, nutty depth that pairs exceptionally well with the apples and warm cinnamon. Another wonderful option is to add about 1/2 cup of dried cranberries, golden raisins, or chopped dried apricots for bursts of chewy sweetness and an extra layer of fruity complexity.
- Amp Up the Spiced Apple Bread Flavor: If you crave an even more robust and intensely aromatic spiced apple bread, consider enhancing the existing spice blend. In addition to the cinnamon and nutmeg already in the recipe, incorporate an extra 1 to 2 teaspoons of pre-made apple pie spice into the bread batter. This blend often includes complementary spices like allspice, cardamom, and ginger, which will deepen the complexity and amplify the comforting warmth of the bread’s flavor profile, making it truly extraordinary and perfect for chilly days.
- Add a Delicious Streusel Topping: For an extra special touch and an irresistible crunchy topping, create a simple streusel to sprinkle over the batter before baking. In a small bowl, combine 1/4 cup all-purpose flour, 2 tablespoons cold unsalted butter (cut into small pieces), 2 tablespoons light brown sugar, and 1/2 teaspoon ground cinnamon. Use your fingertips or a pastry blender to mix until the ingredients form coarse, crumbly streusel. Sprinkle this mixture evenly over the top of the batter just before it goes into the oven. This adds a lovely buttery, sweet, and crunchy layer that perfectly complements the soft apple bread underneath.