
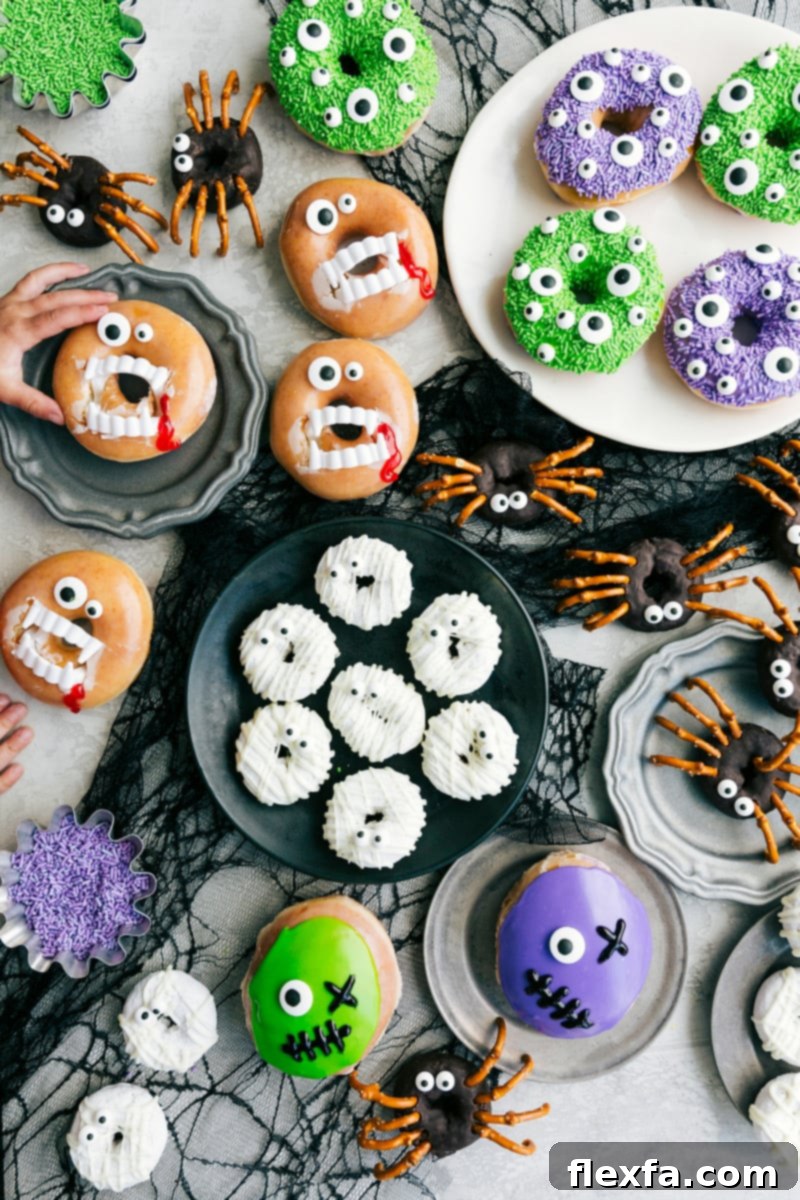
Spooktacular Halloween Donuts: 4 Easy & Fun DIY Decorating Ideas
Get ready to infuse some frightful fun into your Halloween festivities with these amazing Halloween Donuts! We’ve brewed up four incredibly simple yet creative decorating ideas that promise to be a blast for everyone involved. Not only do they look spectacularly spooky, but they taste absolutely divine!
If you’re as obsessed with Halloween as we are, you’ll love exploring more of our ghoulishly good ideas. Don’t miss these 15 Halloween Breakfast Ideas, our irresistible Halloween Cookies, a delicious Candy Salad, FREE Halloween Printables, and more simple Halloween Treats.
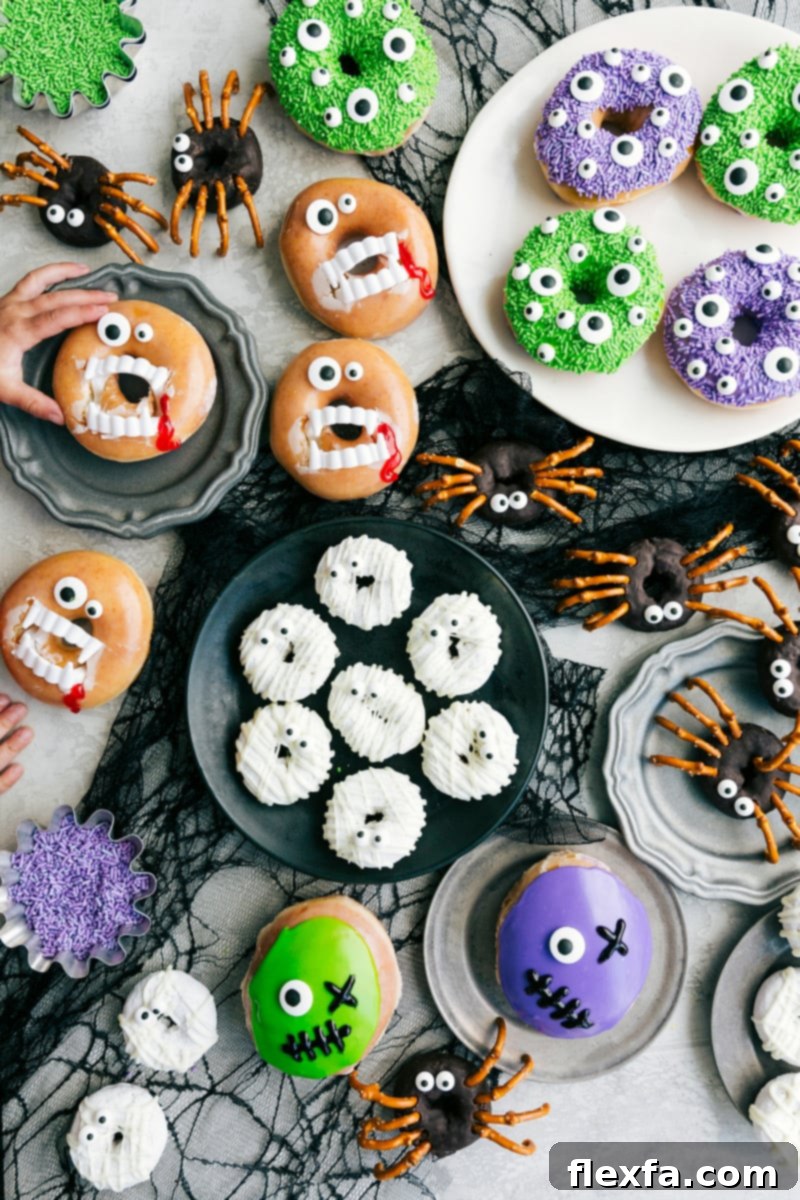

A Personal Touch from the Kitchen
A Donut Costume Party on a Plate: Why These Treats Are a Must!
Halloween has always held a special place in my heart – it’s definitely my favorite holiday! From transforming our home into a haunted mansion with spider webs and spooky decor, to carving pumpkins with the kids, and whipping up themed party snacks like Halloween Muddy Buddies, I embrace every opportunity to celebrate. Every year, I challenge myself to introduce at least one new, exciting food idea to our traditions, and these Halloween Donuts quickly soared to the top of our list. They’ve become an indispensable part of our spooky season celebrations, beloved by both kids and adults alike.
The best part? How effortlessly these treats come together. You won’t find me laboring over homemade donuts for this project (though if you’re a baking enthusiast, go for it!). My secret weapon is a simple box of store-bought glazed, powdered, or chocolate-frosted donuts. This clever shortcut allows me to channel all my energy and excitement into the truly fun part: decorating! It transforms what could be a time-consuming task into a joyous, creative activity that fits perfectly into a busy Halloween schedule.
Watching my kids dive into the decorating process is incredibly rewarding. Their imaginations run wild as they carefully position vampire fangs, arrange pretzel “legs” on their spider creations, or give life to a monstrous donut with colorful sprinkles. These moments of shared creativity and laughter make these Halloween donuts more than just a sweet treat; they become cherished family memories that we look forward to making every year.
Why Choose Store-Bought Donuts for Halloween?
Opting for pre-made donuts is a game-changer for Halloween baking. It saves valuable time, reduces stress, and allows you to focus purely on the artistic fun of decorating. Plus, with a variety of base flavors like plain glazed, rich chocolate, or classic powdered sugar, you have the perfect canvas for any spooky character you wish to create. This approach makes these Halloween donuts accessible to everyone, regardless of their baking skill level, ensuring maximum enjoyment with minimal fuss.
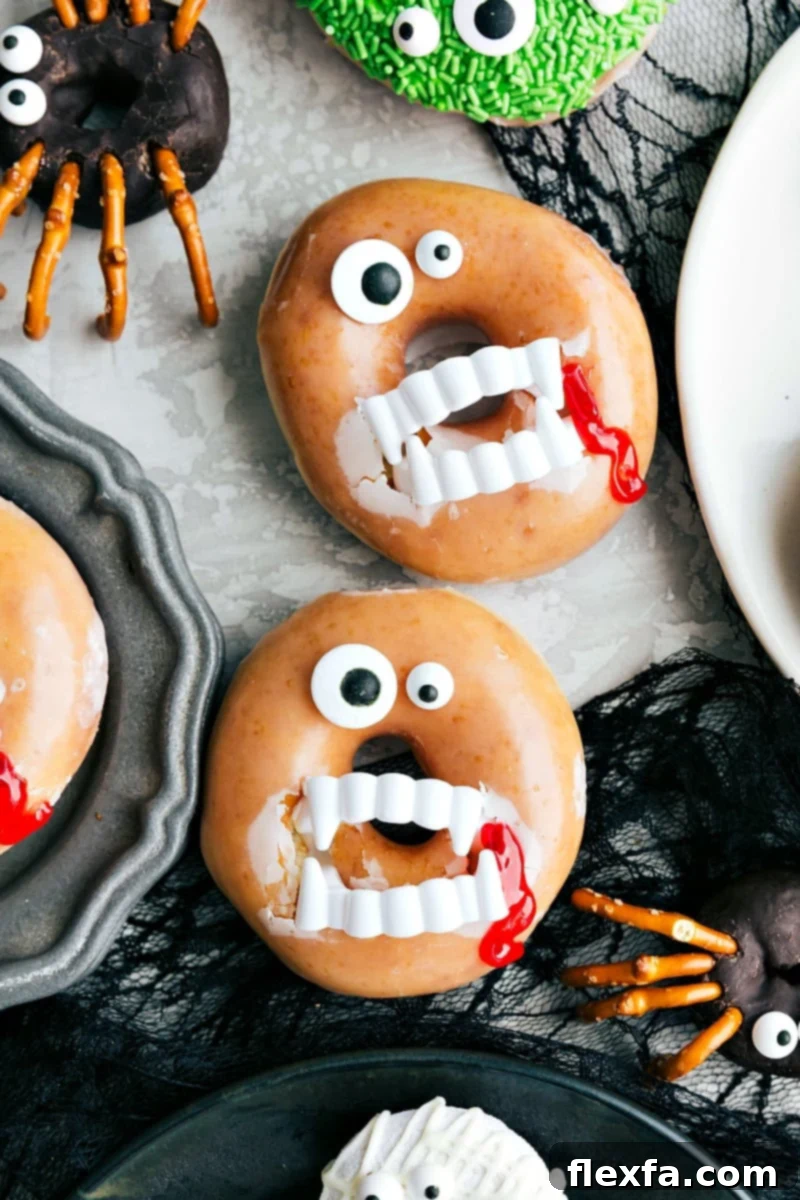
Halloween Donut #1: Terrifying Vampire Donuts
Unleash your inner ghoul with these incredibly easy and dramatically spooky Vampire Donuts! With just a few simple ingredients, you can transform a plain donut into a bloodthirsty treat that will be the talk of your Halloween party.
Ingredients needed:
- A dozen plain, glazed donuts (Krispy Kreme works wonderfully for their classic glaze, but any brand is fine)
- Plastic vampire fangs (ensure they are thoroughly washed and dried before use for hygiene)
- Ediblecandy eyes (we recommend having both small and large sizes on hand to create a more varied and “scarier” vampire look)
- Red edible gel (essential for those ghoulish, dramatic “blood” effects!)
Once you have these few items, you’re ready to bring your vampire creations to life!
How to Make Vampire Donuts:
- Gently press the plastic vampire fangs into the donut. Partially close the fangs and center them, pushing them down a little more than halfway into the donut. This ensures they are secure and protrude realistically.
- Using the red edible gel, pipe a small stream starting from one side of the fangs, letting it drizzle down the donut. Remember, edible gel tends to run, so use it sparingly for a controlled “bloody” effect. Less is often more for realistic drips.
- To attach the candy eyes, dab a tiny bit of edible gel onto the back of each eye and gently press them onto the top half of the donut, above the fangs. Mix and match eye sizes for extra character!
- These dramatic donuts are best served quickly after assembly to maintain their fresh appearance. While they are a showstopper, they don’t do well when made too far in advance, as the gel can spread and the fangs might shift.
These Vampire Donuts are guaranteed to be a hit, adding a touch of spooky elegance to your Halloween spread!
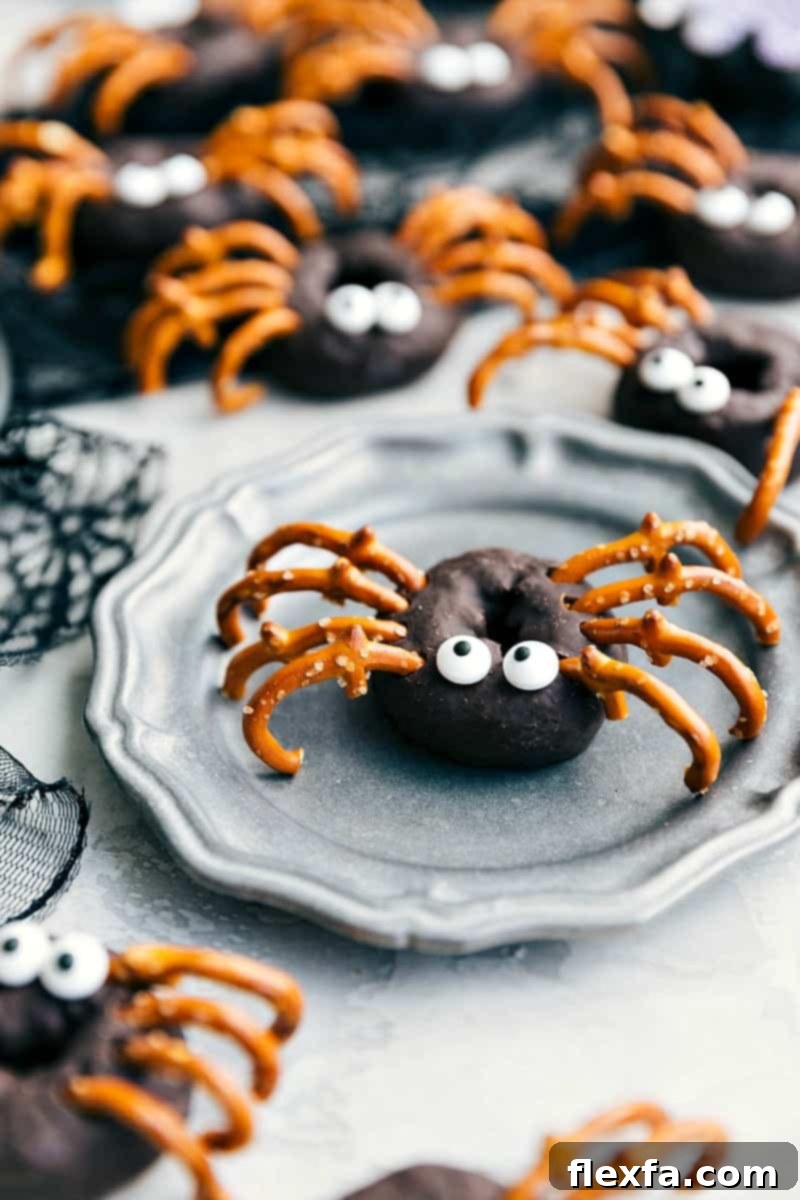
Halloween Donut #2: Creepy-Crawly Spider Donuts
These Spider Donuts are adorably creepy and incredibly fun to make, especially with kids! Chocolate-frosted donuts serve as the perfect dark body for your eight-legged friends, while pretzels become their delightfully crunchy legs.
Ingredients needed:
- Mini chocolate-frosted donuts (often found in the bakery or cookie aisle of most grocery stores)
- Ediblecandy eyes (for giving your spiders a whimsical or spooky gaze)
- Pretzel twists (the classic twist shape works best for breaking into leg-like pieces)
- Cream cheesefrosting or any similar prepared frosting (this acts as the edible “glue” for the eyes)
Gather these items, and let’s get ready to build some tasty spiders!
How to Make Spider Donuts:
- The trickiest part is breaking the pretzels to resemble spider legs. Use a small knife or your hands to snap pretzel twists into leg-shaped segments. Don’t worry if many break imperfectly – there will be some “casualties” at first, but you’ll quickly get the hang of it. Aim for pieces that are roughly an inch long and have a slight curve. You’ll need 8 legs per donut.
- Once you have your pretzel legs, gently press the tops of four broken pretzel pieces into each side of the chocolate donut to create eight legs. Distribute them evenly around the donut’s perimeter for a realistic spider appearance. The chocolate frosting should be soft enough to hold them securely.
- To attach the edible candy eyes, pipe a tiny dab of frosting onto the back of each eye. Then, carefully place two or more eyes on the top center of the donut. For a truly unique spider, you can even use varying numbers or sizes of eyes! Alternatively, you can melt a small amount of chocolate and use that as an adhesive for a stronger hold.
Quick Tip for Piping Frosting
When using a plastic bag to pipe frosting or melted chocolate, these tips can make a big difference: (1) Fold the top edge of the bag down before filling to keep it mess-free. (2) Twist the top of the bag tightly once filled to prevent any leaks from the back. (3) Make an incredibly tiny snip at the very corner of the bag; this gives you much better control for small details like attaching candy eyes.
These Spider Donuts are a charmingly creepy addition that will delight all your Halloween guests!
Halloween Donut #3: Mystical Mummy Donuts
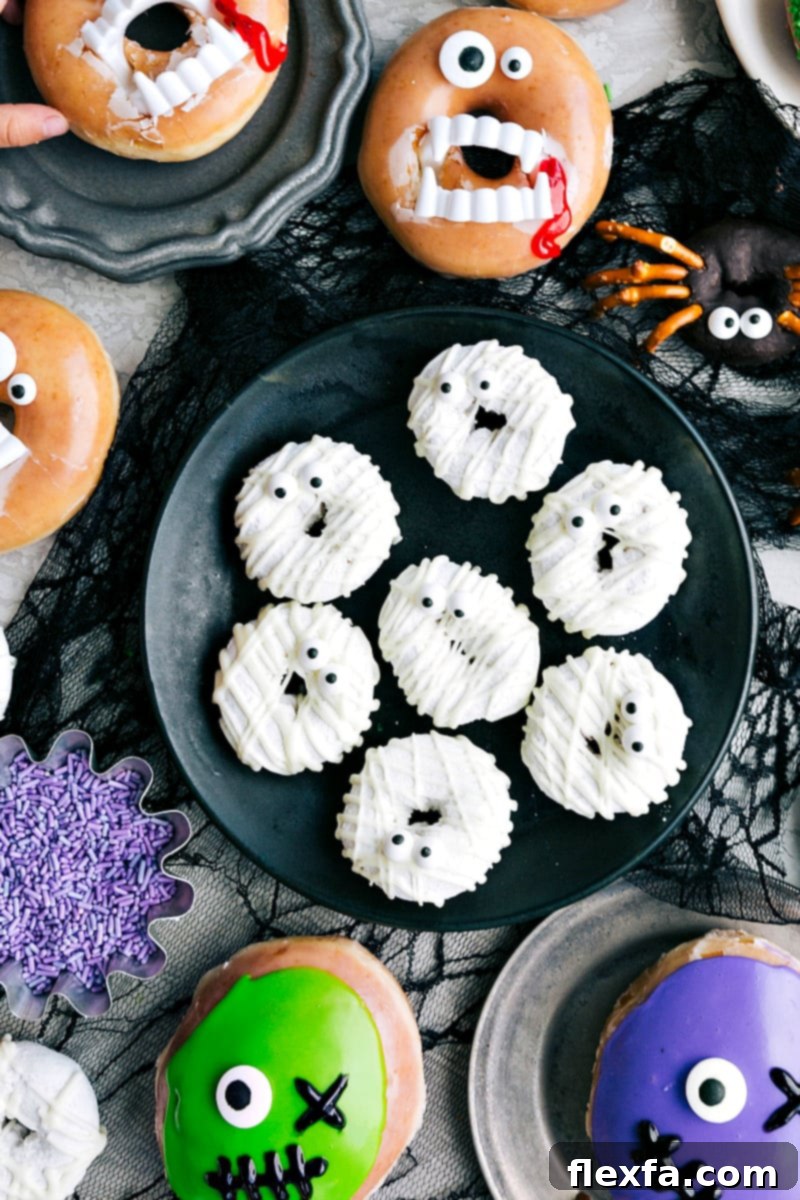
Wrap up some spooky fun with these adorable Mummy Donuts! Powdered sugar donuts provide the perfect base, while melted white chocolate transforms into whimsical bandages, bringing these ancient treats back to life.
Ingredients needed:
- Mini powdered sugar donuts (easily found in the treats or cookie aisle of your grocery store)
- Small edible candy eyes (these will peek out from under the bandages!)
- White chocolate chips (high-quality chips melt more smoothly)
- A little vegetable oil or coconut oil (to thin the chocolate for drizzling)
Prepare these items to resurrect your mummy donuts!
How to Make Mummy Donuts:
- Start by melting your white chocolate. In a microwave-safe bowl, combine 1/2 cup white chocolate chips with 1/4 tablespoon of vegetable oil. Microwave for 30 seconds, then stir thoroughly. Continue microwaving in 15-20 second intervals, stirring well after each, until the chocolate is completely smooth and melted. If it seems too thick for drizzling, add a tiny bit more oil (1/4 teaspoon at a time) and stir until you reach the desired consistency.
- Once melted, spoon a thin layer of the white chocolate over the top two-thirds of each powdered donut. Gently tap the donut on your counter or baking sheet to help the chocolate even out and create a smooth base layer for the bandages.
- Carefully place the donuts on a baking sheet lined with parchment paper or wax paper to allow the chocolate to set. Repeat this process with the remaining donuts. You can pop them in the fridge for a few minutes to speed up the setting process.
- Once the base layer is set, transfer any leftover melted white chocolate into a small plastic bag or a frosting bag. Snip a very small corner off the bag (even smaller than you think you need for fine lines!). Pipe crisscross lines over the top of the donut to create the “bandage” effect, leaving a small gap near the top for the eyes to show through.
- While the white chocolate bandages are still wet, quickly add two small edible candy eyes to the uncovered section. The wet chocolate will act as the adhesive. Allow the donuts to set completely before serving.
These Mummy Donuts are adorably spooky and make for a delightful Halloween treat!
Halloween Donut #4: Whimsical Monster Donuts
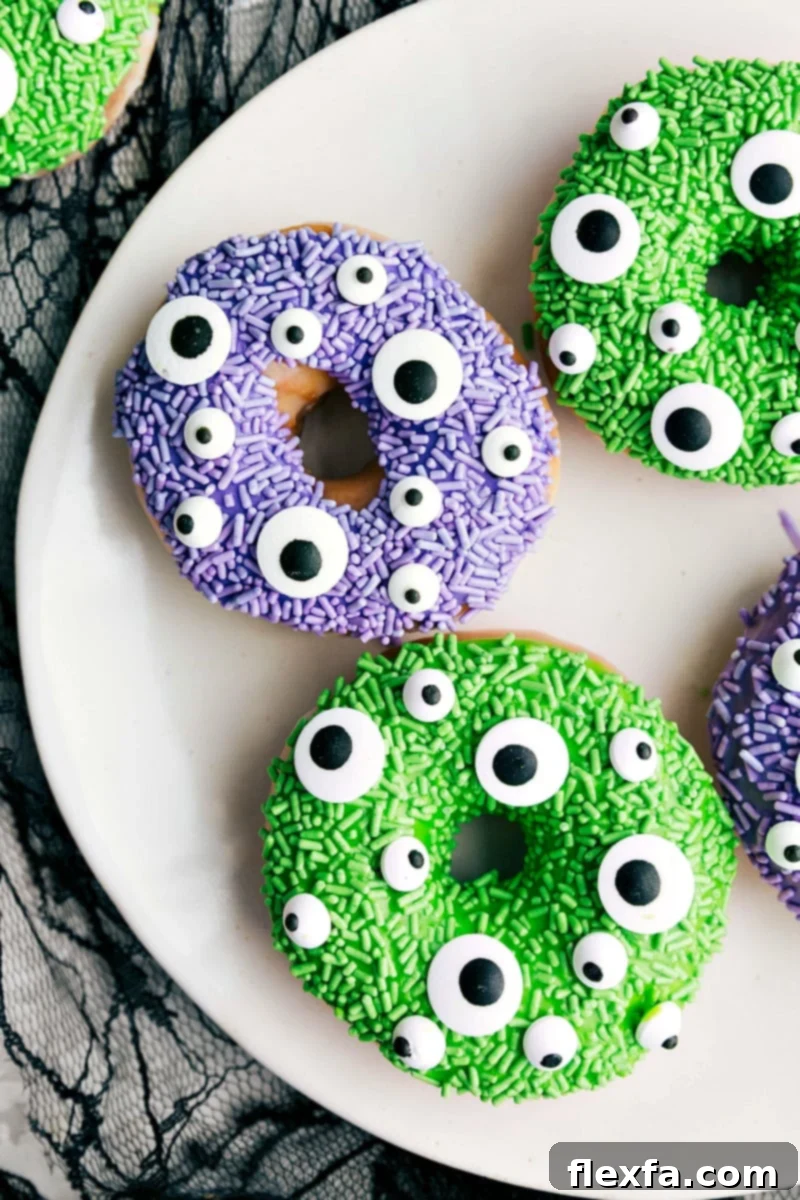
Get ready to create a colorful cast of characters with these vibrant Monster Donuts! These are perhaps the most playful and customizable of all the designs, allowing for endless creativity with sprinkles and candy eyes.
Ingredients needed:
- Plain, glazed donuts (for a classic base) OR you can make your own simple glaze as described below
- Edible candyeyes (an assortment of small and large sizes adds wonderful variation and personality to your monsters)
- Green sprinkles (jimmies work best for texture)
- Purple Sprinkles (another vibrant color for monstrous flair)
- Red edible gel (for adding mouths, scars, or gruesome details)
- For homemade glaze (optional, if not using pre-glazed donuts):
- 2 cups powdered sugar
- 1/3 cup heavy cream or whole milk
- 1/2 teaspoon vanilla extract
- 1/8 teaspoon salt
Let your imagination run wild with these playful monster creations!
How to Make Monster Donuts:
- Prepare the Glaze (if making from scratch): In a medium bowl, whisk together the powdered sugar, heavy cream (or whole milk), vanilla extract, and a pinch of salt until the mixture is smooth and free of lumps. The consistency should be thick enough to coat the donuts but still drippy. If using pre-glazed donuts, you can skip this step, or gently warm them slightly to make the existing glaze slightly tacky for sprinkles.
- Dip the Donuts: Dip the top of each donut into the prepared glaze, allowing any excess to drip off. For pre-glazed donuts, you can either re-glaze them with a colored glaze or simply proceed to step 3 while the existing glaze is still a bit soft.
- Add Sprinkles: While the glaze is still wet and tacky, immediately dip the glazed top of the donut into a bowl of green, purple, or a mix of sprinkles. Gently press to ensure the sprinkles adhere well, covering the donut completely for a full “monster fur” effect.
- Attach Candy Eyes: Use a tiny dab of edible gel (or a little extra glaze/frosting) on the back of each candy eyeball and press them onto the sprinkled donut. This is where the monster’s personality comes to life! Use one large eye, two mismatched eyes, or even three or four eyes for a truly unique creature.
- Add Details: For extra monstrous flair, use the red edible gel to draw mouths, scars, stitches, or angry eyebrows on your monster donuts.
- Set the Glaze: Place the decorated donuts on a wire rack over parchment paper and let the glaze set for at least 20 minutes, or until firm to the touch. This ensures all your monstrous details stay in place.
These Monster Donuts are wonderfully versatile and are a fantastic way to encourage creative expression during your Halloween celebrations!
More Spooky Halloween Fun:
Looking for more ways to make your Halloween celebrations extra special? Explore these other delightful Halloween-themed recipes and activities:
Desserts
Halloween Rice Krispie Treats
Snacks
Halloween Popcorn
Halloween
Ghost Cookies
Quick And Easy
Mummy Bark
Halloween Donuts – Monster Variation Recipe
Chelsea Lords
15
20
35
12
donuts
Video
A video demonstrating how to make these Halloween Donuts would typically be embedded here.
Equipment
-
Medium bowl (for mixing glaze)
-
Whisk
-
Shallow dishes (for sprinkles)
-
Wire rack and parchment paper
Ingredients (for Monster Donuts & Glaze)
- 12 prepared plain glazed donuts I use Krispy Kreme, or use unglazed donuts and make your own glaze.
- 2 cups powdered sugar
- 1/3 cup heavy cream or whole milk
- 1/2 teaspoon vanilla extract
- 1/8 teaspoon salt
- Colored jimmies sprinkles I use green and purple for monster effect
- Candy eyeballs an assortment of small and large
- Edible gel (for attaching eyes and drawing details)
Instructions for Monster Donuts
-
For the Monster Donuts, begin by whisking together powdered sugar, heavy cream (or whole milk), vanilla extract, and a pinch of salt in a medium bowl until the glaze is smooth.
-
Dip the tops of your prepared donuts into the freshly made glaze, allowing any excess to gently drip off.
-
While the glaze is still wet, immediately dip the glazed donut tops into your chosen colored sprinkles (green and purple work great for monsters!). Press gently to ensure good coverage.
-
Attach the candy eyes using a small dab of edible gel on the back of each eye, placing them creatively on your monster donuts.
-
Let the glaze and decorations set for at least 20 minutes on a wire rack before serving.
-
In addition to the Monster Donuts, you can also craft Vampire, Mummy, and Spider donuts. See the detailed instructions and ingredient lists in the post above for those exciting variations!
Recipe Notes
Make Ahead Tips: While the mummy and spider donuts can be made a few hours in advance, vampire donuts are best assembled right before serving to keep the edible gel looking fresh and the fangs secure. Monster donuts with a good set glaze also hold up well for several hours.
Kid-Friendly Activity: These Halloween donut decorating ideas are fantastic for involving children! Set up a decorating station with all the ingredients and let their creativity shine. It’s a wonderful way to make lasting holiday memories.
Nutrition
Serving:
1
serving
|
Calories:
101
kcal
|
Carbohydrates:
20
g
|
Protein:
0.2
g
|
Fat:
2
g
|
Saturated Fat:
2
g
|
Polyunsaturated Fat:
0.1
g
|
Monounsaturated Fat:
1
g
|
Cholesterol:
7
mg
|
Sodium:
2
mg
|
Potassium:
7
mg
|
Sugar:
20
g
|
Vitamin A:
97
IU
|
Vitamin C:
0.04
mg
|
Calcium:
5
mg
|
Iron:
0.02
mg
Nutrition information is automatically calculated and is for the Monster Donut variation, so should only be used as an approximation. It may vary based on specific brands and modifications.
Loved these ideas? Share your thoughts below!