
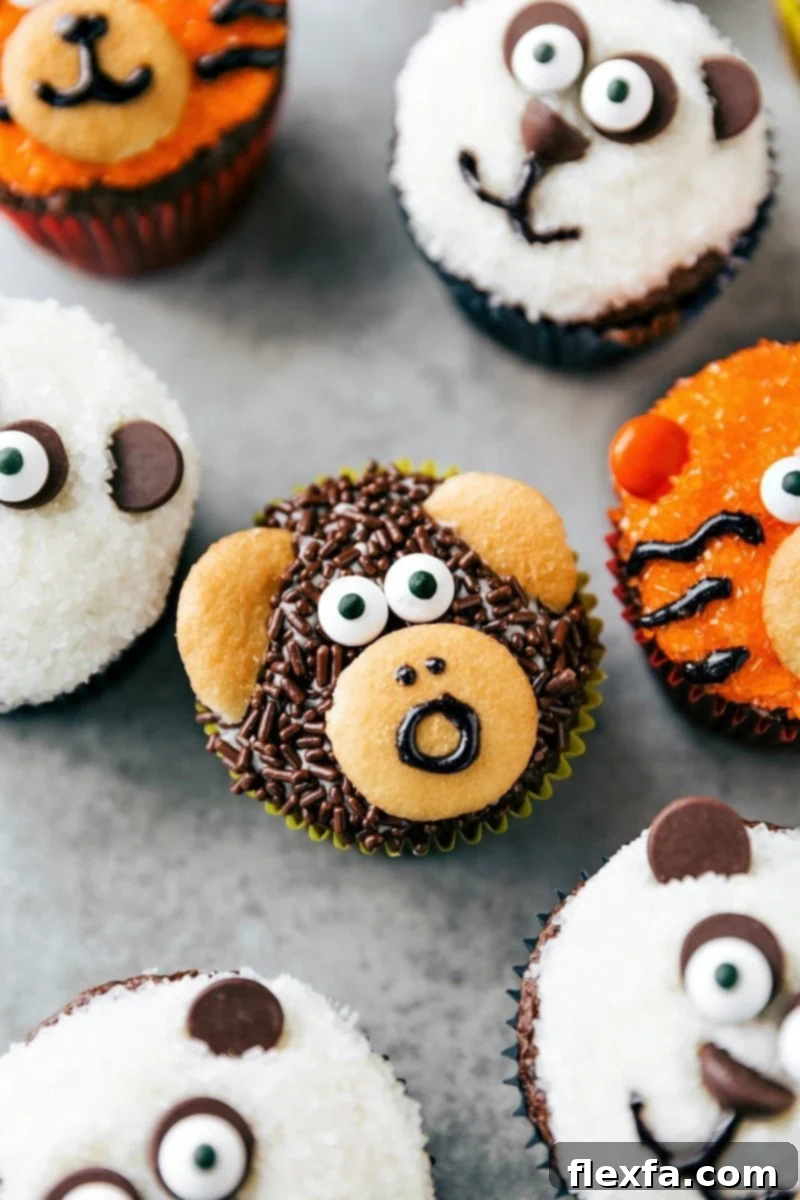
Easy Animal Cupcakes: Craft Adorable Jungle-Themed Treats
Transform ordinary cupcakes into a captivating safari adventure with these incredibly simple and fun animal designs! Whether you’re planning a jungle-themed party, looking for a delightful baking project with kids, or simply want to impress with charming homemade treats, our guide provides everything you need. Choose from a striking zebra, a playful monkey, a fierce tiger, or an irresistible panda design – each one easier to create than you might think. Get ready to bake, decorate, and unleash your creativity!
Why You’ll Love Making These Animal Cupcakes
These animal-themed cupcakes aren’t just desserts; they’re an experience! Here’s why they’re perfect for your next baking endeavor:
- Perfect for Parties: Ideal for birthdays, baby showers, or any celebration that calls for a touch of whimsy and wild fun.
- Kid-Friendly Project: The decorating steps are simple enough for children to help with, fostering creativity and a love for baking.
- Deliciously Decadent: Starting with a rich, moist chocolate cupcake base ensures every bite is a delightful experience before you even get to the adorable decorations.
- Customizable: While we provide four fantastic designs, the techniques can inspire you to create your own animal kingdom.
- Impressive Results, Minimal Effort: Despite their detailed appearance, these cupcakes utilize readily available ingredients and straightforward steps, making them a stress-free dessert option.
The Foundation: Our Irresistible Chocolate Cupcake Recipe
Every spectacular animal cupcake starts with a perfectly baked, moist, and flavorful base. Our chocolate fudge cupcake recipe is foolproof, ensuring a tender crumb and rich taste that complements any frosting and decoration. This recipe yields 24 cupcakes, making it ideal for sharing!
Equipment You’ll Need:
- Muffin pan
- Cupcake liners
- Large mixing bowl
- Whisk
- Measuring cups and spoons
Ingredients for the Chocolate Cupcakes (Yields 24):
- 3 large eggs
- 3/4 cup vegetable oil
- 3/4 cup full-fat sour cream (or full-fat vanilla Greek yogurt)
- 1 tablespoon vanilla extract
- 1/2 cup buttermilk (see note below for substitute)
- 1 (15.25-ounce) package chocolate fudge cake mix (uncooked)
- 1 (3.4-ounce) package chocolate instant pudding and pie filling (uncooked)
- 1 (16-ounce) container cream cheese frosting (or your favorite homemade frosting)
Instructions for the Chocolate Cupcakes:
- Preheat your oven to 350°F (175°C). Line a muffin pan with cupcake liners and set it aside.
- In a large bowl, briskly whisk the eggs for about 20 seconds.
- Add the vegetable oil, sour cream, vanilla extract, and buttermilk to the egg mixture. If you don’t have buttermilk, you can easily make a substitute: combine 1/2 cup milk with 1/2 tablespoon white vinegar in a separate cup and let it sit for 5 minutes before adding it to the mixture. Mix these wet ingredients until well combined.
- Carefully add both the uncooked chocolate fudge cake mix and the uncooked chocolate instant pudding mix to the wet ingredients. Stir gently until just combined. Be careful not to over-stir or beat in too much air, as this can affect the cupcake’s texture.
- Fill each cupcake liner about 3/4 full with batter.
- Bake for 17-20 minutes, or until a toothpick inserted into the center of a cupcake comes out clean.
- Remove the cupcakes from the oven and allow them to cool completely on a wire rack before frosting and decorating.
Recipe Notes for the Base Cupcakes:
Buttermilk Substitute: If you don’t have buttermilk on hand, easily create your own by mixing 1/2 cup of milk with 1/2 tablespoon of white vinegar (or lemon juice). Let the mixture sit for 5 minutes until it slightly curdles, then add it to your cupcake batter.
Storage: Store any leftover cupcakes in an airtight container at room temperature for up to 2 days, or in the refrigerator for up to 5 days. For the best texture and flavor, allow refrigerated cupcakes to come to room temperature before serving.
Nutrition Information (per serving – 1 cupcake)
Serving: 1 serving | Calories: 185kcal | Carbohydrates: 19g | Protein: 1g | Fat: 11g | Saturated Fat: 3g | Polyunsaturated Fat: 3g | Monounsaturated Fat: 3g | Cholesterol: 28mg | Sodium: 132mg | Potassium: 44mg | Fiber: 0.3g | Sugar: 12g | Vitamin A: 90IU | Vitamin C: 25mg | Calcium: 0.4mg
Nutrition information is automatically calculated and should only be used as an approximation.
Crafting Your Wild Wonders: Four Delightful Animal Designs
Now that you have your perfectly baked chocolate cupcakes, it’s time for the most exciting part: bringing these jungle animals to life! Below you’ll find detailed instructions for decorating each unique animal cupcake. Remember to use the cream cheese frosting (or your preferred homemade frosting) from the base recipe for frosting your cooled cupcakes.
1. Zebra Cupcakes: Striking Stripes of Sweetness
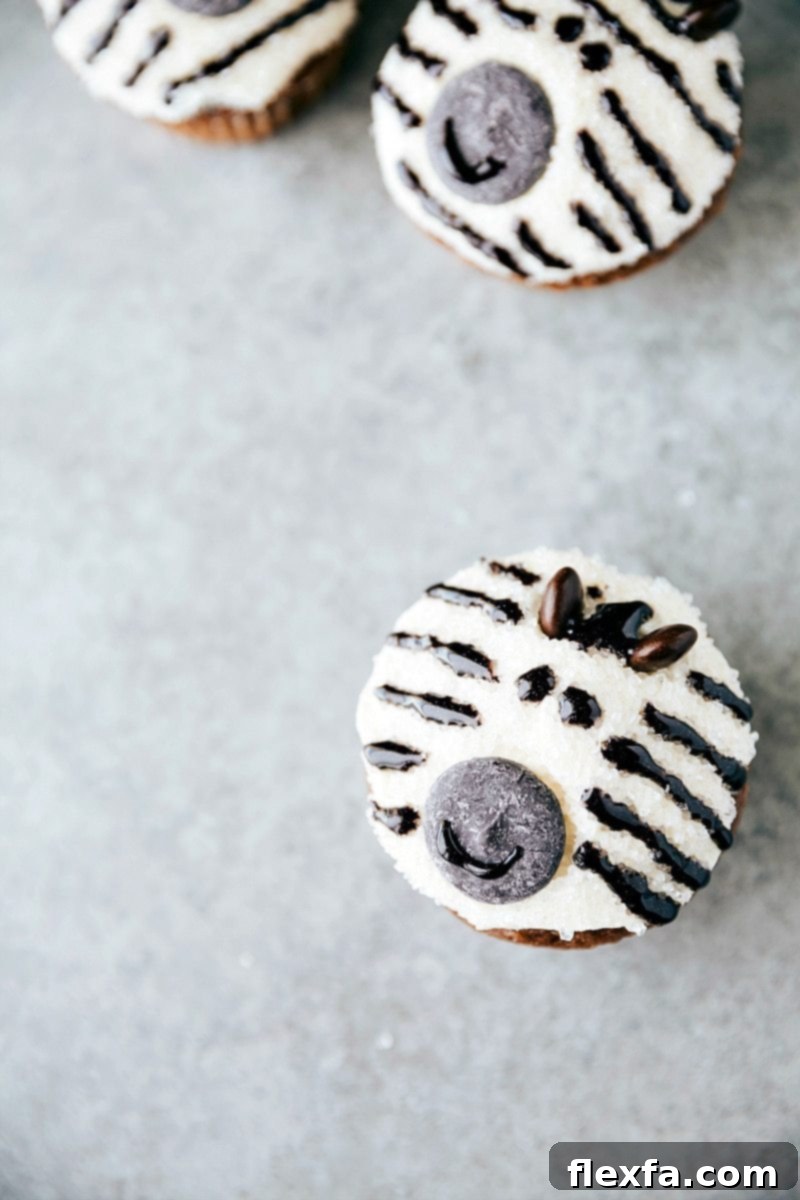
These majestic zebra cupcakes are a crowd-pleaser with their classic black and white stripes and adorable candy faces. They’re a personal favorite of many, combining chic design with delightful flavor. The crisp contrast of colors makes them visually stunning and perfectly capture the cool essence of a zebra.
Zebra Cupcake Decoration Ingredients:
- White sparkling sugar
- Black candy melts
- Brown M&M’s
- Black sparkle gel (or black decorating gel)
Step-by-Step Zebra Decoration:
- Once your chocolate cupcakes are completely cool, spread a smooth layer of cream cheese frosting over each one using a butterknife.
- Pour the white sparkling sugar into a shallow bowl. Gently dip the frosted cupcakes into the sugar, lightly pressing to ensure the entire frosted surface is coated in the sparkling white sprinkles.
- For the zebra’s face, frost the back of a black candy melt. Adhere this frosted side to the bottom half of the cupcake, positioning it as the snout.
- Carefully place two brown M&M’s on the top sides of the cupcake, above the candy melt, to create the zebra’s ears.
- Using the black sparkle gel, draw small lines between the M&M’s for a mane, create bold zebra stripes on the white sparkling sugar portion of the cupcake, and pipe two small dots for eyes and a curved line for a smile on the black candy melt face.
2. Monkey Cupcakes: Bananas for These Bites!
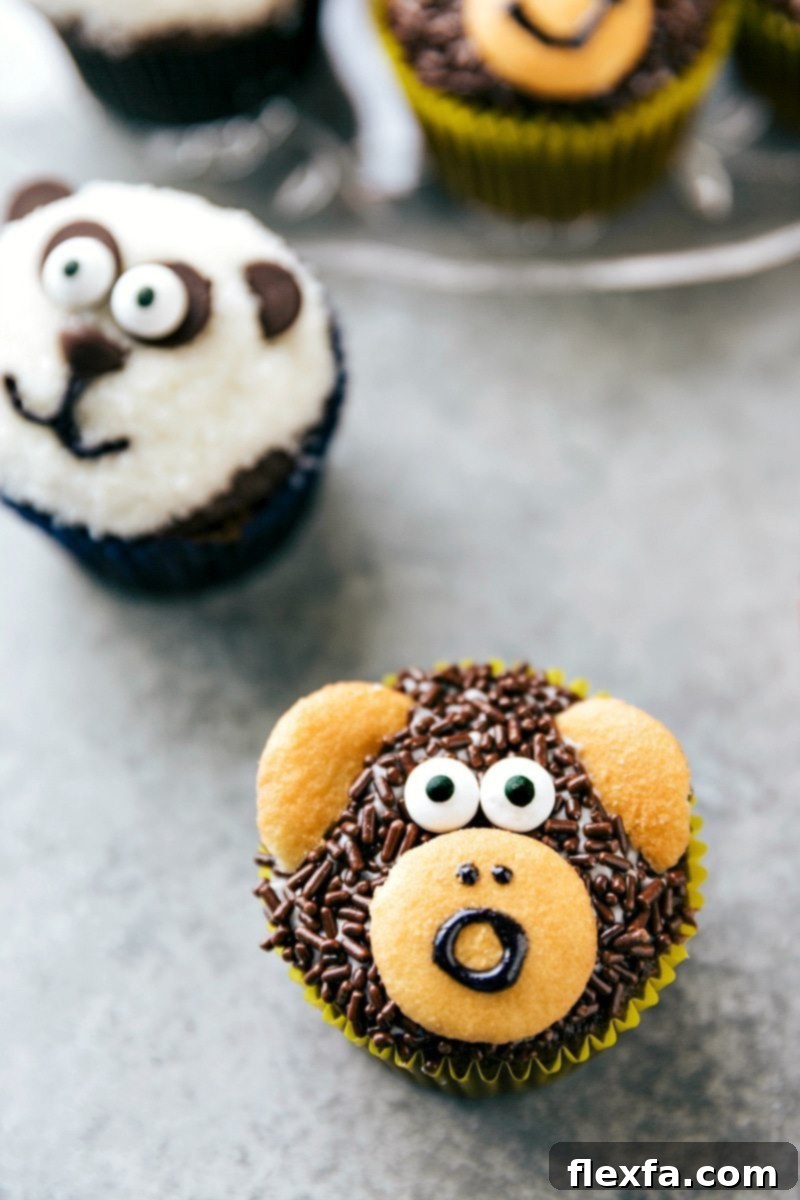
Inspired by incredible encounters with monkeys in places like Bali, these monkey cupcakes are undeniably cute and full of character. They’re a playful addition to any dessert table and are sure to bring smiles. My family absolutely adores these charming little guys!
Monkey Cupcake Decoration Ingredients:
- Chocolate jimmies sprinkles (brown sprinkles)
- 1 box mini vanilla wafers
- Edible candy eyeballs
- Black sparkle gel (or black decorating gel)
Step-by-Step Monkey Decoration:
- Frost your cooled chocolate cupcakes smoothly with the cream cheese frosting.
- Pour the chocolate jimmies sprinkles into a bowl. Dip the frosted cupcakes into the sprinkles, gently pressing to coat the entire frosted surface, creating the monkey’s furry texture.
- To make the monkey’s ears, take a mini vanilla wafer and use an extremely sharp knife to make a quick cut, creating two ear shapes. You might have a few “casualties,” so have extra wafers on hand! Gently stick these wafer ears into the sides of the sprinkle-coated cupcake.
- For the monkey’s mouth area, frost the back of one whole mini vanilla wafer and press it onto the lower half of the cupcake, between the ears.
- Attach the edible candy eyeballs just above the vanilla wafer face using a tiny dab of black sparkle gel.
- Finally, use the black sparkle gel to draw a small nose and a friendly smile on the vanilla wafer face, completing your monkey masterpiece.
3. Tiger Cupcakes: Roaringly Good Treats!
These vibrant tiger cupcakes were hands down the boys’ favorites, and it’s easy to see why! The bright orange color is absolutely captivating, making these fierce and fun treats irresistible. They perfectly capture the wild spirit of a tiger with bold stripes and playful features.
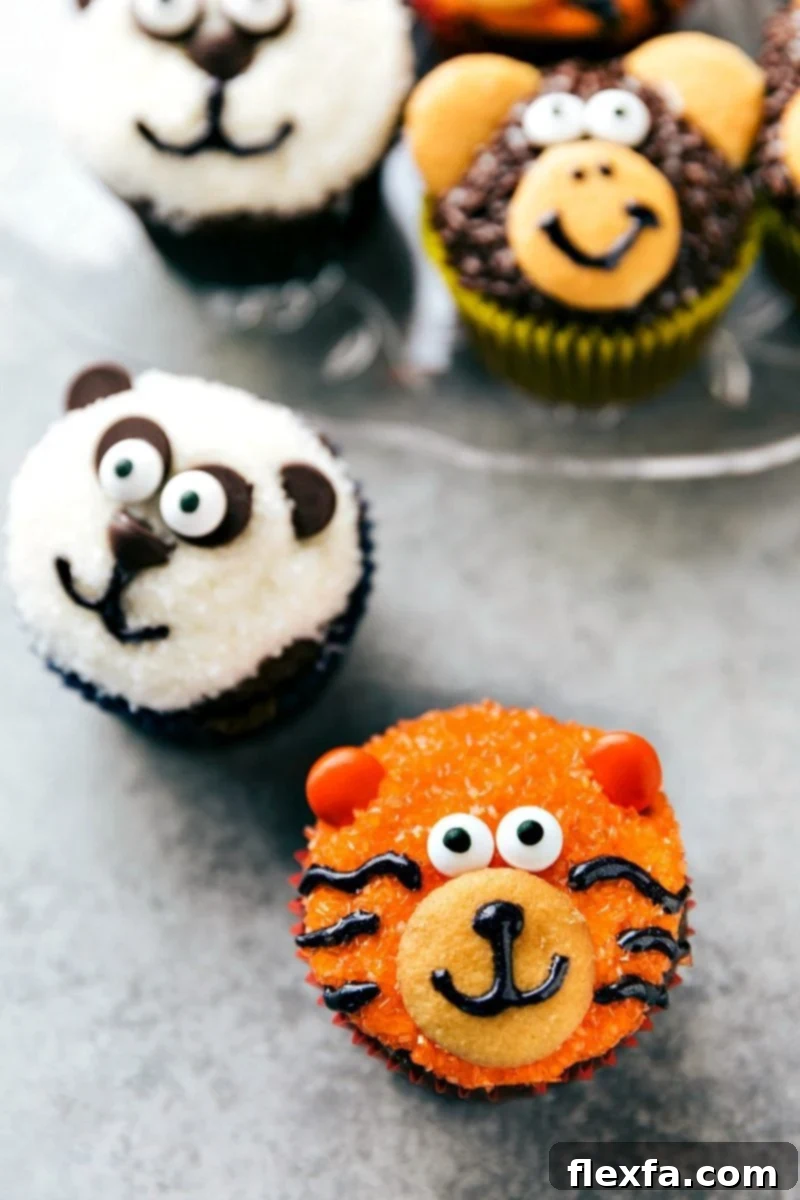
Tiger Cupcake Decoration Ingredients:
- Orange sparkling sugar
- 1 box mini vanilla wafers
- Edible candy eyeballs
- Orange M&M’s
- Black sparkle gel (or black decorating gel)
Step-by-Step Tiger Decoration:
- Frost your cooled chocolate cupcakes smoothly with the cream cheese frosting.
- Pour the orange sparkling sugar into a shallow bowl. Dip the frosted cupcakes into the sugar, gently pressing to coat the entire frosted surface with a vibrant orange hue.
- For the tiger’s snout, frost the back of a mini vanilla wafer and adhere it to the bottom half of the cupcake.
- Place two orange M&M’s on the top sides of the cupcake, above the vanilla wafer, to serve as the tiger’s ears.
- Using a small amount of black sparkle gel, adhere the edible candy eyeballs directly above the vanilla wafer face.
- Finally, use the black sparkle gel to pipe a small nose and a mouth onto the vanilla wafer. Add distinctive curvy stripes on either side of the wafer face to complete the tiger’s iconic look.
4. Panda Cupcakes: Cuteness Overload!
These panda cupcakes are pure cuteness, guaranteed to melt hearts! The secret to their adorable look lies in the perfect placement of chocolate chips for those distinctive panda features. After experimenting with various brands and flavors, Nestle dark chocolate chips proved to be ideal in both color and size, creating the sweetest panda faces.
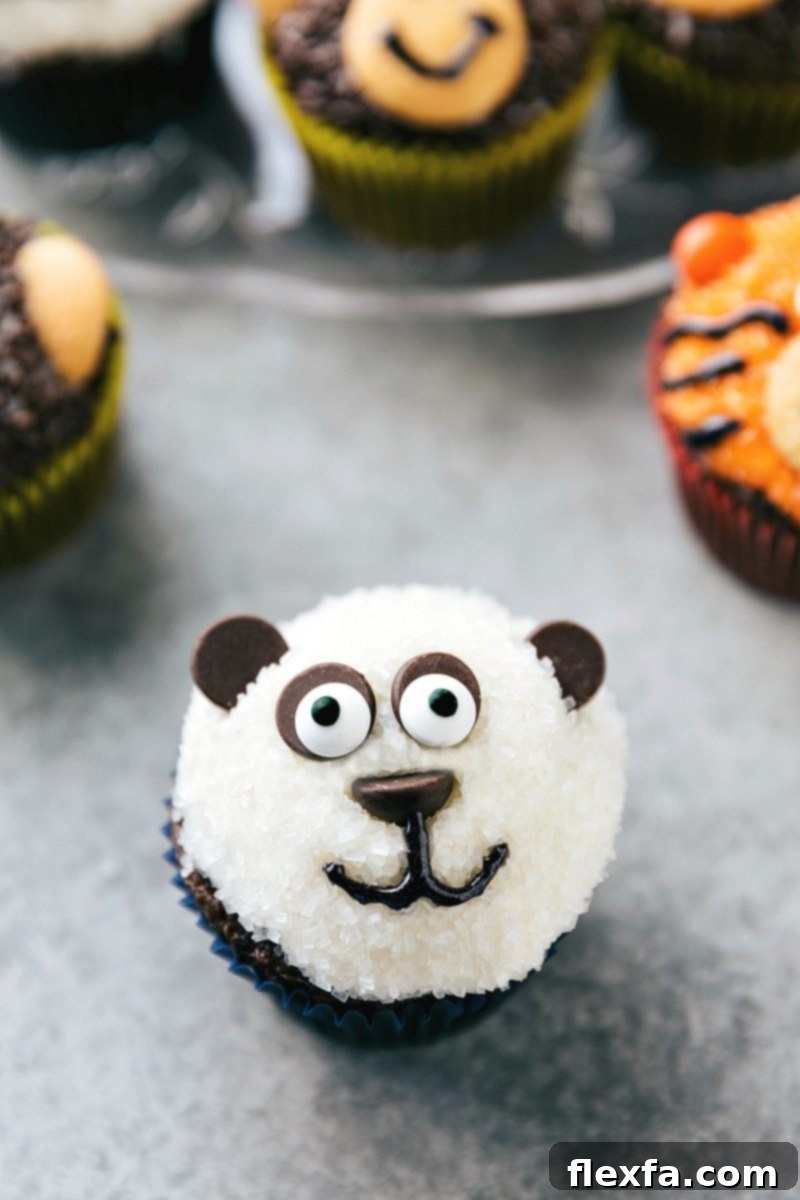
Panda Cupcake Decoration Ingredients:
- White sparkling sugar
- Edible candy eyeballs
- Dark chocolate chips (Nestle is recommended for best look)
- Black sparkle gel (or black decorating gel)
Step-by-Step Panda Decoration:
- Frost your cooled chocolate cupcakes smoothly with the cream cheese frosting.
- Pour the white sparkling sugar into a shallow bowl. Dip the frosted cupcakes into the sugar, gently pressing to coat the entire frosted surface, giving the panda its white fur.
- Press two dark chocolate chips onto the top sides of the cupcake for the panda’s ears.
- Add two more dark chocolate chips below the ears, pressing them lightly into the frosting to create the panda’s signature eye sockets. Then, press one chocolate chip on its side, below the eye sockets, to form the nose.
- Use a tiny dab of black sparkle gel to adhere the edible candy eyeballs into the chocolate chip eye sockets.
- Finally, pipe a small, sweet mouth directly below the chocolate chip nose using the black sparkle gel.
Tips for Perfect Animal Cupcake Creations
To ensure your animal cupcakes are not only adorable but also perfectly delicious, here are a few extra tips:
- Cool Completely: Always wait for your cupcakes to cool entirely before frosting. Warm cupcakes will melt the frosting, ruining your decorations.
- Even Frosting Layer: For the best base for sprinkles or decorations, apply an even, smooth layer of frosting. A small offset spatula or butter knife works wonders.
- Ingredient Sourcing: Most of the decorating ingredients can be found in the baking aisle of your local grocery store or online at retailers like Amazon. Check the links provided in each section for convenience.
- Pre-Assemble Small Pieces: For ears or facial features that require cutting (like the monkey’s ears), pre-cut them before you start decorating to streamline the process.
- Make-Ahead Options: You can bake the cupcakes a day in advance and store them in an airtight container. Frost and decorate closer to when you plan to serve them for the freshest look.
- Transporting Decorated Cupcakes: If transporting, use a cupcake carrier to prevent decorations from being smushed. Avoid stacking cupcakes once decorated, especially those with delicate features like the tiger and panda.
- Creative Variations: Don’t feel limited to these four animals! Use the techniques learned here to inspire your own creations. Think about other animals like foxes, bears, or even mythical creatures!
Unleash Your Inner Baker: Get Started Today!
With this comprehensive guide, creating these delightful and easy animal cupcakes is a breeze. Gather your ingredients, invite some friends or family to join the fun, and prepare to bring a touch of the wild jungle to your kitchen. These treats are guaranteed to be the highlight of any gathering and a joyous memory for anyone who helps make them. Happy baking!
Like this? Leave a comment below!