

The Ultimate Homemade Peppermint Bark Recipe: A Festive Chocolate Delight
Unwrap the magic of the holidays with the best Peppermint Bark recipe you’ll ever make. This seasonal favorite features a decadent blend of three distinct chocolates, elegantly layered and generously topped with perfectly crushed peppermint candies. It’s a treat that captures the essence of Christmas in every crisp, cool bite.
If you adore the refreshing minty crunch of peppermint, you’ll love exploring other festive treats like Peppermint Bark Pretzels, our delightful Peppermint Muddy Buddies, and irresistible Peppermint Bark Cookies!
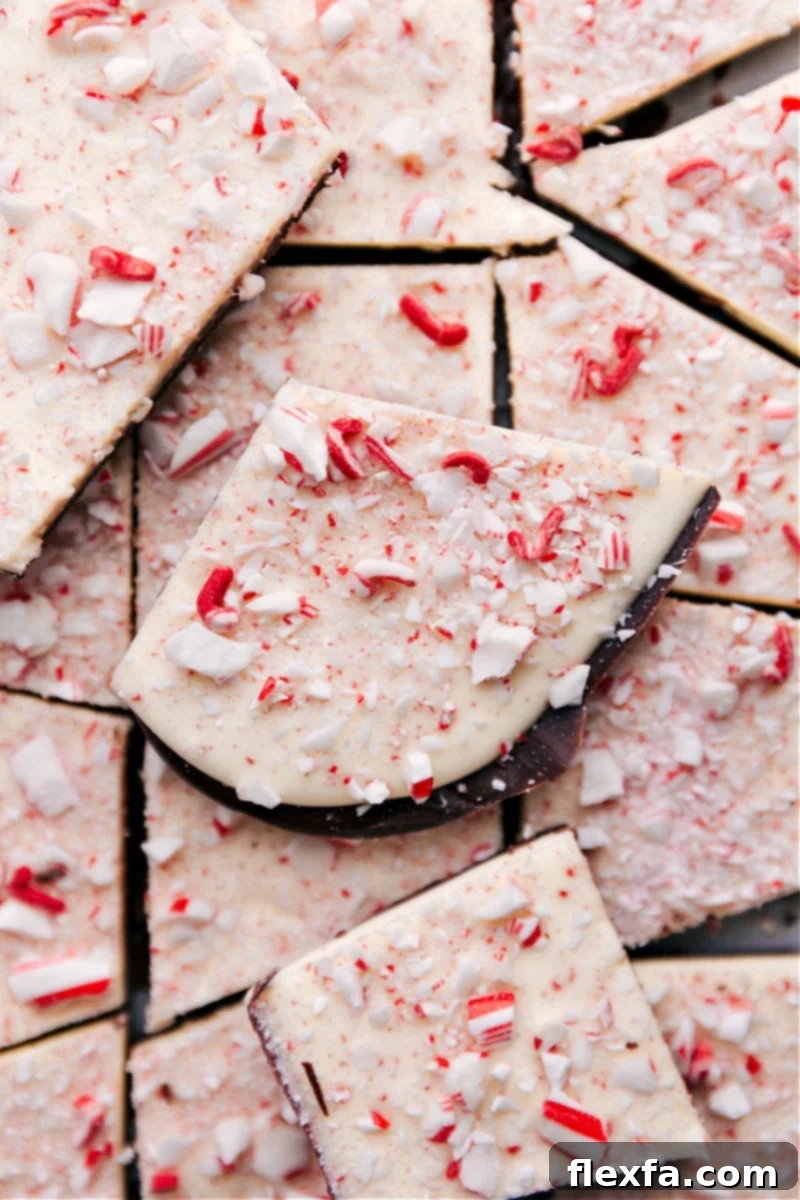
Why Homemade Peppermint Bark is Always Best
For many, the scent of fresh pine and baking spices signals the start of the holiday season. In my home, however, Christmas truly begins with the first batch of homemade Peppermint Bark. This quintessential holiday candy holds a special place in my heart, evoking cherished memories of joyful December days.
Growing up, my mother and I shared a passion for baking, filling our kitchen with the aroma of Carmelitas and 7 Layer Bars. Yet, despite our baking prowess, we often opted for store-bought peppermint bark, like the convenience of Ghirardelli®. It was a delicious shortcut, but something was always missing – the personal touch, the joy of crafting it from scratch.
In recent years, I’ve rediscovered the pleasure of candy making, sharing the experience with my own children. They’ve developed a fondness for crunchy Buttercrunch Candy, while I still gravitate towards rich Toffee. This renewed enthusiasm inspired us to finally ditch the pre-made versions and embark on our own peppermint bark journey. The result? A revelation!
Making peppermint bark at home offers unparalleled creative freedom. You can select premium chocolates, experiment with different cocoa percentages, and customize the intensity of the peppermint flavor. Plus, there’s a unique satisfaction in breaking off pieces exactly as big or small as you desire. The superior taste, texture, and personalized touch of homemade bark simply cannot be matched by anything from a bag or box. It’s an edible tradition worth starting.
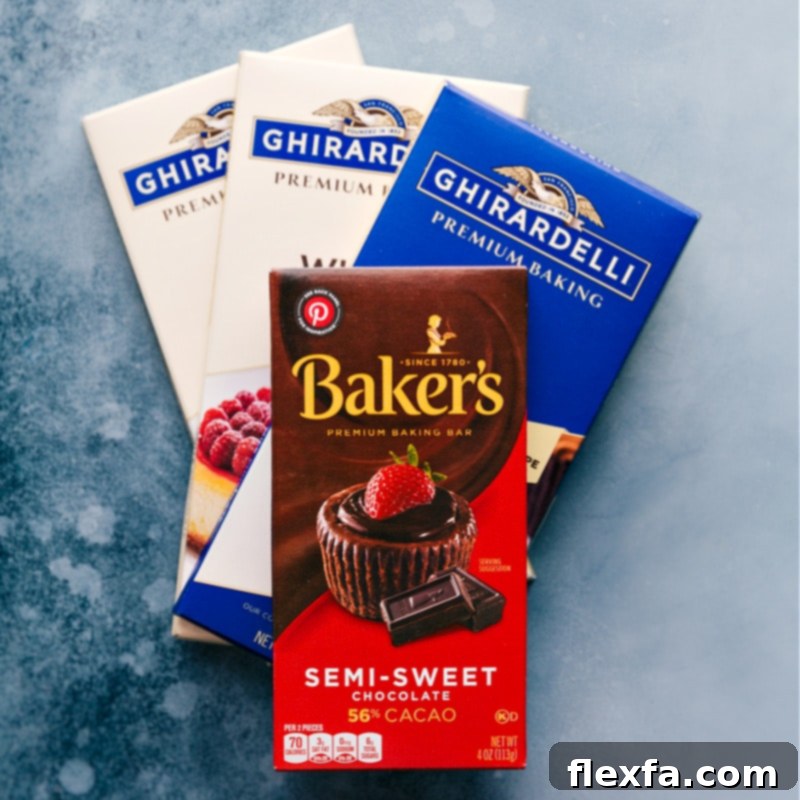
Essential Ingredients for Perfect Peppermint Bark
Crafting exquisite peppermint bark starts with high-quality ingredients. Each component plays a crucial role in achieving the desired flavor and texture:
- Candy Canes (or Hard Peppermint Candies): These provide the signature minty crunch and festive visual appeal. When crushing, use sturdy full-sized candy canes for the best results. Always double-bag them to prevent sharp pieces from tearing through the plastic. Aim for small, irregular chunks, not a fine powder, for optimal texture.
- High-Quality White Chocolate Baking Bar: This is the foundation of your top layer. Opt for baking bars (often found in the baking aisle with other chocolate bars) rather than chocolate chips or morsels. Baking bars contain less wax and stabilizers, allowing for a smoother, more even melt and a superior, non-streaky finish that adheres beautifully. Look for brands known for good quality chocolate.
- Premium Dark, Semi-Sweet, or Milk Chocolate Baking Bar: For the base layer, choose your favorite chocolate. Dark chocolate offers a sophisticated bitterness, semi-sweet provides a classic balance, and milk chocolate gives a sweeter, creamier profile. Again, baking bars are key for smooth melting and a stable bottom layer. It’s beneficial to reserve a small amount of unmelted chocolate to stir in after melting the majority, which helps to temper the chocolate slightly, resulting in a glossier finish and better snap.
- Vegetable or Coconut Oil: A small amount of neutral oil helps to achieve a perfectly smooth, fluid consistency for pouring and spreading the chocolate. It ensures your bark isn’t too thick or prone to cracking excessively.
- Pure Peppermint Extract: This amplifies the mint flavor in your white chocolate layer. Start with a smaller amount and taste test (if safe to do so) before adding more, as extract strengths can vary. It’s easier to add more than to remove it!

Expert Tips for Crushing Peppermint Candies
The perfect peppermint topping is crucial for genuine peppermint bark. Here’s how to achieve that satisfying crunch:
- Choose Your Candy: You can use classic candy canes or any hard peppermint candies. Both work wonderfully, but ensure they are unwrapped before crushing.
- Texture is Key: The goal is to create small, irregular chunks – not a fine powder and not large, sharp shards. Small chunks offer the best textural contrast against the smooth chocolate.
- Double Bag for Durability: Place the unwrapped candies into a heavy-duty freezer bag. For extra security and to prevent tears, slip that bag inside another identical bag. This dual-layer protection is vital as the sharp edges of crushing peppermint can easily puncture a single bag.
- Remove Air Before Crushing: Seal the bags, pressing out as much air as possible. This creates a more stable surface for crushing and reduces the chance of the bag bursting.
- Manual Crushing is Best: Use a rolling pin, a meat mallet, or even the bottom of a heavy pan to smash the candies. Apply firm, even pressure until you achieve your desired coarse crumb.
- Avoid Blenders or Food Processors: While tempting for speed, these appliances tend to pulverize candy into a fine powder, which doesn’t provide the same satisfying crunch as hand-crushed pieces. The texture will also be less visually appealing.
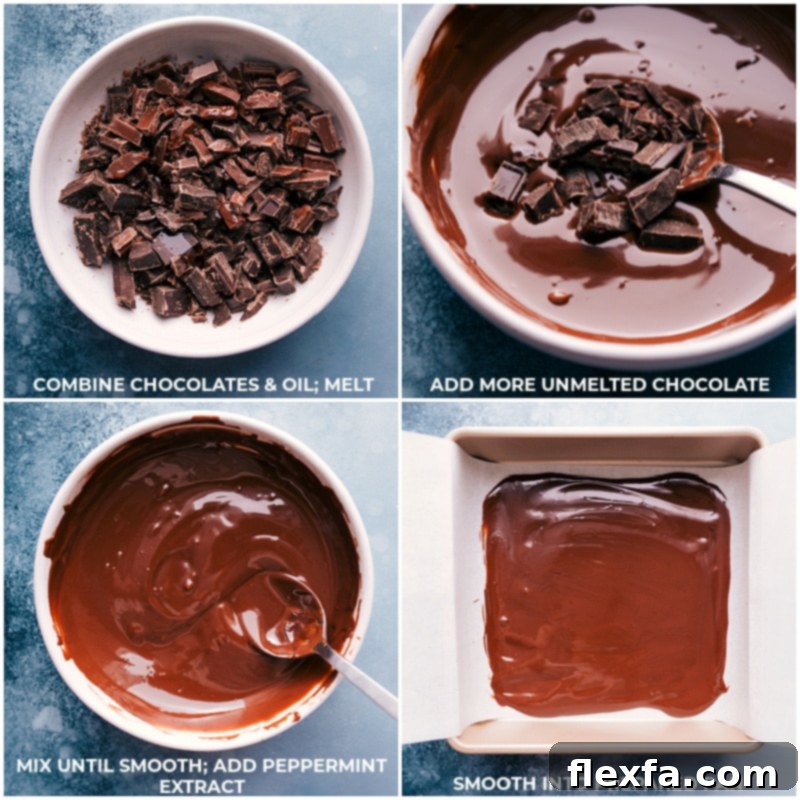
Step-by-Step Guide: Crafting Your Own Peppermint Bark
Follow these detailed instructions to create beautiful, delicious homemade peppermint bark:
- Prepare Your Peppermint: Begin by crushing your candy canes or hard peppermint candies into coarse, small pieces. Ensure they are unwrapped and double-bagged for mess-free crushing with a rolling pin or meat mallet. Set aside the crushed peppermint.
- Prepare Your Pan: Line an 8×8 or 9×9-inch baking pan with parchment paper, leaving a generous overhang on two sides. This overhang will serve as handles, making it easy to lift the hardened bark from the pan later. Set the prepared pan aside.
- Chop Your Chocolate: Coarsely chop the semi-sweet (or dark/milk) chocolate and the white chocolate into small, uniform pieces. Smaller pieces melt more evenly.
- Melt the Dark/Semi-Sweet Chocolate Base: Place all but 2 tablespoons of your chopped semi-sweet or milk chocolate into a large, microwave-safe bowl. Add 1/2 teaspoon of vegetable or coconut oil. Microwave in 15-second intervals, stirring vigorously for 15 seconds after each interval. Continue this process until the chocolate is mostly melted and smooth. Crucially, avoid overheating the chocolate; it should be just warm enough to melt, not hot. Once mostly melted, stir in the reserved 2 tablespoons of unmelted chocolate until it fully melts and incorporates, creating a beautifully glossy finish. Stir in the peppermint extract.
- Form the First Layer: Pour the melted dark/semi-sweet chocolate mixture into your prepared pan. Using an offset spatula or the back of a spoon, gently spread it into an even layer, ensuring it covers the entire bottom of the pan. Do not refrigerate this layer; let it set at room temperature. This gradual setting helps prevent streaks and separation.
- Melt the White Chocolate Layer: In a separate large, microwave-safe bowl, combine all but 2 tablespoons of the chopped white chocolate with the remaining 1/2 teaspoon of vegetable or coconut oil. Follow the same melting procedure as with the dark chocolate: 15-second microwave bursts, stirring for 15 seconds in between, until mostly melted. Then, stir in the reserved 2 tablespoons of unmelted white chocolate until smooth and glossy.
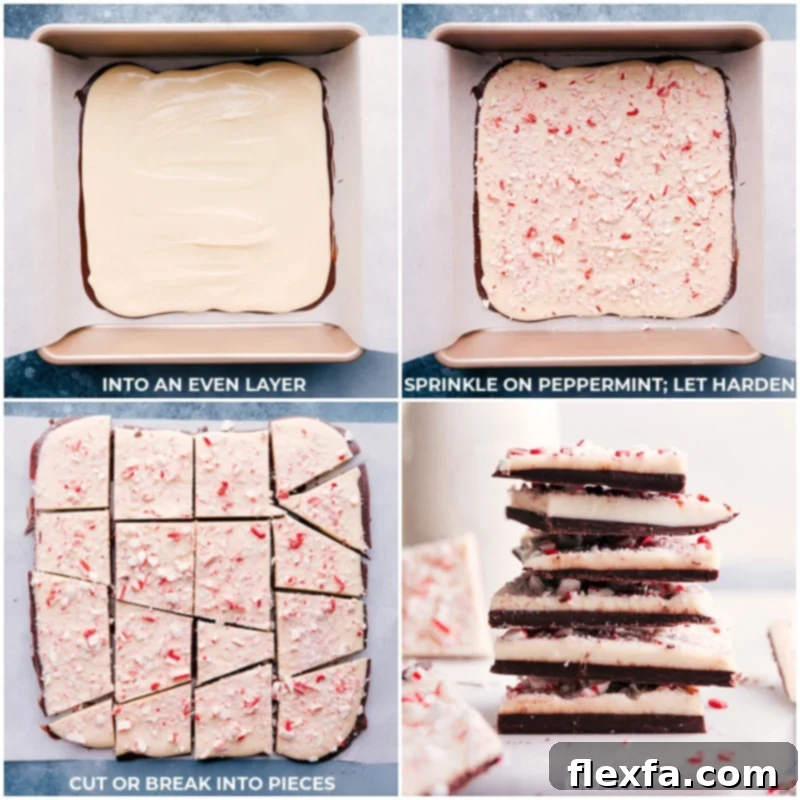
- Layer and Decorate: Once the white chocolate is perfectly melted and smooth, drizzle it evenly over the set (but not fully hardened) dark chocolate layer in the pan. Carefully and slowly spread the white chocolate into an even layer using the back of a spoon, taking care not to swirl or mix the two chocolate layers together. Immediately and generously sprinkle the crushed candy canes over the entire white chocolate surface. You can add as much or as little as you prefer for a vibrant, minty finish.
- Allow to Set Completely: Leave the peppermint bark to set undisturbed at room temperature for approximately 3-5 hours, or until it is completely firm and hard to the touch. Avoid the temptation to refrigerate it, as rapid cooling can lead to streaky chocolate and layers that separate easily.
- Break or Cut and Enjoy: Once fully hardened, use the parchment paper overhang to lift the bark from the pan. Place it on a cutting board. You can either break it into rustic, irregular chunks (which is part of its charm!) or, for neater pieces, refer to our FAQ section below for tips on cutting. Serve and enjoy this festive, homemade treat!
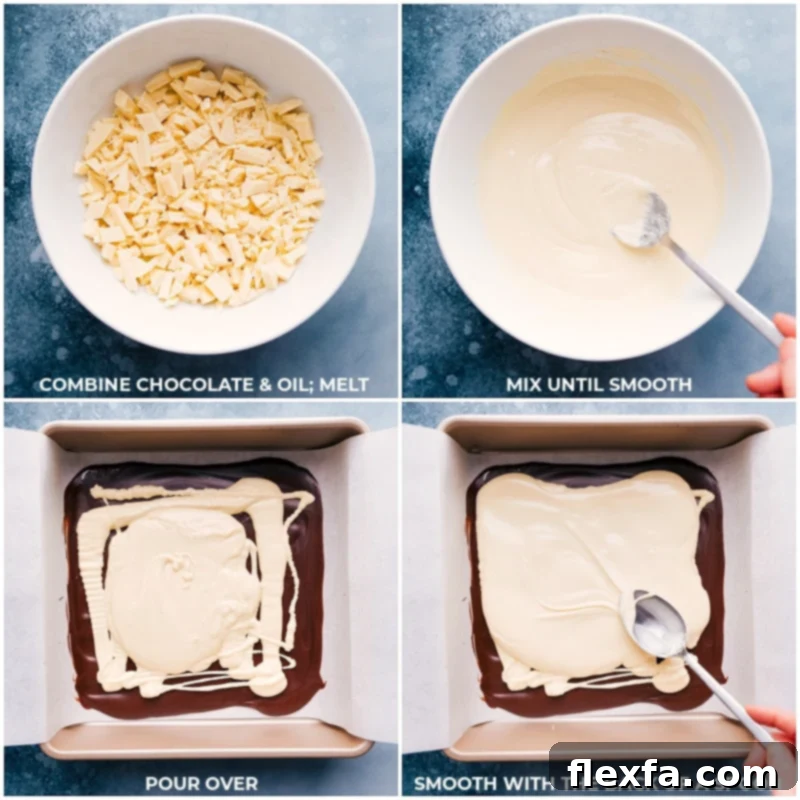
Essential Tips for Flawless Peppermint Bark
Achieving perfectly smooth, glossy, and well-set peppermint bark requires a bit of patience and a few key techniques:
- The Art of Melting Chocolate (Simplified Tempering): To achieve a beautiful, streak-free shine and a satisfying snap, melt your chocolate slowly. Microwave-safe glass or ceramic bowls are ideal; avoid plastic or melamine, which can retain heat unevenly. Heat the chocolate in short, 15-second bursts, stirring thoroughly for 15 seconds after each burst. This gradual heating prevents burning and ensures the cocoa butter melts uniformly. A crucial step is to melt most of the chocolate, then stir in a small amount (about 2 tablespoons) of unmelted, finely chopped chocolate. This cools down the melted chocolate slightly and helps to stabilize it, a technique known as “seeding” that mimics tempering. It results in a smoother texture that sets firmer at room temperature and is less prone to melting in your hands.
- Preventing Overheating: Chocolate continues to melt from residual heat even after it’s removed from the microwave. Always err on the side of caution. If it looks almost melted, stop microwaving and rely on stirring to finish the job. Overheated chocolate can seize (become thick and clumpy) or develop a dull, streaky appearance.
- The Right Tools: Use strong, microwave-safe bowls for melting. A heat-resistant rubber spatula is perfect for stirring and spreading the chocolate smoothly.
- Patience is a Virtue (Room Temperature Setting): Resist the urge to rush the setting process by placing the bark in the refrigerator or freezer. Rapid temperature changes can cause the chocolate to bloom (develop white streaks or spots) or lead to separation of the layers. Allow the bark to set naturally at a cool room temperature (around 68-72°F or 20-22°C) for the best results.
- Working Quickly with Layers: While you shouldn’t refrigerate, it’s important to pour the second chocolate layer once the first layer has *just* set enough to hold its shape (about 15-30 minutes, depending on room temperature). If you wait too long, the first layer might fully harden and cool, preventing the second layer from properly adhering and increasing the risk of separation when broken.
Quick Tip for Glossy Chocolate
Melting chocolate slowly and stirring often prevents unsightly streaks by keeping the cocoa butter perfectly emulsified. Incorporating a small amount of unmelted chocolate at the final stage helps to cool and stabilize it, ensuring a beautiful, glossy finish and a firm set at room temperature that won’t easily melt on your fingertips.
Peppermint Bark Frequently Asked Questions
While it’s tempting to use the fridge to speed things up, we strongly advise against it. Rapid cooling can cause the chocolate to cool unevenly, often leading to a streaky appearance on the surface (known as “bloom”) and making the layers more prone to separating when you break or cut the bark. Patience is key for a beautiful, stable bark.
For neat, clean cuts instead of rustic broken pieces, a simple trick is to use a large, sharp chef’s knife. Before each cut, heat the knife blade under very hot running water, then quickly wipe it completely dry with a kitchen towel. Make a swift, firm downward cut through the bark. The warm, dry blade will melt through the chocolate cleanly. Repeat this process for every cut you make to maintain sharp edges.
Layer separation is a common issue, but it’s easily avoided with these tips:
- Choose Quality Chocolate: Avoid chocolate chips or baking morsels that often contain stabilizers (like palm oil) designed to help them hold their shape during baking. These stabilizers can prevent the layers from properly bonding. Always opt for high-quality baking bars that melt smoothly.
- Timing is Everything: Pour your second chocolate layer as soon as the first layer has set *just enough* to be firm to the touch but is still slightly cool. If the first layer cools down too much, the two layers won’t adhere properly.
- Full Setting Time: Ensure the entire bark has set fully at room temperature before attempting to break or cut it. The longer it sets, the stronger the bond between layers will be.
- Room Temperature Breaking/Cutting: Do not break or cut the bark when it’s cold. If the bark is too chilled, the layers can become brittle and separate more easily. Allow it to come to a full room temperature before handling.
- No Refrigeration/Chilling: As mentioned, refrigeration or chilling can contribute significantly to layer separation. Stick to room temperature setting.
Absolutely! While candy canes are traditional, you can use other peppermint candies. Some people enjoy using soft peppermints for a different texture, or even a mix of larger and smaller crushed pieces for visual interest. Just ensure they are pure peppermint and not a chewy or gummy candy.
Chocolate seizes when it comes into contact with even a tiny amount of water or when overheated. If your chocolate becomes thick, lumpy, and unworkable, it has seized. Unfortunately, it’s very difficult to rescue seized chocolate for bark. Prevention is key: ensure all your tools and bowls are completely dry, and melt chocolate slowly and carefully as described in the tips section.
Peppermint Bark Storage Guidelines
Storing Your Homemade Peppermint Bark
To preserve its fresh taste, crisp texture, and vibrant appearance, homemade Peppermint Bark is best enjoyed within two weeks of preparation. Store it in a completely airtight container to protect it from moisture and odors. Keep the container in a cool, dark place at room temperature, such as a pantry or cupboard. There is absolutely no need to refrigerate peppermint bark; in fact, chilling can negatively affect its texture and appearance.
More Festive Christmas Treats to Explore
Looking for more delightful holiday recipes to share with family and friends? Here are some other festive favorites perfect for your Christmas celebrations:
- Christmas Snack Mix: A fun, salty-sweet mix adorned with classic red and green M&M’s, perfect for munching during holiday movies.
- Christmas Oreo Pops: Discover four creative and easy ideas to transform simple Oreo cookies into charming, edible holiday decorations on a stick.
- 3 Ingredient Christmas Cookies: For when you need a quick yet impressive treat, these super simple cookies are a lifesaver.
- 6 Easy Christmas Gifts: Whip up thoughtful homemade gifts in no time, complete with free printable tags to make your presents extra special.
- Santa Cookies: Adorable, festive cookies decorated with red and green M&M’s that are sure to bring smiles to everyone’s faces.

Print Recipe
Peppermint Bark Recipe
By Chelsea Lords
This Peppermint Bark is holiday perfection—three luxurious layers of chocolate topped with vibrant crushed peppermint. Simple, festive, and utterly irresistible!
Equipment
- 8 x 8-inch baking pan (or 9 x 9-inch)
- Parchment paper
- Microwave-safe bowls
- Rubber spatula
- Rolling pin or meat mallet
Ingredients
- 2 to 3 full-sized candy canes (about 1/3 cup when crushed)
- 8 ounces white chocolate baking bar (see note 1 for best results)
- 4 ounces semi-sweet chocolate baking bar
- 2 ounces milk chocolate (or additional semi-sweet or dark chocolate)
- 1 teaspoon vegetable oil (or coconut oil, divided)
- 1/4 up to 1/2 teaspoon pure peppermint extract (adjust to taste)
Instructions
- Add unwrapped candy canes to a large, heavy-duty plastic bag. For extra security, place this bag inside another one, as peppermint can tear through plastic. Seal the bag, pressing out as much air as possible, and crush with a rolling pin or meat mallet until coarse crumbs are formed. Set aside.
- Line an 8×8 or 9×9-inch baking pan with parchment paper, ensuring there’s an overhang on two sides for easy removal later. Set aside. Coarsely chop the white, semi-sweet, and milk chocolate into small, uniform pieces. Tip: Be patient when melting chocolate and avoid rapid temperature changes (do not microwave too long or excessively, stir too much, or refrigerate/freeze layers of finished bark).
- Combine all but 2 tablespoons of the chopped semi-sweet and milk chocolate in a large microwave-safe bowl. Add 1/2 teaspoon of oil. Microwave for 15 seconds, then stir vigorously for 15 seconds. Continue this process, microwaving and stirring, until the chocolate is mostly melted and smooth. The chocolate should be warm enough to melt gradually, but not hot. Once mostly melted, stir in the reserved 2 tablespoons of chocolate until it completely melts and the mixture is smooth and glossy. If necessary, microwave in very short 5-second bursts only if the chocolate is not melting after prolonged stirring.
- Once the dark chocolate is fully melted and smooth, pour in the peppermint extract (use 1/2 teaspoon for a stronger peppermint flavor) and mix well to combine. Pour this chocolate mixture into the prepared pan and spread it into an even layer using a spatula or the back of a spoon. Do not refrigerate. Allow it to set at room temperature.
- In a separate large microwave-safe bowl, combine all but 2 tablespoons of the chopped white chocolate with the remaining 1/2 teaspoon of oil. Follow the same melting directions as outlined in step 3. Once mostly melted, add the reserved 2 tablespoons of white chocolate and stir until completely smooth and glossy.
- Once the white chocolate is smooth, drizzle it evenly on top of the dark chocolate base layer (which should be set but still slightly cool). Carefully and slowly smooth the white chocolate into an even layer with the back of a spoon, being very careful not to swirl the two layers together. Immediately sprinkle the crushed candy canes generously on top (add as much or as little as you’d like for visual appeal and flavor).
- Set aside at room temperature (not in the fridge) until the bark is completely hardened and firm, which usually takes about 3–5 hours.
- Once fully hardened, use the parchment paper overhang to gently remove the bark from the pan. Place it on a clean surface. Break it into rustic, irregular pieces or cut it into neat squares (refer to note 3 in Recipe Notes for cutting tips). Enjoy your festive homemade peppermint bark!
Recipe Notes
Note 1: Choosing Your Chocolate: For peppermint bark that doesn’t separate, streak, discolor, or become crumbly, always opt for high-quality chocolate baking bars. Chocolate chips or baking morsels often contain stabilizers (like palm oil or soy lecithin) that prevent them from melting completely smooth and can interfere with proper layer adhesion, leading to separation when the bark is broken or cut. Investing in good quality chocolate bars makes a significant difference in both appearance and texture.
Note 2: The Importance of Slow Melting: Melting chocolate slowly and stirring frequently is crucial. This gentle process prevents the cocoa butter from separating, which can cause streaks and a dull finish. Adding a small amount of unmelted chocolate at the end of the melting process helps to cool and stabilize the melted chocolate. This aids in achieving a smooth, glossy finish that sets firmly at room temperature and is more resistant to melting from the warmth of your fingers.
Note 3: How to Cut Peppermint Bark: If you prefer clean-cut pieces over rustic broken chunks, use a large, sharp chef’s knife. To ensure a smooth cut, run the knife under very hot water, then thoroughly dry it with a kitchen towel before making each cut. The warm, dry blade will slice through the chocolate cleanly. Repeat this heating and drying process for every single cut to maintain precision.
Storage: When properly stored, this homemade peppermint bark is best enjoyed within 2 weeks. Keep it in a tightly sealed, airtight container in a cool, dark place at room temperature. It does not need to be refrigerated; in fact, refrigeration can negatively impact its texture and appearance.
Nutrition Information
Serving: 1 piece | Calories: 155kcal | Carbohydrates: 19g | Protein: 1g | Fat: 9g | Saturated Fat: 5g | Polyunsaturated Fat: 1g | Monounsaturated Fat: 3g | Trans Fat: 1g | Cholesterol: 3mg | Sodium: 14mg | Potassium: 91mg | Fiber: 1g | Sugar: 16g | Vitamin A: 8IU | Vitamin C: 1mg | Calcium: 33mg | Iron: 1mg
Nutrition information is automatically calculated and should only be used as an approximation.
Like this? Leave a comment below!