
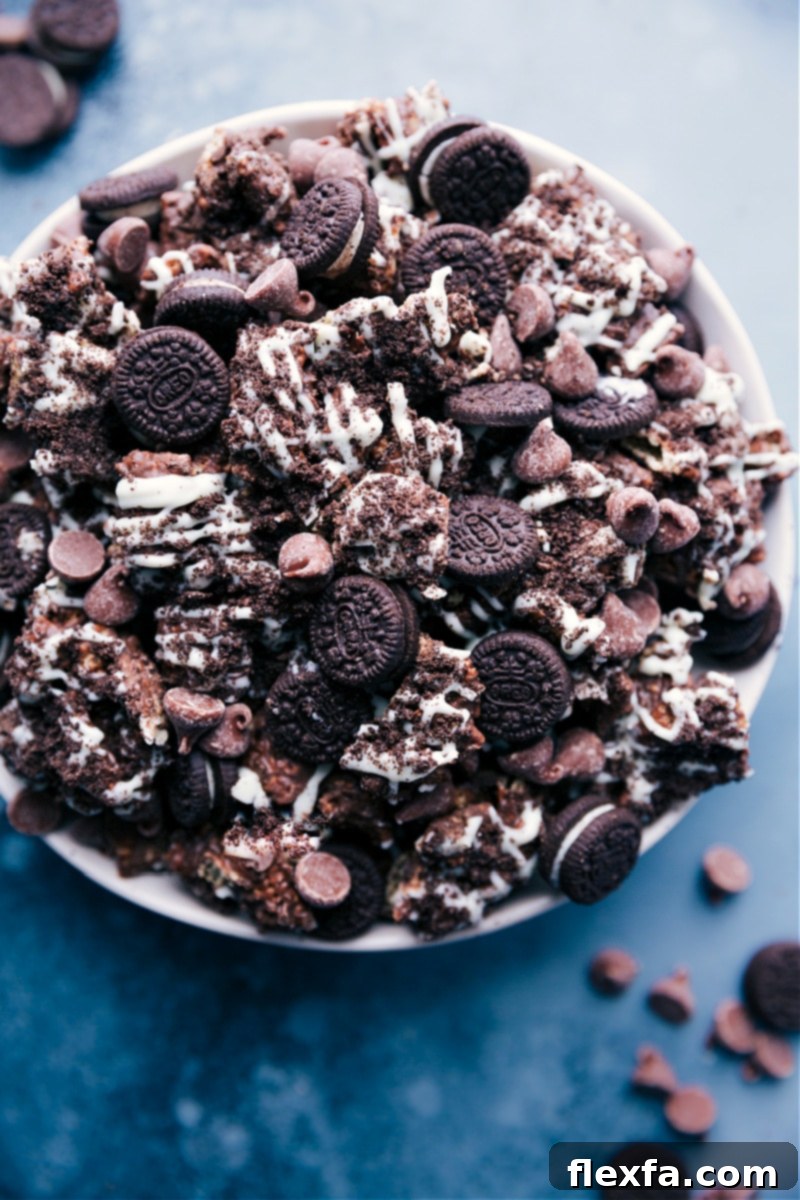
Irresistible Cookies and Cream Muddy Buddies: The Ultimate No-Bake Oreo Snack Mix
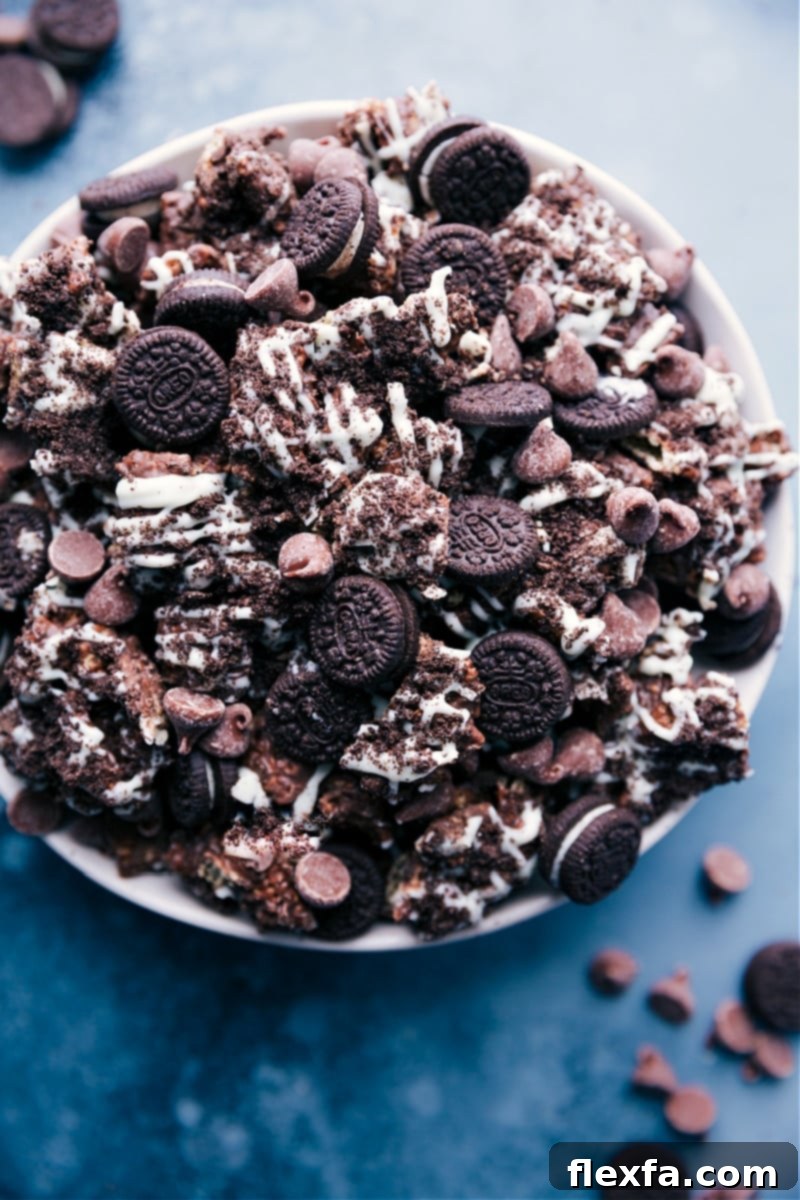
Get ready to transform your snacking experience with these **Cookies and Cream Muddy Buddies**! This phenomenal no-bake treat brings together the beloved flavor of America’s favorite cookie—Oreos—with a delightful crunch and rich chocolatey goodness. Imagine eating handfuls of crispy cereal coated in luscious chocolate, sprinkled with crushed Oreos, and drizzled with creamy white chocolate. It’s an instant classic, delivering that iconic cookies-and-cream taste in every single bite.

Author’s Insight
Cookies and Cream Muddy Buddies: A Game-Changer!
For years, traditional Puppy Chow (also known as Muddy Buddies) has been a go-to snack, but one question always popped up: “What if I can’t use peanut butter?” or “How can I make this nut-free?” I understand completely! Growing up, my brother’s severe peanut allergy meant we missed out on this popular treat. (Rest assured, I more than made up for it in college, haha!)
But now, I have the perfect solution—and honestly, it might be even better than the original! These Cookies and Cream Muddy Buddies are unbelievably delicious and completely nut-free. Our family can’t get enough of them! They are wonderfully sweet, incredibly crunchy, and boast that unmistakable, classic Oreo flavor that everyone adores. They’re quickly becoming a new household favorite!
Why You’ll Fall in Love with These Oreo Muddy Buddies
If you’re searching for an easy, delightful, and crowd-pleasing dessert, look no further! These Cookies and Cream Muddy Buddies offer so many reasons to become your new favorite:
- Effortlessly Delicious: This is a no-bake recipe, meaning minimal fuss and maximum flavor. It’s perfect for beginner bakers or anyone looking for a quick treat.
- Nut-Free & Allergy-Friendly: A fantastic alternative for those with peanut allergies, allowing everyone to enjoy this classic snack mix without worry.
- Iconic Flavor Profile: The combination of rich chocolate, creamy white chocolate, and genuine Oreo cookie crumbs creates a taste sensation that’s both familiar and exciting.
- Perfect for Any Occasion: Whether you need a party snack, a movie night treat, a school event contribution, or just a simple indulgence, these muddy buddies fit the bill.
- Highly Customizable: While perfect as is, this recipe provides a wonderful base for creative additions and variations to suit any preference.
- Satisfying Crunch: The crisp Rice Chex cereal provides an incredibly satisfying texture, making each bite addictive.
Mastering the Chocolate for Perfect Muddy Buddies
The quality and handling of your chocolate are key to achieving the perfect Cookies and Cream Muddy Buddies. Here are some essential tips for working with chocolate:
- Choose Quality Chocolate Chips: Not all chocolate chips are created equal. Opt for high-quality brands like Ghirardelli or Guittard. These brands contain better ingredients and melt more smoothly, resulting in a superior flavor and texture for your snack mix. Cheaper chocolates can sometimes seize or become grainy when melted.
- Melt Chocolate Slowly and Carefully: Melting chocolate requires patience. Use a strong, microwave-safe glass bowl (avoid plastic, which can retain heat unevenly and cause scorching). Microwave in short bursts (20-30 seconds), stirring thoroughly after each interval. This gradual approach prevents the chocolate from overheating, burning, or becoming clumpy, ensuring a silky-smooth coating.
- Adjust Sweetness Levels: If you prefer a less sweet treat, consider using semi-sweet or dark chocolate chips instead of milk chocolate. You can also reduce or omit the optional extra chocolate chips and mini Oreos on top to further cut down on sweetness.
- White Chocolate Hardens Quickly: White chocolate has a different composition than milk or dark chocolate, and it tends to set much faster. Once melted, work quickly to drizzle it over your cereal and immediately add any desired toppings. Gentle pressing will help them adhere before the white chocolate fully hardens.
Expert Tips for Crafting Your Cookies and Cream Muddy Buddies
Achieving the ideal texture and flavor for your Cookies and Cream Muddy Buddies is simple with these helpful tips:
- Perfecting the Oreo Crumbs: For the finest crumbs, use a high-powered blender or a food processor. Simply add whole Oreos (no need to remove the cream filling – that’s where the magic happens!) and pulse until you have fine, consistent crumbs. If you don’t have a blender, place the cookies in a sturdy plastic bag, press out the air, seal it, and crush them with a rolling pin or a heavy object until finely ground.
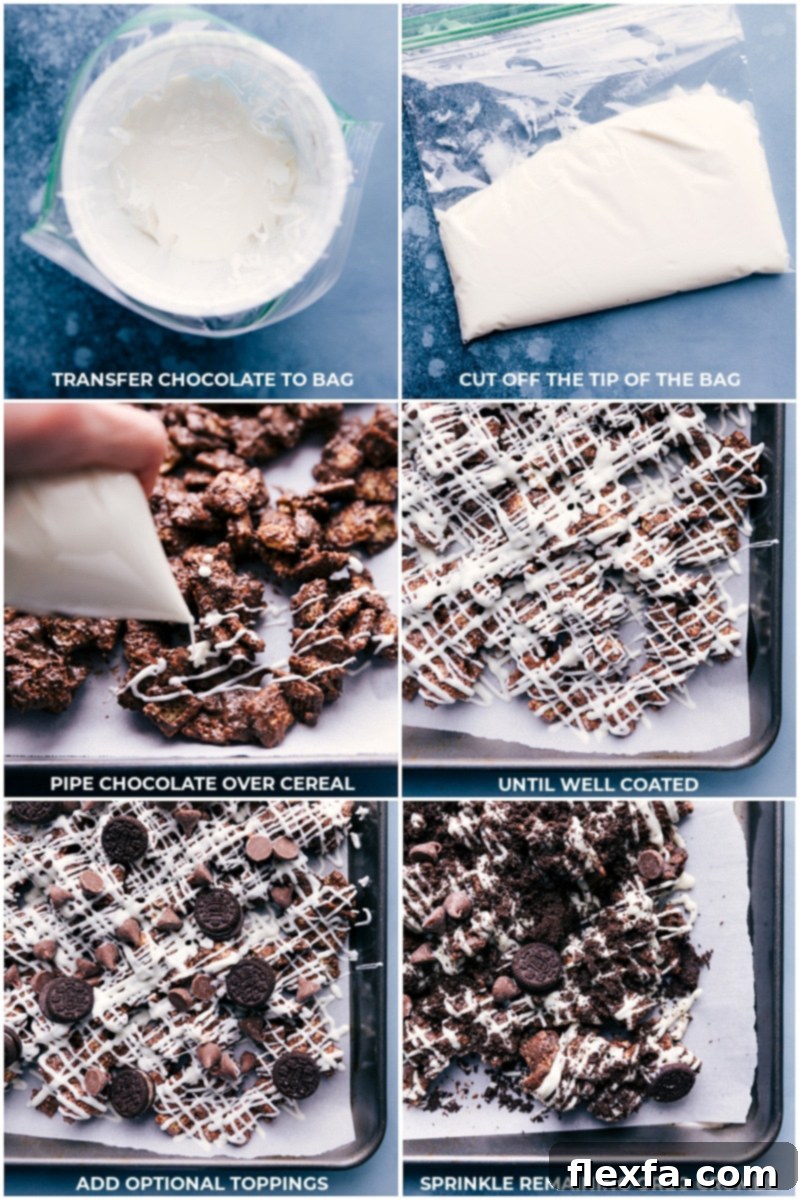
- Easy Drizzling with No Special Tools: You don’t need a professional piping bag for the white chocolate drizzle. A simple sandwich-sized plastic bag works perfectly! Just spoon the melted white chocolate into one corner of the bag, twist the top to seal, and snip off a tiny bit of the corner with scissors. This creates a makeshift piping bag for easy, controlled drizzling.
- Prepare Your Workspace: Before you start mixing, ensure your large sheet pan (or two smaller ones) is lined with parchment paper, a Silpat® mat, or aluminum foil. This crucial step prevents the sticky snack mix from adhering to the pan, making cleanup a breeze and ensuring easy breaking apart once it’s set.
Quick Drizzling Trick
For easy white chocolate drizzling, grab a sturdy sandwich-sized plastic bag and place it in a tall cup, folding the top edges of the bag over the rim of the cup. This creates a stable holder for filling. Spoon the melted white chocolate into the bag. Once filled, remove the bag from the cup, squeeze out any excess air, and seal the bag. Guide the melted chocolate into one of the bottom corners of the bag and snip off a small tip from that corner. Now, you can gently squeeze to drizzle the chocolate beautifully and evenly over your muddy buddies.
Enhancing Your Muddy Buddies with Optional Toppings
While the Cookies and Cream Muddy Buddies are absolutely incredible on their own, the addition of toppings can elevate them even further, adding extra texture and visual appeal. The mini Oreos and extra chocolate chips truly enhance the “cookies and cream” experience, but remember, they are entirely optional and can be customized to your liking.
- Timing is Everything: If you decide to add optional toppings, be sure to sprinkle them on immediately after drizzling the white chocolate. White chocolate sets very quickly, so working swiftly ensures that the toppings adhere properly before it hardens. Press them in gently to secure.
- Mini vs. Regular Chocolate Chips: For a more integrated and less intrusive chocolate burst, mini chocolate chips are an excellent choice. However, regular-sized milk chocolate chips work just as well if that’s what you have on hand or prefer a bolder chocolate accent.
- Embrace Mini Oreos: Mini Oreos are my personal favorite for this recipe, adding a delightful crunch and concentrated Oreo flavor. If you only have regular Oreos, simply chop them into smaller, bite-sized pieces to distribute them evenly throughout the mix.
- Other Topping Ideas: Feel free to get creative! Consider adding sprinkles for a festive touch, or a sprinkle of flaky sea salt to balance the sweetness.
Serving & Storage Suggestions for Your Muddy Buddies
Once your Cookies and Cream Muddy Buddies have set, break them into bite-sized clusters and they’re ready to enjoy! This snack mix is perfect for:
- Parties & Gatherings: Serve them in a large bowl, and watch them disappear!
- Movie Nights: A delicious upgrade from popcorn.
- Lunchbox Treats: Pack a small portion for a special midday snack.
- Homemade Gifts: Bag them up with a pretty ribbon for a thoughtful present.
Storage Guidelines
- Room Temperature: Store your Cookies and Cream Muddy Buddies in an airtight container or a gallon-sized resealable bag in a cool, dry place. For optimal freshness, they are best enjoyed within 2-3 days, though they can maintain good quality for up to a week.
- Freezing for Longer Shelf Life: To extend their deliciousness, transfer the snack mix to a freezer-safe container or bag, ensuring all excess air is removed. You can freeze them for up to 2 months. Thaw at room temperature for a few minutes before serving for the best texture.
Proper storage helps maintain their delightful crunch and rich flavor.
Frequently Asked Questions (FAQs)
Got questions about making the perfect Cookies and Cream Muddy Buddies? We’ve got answers!
- Can I use a different type of cereal? Yes! While Rice Chex provides the best light and crispy texture, you can experiment with Corn Chex or even a combination of both. Just ensure it’s a sturdy, plain cereal that can hold up to the chocolate coating.
- Do I have to use coconut oil? Coconut oil (or vegetable/canola oil) is important for achieving a smooth, pliable chocolate coating. It helps thin the chocolate slightly and prevents it from seizing. While you can try without, the texture might be thicker.
- What if my chocolate seizes? If your chocolate becomes thick, lumpy, or grainy while melting, it likely got too hot or came into contact with water. Unfortunately, seized chocolate is difficult to salvage for this recipe. It’s best to start over with fresh chocolate, melting slowly and carefully as described in the “Chocolate Notes” section.
- Can I make this ahead of time for a party? Absolutely! Muddy Buddies are an excellent make-ahead snack. Prepare them 1-2 days in advance and store them in an airtight container at room temperature. They’ll retain their crunch and flavor, making party prep a breeze.
- How can I make this even more festive? For holidays or special occasions, add themed sprinkles when you add the other toppings. Green sprinkles for St. Patrick’s Day, red and green for Christmas, or pastel colors for Easter would be fun!
More Delicious Treats You’ll Love:
Desserts
Oreo Truffles
Desserts
Tiger Butter Fudge
Snacks
Chocolate Peanut Butter Snack Mix
Desserts
Avalanche Cookies (No Baking!)

Pin Recipe
Print Recipe
Cookies and Cream Muddy Buddies Recipe
Chelsea Lords
30 minutes
1 hour
1 hour
30 minutes
10
servings
Equipment
-
Large sheet pan (15″ x 21″) or 2 smaller pans
-
Parchment paper or aluminum foil / Silpat®
-
Blender high-powered, or food processor
Ingredients
-
6 cups Rice Chex cereal -
16 Oreos -
2 cups milk chocolate chips or use semi-sweet for a less sweet mix -
3 teaspoons coconut oil or vegetable/canola oil, divided -
1 cup white chocolate chips
-
1/2 cup milk chocolate chips mini or regular-sized -
1/2 cup mini Oreos
Instructions
-
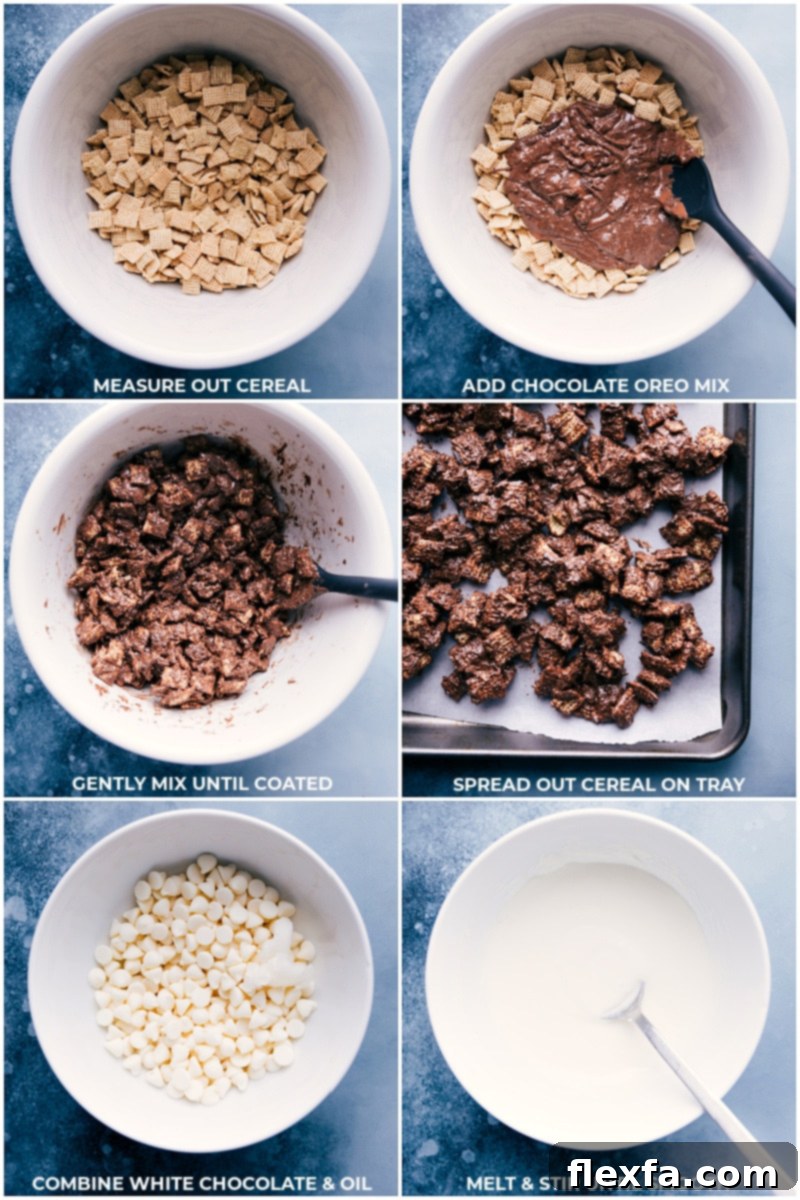
1. Prepare Your Pan: Line a very large (15×21-inch) sheet pan (or two smaller sheet pans if you don’t have one large enough) with parchment paper or aluminum foil. This step is essential for easy removal and cleanup. Set the prepared pan(s) aside. Measure out the 6 cups of Rice Chex cereal and gently pour them into a very large mixing bowl, taking care not to crush the delicate cereal squares.
-
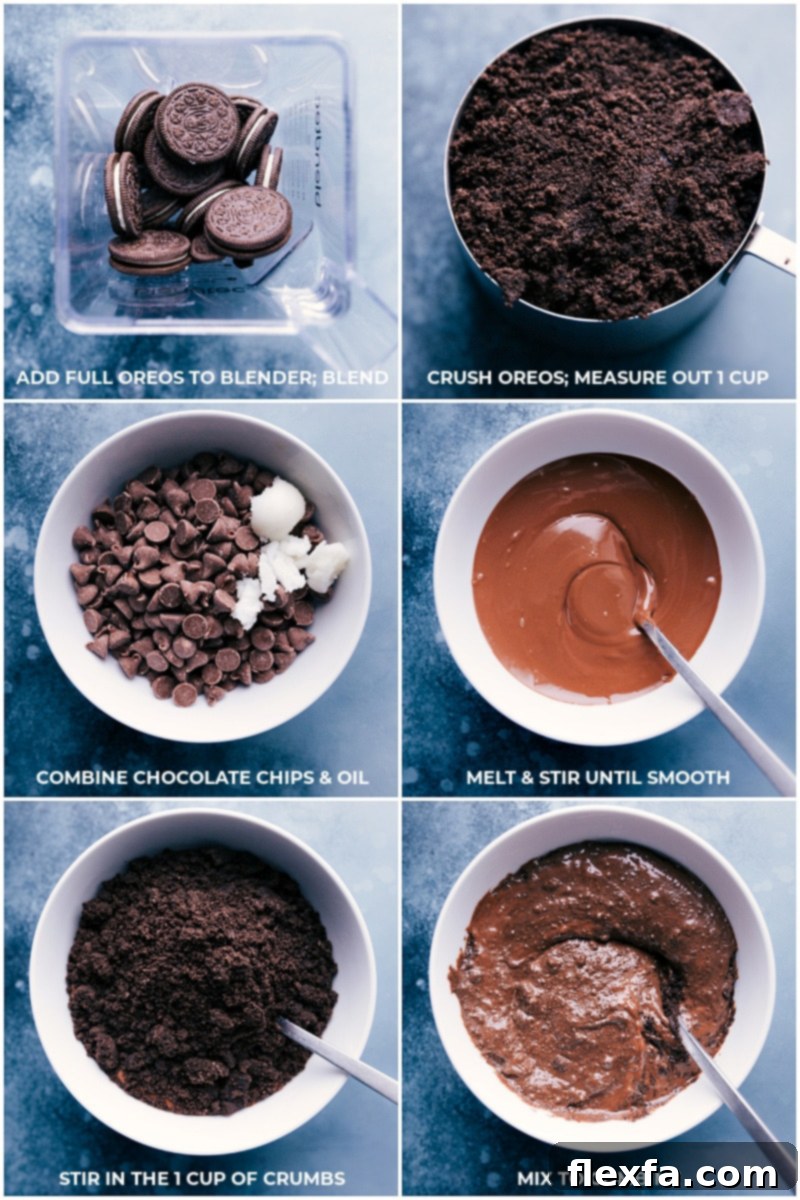
2. Crush the Oreos: Add the 16 whole Oreos (do not remove the cream filling, it adds to the flavor!) to a high-powered blender or a food processor. Pulse or blend until they are transformed into fine, consistent crumbs. Carefully measure out 1 level cup (approximately 135g) of these crushed Oreo crumbs and set them aside. The remaining crumbs will be used later as an optional topping.
-
3. Melt the Chocolate & Combine: In a separate large microwave-safe bowl, combine the 2 cups of milk chocolate chips (or semi-sweet, if preferred) and 2 teaspoons of coconut oil. Microwave in short bursts of 20 seconds, stirring well for 20 seconds after each burst, until the chocolate is completely melted and smooth. Once melted, stir in the 1 cup of crushed Oreos until fully combined with the chocolate. Pour this rich chocolate-Oreo mixture over the Rice Chex cereal in the large bowl. Use a rubber spatula to scrape out every last bit of chocolate. Gently fold and stir the cereal until every piece is evenly coated in the chocolate and Oreo mix. Then, transfer the coated cereal to your prepared sheet pan(s), spreading it out into an even layer.
-
4. Drizzle with White Chocolate: In another large microwave-safe bowl, add the 1 cup of white chocolate chips and the remaining 1 teaspoon of coconut oil. Microwave in 20-second intervals, stirring thoroughly between each, until the white chocolate is fully melted and perfectly smooth. To drizzle, line a cup with a resealable plastic bag and pour the melted white chocolate into it. Seal the bag, pressing out any air, and snip off a small tip from one corner. Generously drizzle the white chocolate over the chocolate-coated cereal on the sheet pan until all the white chocolate has been used.
-
5. Add Toppings & Set: Work quickly at this stage, as white chocolate hardens fast! Immediately sprinkle on any optional chocolate chips and mini Oreo cookies. Then, liberally sprinkle the reserved remaining cookie crumbs over the entire mix for an extra burst of Oreo flavor and texture. Allow the snack mix to harden completely at room temperature, which typically takes about 1 hour. For a quicker set, you can place the pan in the refrigerator for approximately 20 minutes. Once fully set, break the snack mix apart into individual clusters. Serve and enjoy this incredibly tasty Cookies and Cream Muddy Buddies! This mix is best enjoyed within 2 days for peak freshness.
Recipe Notes
Storage: To keep your Muddy Buddies fresh, store any leftovers in an airtight container or a gallon-size resealable bag. Keep them in a cool, dry place away from direct sunlight. They are best when enjoyed within 2-3 days but can maintain good quality for up to a week. For longer storage, transfer them to a freezer-safe container or bag, ensuring to remove as much air as possible, and freeze for up to 2 months. Thaw at room temperature for a few minutes before indulging.
Nutrition
Calories: 816kcal |
Carbohydrates: 156g |
Protein: 13g |
Fat: 17g |
Saturated Fat: 8g |
Trans Fat: 1g |
Cholesterol: 5mg |
Sodium: 1439mg |
Potassium: 367mg |
Fiber: 7g |
Sugar: 38g |
Vitamin A: 2637IU |
Vitamin C: 32mg |
Calcium: 579mg |
Iron: 50mg
Nutrition information is automatically calculated and should only be used as an approximation. Individual results may vary based on ingredients and preparation.
Love this recipe? Leave a comment below!