
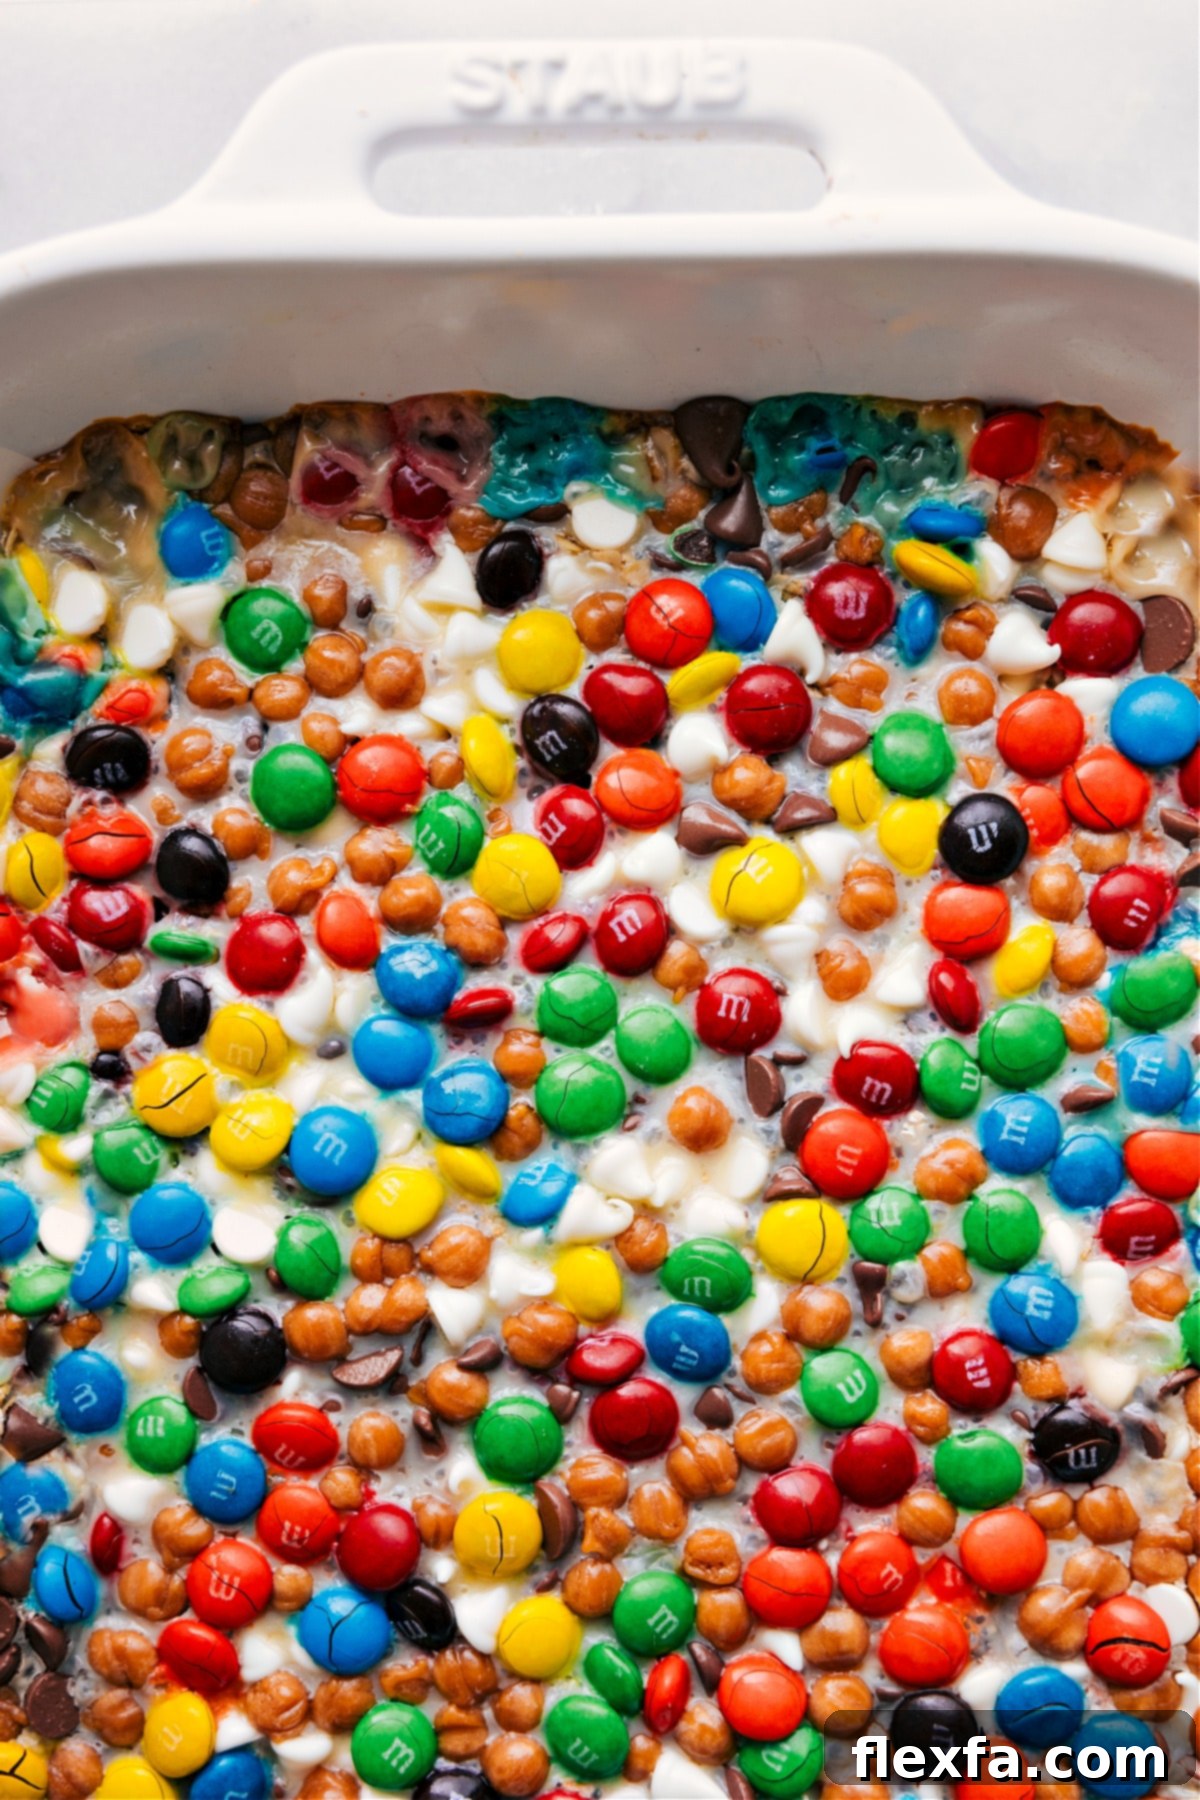
Magic Cookie Bars are a beloved classic dessert, famous for their incredibly rich flavor and satisfying texture. This recipe delivers a thick, buttery graham cracker crust, topped with a delightful medley of chocolate chips, vibrant M&M’s, gooey caramel bits, and hearty oats, all magically bound together by a luscious layer of sweetened condensed milk. Each bite is a symphony of sweet, chewy, and crunchy elements, making them an absolute crowd-pleaser.
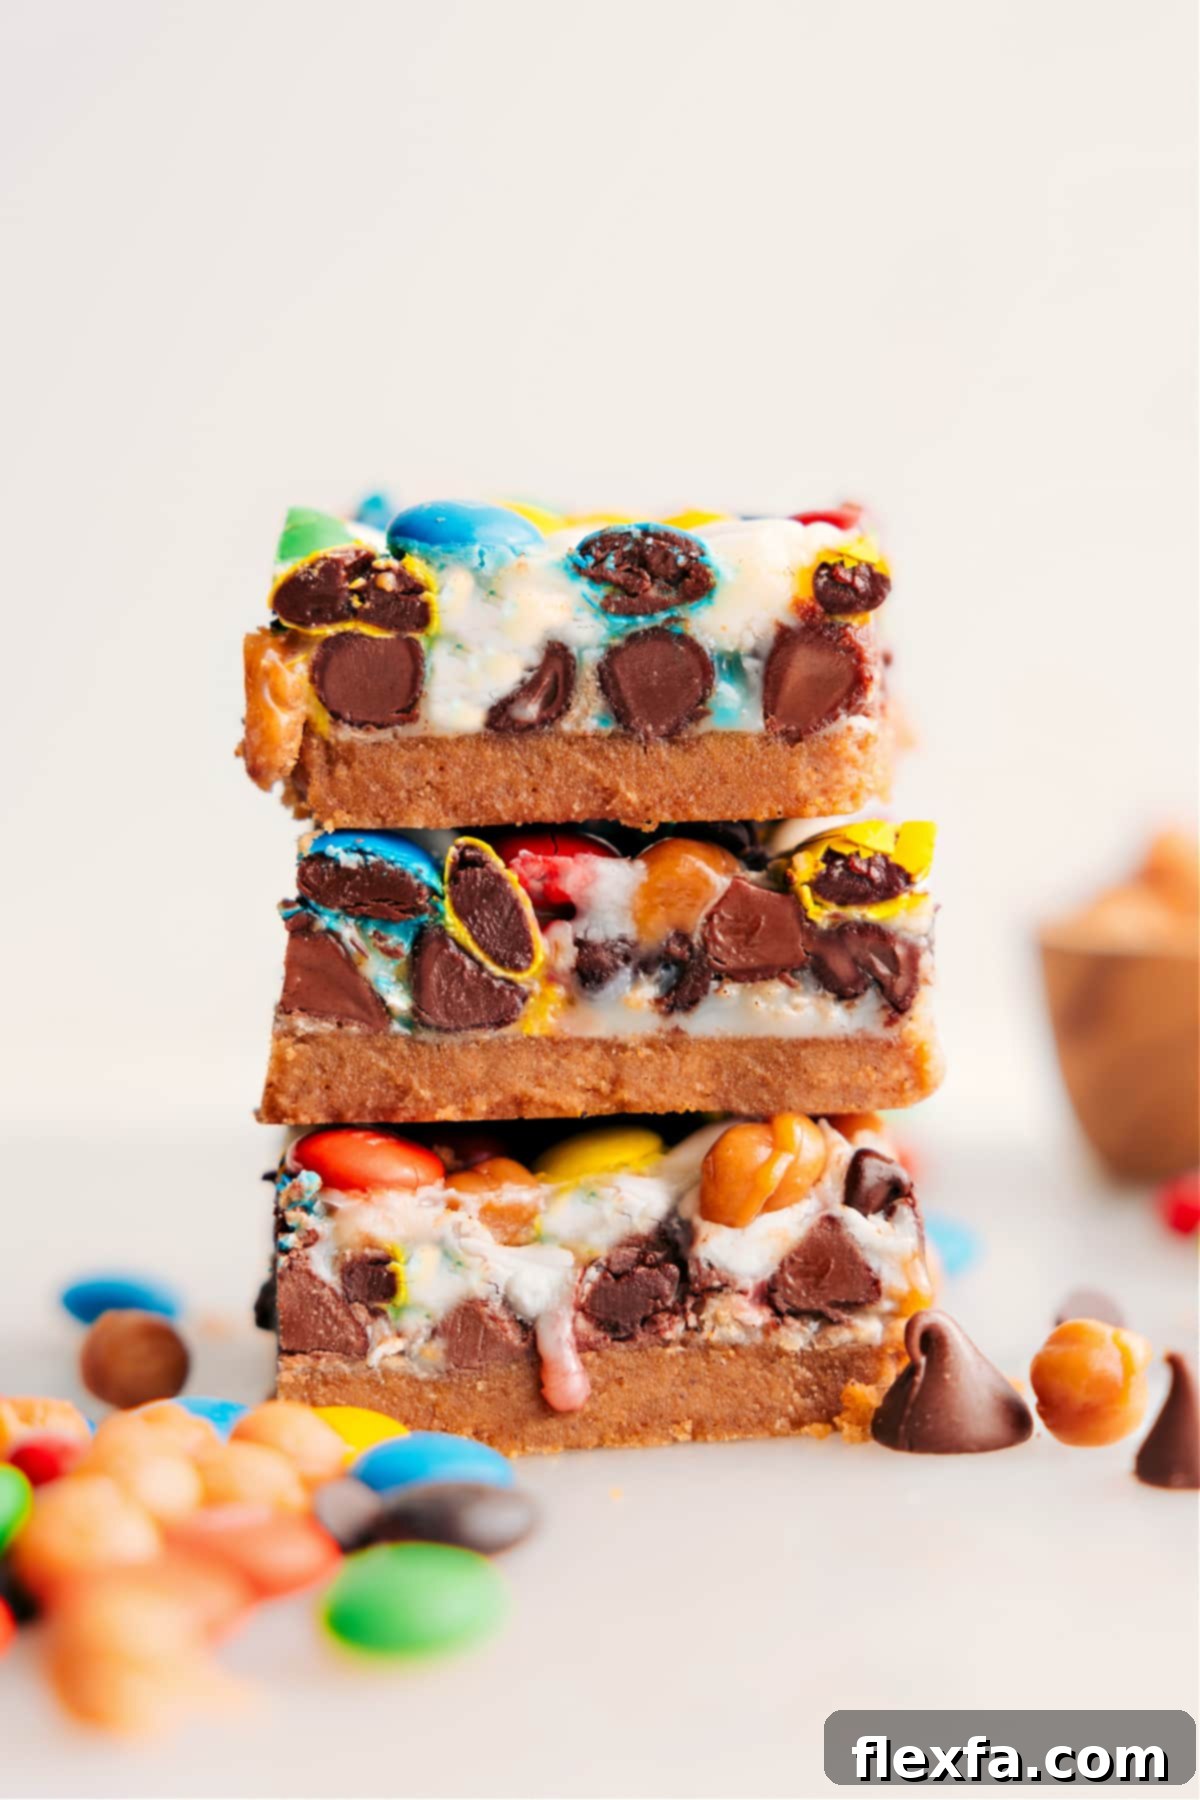
The Ultimate Magic Cookie Bars: A 7-Layer Dream Dessert
Prepare to fall in love with these extraordinary Magic Cookie Bars. Often referred to as 7-Layer Bars or Hello Dolly Bars, they are an iconic treat for a reason. Imagine a dessert lover’s dream come true: a robust base, generously loaded with a delightful mix of rich chocolate chips, colorful M&M’s, tender caramel bits, and wholesome oats, all enveloped in a thick, irresistibly gooey embrace of sweetened condensed milk. This is more than just a cookie bar; it’s an experience.
If you’re a fan of the classic 7-layer bars, then this recipe is absolutely perfect for you. These bars boast a deep, indulgent sweetness and a rich texture that makes them ideal for cutting into smaller, fudge-like squares. Their intense flavor means a little goes a long way, making them a perfect treat for sharing at parties, potlucks, or simply enjoying as a decadent indulgence.
Why You’ll Adore This Magic Cookie Bar Recipe
There are countless reasons why Magic Cookie Bars have remained a favorite for generations. Beyond their ease of preparation, they offer an unparalleled combination of textures and flavors. The contrast between the crunchy graham cracker crust and the soft, gooey topping is simply divine. Each bite offers a different nuance – the melt of chocolate, the chewiness of oats, the sweet pull of caramel, and the satisfying crunch of an M&M. They’re incredibly adaptable, allowing for endless customization to suit any preference or occasion. Whether you’re a seasoned baker or just starting, these bars are a foolproof way to impress with minimal effort.
Essential Ingredients for Irresistible Magic Cookie Bars
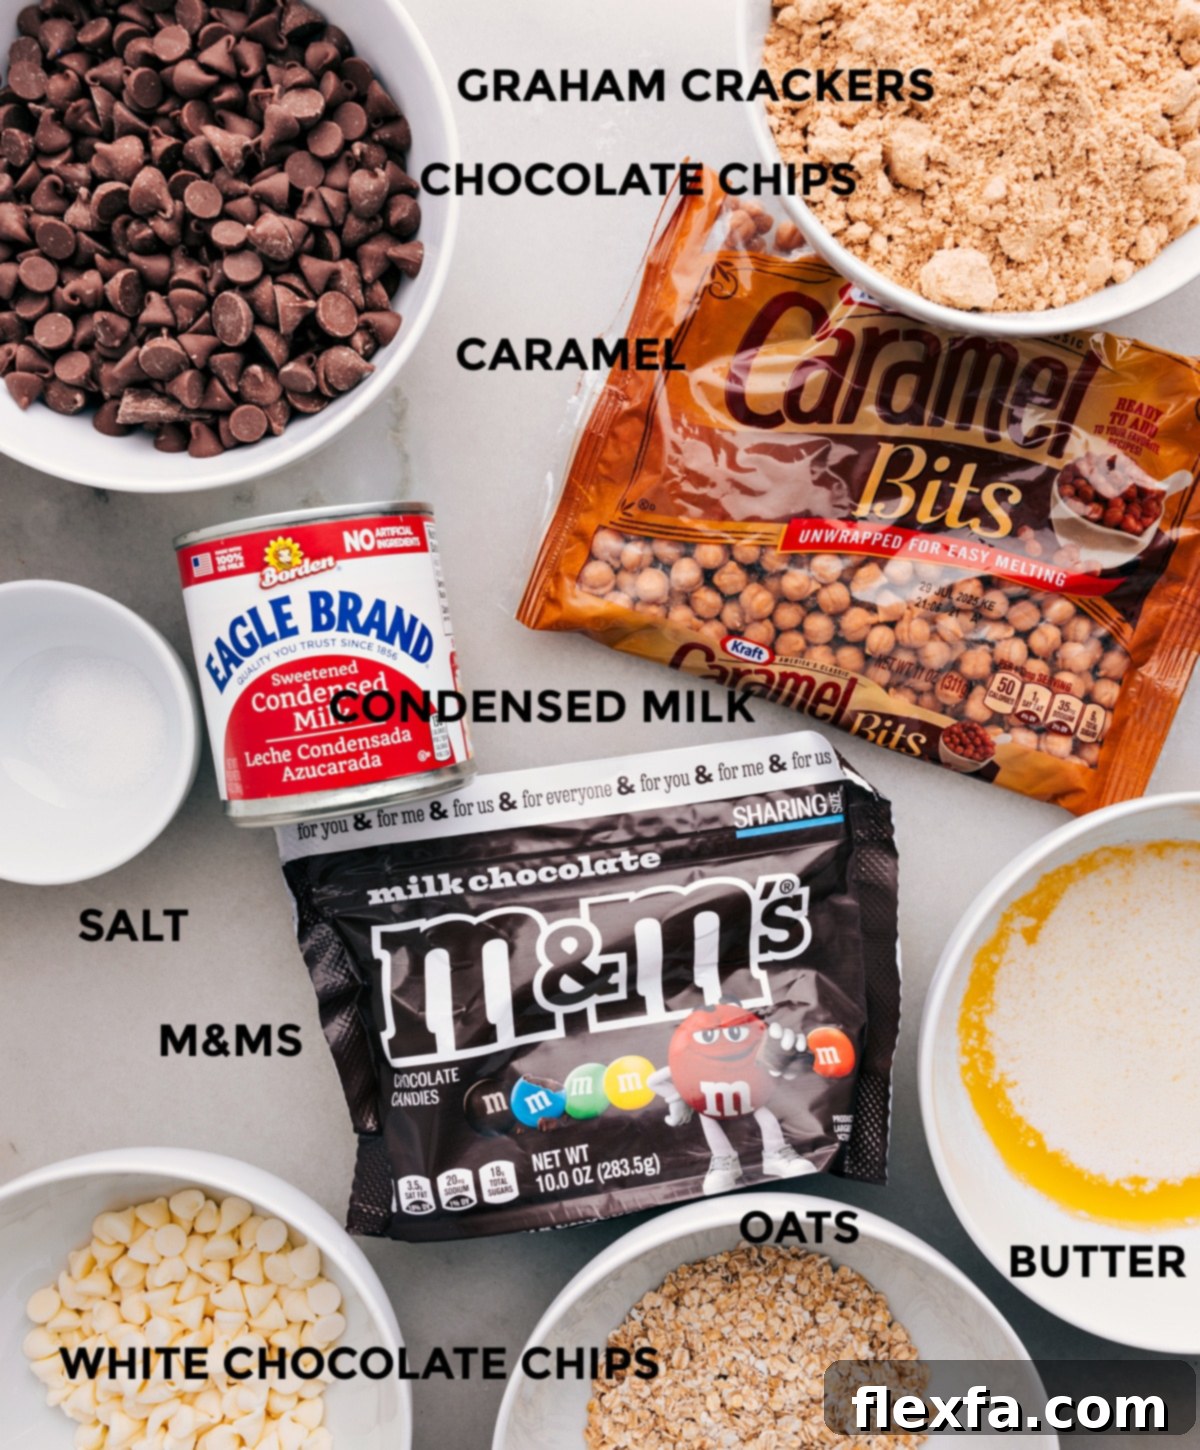
The magic truly happens with a selection of quality ingredients. Here’s a closer look at what makes these Magic Cookie Bars so incredibly good and how to choose the best for your batch:
- Quick Oats: These are highly recommended for achieving a soft, cohesive texture within the bar. Quick oats cook faster and blend more seamlessly into the gooey mixture, providing a pleasant chew without being overly fibrous. While old-fashioned oats can be used, they will result in a chewier, slightly firmer bar.
- Milk Chocolate Chips: The classic choice for a reason! Milk chocolate chips contribute a rich, creamy sweetness that perfectly complements the other flavors. Feel free to experiment with dark chocolate chips for a less sweet, more intense cocoa flavor, or semi-sweet for a balanced profile.
- White Chocolate Chips: These add another layer of creamy sweetness and a beautiful visual contrast. If you’re feeling adventurous or prefer different flavor profiles, butterscotch chips offer a rich, buttery note, while peanut butter chips can transform these into a truly unique, nutty delight.
- Caramel Bits: These tiny, unwrapped caramel balls are incredibly convenient and melt beautifully into soft, chewy pockets of caramel. You’ll typically find them in the baking or candy aisle. Always ensure you’re using a fresh bag to guarantee they are soft and pliable, which will ensure a smooth melt.
- M&M’s®: The vibrant color and satisfying candy shell of regular M&M’s add a playful crunch and extra sweetness. For the best results, stick with the standard size; larger or filled varieties may not integrate as well into the bar structure.
- Sweetened Condensed Milk: This is the crucial ingredient that acts as the “glue,” creating the signature gooey, chewy texture of Magic Cookie Bars. It’s essential to use full-fat and full-sugar sweetened condensed milk. Do not substitute with evaporated milk, as it lacks the sugar and thickness required for the bars to set correctly and achieve their characteristic richness.
- Unsalted Butter: The foundation of our perfect graham cracker crust. Using unsalted butter gives you control over the salt content of the entire recipe.
- Graham Cracker Crumbs: The base layer of these bars. Ensure they are finely crushed for a uniform and sturdy crust.
- Fine Sea Salt: A small but mighty ingredient that balances the intense sweetness of the bars, enhancing all the other flavors without making them salty.
Crafting the Perfect Graham Cracker Crust for Magic Cookie Bars
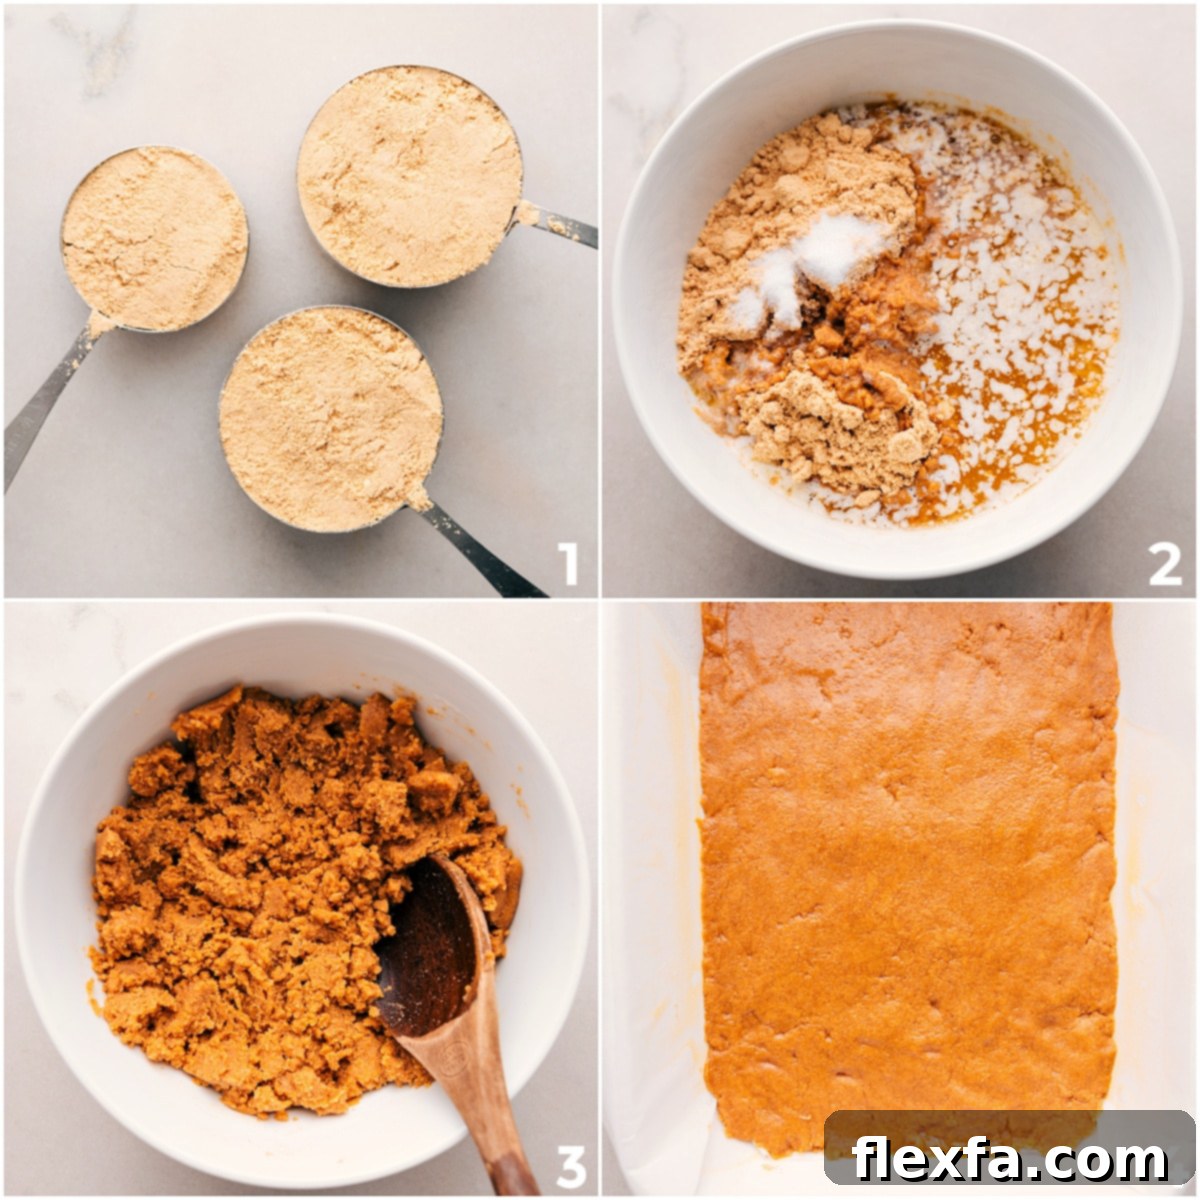
The foundation of these delightful Magic Cookie Bars is a thick, delicious graham cracker crust. Getting this right is key to the overall success and stability of your dessert. Here are some detailed tips to ensure your crust is absolutely perfect every time:
- Cool the Butter to Room Temperature: This step is critical. After melting your butter, allow it to cool down to room temperature before mixing it with the graham cracker crumbs. Using hot butter will cause the crust mixture to become overly greasy, leading to a crust that is prone to crumbling and can feel oily. Room temperature butter, however, binds the crumbs together more effectively, creating a firm yet tender crust.
- Don’t Skip the Salt: A small amount of salt in the crust mixture does wonders. It helps to cut through and balance the intense sweetness from the condensed milk and various toppings. This subtle addition elevates the overall flavor profile, ensuring your bars aren’t just sweet, but deliciously well-rounded.
- Blend Graham Crackers into Fine Crumbs: For a smooth, consistent, and sturdy crust, it’s essential to process your graham crackers into very fine crumbs. Large chunks will make the crust uneven and prone to breaking apart. A powerful blender or food processor works best for this, ensuring a uniform texture.
- Measure Crumbs Precisely: Never rely solely on counting crackers, as cracker sizes and densities can vary significantly between brands. Always measure your graham cracker crumbs *after* they have been crushed. This ensures you have the exact amount needed for the perfect butter-to-crumb ratio, which is crucial for a crust that holds together well.
- Press the Crust Firmly and Evenly: Once your butter and crumbs are mixed, press the mixture into the prepared pan with conviction. Use the bottom of a flat measuring cup, a clean glass, or even your hands to pack the crust down tightly. This firm compression is vital for creating a clean, sturdy, and even base that won’t fall apart when you cut into your finished bars. An even layer also ensures consistent baking.
Assembling and Baking Your Magic Cookie Bars to Perfection
With your perfect graham cracker crust ready, it’s time for the fun part: layering on all the delightful toppings. The assembly is straightforward, but a few key techniques will ensure your Magic Cookie Bars bake beautifully and taste incredible.
Expert Tips for Magic Cookie Bar Success
- Always Use Parchment Paper: This is arguably the most important tip for easy removal and clean cuts. Line your baking pan with parchment paper, making sure to leave a generous overhang on two sides. This overhang acts as a sling, allowing you to easily lift the entire slab of cooled bars out of the pan. This technique is far superior to using foil, which can stick, or wax paper, which is not oven-safe for baking temperatures.
- Unleash Your Creativity with Toppings: Magic Cookie Bars are incredibly versatile! While the classic combination is fantastic, feel free to customize the toppings to your heart’s content. The key is to maintain similar sizes and total amounts of dry toppings to ensure even baking and distribution.
- Nuts: Add pecans, walnuts, or almonds for extra crunch and a nutty flavor.
- Coconut: Shredded coconut (sweetened or unsweetened) is a popular traditional addition, offering a tropical chewiness.
- Other Candies: Try chopped chocolate bars, butterscotch chips, peanut butter cups, or even seasonal candies to match holidays.
- Crust Variations: For an unexpected twist, consider using crushed Nilla® Wafers, Teddy Grahams®, or even Oreos for your crust.
The possibilities are endless, making these bars perfect for experimenting and adapting to personal tastes.
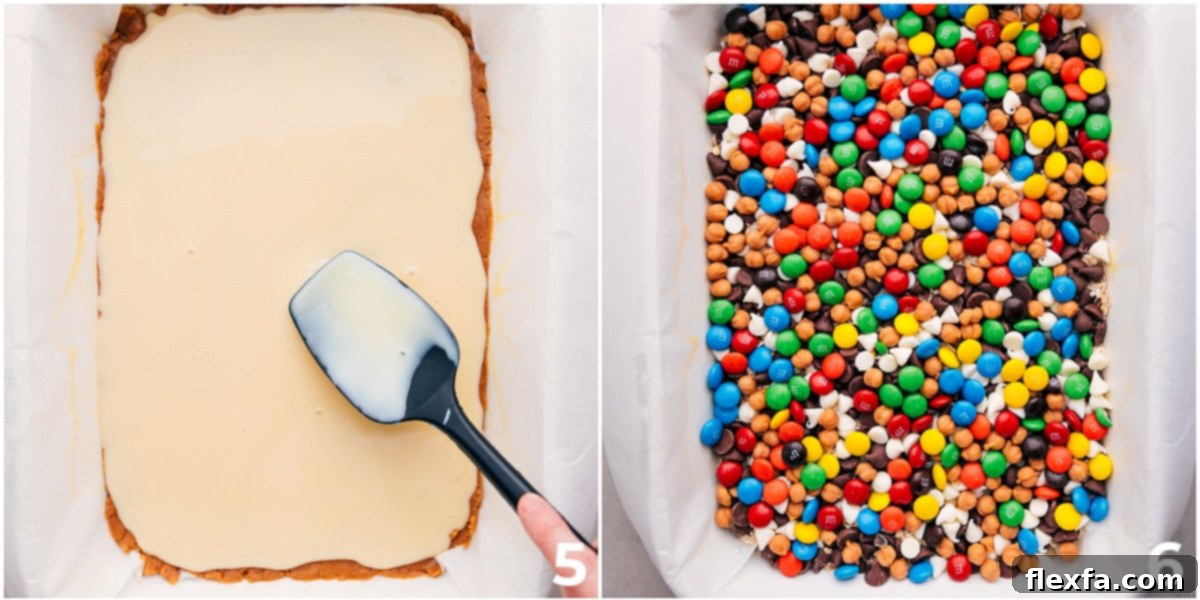
- Gently Press Toppings into the Sweetened Condensed Milk: After layering all your delicious toppings over the condensed milk, take a moment to gently press them down. This ensures that every ingredient adheres properly to the gooey milk, preventing loose toppings and ensuring each bar stays intact and looks neat when cut. This also helps the toppings meld together as they bake, creating that signature “magic” effect.
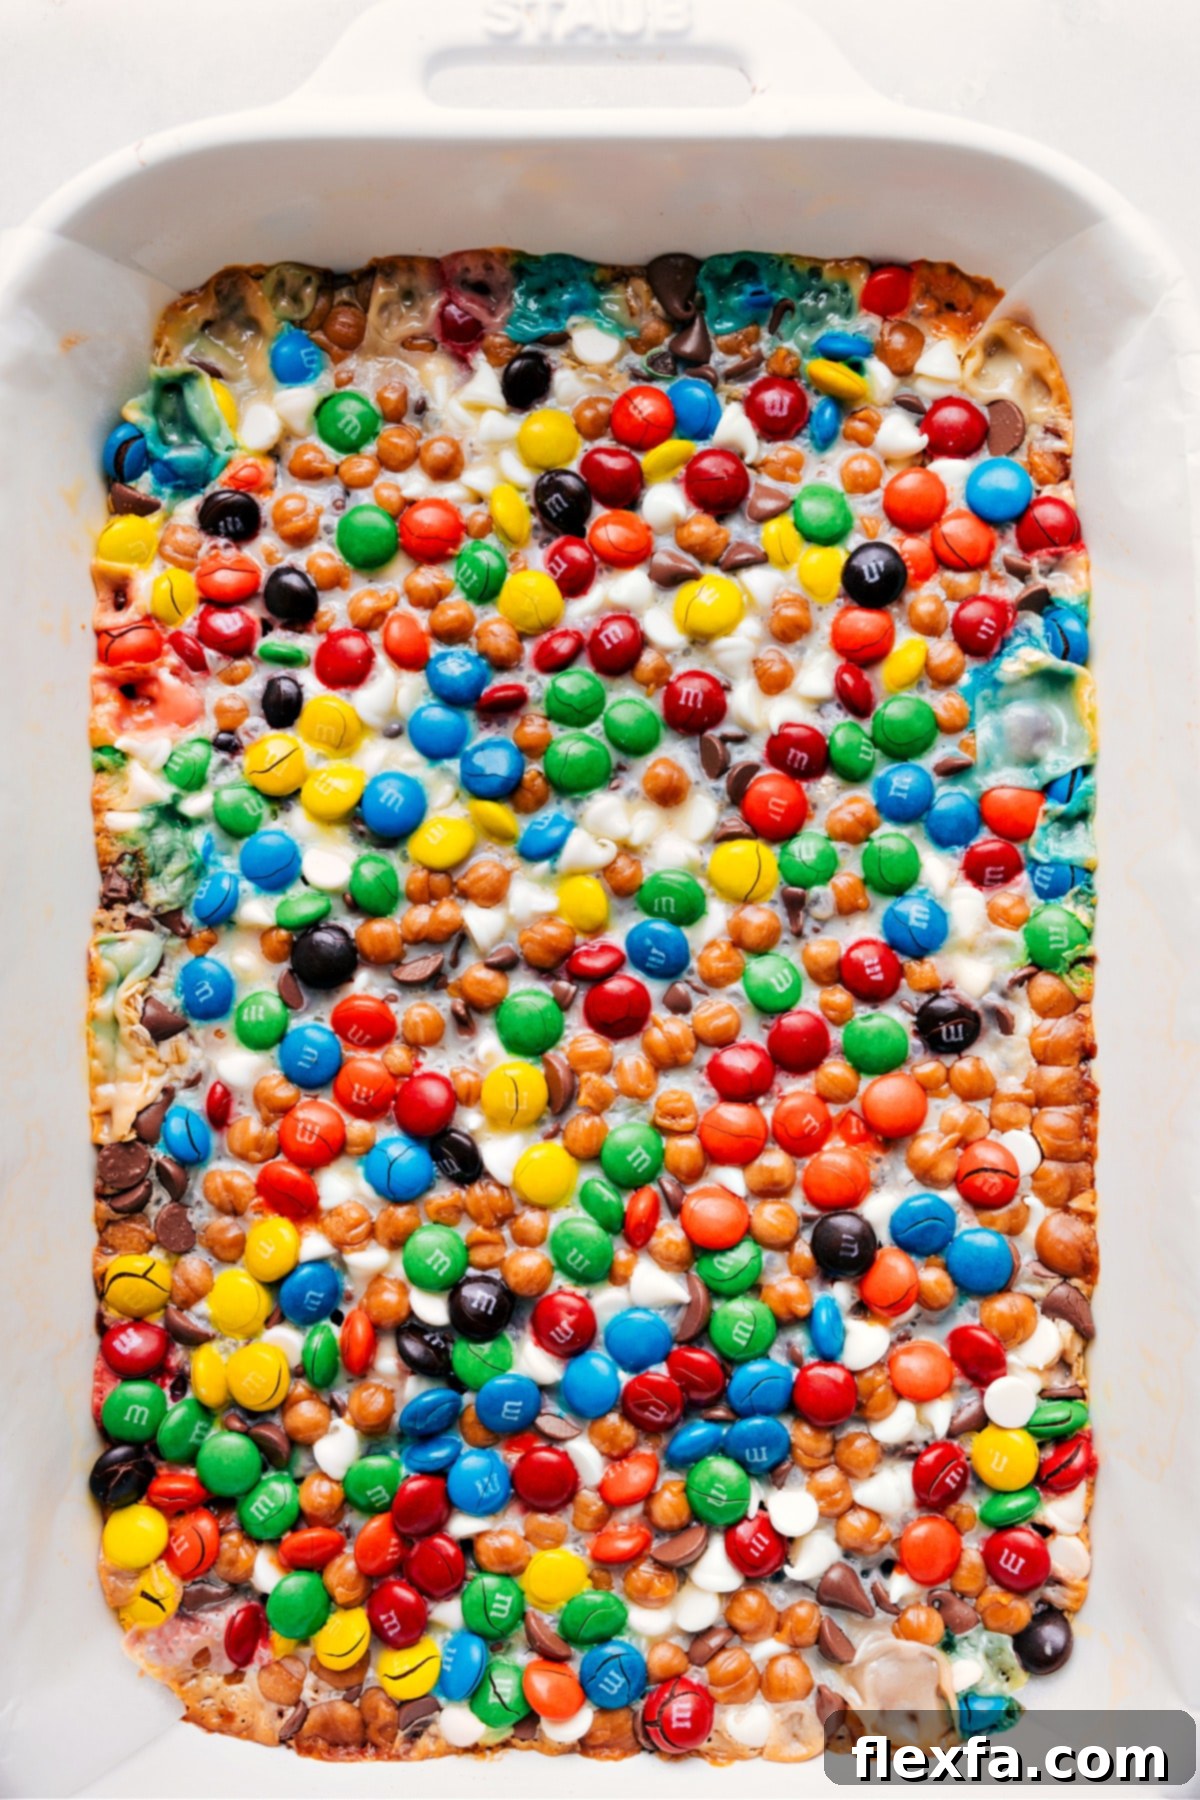
- Know Your Oven: Baking times can vary. While 23-28 minutes is a good guideline, watch for visual cues. The edges of the bars should be nicely golden brown, and the center should appear set, not overly jiggly. If your oven tends to run hot or cold, adjust baking time accordingly. Overbaking can lead to a dry crust, while underbaking makes them too gooey and difficult to cut.
Storage and Shelf Life
Making Your Magic Cookie Bars Last
Proper storage is essential to keep your Magic Cookie Bars fresh, delicious, and easy to enjoy. Here’s how to store any leftovers:
- Room Temperature: Once completely cooled, store your Magic Cookie Bars in an airtight container at room temperature for up to 3 days. If your kitchen is particularly warm, consider refrigerating them to maintain their structure.
- Refrigerator: For extended freshness and a firmer texture, store the bars in an airtight container in the refrigerator for up to 5 days. To prevent sticking, place layers of parchment paper between the bars. Chilling also makes them less gooey and easier to handle, which some people prefer.
- Freezer: Magic Cookie Bars freeze beautifully! To freeze, wrap individual bars or small sections tightly in plastic wrap, then place them in a freezer-safe airtight container or heavy-duty freezer bag. They can be stored in the freezer for up to 3 months. Thaw frozen bars at room temperature for an hour or two before serving for the best texture.
Remember, always allow the bars to cool completely before storing them, regardless of the method, to prevent condensation and sogginess.
Magic Cookie Bars Recipe Card
Magic Cookie Bars
Chelsea Lords
20
25
45
36 bars
Equipment
-
9 x 13-inch baking pan
-
Parchment paper
-
Blender or Food Processor
Ingredients
- 12 tablespoons unsalted butter (3/4 cup), melted and cooled to room temperature
- 2-1/2 cups graham cracker crumbs (measure after crushing; about 20–22 full crackers)
- 1/2 teaspoon fine sea salt (or 1/4 teaspoon table salt)
- 1 (14-ounce) can sweetened condensed milk (full-fat, essential for gooey texture)
- 1/2 cup quick oats
- 2 cups chocolate chips (milk, semi-sweet, or dark)
- 1/2 cup white chocolate chips
- 3/4 cup caramel bits (ensure they are fresh and soft)
- 1 cup M&M’s
Instructions
-
Preheat your oven to 350°F (176°C). Prepare a 9×13-inch baking pan by lining it with parchment paper. Make sure to leave a generous overhang on the longer sides; this will create handles for easy removal of the baked bars. Avoid using wax paper or aluminum foil, as they may stick or not be suitable for baking temperatures. Melt the butter (if not already melted) and set it aside to cool completely to room temperature. This step is crucial, as hot butter can make your crust greasy and less cohesive.
-
Coarsely break up the graham crackers and place them into a powerful blender or food processor. Process until all the crackers are transformed into fine, uniform crumbs. You may need to do this in batches if your appliance isn’t large enough. Measure out 2-1/2 cups of these fine crumbs and transfer them to a large mixing bowl. Add the salt to the crumbs and stir to combine. Pour in the cooled, melted butter and mix thoroughly until the crumbs are evenly moistened and a thick, sandy mixture forms. Press this mixture firmly and evenly into the bottom of your prepared baking pan. Use the back of a flat measuring cup or a clean glass to compact the crust, ensuring it’s dense and level.
-
Carefully pour the entire can of sweetened condensed milk over the prepared graham cracker crust. Using the back of a spoon or an offset spatula, gently spread the milk into an even layer, covering the entire surface of the crust. Then, evenly scatter the quick oats, chocolate chips, white chocolate chips, caramel bits, and M&M’s over the condensed milk. Once all the toppings are distributed, gently press them down into the sweetened condensed milk layer. This helps them adhere and ensures a neat, uniform appearance after baking.
-
Place the pan into your preheated oven and bake for approximately 23–28 minutes, or until the edges of the bars are beautifully golden brown and the center appears set and slightly bubbly. In many ovens, this typically takes around 25 minutes. Keep an eye on them towards the end of the baking time to prevent overbaking.
-
Once baked, remove the pan from the oven and place it on a wire rack to cool completely. This cooling process is crucial and can take about 1–2 hours at room temperature. For quicker cooling, you can transfer the bars to the refrigerator after they have cooled for approximately 20 minutes at room temperature. Once thoroughly cooled, use the parchment paper overhang to carefully lift the entire slab of bars out of the pan. Place them on a cutting board and use a sharp, clean knife to make decisive, clean cuts. For the neatest slices, run your knife under warm water, dry it on a kitchen towel, make a cut, and then repeat this process for each subsequent cut. This helps prevent sticking and tearing of the gooey layers.
Recipe Notes
Note 2 (Sweetened Condensed Milk vs. Evaporated Milk): It’s very easy to confuse sweetened condensed milk with evaporated milk, but for this recipe, only full-fat, full-sugar sweetened condensed milk will work. Evaporated milk lacks the necessary sugar content and thickness, and your bars will not set correctly. Always double-check the label! I personally recommend brands like Eagle Brand® for consistent, excellent results.
Note 3 (Caramel Bits Alternatives): Caramel bits are small, soft caramel candies found in the baking or candy aisle. If you cannot find them, or prefer a different flavor, you can substitute them with an additional 1/2 cup of white chocolate chips or butterscotch chips for a different but equally delicious outcome.
Storage Tips: Store any leftover Magic Cookie Bars in an airtight container. For optimal freshness and to prevent sticking, separate layers with parchment or wax paper. They can be kept at room temperature for up to 3 days, or refrigerated for up to 5 days, especially if your ambient temperature is warm. While refrigeration is not strictly required, chilling the bars can make them firmer and less gooey, which some people prefer. They are best enjoyed within 3-5 days of baking.
Nutrition
Calories: 180 kcal |
Carbohydrates: 23 g |
Protein: 3 g |
Fat: 9 g |
Saturated Fat: 5 g |
Trans Fat: 1 g |
Cholesterol: 16 mg |
Sodium: 110 mg |
Potassium: 85 mg |
Fiber: 1 g |
Sugar: 17 g |
Vitamin A: 170 IU |
Vitamin C: 1 mg |
Calcium: 60 mg |
Iron: 1 mg
Nutrition information is an estimate based on ingredients and standard calculations; it should only be used as an approximation and not a substitute for professional nutritional advice.
Frequently Asked Questions About Magic Cookie Bars
Here are some common questions and helpful answers to ensure your Magic Cookie Bars turn out perfectly every time:
- Can I use old-fashioned oats instead of quick oats?
Yes, you can, but be aware that old-fashioned oats will result in a chewier, slightly firmer texture in your bars. Quick oats are generally preferred for their softer, more integrated consistency. - What if I don’t have caramel bits?
Caramel bits are great for ease and even melting. If you don’t have them, you can substitute with an equal amount of chopped caramel candies (like Kraft Caramels), or simply use an additional 1/2 cup of white chocolate chips or butterscotch chips for a different but delicious flavor. - Can I make these bars gluten-free?
To make these bars gluten-free, you would need to use gluten-free graham cracker crumbs and ensure all other ingredients (like oats and candies) are certified gluten-free. - Why do my bars fall apart when I cut them?
The most common reason for crumbling bars is insufficient cooling time. It is crucial to allow the bars to cool completely, preferably for 1-2 hours at room temperature, or even chilling them in the refrigerator, before attempting to cut. Using a warm, sharp knife (wiped clean after each cut) also helps achieve clean slices. - Can I add nuts or shredded coconut?
Absolutely! These are popular additions to Magic Cookie Bars. Feel free to add 1/2 to 1 cup of chopped pecans, walnuts, or shredded coconut along with your other toppings for extra texture and flavor.
More Decadent Dessert Bar Recipes to Try
If you loved these Magic Cookie Bars, you’re in for a treat! Explore some of our other favorite easy-to-make dessert bars:
- Classic Chocolate Chip Cookie Bars: A simpler take on cookie bars, packed with beloved chocolate chips.
- Chewy Carmelitas: Irresistible oatmeal caramel bars with a rich, buttery flavor.
- Crispy Scotcheroos: A crunchy, peanut buttery treat topped with a luscious chocolate and butterscotch coating.
- Decadent Brownie Oreo Ice Cream Bars: A cool and creamy dessert featuring a rich brownie base and Oreo ice cream.
- Homestyle Apple Crumble Bars: Featuring a delightful caramel center and a buttery apple crumble topping.
Loved this recipe? Share your thoughts in the comments below!
Your feedback helps us create more delicious recipes!