
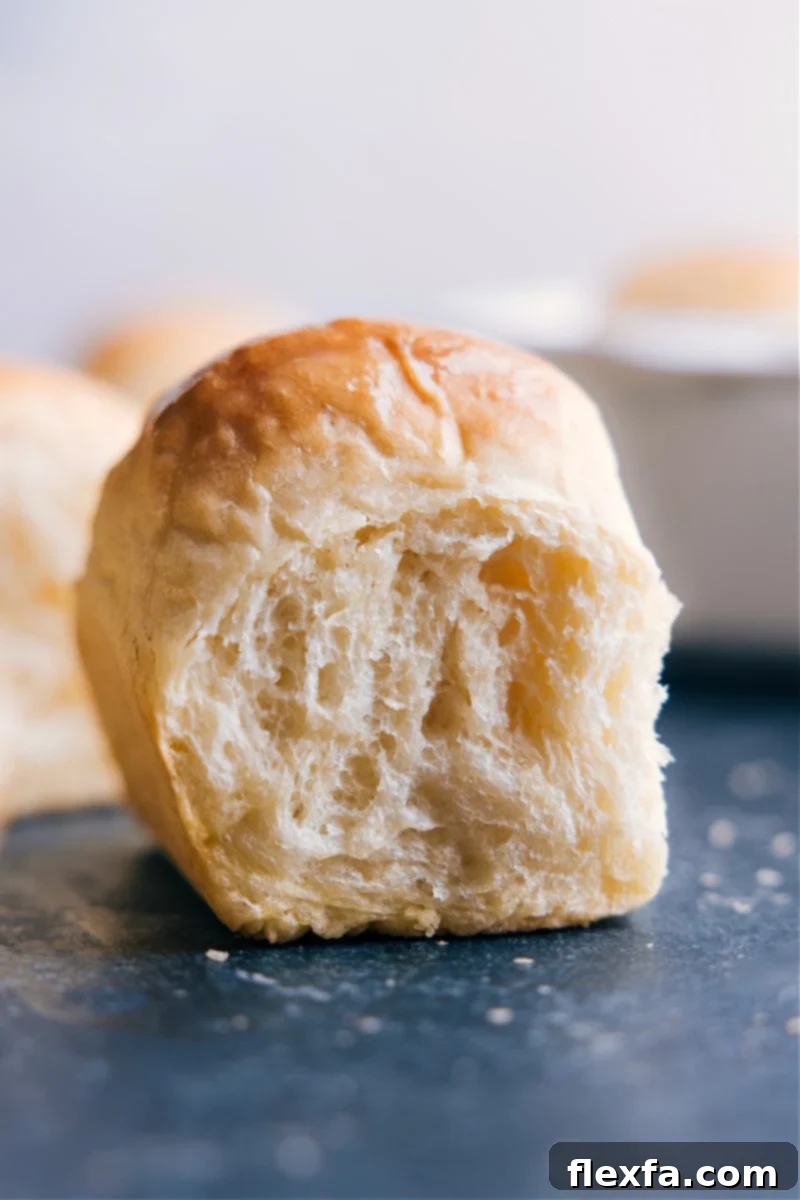
Welcome to the world of effortless baking! My truly life-changing **No-Knead Dinner Rolls** recipe is designed to bring you the joy of freshly baked bread without the usual fuss. Forget about stand mixers, hand mixers, or the strenuous work of kneading dough. These rolls promise to be incredibly easy, yet deliver spectacular results every single time.
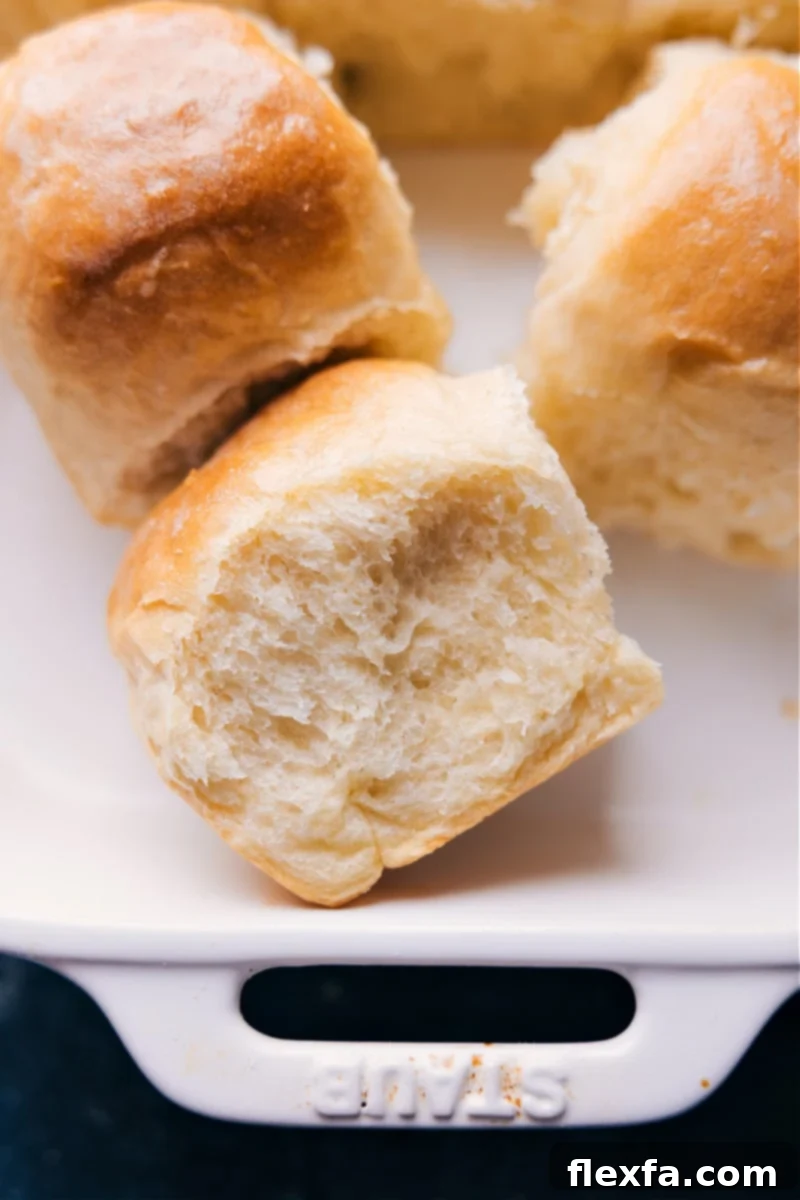
Imagine pulling from your oven beautifully risen rolls with irresistibly soft, fluffy centers and perfectly crisp, golden-brown edges. Yes, that’s right – they truly are as amazing as they sound, transforming your dinner table and delighting everyone who tries them!
Whether you’re a seasoned baker or venturing into the world of homemade rolls for the very first time, consider this your ultimate guide. I’ll walk you through each step with clear, concise instructions, sharing all the invaluable tips and tricks I’ve gathered and perfected over my many years of baking. Get ready to impress yourself and your loved ones with these unbelievably simple, delicious dinner rolls!
Elevate Your Meal: Why This No-Knead Dinner Roll Recipe Is a Must-Try!
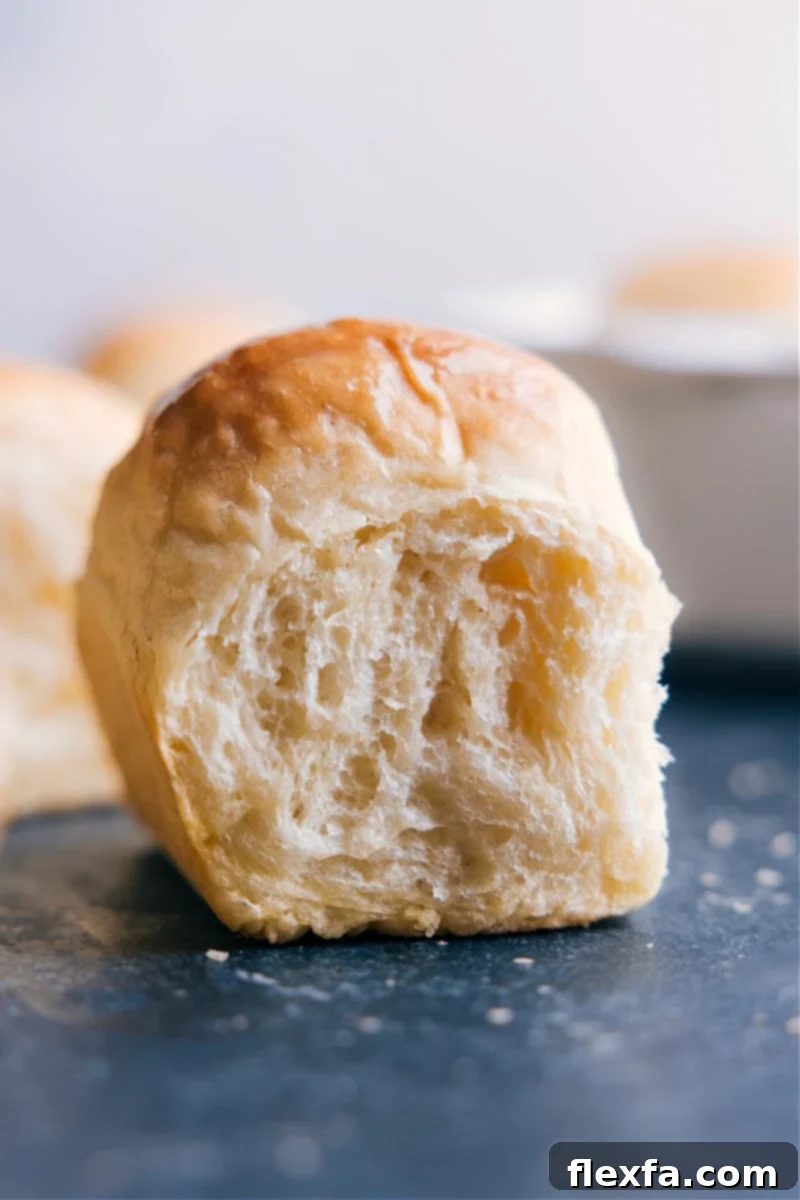
Are you searching for the best dinner rolls recipe that combines incredible flavor with unmatched ease? Look no further! These aren’t just any rolls; they’re substantial, wonderfully soft, generously buttery, and absolutely divine when served warm, fresh from the oven. Pair them with a dollop of homemade honey butter, sweet apple butter, or your favorite fruit jam for an unforgettable culinary experience.
Beyond their sensational taste and comforting aroma, what truly sets these rolls apart is their remarkable simplicity. This recipe builds upon the success of my widely popular No-Knead Bread, adapting its straightforward approach to create perfect individual rolls. It’s a method I’ve cherished in my own kitchen for its simplicity and the consistently delicious results it yields.
The Magic Behind These Effortless Dinner Rolls:
This recipe truly feels like magic, especially for those who might be intimidated by traditional bread making. Here’s why these **easy dinner rolls** will become your new go-to:
- Minimal Ingredients: Only 7 pantry staples! You won’t need a long list of obscure items. Just basic flour, yeast, water, honey, butter, eggs, and salt – simple ingredients for extraordinary flavor. This means less shopping and more baking!
- No Mixer Needed: Hands-On, Not Machine-Driven. Ditch the bulky stand mixer and even the hand mixer. This recipe is designed to be mixed entirely by hand, offering a wonderfully tactile baking experience without specialized equipment.
- Mixed with a Spatula: The Easiest Dough Ever. Forget messy hands or heavy-duty mixing. A sturdy rubber spatula is all you need to bring this dough together, making cleanup a breeze and the process incredibly straightforward.
- Absolutely No Kneading Required: A Baker’s Dream. This is the ultimate time-saver! The unique no-knead method allows time and yeast to do all the work of developing gluten, resulting in a tender, airy crumb without any physical effort from you.
- Flexible Timing: Make Ahead or Same-Day Deliciousness. Whether you need fresh rolls in a few hours or prefer to prep your dough the night before, this recipe offers flexibility. Perfect for busy weeknights or stress-free holiday entertaining.
I am genuinely excited for you to try these rolls and experience the difference. I can’t wait to hear what you think of this truly life-changing recipe!
Your Step-by-Step Guide: Crafting the Perfect No-Knead Dinner Rolls
Creating these delightful dinner rolls is a straightforward process, broken down into simple, manageable steps. Follow along closely, and you’ll have warm, homemade rolls ready to grace your table in no time.
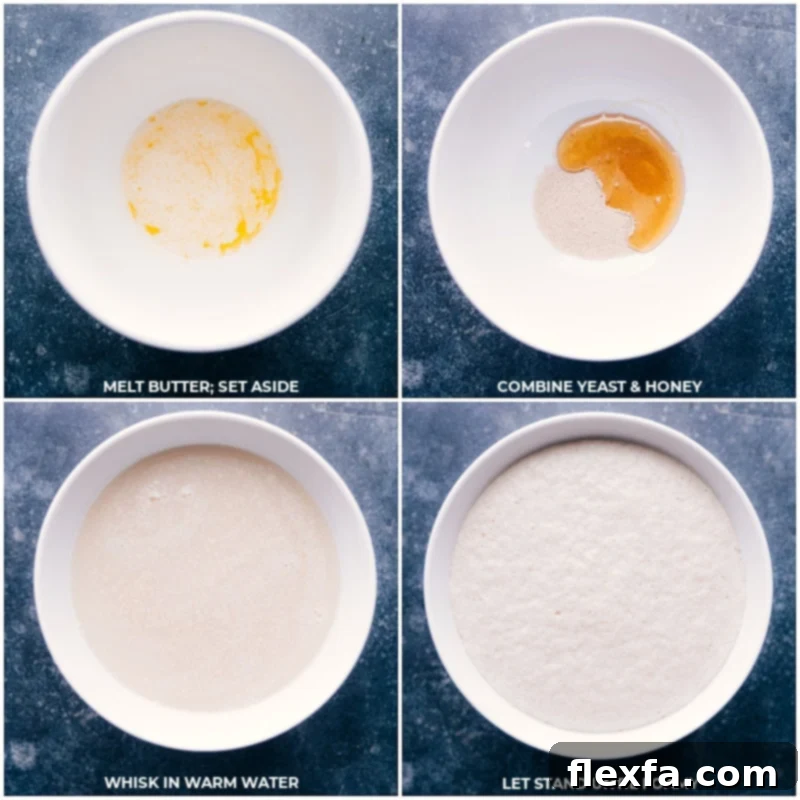
- Activate the Yeast (Proofing): In a medium bowl, combine the warm water (aim for around 110°F, comfortable to the touch but not hot, check Note 2 in the recipe card below) with the instant yeast and 1 tablespoon of honey. Give it a gentle whisk and then let this mixture rest undisturbed for 5-10 minutes. During this time, the yeast should become visibly foamy and creamy on the surface, indicating it’s active and ready to work its magic. If you don’t see this foamy action, your yeast might be old or the water temperature was off, and it’s best to start with fresh yeast and properly warmed water.
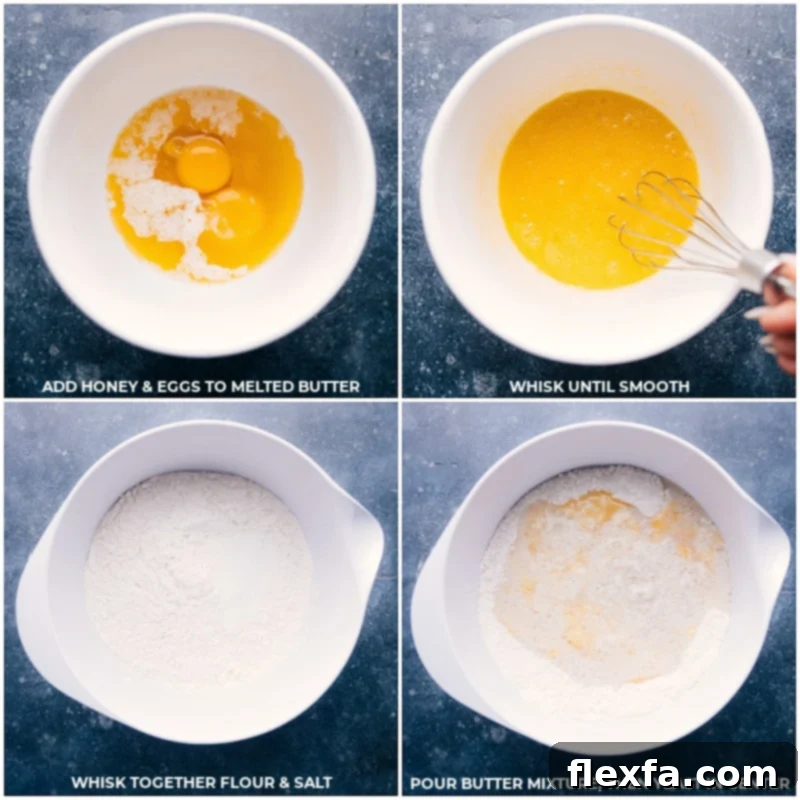
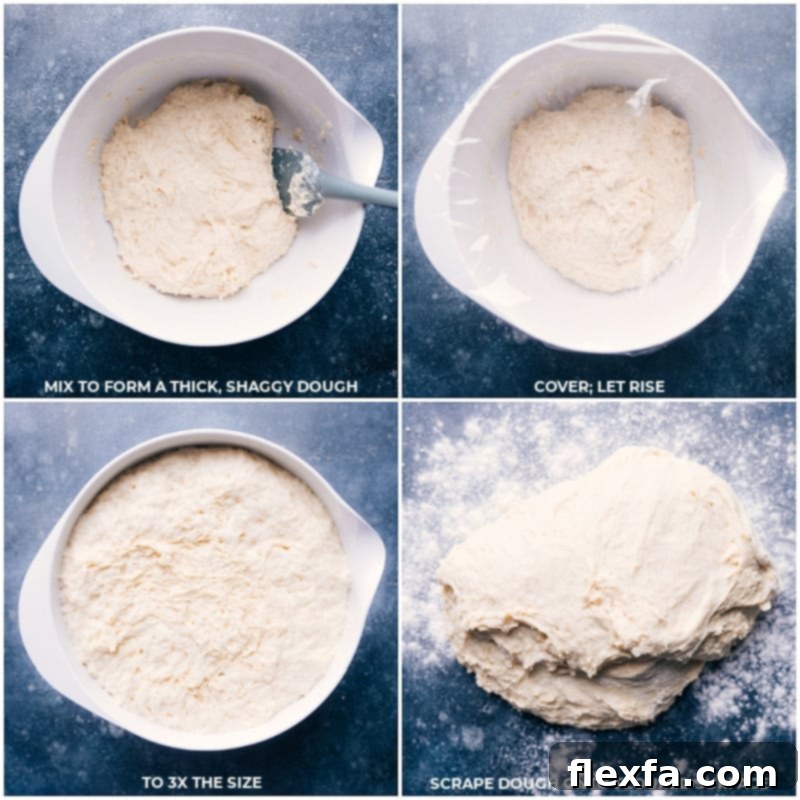
- Combine Wet and Dry Ingredients: While your yeast proofs, melt 4 tablespoons of butter in a microwave-safe bowl and set it aside to cool slightly. Once cooled, whisk in the remaining 2 tablespoons of honey and the large eggs until smoothly combined. In a separate, generously sized mixing bowl, whisk together the all-purpose flour and salt. Create a small well in the center of the dry ingredients. Pour the cooled butter-egg mixture and the activated yeast mixture into the well. Using a sturdy rubber spatula, gently stir everything together until a thick, shaggy, and uniform dough forms. The beauty here is that you don’t need to knead it – just ensure there are no dry pockets of flour remaining.
- First Rise (Bulk Fermentation): Once your dough is mixed, cover the bowl tightly with plastic wrap. Place it in a warm, draft-free spot (ideally around 70°F). This is where the magic of “no-knead” truly shines! Allow the dough to rise for 1½ to 2 hours, or until it has nearly tripled in size. For “Same-Day Rolls,” this might be around 90 minutes. For “Overnight Rolls,” you can let it rise for 30 minutes at room temperature, then refrigerate for 8-12 hours, allowing it to come back to room temperature and triple in size before shaping.
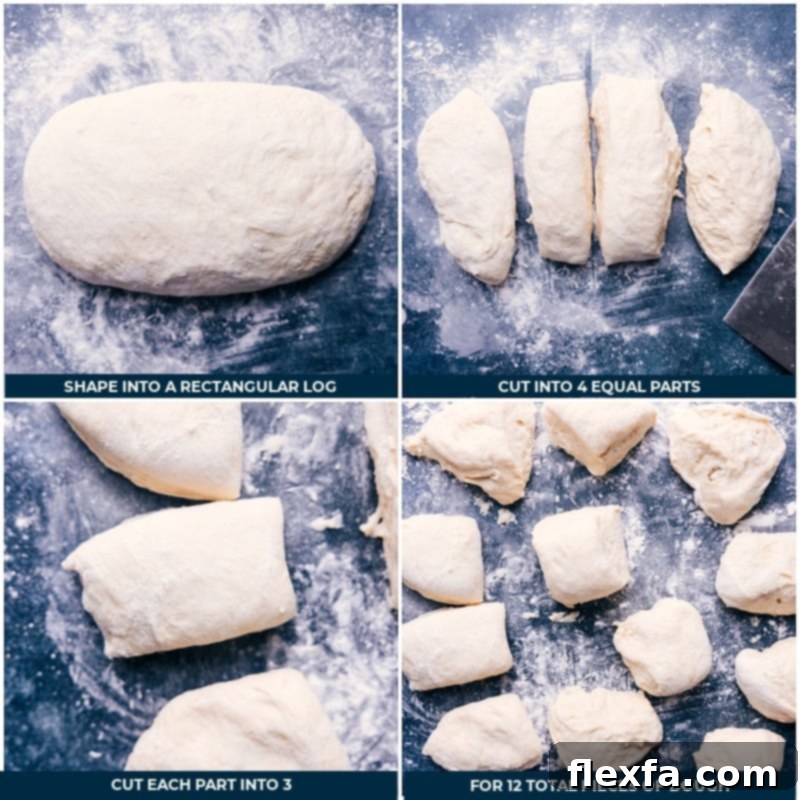
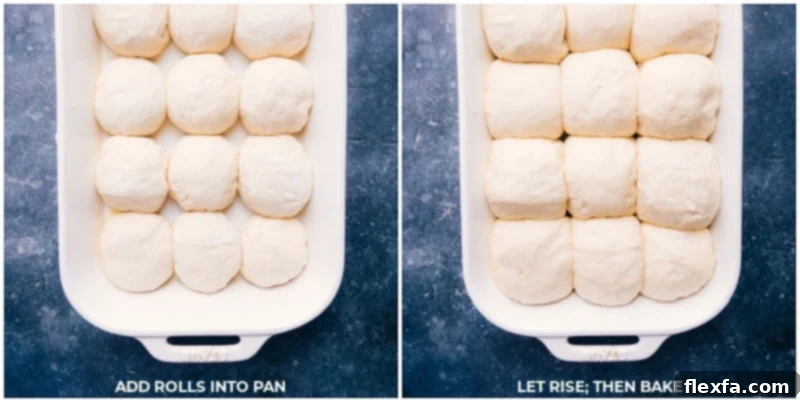
- Shape the Rolls: Lightly flour a clean work surface and your hands. With a floured spatula, gently scrape the risen dough onto the surface. Carefully shape the dough into a rough rectangular log. Using a sharp knife or bench scraper, cut the log into 12 equal pieces. A good technique is to first cut it into quarters, then each quarter into three. Take each piece and form it into a smooth ball. Do this by pulling the edges of the dough from the top down and pinching them together underneath, then gently rolling the ball on the work surface with the pinched side down. Arrange these beautifully shaped balls in a greased 9×13-inch baking pan, typically in 4 rows of 3. Cover the pan loosely with lightly greased plastic wrap to prevent drying.
- Second Rise (Proofing): Allow the shaped rolls to undergo their second rise. Place the covered pan back in a warm spot for another 20-30 minutes, or up to 45 minutes, until they have nearly doubled in size and look visibly puffy. This final rise contributes significantly to their light and airy texture.
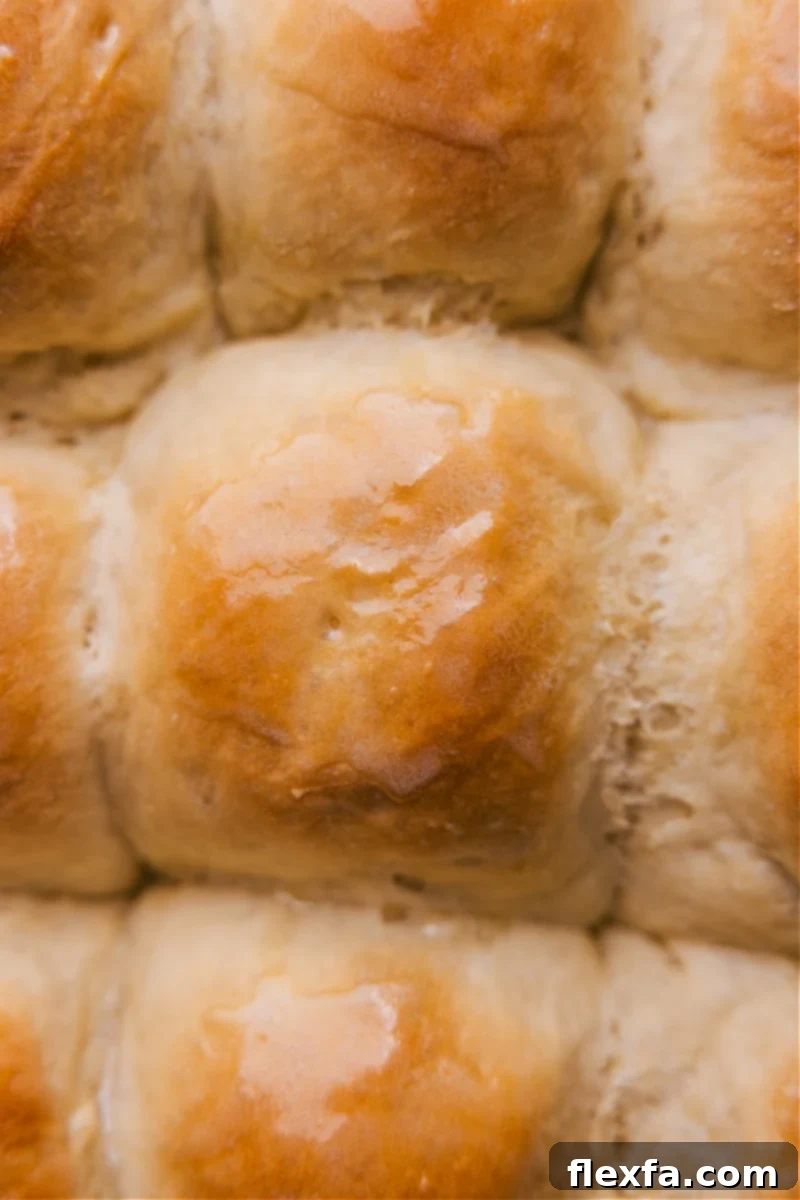
- Bake to Golden Perfection: While your rolls are enjoying their second rise, preheat your oven to 350°F (175°C). Once the rolls have risen adequately, remove the plastic wrap and place the pan in the preheated oven. Bake for approximately 45-50 minutes, or until the tops are beautifully golden brown and they sound hollow when lightly tapped. As soon as they come out of the oven, brush the tops with the remaining 1 tablespoon of melted butter for an extra touch of richness and shine. Let them cool slightly in the pan before serving warm.
Quick Tip: Understanding Yeast Proofing
Have you ever wondered why we “proof” yeast? It’s a simple yet crucial step to ensure your bread rises beautifully. Think of it as a quality check for your yeast. When you combine warm water, a touch of sugar (like honey), and yeast, you’re creating the perfect environment for the yeast to activate. If it’s fresh and alive, it will consume the sugar and produce carbon dioxide, resulting in a bubbly, foamy mixture. This “proof” tells you your yeast is active and ready to make your rolls light and fluffy. If it doesn’t foam, your yeast might be old or the water too hot, meaning it’s time to start fresh!
Expert Tips for Consistently Perfect No-Knead Dinner Rolls
Achieving bakery-quality dinner rolls at home is entirely possible with a few insider tips. Pay attention to these details for the best results every time:
- Ensure Foamy Yeast: The Foundation of Fluffy Rolls. As mentioned, properly proofed yeast is paramount. If your yeast mixture doesn’t become wonderfully foamy and fragrant after 5-10 minutes, it’s a clear sign that your yeast is either inactive (too old) or the water you used was too hot (which can kill the yeast) or too cold (which won’t activate it). Don’t proceed with a non-foamy mixture; instead, discard it and start again with fresh yeast and properly tempered water to avoid dense, flat rolls.
- Optimal Rising Environment: Speed Up or Slow Down as Needed. Dough loves a warm, consistent temperature. The ideal temperature for dough to rise is around 70°F (21°C).
- To speed up rising: Place the covered bowl in a slightly warm oven (preheat to 170°F/75°C for 5-10 minutes, then turn it OFF before putting the dough in), near a low-heat fireplace, or even on top of a warm appliance like a refrigerator.
- Avoid extremes: Too hot an environment can kill the yeast and lead to an over-proofed dough with an alcoholic smell, while too cold will drastically slow down the rise, potentially leading to a less airy texture.
- Gentle Handling for a Tender Crumb. When you’re ready to shape your rolls, remember that gentle hands are key. Avoid overworking the dough, which can develop too much gluten and result in tough rolls. A lightly floured surface and hands will prevent sticking without incorporating too much extra flour.
- Mastering the Roll Shape: To create those beautifully smooth, round dinner rolls, simply pull the edges of each dough piece from the top towards the bottom, gathering and pinching them firmly underneath to create tension on the surface. Then, place the pinched side down on your floured work surface and gently cup your hand over it, moving it in small circles to round out the ball. This technique ensures a smooth top and uniform rise.
- Don’t Overbake: Keep a close eye on your rolls towards the end of the baking time. Overbaking can lead to dry, tough rolls. They should be golden brown and sound hollow when tapped on the bottom. If the tops are browning too quickly, you can loosely tent the pan with foil for the last 10-15 minutes of baking.
Creative Variations for Your Dinner Rolls
While these honey-kissed rolls are perfectly sweet and delightful on their own, especially with a spread of jam, they also serve as a fantastic canvas for other flavors. Here are a few ideas to customize your batch:
- Sweet Soft Dinner Rolls: For an even sweeter treat, add 2-3 tablespoons of white granulated sugar to the flour mixture along with the salt. This slight increase in sweetness makes them ideal for breakfast or dessert.
- Garlic Herb Rolls: Infuse savory goodness by adding 1-2 teaspoons of dried Italian herbs (or a mix of dried parsley, oregano, and basil) and a teaspoon of garlic powder to the flour mixture. You can also brush the baked rolls with garlic butter (melted butter mixed with minced fresh garlic and parsley) instead of plain melted butter.
- Cheesy Rolls: Fold in ½ cup of shredded cheddar, Parmesan, or a mozzarella blend into the dough during the final mixing stage, just before the first rise. The cheese will melt into gooey pockets, adding a savory twist.
- Everything Bagel Rolls: After brushing the risen rolls with melted butter before baking, sprinkle generously with everything bagel seasoning for a unique, savory crust.
- Whole Wheat Blends: For a slightly healthier and heartier roll, substitute up to 1 cup of the all-purpose flour with whole wheat flour. Note that this might require a tiny bit more liquid and could result in a slightly denser roll, but still delicious!
Your Questions Answered: Dinner Rolls FAQs
Dinner rolls are small, individual-sized portions of bread primarily served as a side dish to complement a meal. Historically, their smaller size made them easy to pass around a table and consume without needing to slice a larger loaf. They add texture, flavor, and a comforting carb element to a diverse range of dishes, perfect for soaking up sauces or enjoying with butter.
While there are countless types of bread, dinner rolls typically stand out due to their smaller, individual serving size and often a softer, richer dough. Unlike crusty artisanal breads or dense whole-grain loaves, classic dinner rolls are usually characterized by a tender, puffy interior, a delicate and soft crust, and a subtle buttery flavor. They are most commonly made with all-purpose white flour, which contributes to their light texture. Their purpose is usually to accompany a meal, rather than being the main star.
Several factors can lead to dense or heavy dinner rolls instead of light and fluffy ones:
- Inactive or Dead Yeast: This is the most common culprit. If your yeast isn’t active (meaning it didn’t foam during proofing), it won’t produce enough carbon dioxide to make the dough rise.
- Too Much Flour: Adding too much flour makes the dough stiff and difficult to rise, resulting in a dense texture. Always measure flour accurately, ideally by weight, or spoon and level when using cups.
- Not Enough Proofing Time: The dough needs sufficient time to rise properly. If you rush the first or second rise, the rolls won’t develop enough air pockets to become light and airy. Ensure your rising environment is warm enough.
- Overworking the Dough: While these are no-knead, aggressive mixing or shaping can still overdevelop gluten, leading to a tougher texture. Be gentle during mixing and shaping.
- Incorrect Water Temperature: Water that’s too hot will kill the yeast, and water that’s too cold won’t activate it effectively. Aim for around 105-115°F (40-46°C).
Jazzing up your dinner rolls is a fun way to tailor them to your meal or preferences! Here are some delightful ideas:
- Herb-Kissed Butter: After baking, brush the warm rolls with melted butter infused with fresh chopped herbs like thyme, parsley, oregano, or rosemary.
- Sweet Spreads: Serve them alongside an array of gourmet butters (like honey butter or cinnamon butter) and a selection of homemade or artisanal fruit jams.
- Savory Salt Flakes: For a simple yet elegant touch, brush with melted butter and sprinkle a few flakes of flaky sea salt on top right after baking.
- Garlic Parmesan: Mix minced garlic and grated Parmesan cheese into the melted butter before brushing it over the hot rolls.
- Sesame Seeds: For a nutty crunch, sprinkle sesame seeds on top of the rolls before the second rise or before baking.
Absolutely! This recipe is incredibly flexible. After the initial 30-minute rise at room temperature, you can place the covered dough in the refrigerator for 8-12 hours (or even up to 24 hours). This slow, cold fermentation develops even deeper flavor. Just remember to bring the dough back to room temperature for about 30 minutes, or until it has nearly tripled in size, before shaping and proceeding with the second rise and baking.
For optimal freshness, these rolls are truly best enjoyed the same day they are baked. However, if you have leftovers, allow them to cool completely on a wire rack to prevent sogginess. Once fully cool, store them in an airtight bag or container at room temperature for up to 2-3 days. Avoid refrigerating them, as the cold air tends to dry out bread and make it stale faster. For longer storage, freezing is your best option (see “Storing Dinner Rolls” section for details).
The Perfect Accompaniment: What To Serve With Your No-Knead Dinner Rolls
These soft, buttery dinner rolls are incredibly versatile and make a fantastic addition to almost any meal. Their tender crumb and slight sweetness make them ideal for dunking, sopping up delicious sauces, or simply enjoying with your favorite spreads.
- Hearty Main Courses: They are the quintessential side for robust, comforting meals. Imagine tearing into a warm roll alongside a rich Shepherd’s Pie, a slow-cooked CrockPot Pot Roast, or a savory Spaghetti Bolognese. They’re perfect for sopping up every last drop of flavorful gravy or sauce.
- Soups and Stews: There’s nothing quite like dipping a warm, fluffy roll into a steaming bowl of soup. They pair wonderfully with creamy varieties like Broccoli Cheddar Soup, a comforting Creamy Vegetable Soup, or a hearty Creamy Italian Sausage Tortellini Soup.
- Holiday Feasts: These rolls are an absolute staple for any holiday spread. Whether it’s Easter brunch, a lavish Thanksgiving dinner, or a festive Christmas meal, these homemade rolls will undoubtedly be a crowd-pleaser and disappear quickly from the table.
- Barbecues and Potlucks: Don’t limit them to formal dinners! These rolls are excellent with grilled meats, pulled pork sandwiches, or as an accompaniment to any casual potluck dish.
- Breakfast or Brunch: While traditionally a dinner item, a slightly sweeter version (see variations) or even these plain rolls are fantastic with scrambled eggs, bacon, or alongside fruit salad for a delightful breakfast or brunch.
Storing & Enjoying Your No-Knead Dinner Rolls Later
While these magnificent rolls are at their absolute peak of flavor and texture the very same day they are baked, proper storage ensures you can enjoy them for a little longer, or even save some for future meals.
Once baked, it’s crucial to let your rolls cool completely on a wire rack for at least an hour before storing them. This prevents condensation from building up inside the storage container, which can make the rolls soggy. After cooling, place them in an airtight bag or container and store them at room temperature. A key tip: **do not refrigerate dinner rolls!** The cold environment of a refrigerator actually speeds up the staling process, making your rolls dry and tough much faster than if left at room temperature.
- Room Temperature Storage: Stored in an airtight container at room temperature, these rolls will stay fresh for up to 2-3 days, though their texture will be slightly less soft than on day one.
- Freezing Baked Rolls: For longer preservation, freezing is your best friend. Once the rolls are completely cool, wrap each one individually in aluminum foil. Then, place the foil-wrapped rolls into a freezer-safe airtight bag or container. They can be stored in the freezer for up to 2-3 months without significant loss of quality.
- Thawing and Reheating Frozen Rolls: To enjoy your frozen rolls, simply take them out of the freezer and let them thaw overnight at room temperature (still wrapped in foil). Once thawed, or even straight from frozen (they’ll just need a bit more time), you can reheat them in your oven. Place the foil-wrapped rolls in a preheated oven at 300°F (150°C) for about 10-15 minutes (or 20-25 minutes if reheating from frozen) until warmed through and soft. Serve immediately for that fresh-baked experience.
A Note on Texture and Flavor: It’s important to manage expectations – while still delicious, rolls that have been frozen and thawed, or those enjoyed on the second or third day, may lose some of their initial crispness and pristine fresh-from-the-oven texture and flavor. However, a quick reheat can often revive much of their softness and warmth.
Before You Start: A Quick Recommendation
Although this is an incredibly straightforward recipe, I highly recommend reading through the entire set of instructions and recipe notes below before you begin. Familiarizing yourself with all the steps and tips will ensure a smooth baking process and guarantee you achieve the best possible results with these truly amazing no-knead dinner rolls!
Explore More Easy Bread Recipes
If you loved the simplicity and deliciousness of these no-knead dinner rolls, you’re in for a treat! Here are some more fantastic bread recipes from my kitchen that minimize effort and maximize flavor:
- Hawaiian Roll Cinnamon Rolls: A brilliant shortcut recipe using packaged Hawaiian rolls for a quick and incredibly tasty cinnamon roll experience.
- No-Knead Focaccia: Dive into the world of focaccia with another simple, no-knead method that yields a beautifully airy and flavorful Italian flatbread.
- Artisan Overnight Herb Bread: For those who appreciate the rustic charm of artisan bread, this recipe offers an overnight rise for deep flavor and a fantastic crust with minimal effort.
- Classic French Bread: Achieve that coveted crusty exterior and soft, chewy interior with this approachable recipe for a beloved classic.
- Easy No-Knead Cinnamon Rolls: Indulge in warm, gooey cinnamon rolls with all the flavor and none of the kneading hassle. Perfect for a weekend breakfast!
Print Recipe
Life-Changing No-Knead Dinner Rolls
Chelsea Lords
15
45-50
~2.5
~3.5
12 rolls
Equipment
-
9 x 13-inch baking pan (ceramic recommended for even baking)
-
Large mixing bowls (2)
-
Sturdy rubber spatula
-
Whisk
-
Measuring cups and spoons
Ingredients
- 5 tablespoons unsalted butter divided (4 tbsp melted for dough, 1 tbsp melted for brushing)
- 3 teaspoons instant yeast or active dry yeast (see Note 1)
- 3 tablespoons honey divided (1 tbsp for yeast, 2 tbsp for dough)
- 1-1/2 cups water warm (110℉ / 43°C – see Note 2)
- 2 large eggs
- 4-1/2 cups all-purpose flour plus more for dusting work surface and hands
- 2 teaspoons fine sea salt
Instructions
-
In a microwave-safe bowl, melt 4 tablespoons of the unsalted butter. Set it aside to cool completely to room temperature. This is crucial as hot butter can kill the yeast.
-
In a medium bowl, combine the instant yeast, 1 tablespoon of honey, and the warm water. Whisk these ingredients together gently. Allow the mixture to sit for 5-10 minutes. It should become visibly creamy and foamy on the surface; this indicates the yeast is active. If no foam appears, your yeast may be inactive, or the water was too hot or cold, and you will need to start over with fresh yeast and properly tempered water.
-
Once the melted butter is at room temperature, add the remaining 2 tablespoons of honey and the large eggs to the butter bowl. Whisk everything together until the mixture is smooth and well combined.
-
In a large mixing bowl, whisk together the all-purpose flour and fine sea salt until evenly distributed. Create a shallow well in the center of the dry ingredients. Pour the cooled butter-egg mixture and the activated yeast mixture into this well. Using a strong rubber spatula, stir the ingredients together thoroughly until a thick, shaggy dough forms and there are no dry streaks of flour visible. Remember, no kneading is required! Cover the bowl tightly with plastic wrap.
-
First Rise (Bulk Fermentation):
For Same-Day Rolls: Place the covered dough in a warm, draft-free environment (around 70°F or 21°C is ideal) for 90–120 minutes, or until the dough has nearly tripled in size. This usually takes about 90 minutes.
For Overnight Rolls: Allow the dough to rise in a warm, draft-free environment for 30 minutes. After this initial rise, transfer the covered bowl to the refrigerator for 8–12 hours (or up to 24 hours). Before shaping, remove the dough from the refrigerator and let it stand at room temperature for 30-60 minutes, or until it has nearly tripled in size, indicating it’s ready to be shaped.
-
Shape the Rolls: Lightly spray a 9×13-inch baking pan generously with cooking spray. Flour a large, clean work surface and lightly dust your hands with flour. Using a floured spatula, gently scrape the risen dough out of the bowl onto the floured surface. Carefully shape the dough into a rectangular log. Cut this log into 4 equal pieces, then cut each of those pieces into 3 smaller, equal pieces, resulting in 12 dough balls in total. Dust with additional flour as needed to prevent the dough from sticking.
To shape each piece into a smooth ball: take a piece of dough, pull the edges from the top down and pinch them together tightly underneath. Place the pinched side down on your work surface and gently cup your hand over the dough, rolling it in small circles to create a smooth, round ball. Arrange these shaped balls into the prepared 9×13-inch pan, typically in 4 rows of 3. Cover the pan loosely with lightly greased plastic wrap to prevent the rolls from drying out.
-
Second Rise (Final Proof): Allow the shaped rolls to rise again in a warm, draft-free spot for 20–30 minutes, or up to 45 minutes, until they have visibly plumped up and nearly doubled in size. This final rise is crucial for a light and airy texture.
-
While the rolls are completing their second rise, preheat your oven to 350°F (175°C). Once the rolls have sufficiently risen, carefully remove the plastic wrap. Bake the rolls for 45–50 minutes, or until their tops are beautifully golden brown and they sound hollow when gently tapped. Immediately after removing them from the oven, brush the tops with the remaining 1 tablespoon of melted unsalted butter for a glorious sheen and rich flavor.
-
Allow the freshly baked rolls to cool slightly in the pan on a wire rack for about 10-15 minutes before serving them warm. Enjoy!
Recipe Notes
Note 2 – Water Temperature: The ideal temperature for warm water to activate yeast is between 105°F to 115°F (40°C to 46°C). You can test the temperature on your wrist – it should feel comfortably warm, like a baby bottle, not hot or cold. Using a thermometer is the most accurate way to ensure success.
Storage: These rolls are truly at their peak the same day they are made. Once fully cooled, store them at room temperature in an airtight container or bag for up to 2-3 days. Avoid refrigeration as it causes bread to go stale faster.
Freezing: To freeze baked rolls, ensure they are completely cool. Wrap each roll individually in aluminum foil, then place them all into a large freezer-safe airtight bag or container. Freeze for up to 2-3 months. To thaw, leave them out overnight at room temperature. Reheat in foil in a preheated oven at 300°F (150°C) for about 10-15 minutes until warm and soft.
Nutrition
Calories: 400kcal |
Carbohydrates: 72g |
Protein: 11g |
Fat: 7g |
Saturated Fat: 3g |
Polyunsaturated Fat: 1g |
Monounsaturated Fat: 2g |
Trans Fat: 0.2g |
Cholesterol: 44mg |
Sodium: 405mg |
Potassium: 148mg |
Fiber: 3g |
Sugar: 3g |
Vitamin A: 191IU |
Vitamin C: 0.01mg |
Calcium: 28mg |
Iron: 4mg
Nutrition information is automatically calculated and is an approximation only. It may vary based on specific ingredients and preparation methods.
Loved this recipe? Leave a comment below and share your experience!
Your feedback helps other bakers!