

Start your day with these incredibly delicious Tart Cherry Scones! They are generously packed with vibrant, tart dried cherries, infused with a delicate hint of almond flavor, and beautifully crowned with a luscious, sweet orange glaze. These scones promise a delightful melt-in-your-mouth experience that will quickly become a favorite morning treat or a perfect accompaniment to your afternoon tea.


Author’s Culinary Journey
Discover the Secret to Melt-in-Your-Mouth Cherry Scones!
I’ve been absolutely captivated by the art of scone-making ever since I mastered my Pumpkin Chocolate Chip Scones. For a long time, I harbored a misconception that homemade scones were destined to be dry, crumbly, and utterly underwhelming. This belief often led me to bypass them in favor of other baked goods.
However, after countless hours of diligent testing, tweaking, and refining that pumpkin scone recipe, I experienced a culinary revelation. I discovered just how incredibly tender, flaky, and flavorful homemade scones could be! It was a game-changer, and I’ve been utterly hooked ever since.
My scone obsession led me to explore a variety of flavors. I’ve already successfully created beloved Strawberry Scones and decadent Chocolate Chip Scones. But the journey wouldn’t be complete without a cherry version. After several rounds of experimentation, I finally pinpointed the crucial element that elevates these cherry scones to perfection: tart dried cherries.
Trust me when I say, these scones are truly something extraordinary. They burst with vibrant cherry flavor, complemented beautifully by a subtle almond undertone, and possess that coveted soft, melt-in-your-mouth texture. The exquisite balance of tartness and sweetness makes it incredibly challenging to resist reaching for just one more. Prepare to impress your family and friends with this exceptional recipe!
Rave Reviews from Our Community!
“THE BEST scone recipe! I made them last week, and my coworkers absolutely adored them. Today, I even adapted your basic recipe with lime and coconut, and OMG! They were incredible. Thank you so much for sharing!”
– JB
Why You’ll Love These Tart Cherry Scones
These aren’t just any scones; they are a testament to how simple ingredients, combined with the right technique, can create a truly memorable baked good. Here’s why this recipe stands out:
- Perfectly Flaky & Tender Texture: Say goodbye to dry, crumbly scones! Our recipe guarantees a tender, moist interior with those desirable flaky layers that define a truly exceptional scone.
- Vibrant Cherry Flavor: By using dried tart cherries, we ensure an intense, concentrated cherry flavor that’s perfectly balanced by the sweetness of the glaze. The tartness cuts through the richness, preventing the scones from being overly sweet.
- Aromatic Almond & Orange Notes: A subtle hint of almond extract complements the cherries beautifully, while fresh orange zest and juice infuse both the dough and the glaze with a bright, citrusy aroma that is simply irresistible.
- Easy to Master: Even if you’re new to baking, our detailed, step-by-step instructions will guide you through the process, making scone creation enjoyable and stress-free.
- Versatile Treat: Ideal for breakfast, brunch, afternoon tea, or as a delightful dessert. They’re impressive enough for guests but simple enough for a weekday indulgence.
Key Ingredients for Perfect Cherry Scones
Crafting the perfect scone begins with understanding the role each ingredient plays. Here’s a breakdown of what you’ll need and why it’s essential:
- Unsalted Butter (Frozen and Cubed): This is the secret to flakiness! Keeping the butter super cold and cutting it into small pieces prevents it from fully incorporating into the flour. As the butter melts during baking, it releases steam, creating airy pockets and those coveted flaky layers in your scones. Unsalted butter also gives you control over the overall saltiness.
- Orange Zest & Fresh Orange Juice: The zest adds a bright, aromatic citrus essence directly into the dough, enhancing the overall flavor profile. The juice is then used to create a vibrant, tangy-sweet glaze that perfectly complements the cherries and adds a beautiful finish.
- Granulated Sugar & Powdered Sugar: Granulated sugar provides the foundational sweetness and helps tenderize the scone dough, contributing to its soft texture. Powdered sugar, with its finer consistency, is essential for creating a smooth, lump-free glaze.
- Baking Powder: Our primary leavening agent! Baking powder reacts with the moisture in the dough and the heat of the oven to produce carbon dioxide gas, which causes the scones to rise beautifully and become wonderfully fluffy and light.
- All-Purpose Flour (Spoon and Leveled): Provides the essential structure for the scone dough. It’s crucial to measure it correctly by spooning it into the measuring cup and leveling it off, as too much flour can lead to dry, dense scones.
- Heavy Cream: This rich ingredient adds moisture and fat to the dough, resulting in a tender crumb. It’s also used for brushing the tops of the scones before baking, encouraging a golden-brown crust and a slightly crisp exterior.
- Large Egg: Acts as a binder, helping to hold all the ingredients together and adding richness. The egg also contributes to the scone’s golden color and slightly improves its texture.
- Vanilla Extract and Almond Extract (Optional): Vanilla extract offers a classic, warm, and sweet aroma. Almond extract, though optional, truly enhances the cherry flavor, creating a harmonious and sophisticated taste combination that makes these scones truly special.
- Dried Tart Cherries: These are the star of the show! Dried tart cherries provide an intense, chewy burst of fruity flavor that is far superior to fresh or frozen cherries in scones, as they don’t add excess moisture to the dough. Their tartness balances the sweetness of the scone and glaze perfectly.
- White Sparkling Sugar (Optional): A sprinkle of sparkling sugar on top before baking adds a beautiful crystalline crunch and a lovely presentation.

Step-by-Step: How To Make Irresistible Cherry Scones
Creating these delightful cherry scones is a rewarding experience. Follow these detailed steps to ensure perfectly flaky and flavorful results every time:
- Prepare Your Ingredients & Workspace: The golden rule for flaky scones is to keep everything cold. Begin by cubing your unsalted butter and placing it in the freezer to chill thoroughly while you prepare other ingredients. Zest two large oranges to get about 2 tablespoons of zest and set it aside. Juice the same oranges to yield 2 tablespoons of fresh orange juice for the glaze. Line a large baking sheet with parchment paper or a silicone baking mat.
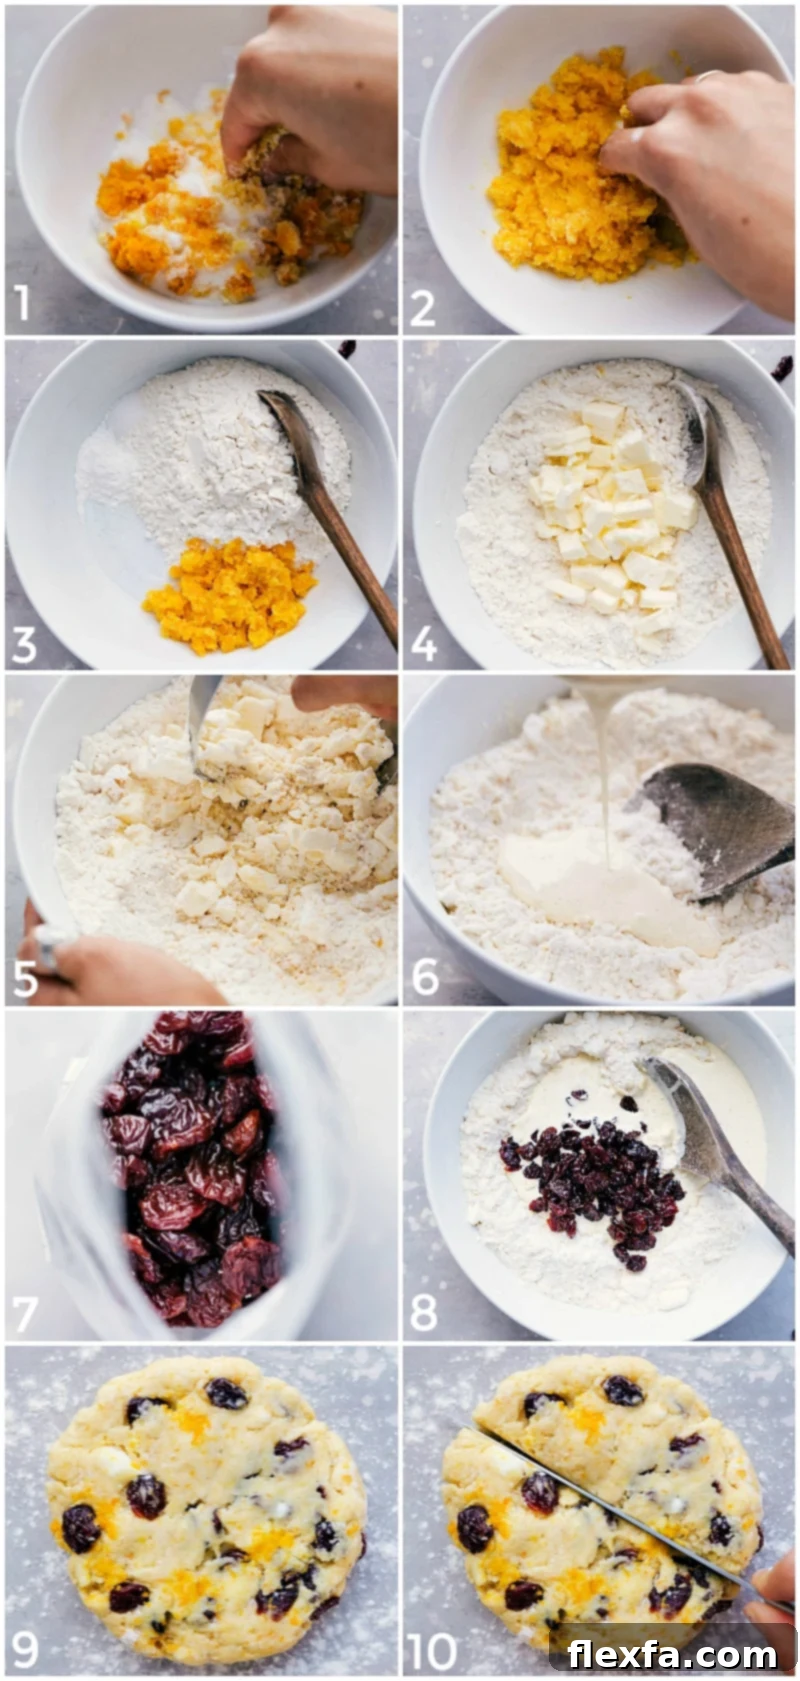
- Combine Dry Ingredients: In a spacious mixing bowl, combine the orange zest with the granulated sugar. Use your fingertips to gently rub the zest into the sugar; this technique releases the aromatic oils from the zest, infusing the sugar with incredible citrus flavor. Next, add the baking powder, salt, and the measured flour (remember to spoon and level!). Whisk these dry ingredients together thoroughly until well combined.
- Whisk Wet Ingredients: In a separate, smaller bowl, whisk together 1/2 cup of heavy cream, one large egg, vanilla extract, and the optional almond extract until the mixture is smooth and uniform.
- Incorporate Butter & Wet Mixture: Add the frozen, cubed butter directly into your bowl of dry ingredients. Using a pastry cutter (or your fingertips, working quickly), cut the butter into the dry mixture until it resembles coarse crumbs, with some pieces of butter still about the size of small peas. This step is crucial for flakiness. Create a small well in the center of these ingredients and pour in the whisked wet mixture. With a wooden spoon or spatula, gently fold the ingredients together until a dough just begins to form. As soon as you see the dough coming together, add the dried tart cherries. Mix as little as possible – just enough until everything is moistened and the cherries are mostly dispersed. Overmixing develops gluten, which leads to tough scones.
- Shape & Chill the Dough: Lightly flour a clean work surface and gently turn out the scone dough onto it. With lightly floured hands, carefully bring the dough together into a cohesive ball. Handle the dough as minimally as possible. If the dough feels too sticky, add a tiny sprinkle more flour; if it seems too dry, incorporate 1-2 tablespoons of additional heavy cream. Once cohesive, gently press the dough into a disc about 1-inch thick. Cut this disc exactly in half, then form each half into a smaller, roughly 5-inch wide disc. Wrap these discs tightly in plastic wrap and chill them in the refrigerator for at least 10 minutes. This chilling period helps the butter firm up, leading to better rise and flakiness.
- Cut, Brush & Prepare for Baking: After chilling, remove the dough discs from the fridge. Using a very sharp knife, cut each disc into 8 equal wedges (like slicing a pizza). Make decisive, clean cuts rather than sawing motions, which can hinder the rise. Arrange the wedges on your lined baking sheet, spacing them about 2 inches apart. Pour the remaining 2-3 tablespoons of heavy cream into a small dish and, using a pastry brush, gently brush the tops of each scone. If desired, sprinkle them generously with white sparkling sugar for an added crunch and sparkle.
- Final Chill & Preheat: Once again, refrigerate the scones on the baking sheet for another 20 minutes. While they chill, preheat your oven to 400°F (200°C). This ensures the oven is at the perfect temperature when the scones go in, promoting a quick rise and tender interior.
- Bake to Golden Perfection: Bake the scones for 17-25 minutes, or until their edges are a beautiful light golden brown and the tops are just starting to brown. It’s essential to keep a close eye on them, as overbaking can result in a drier, denser scone with less flavor. In my oven, they typically reach perfection around the 19-20 minute mark. Once baked, remove them from the oven and let them cool on the baking sheet for a few minutes before carefully transferring them with a metal spatula to a wire cooling rack to cool completely.
- Glaze & Enjoy: While the scones cool, prepare the vibrant orange glaze. In a small bowl, whisk together 1 cup of powdered sugar with the 2 tablespoons of fresh orange juice. If you prefer a thinner glaze, you can add a tiny bit more orange juice, a teaspoon at a time, until it reaches your desired consistency. Once the scones are completely cooled (this is important, or the glaze will melt), generously drizzle the orange glaze over them. Allow the glaze to set for a few minutes before serving. Enjoy these scrumptious, melt-in-your-mouth cherry scones!
Quick Tip for Ultimate Flakiness!
#1 Pro Tip: The absolute key to achieving wonderfully flaky, tender scones is to keep your butter and dough as cold as humanly possible! I go to great lengths: I chill my flour in the fridge for 10-20 minutes before starting, I cube and freeze the butter until the very last moment, and I ensure all wet ingredients (like cream and egg) are taken straight from the refrigerator just before mixing. The colder your dough stays throughout the process, the more distinct and airy those coveted flaky layers will be. Don’t compromise on cold!

Storing Your Delicious Cherry Scones
Proper storage ensures your scones remain fresh and delightful for as long as possible. Here’s how to keep your cherry scones at their best:
- Room Temperature: If your scones are glazed, ensure the glaze has fully set. Store them in an airtight container at room temperature for up to 2 days. This is ideal for immediate enjoyment.
- Refrigerate: For slightly longer freshness, place your cherry scones in an airtight container and store them in the refrigerator for up to 1 week. Bring them to room temperature or gently warm them before serving for the best texture.
- Freeze (Baked Scones): For extended storage, allow the baked scones to cool completely. Wrap each scone individually in plastic wrap, then place them in a freezer-safe airtight container or heavy-duty freezer bag. They can be frozen for up to 3 months. Thaw them at room temperature or warm gently in a low oven (around 300°F/150°C) for 10-15 minutes until heated through.
- Freeze (Unbaked Scones): You can also prepare the dough and freeze the unbaked wedges! After cutting the dough into wedges and brushing with cream (before the sugar), place them on a parchment-lined baking sheet and freeze until solid (about 1-2 hours). Transfer the frozen wedges to a freezer-safe bag or container and freeze for up to 1 month. When ready to bake, place frozen scones on a lined baking sheet, brush with cream, sprinkle with sugar (if using), and bake from frozen at 400°F (200°C) for 20-28 minutes, adding a few extra minutes to the baking time.
Serving Suggestions & Delightful Variations
These cherry scones are exquisite on their own, but here are some ideas to elevate your experience:
- Classic Accompaniments: Serve them warm with a dollop of clotted cream, a spoonful of cherry jam, or a side of fresh berries. They pair wonderfully with a hot cup of coffee, tea, or even a glass of cold milk.
- Brunch Star: Arrange them on a platter for your next brunch gathering. They look beautiful and are always a crowd-pleaser.
- Seasonal Swaps:
- Mixed Berry Scones: Replace dried cherries with a combination of dried cranberries, blueberries, or raspberries.
- Lemon-Poppy Seed: Omit almond extract and orange zest, add lemon zest and a tablespoon of poppy seeds to the dough. Glaze with a lemon juice and powdered sugar mixture.
- Chocolate Cherry: Add 1/2 cup of mini chocolate chips along with the dried cherries for a richer flavor.
- Nutty Additions: Fold in 1/4 cup of chopped toasted pecans or walnuts along with the dried cherries for added texture and flavor.
Frequently Asked Questions About Scones
- What makes a scone dry?
- A common culprit for dry scones is overworking the dough, which develops gluten and makes the scones tough. Over-measuring flour or baking for too long can also lead to dryness. Always measure flour accurately (spooned and leveled) and mix until just combined.
- Can I use fresh or frozen cherries instead of dried?
- While you can, dried tart cherries are highly recommended for this recipe. Fresh or frozen cherries contain more moisture, which can make the dough too wet and result in a denser scone. If you absolutely must use them, chop them finely and toss them with a tablespoon of flour before adding to the dough to absorb some excess moisture, but be aware the texture might be different.
- How do I get flaky scones?
- The key to flaky scones is cold butter and minimal handling. Freezing your cubed butter and chilling your dough at various stages prevents the butter from fully incorporating. As the cold butter melts during baking, it creates steam pockets, leading to those desirable flaky layers.
- What’s the difference between scones and biscuits?
- Scones and biscuits are very similar, both quick breads. Scones typically contain eggs and sugar, giving them a richer, slightly sweeter profile, and are often served with jam and cream. Biscuits are usually savory, made without eggs or much sugar, and are served with gravies or as part of a meal.
Explore More Delightful Cherry Recipes:
Beverages
Refreshing Cherry Smoothie Recipe
Desserts
30-Minute Cinnamon Roll Cherry Danish
Desserts
Sweet & Salty Dried Tart Cherry Snack Mix
Desserts
Easy Skillet Cherry Crisp Recipe

Tart Cherry Scones with Orange Glaze
Chelsea Lords
These homemade Tart Cherry Scones are the perfect way to start your day! They feature plump, dried tart cherries, a delightful hint of almond flavor, and are finished with a vibrant, sweet orange glaze for an irresistible treat.
25 minutes
18 minutes
30 minutes
1 hour 13 minutes
16 scones
Recipe Video
Equipment
- Sheet pan (15″ x 10″) (lined with parchment paper or silicone mat)
- Pastry cutter
- Large mixing bowls
- Whisk
- Citrus zester and juicer
- Sharp knife
- Pastry brush
- Wire cooling rack
Ingredients
- 8 tablespoons unsalted butter, cubed and frozen
- 2 large oranges (for zest and juice)
- 1/2 cup granulated sugar
- 2 teaspoons baking powder
- 1/2 teaspoon salt
- 2 cups all-purpose flour, spooned and leveled
- 11 tablespoons heavy cream, divided (approximately 1/2 cup + 3 tablespoons)
- 1 large egg
- 1 teaspoon vanilla bean paste or vanilla extract
- 1/4 teaspoon almond extract (optional, but highly recommended)
- 3/4 cup dried tart cherries
- White sparkling sugar (optional, for topping)
- 1 cup powdered sugar
- 2 tablespoons fresh orange juice (from the oranges used earlier)
Instructions
- 1. Prep Ingredients: Ensure all your ingredients are as cold as possible. If desired, chill your flour in the fridge for 10-20 minutes. Cut the unsalted butter into small cubes and place them in the freezer until needed. Line a sheet pan with parchment paper or a silicone baking mat. Zest the oranges to yield 2 tablespoons of zest. Juice the oranges to get 2 tablespoons of orange juice for the glaze.
- 2. Combine Dry Ingredients: In a large bowl, combine the orange zest and granulated sugar. Rub them together with your fingers until the sugar is fragrant and fully infused with the orange zest. Add the baking powder, salt, and the measured flour. Whisk these dry ingredients together until well combined.
- 3. Prepare Wet Mixture: In a separate small bowl, whisk together 1/2 cup of heavy cream, the large egg, vanilla extract, and almond extract (if using) until smooth.
- 4. Mix Dough: Add the frozen cubed butter to the dry ingredients. Using a pastry cutter or your fingertips, cut the butter into the dry ingredients until the butter pieces are about the size of small peas and evenly dispersed. Make a well in the center of the mixture and pour in the wet ingredients. With a wooden spoon, gently combine the ingredients until a dough just begins to form. As soon as it comes together, add the dried cherries. Mix as little as possible, just until everything is moistened and mostly combined. Avoid overmixing.
- 5. Shape the Dough: Lightly flour a clean surface and turn the dough onto it. With lightly floured hands, gently work the dough into a cohesive ball, handling it minimally. If the dough is too sticky, add a tiny bit more flour; if it’s too dry, add 1-2 tablespoons of additional cream. Press the dough into a disc about 1-inch thick. Cut this disc exactly in half, then gently form each half into a smaller disc about 5 inches wide.
- 6. Chill & Cut Scones: Wrap the dough discs tightly in plastic wrap and chill them in the fridge for 10 minutes. Remove and place the discs back on your lightly floured surface. Using a very sharp knife, cut each disc into 8 equal wedges, making swift, decisive cuts. Place the wedges on your lined baking sheet, ensuring they are about 2 inches apart. Pour the remaining 2-3 tablespoons of heavy cream into a small dish, and using a pastry brush, brush the cream over the tops of the scones. If desired, sprinkle with coarse white sparkling sugar.
- 7. Final Chill & Preheat Oven: Refrigerate the scones on the baking pan for another 20 minutes. While they chill, preheat your oven to 400°F (200°C).
- 8. Bake: Bake the scones for 17-25 minutes, or until the edges are lightly golden brown and the tops are just browned. Keep a close eye on them, as overbaking can lead to a less flavorful and denser texture; my scones typically take about 19-20 minutes. Remove them from the oven and let them cool for a few minutes on the baking sheet before using a metal spatula to transfer them to a wire cooling rack to finish cooling completely.
- 9. Glaze & Serve: While the scones cool, whisk together the powdered sugar and 2 tablespoons of orange juice in a small bowl until smooth. Add additional juice for a thinner glaze, if desired, a teaspoon at a time. Once the scones are completely cooled, drizzle the orange glaze generously over them. Allow the glaze to set before serving. Enjoy your delicious homemade Tart Cherry Scones!
Recipe Notes
Storage: Keep baked and glazed scones in an airtight container at room temperature for up to 2 days. For longer storage, refrigerate them in an airtight container for up to 1 week. For even longer preservation, individually wrap cooled scones in plastic wrap, place them in an airtight container or freezer bag, and freeze for up to 3 months. Thaw frozen scones at room temperature or warm gently in a low oven.
Make Ahead: You can prepare the scone dough, cut it into wedges, and freeze them unbaked. Place the unbaked wedges on a parchment-lined sheet pan and freeze until solid. Transfer to a freezer bag and store for up to 1 month. When ready to bake, transfer frozen scones directly to a lined baking sheet, brush with cream, sprinkle with sugar, and bake at 400°F (200°C) for 20-28 minutes.
Nutrition Information (per scone)
- Calories: 270 kcal
- Carbohydrates: 43 g
- Protein: 4 g
- Fat: 9 g
- Saturated Fat: 6 g
- Cholesterol: 38 mg
- Sodium: 136 mg
- Potassium: 46 mg
- Fiber: 1 g
- Sugar: 18 g
- Vitamin A: 519 IU
- Vitamin C: 2 mg
- Calcium: 48 mg
- Iron: 2 mg
Nutrition information is automatically calculated and should only be used as an approximation. It may vary based on specific ingredient brands and preparation methods.
Love this recipe? Share your thoughts below!
Your feedback helps us create more delicious content!