
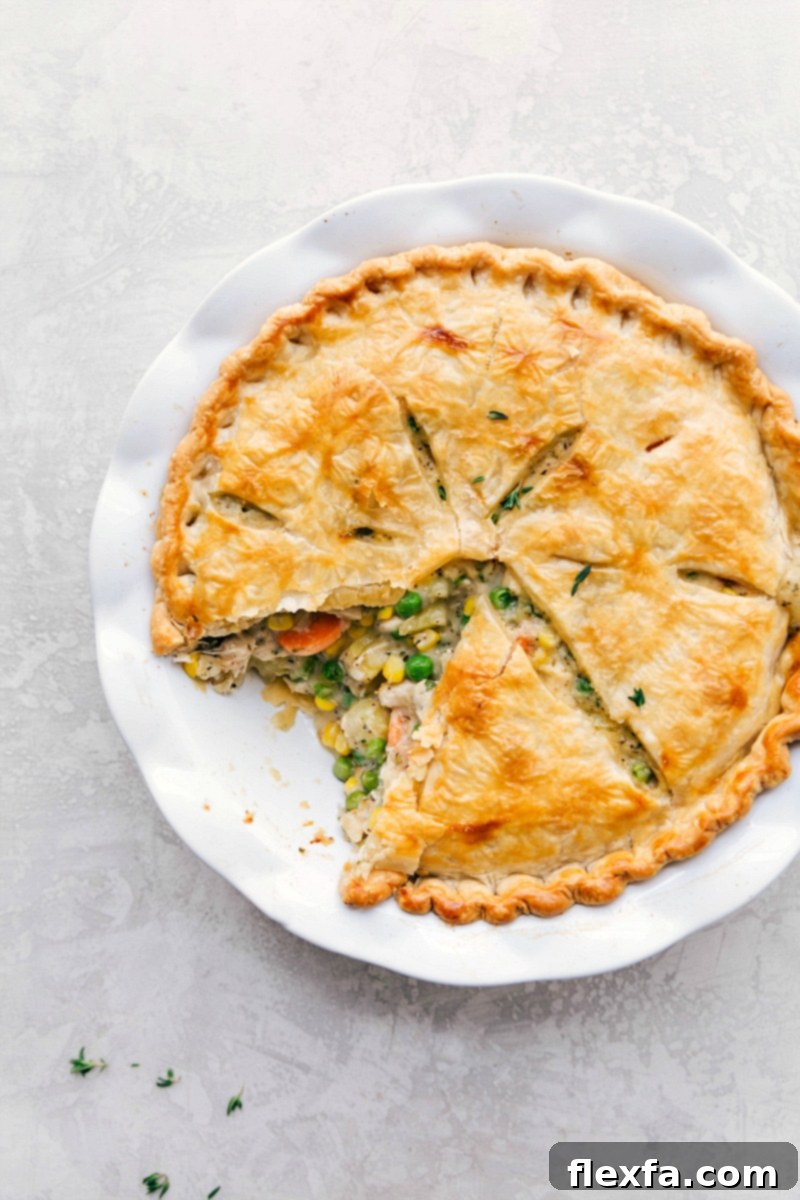
Welcome to the ultimate guide for crafting a truly exceptional **Chicken Pot Pie Recipe**. This beloved American classic isn’t just a meal; it’s a hug in a dish, bringing warmth and satisfaction to any table. Our recipe delivers an irresistible combination: a golden, incredibly flaky crust that shatters with every bite, a rich, exquisitely seasoned cream sauce, and a generously packed filling brimming with tender chicken and a vibrant medley of hearty vegetables. What makes this recipe truly special is its adaptability and convenience. We’ll show you how to prepare it with ease, offering tips to make it ahead of time, freeze for busy weeknights, and customize it using ingredients you already have on hand. Prepare to make a comforting masterpiece that your family will request again and again.
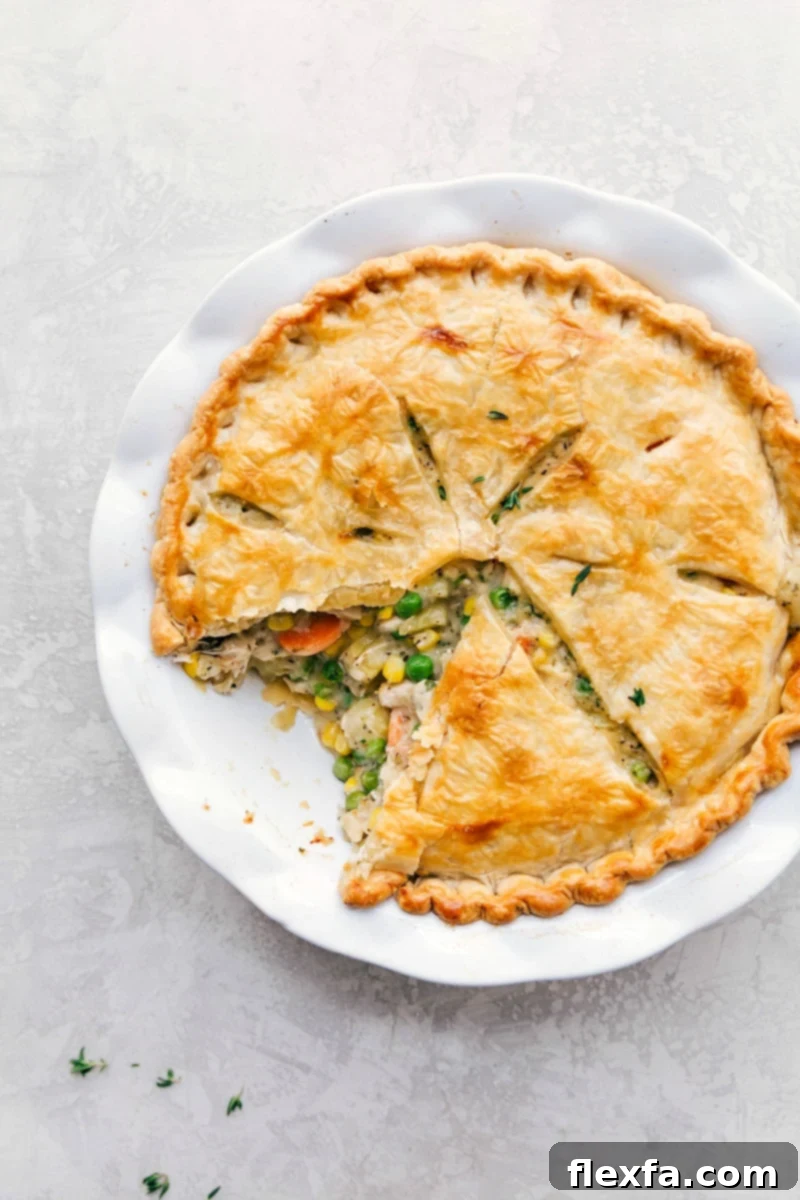

From the Author
The Secret to an Incredible Shortcut Chicken Pot Pie
In my kitchen, Chicken Pot Pie isn’t just a staple; it’s a family obsession. My children affectionately call it “chicken pie,” and it’s so popular that my 6-year-old will often ask for leftovers for breakfast the next morning! This dish holds a special place in our hearts, embodying comfort and homemade goodness.
I’ve certainly ventured into the realm of fussy, elaborate pot pie recipes over the years, spending hours cooking chicken from scratch and meticulously preparing every single component. While there’s a time and place for such culinary endeavors, I’ve honestly discovered that this simpler, shortcut version tastes just as phenomenal – if not better – and requires significantly less effort. My secret? I grab a flavorful rotisserie chicken from the store, which provides perfectly cooked, tender shredded meat in minutes. I rely on the convenience of frozen peas and corn for a quick veggie boost. The key, however, remains in crafting a sauce that is exceptionally rich, deeply flavorful, and perfectly seasoned, all tucked into a beautifully flaky double crust. This approach delivers maximum comfort and incredible taste with minimal stress, making it the perfect meal for any day of the week.
Essential Ingredients for Your Perfect Chicken Pot Pie
A truly delicious chicken pot pie hinges on the quality and balance of its ingredients. Here’s a detailed look at what you’ll need, complete with expert tips and potential substitutions to ensure your pot pie is nothing short of spectacular.
| Ingredient | Tips & Smart Swaps for Best Results |
|---|---|
| Pie Crusts (2) | The foundation of your pie! You can opt for a truly remarkable homemade flaky pie crust for a superior texture and taste, or choose high-quality store-bought pie crusts for maximum convenience. Always keep your dough as cold as possible before rolling and chill it again if it becomes too warm. This is crucial for preventing shrinkage and achieving that desirable flakiness. |
| Yukon Gold Potatoes (diced) | These potatoes are ideal for their creamy texture and ability to hold their shape after cooking. If Yukon Golds aren’t available, Russet potatoes are a great alternative, providing a similar starchiness. Ensure you cook them just until they are tender – typically 10-15 minutes – so they don’t become mushy when baked into the pie. Dicing them into small, even pieces (about 1/2 inch) ensures uniform cooking. |
| Unsalted Butter (for roux & sautéing) | Butter forms the base for sautéing your vegetables and creating the roux for the creamy sauce. Using unsalted butter allows you to precisely control the overall saltiness of your dish. Don’t skimp on this; it’s key to richness. |
| Yellow Onion (diced) | A foundational aromatic that adds a sweet, savory depth to the filling. Dicing them finely will help them cook down smoothly into the sauce without large chunks. |
| Minced Garlic | Garlic provides a pungent, aromatic kick that complements the other savory ingredients. Freshly minced garlic offers the best flavor, but pre-minced garlic is a convenient shortcut. Add it towards the end of sautéing to prevent burning. |
| Carrots (thinly sliced) | Carrots add a touch of sweetness, vibrant color, and essential nutrients. Slicing them thinly ensures they become tender within the cooking time and integrate well into the filling. Don’t undercook them in the sauté step, as they won’t soften much more in the oven. |
| Celery (thinly sliced) | Celery contributes a subtle savory note and a slight crunch that contrasts nicely with the creamy sauce. Like carrots, thin slices are best for texture and even cooking. |
| All-Purpose Flour (for roux) | This is the thickening agent for our luscious cream sauce. When making the roux, cook the flour for at least one minute after adding it to the butter. This step is critical to eliminate the raw flour taste, which can otherwise make your sauce taste pasty. For gluten-free needs, a 1:1 gluten-free flour blend generally works beautifully. |
| Chicken Stock or Broth | The primary liquid for the sauce. Opt for low-sodium chicken stock to give you full control over the salt levels in your pot pie. High-quality broth also works well. For an even deeper flavor, homemade chicken stock is always a fantastic choice. |
| Heavy Cream | Indispensable for achieving that luxurious, velvety texture that defines a classic chicken pot pie. For a slightly lighter option, half-and-half can be substituted, though it will result in a less rich sauce. In a pinch, whole milk can be used, but you may need to simmer the sauce longer to reach the desired thick consistency. |
| Salt & Pepper | Fundamental seasonings. Always taste your filling before adding it to the pie and adjust salt and pepper to your preference. Freshly ground black pepper offers superior flavor. |
| Fresh Thyme & Flat-Leaf Parsley | These fresh herbs infuse the filling with bright, aromatic notes. Finely mincing them ensures their flavor is evenly distributed. Dried herbs can be used in a pinch, but fresh provides a more vibrant taste. For dried, use about 1/2 to 1/3 the amount. |
| Celery Seed (optional) | A small but mighty addition! Celery seed enhances the savory vegetable profile of the pie, adding a subtle, earthy undertone that ties all the flavors together. Highly recommended if you have it. |
| Chicken Bouillon Powder | This is a fantastic flavor booster, intensifying the chicken essence in your filling. It’s a chef’s trick for adding depth and richness, especially when using rotisserie chicken or store-bought stock. |
| Shredded Rotisserie Chicken | The ultimate time-saver! A store-bought rotisserie chicken comes pre-cooked and perfectly seasoned, making prep incredibly quick. Alternatively, use any leftover cooked chicken—roasted, grilled (like this one), or boiled—shredded or chopped into bite-sized pieces. Aim for about 2.5 cups. |
| Frozen Peas & Corn | These frozen vegetables add a burst of sweetness, color, and texture without any chopping. They can be added directly from the freezer to the warm sauce; their heat will thaw and cook them perfectly, maintaining their freshness. |
| Large Egg White (beaten) | Used as an egg wash for the top crust. Brushing it on before baking gives your pot pie a beautiful, professional-looking golden-brown finish and a slight crispness. |
Step-by-Step Guide: How to Make This Irresistible Chicken Pot Pie
Crafting a perfect chicken pot pie is simpler than you might think, especially with these clear, easy-to-follow instructions. Get ready to create a comforting meal that tastes like it took hours, but comes together with surprising ease.
- Prepare Your Flaky Pie Crusts: Begin by combining 2 and 2/3 cups of all-purpose flour and 1/2 teaspoon of fine sea salt in a large mixing bowl. Add 14 tablespoons of cold, cubed unsalted butter to the flour mixture. Using a pastry cutter, your fingertips, or a food processor, cut the butter into the dry ingredients until the mixture resembles coarse breadcrumbs with some pea-sized pieces of butter remaining. In a separate small bowl, whisk together 2 large egg yolks and 4 to 6 tablespoons of very cold water until smooth. Pour this liquid mixture into the center of the dry ingredients and stir with a wooden spoon until a shaggy dough forms. Gently knead the mixture briefly with your hands—just enough to bring it together into a cohesive dough. Avoid overworking it, as this can lead to a tough crust. Flatten the dough into a disc, then divide it exactly in half and form each half into a smaller, flatter disc. Wrap each disc tightly in plastic wrap and refrigerate for at least 30 minutes. This crucial chilling period allows the gluten to relax, making the dough much easier to roll out and ensuring a wonderfully flaky final crust. You can prepare these crusts up to 5 days in advance and store them in the refrigerator.
- Cook the Potatoes to Perfection: Preheat your oven to a steady 400°F (200°C). Take your diced Yukon Gold potatoes (peeling them is entirely optional but recommended for a smoother texture) and place them in a medium-sized pot. Cover the potatoes with cold water and bring them to a rolling boil over high heat. Cook for approximately 10–15 minutes, or until the potatoes are just tender when pierced with a fork but still firm enough to hold their shape. It’s important not to overcook them, as they will continue to soften slightly during baking. Once tender, remove the pot from the heat, drain the potatoes thoroughly, and set them aside.
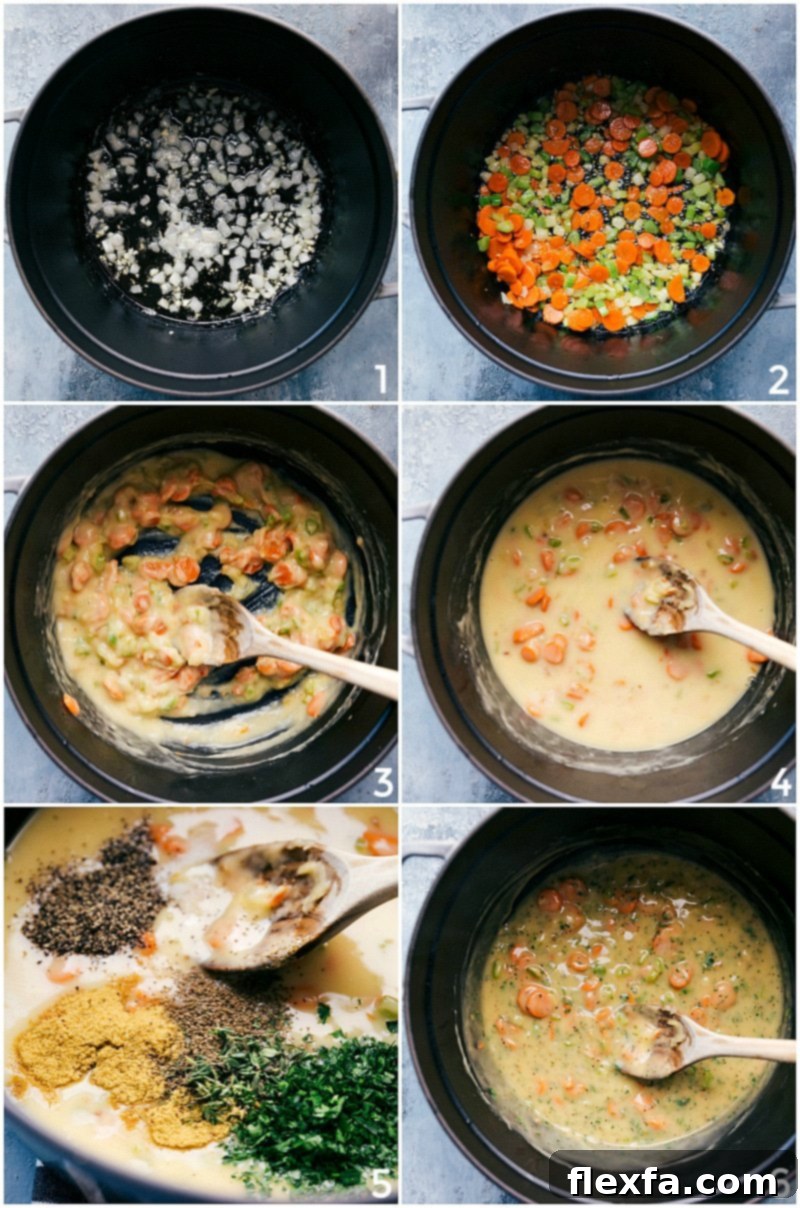
- Build the Aromatic Filling Base: While the potatoes are cooking and the dough is chilling, melt 4 tablespoons of unsalted butter in a large, heavy-bottomed skillet or Dutch oven over medium-high heat. Add the diced yellow onions and sauté for 2–3 minutes, stirring occasionally, until they become softened and translucent. Stir in the 1 teaspoon of minced garlic and cook for just another minute until fragrant, being careful not to burn it. Next, add the thinly sliced carrots and celery to the skillet. Continue to cook and stir occasionally for 6–8 minutes, or until these vegetables are tender-crisp. This step is vital; do not rush it! Ensuring the carrots and celery are tender now will prevent hard, crunchy pieces in your finished pot pie, as they won’t soften significantly more during the baking process.
- Create the Velvety Sauce (Roux & Liquids): After your vegetables are tender, whisk 1/3 cup of all-purpose flour into the skillet with the sautéed vegetables. Cook, stirring constantly, for about 1 minute. This step is crucial for cooking off the raw flour taste, which can make your sauce taste pasty. Gradually pour in 1-3/4 cups of chicken stock and 1/2 cup of heavy cream, whisking continuously to prevent any lumps from forming. Keep whisking until the sauce is completely smooth and uniform.
- Season and Thicken the Sauce: Once your sauce is smooth, stir in the 1 teaspoon of salt, 1/2 teaspoon of pepper (or lemon pepper for a zesty twist!), 1/2 tablespoon of finely minced fresh thyme, 1 tablespoon of finely minced fresh flat-leaf parsley, 1/4 teaspoon of celery seed (if you’re using it), and 2 teaspoons of chicken bouillon powder. Bring the sauce to a gentle simmer over medium-low heat. Continue to cook, stirring occasionally, for 6–8 minutes, or until the sauce has noticeably thickened to a creamy, gravy-like consistency. It should be thick enough to coat the back of a spoon.
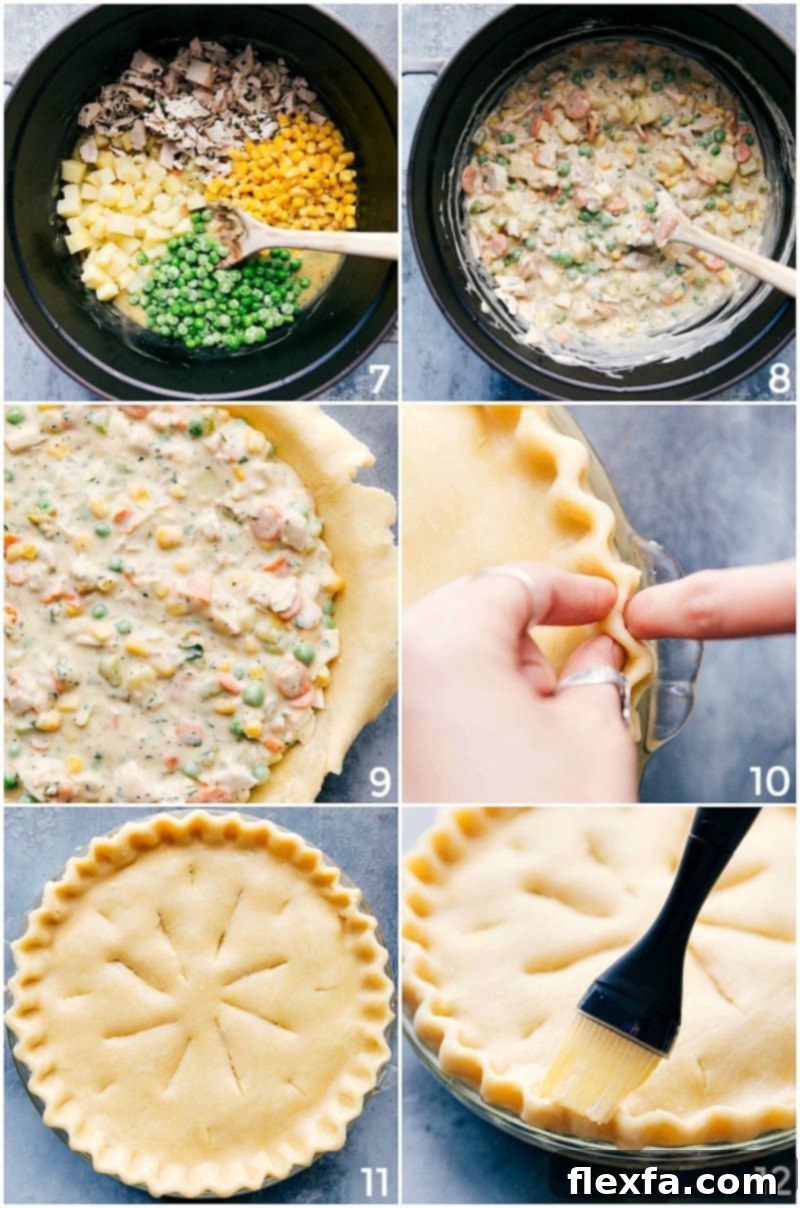
- Combine All Filling Ingredients: Remove the thickened sauce from the heat. Gently fold in the 2-1/2 cups of shredded rotisserie chicken, the 3/4 cup of frozen peas, the 3/4 cup of frozen corn (there’s no need to thaw these frozen vegetables beforehand; they will warm through beautifully in the sauce), and the drained, cooked potatoes. Stir gently until all of the ingredients are evenly distributed and thoroughly coated in the rich, creamy sauce. Taste the filling at this stage and adjust any seasonings as needed; this is your last chance to perfect the flavor before baking.
- Assemble Your Magnificent Pot Pie: On a lightly floured surface, take one of your chilled pie crust discs and roll it out into a roughly 12-inch circle. Carefully transfer this rolled-out dough into a 9-inch pie pan (glass or ceramic pans are generally preferred for more even baking). Pour the entire chicken pot pie filling into the bottom crust, spreading it out evenly with a spoon or spatula. Now, roll out your second chilled pie crust disc into another 12-inch circle. Carefully place this second crust over the filling, aligning it with the bottom crust. Trim any excess dough from the edges, then gently press and crimp the top and bottom crusts together to seal the pie completely. This not only creates a beautiful edge but also prevents the delicious filling from bubbling out during baking.
- Bake to Golden Perfection: With a sharp knife, make several small slits (usually 3-4) in the center of the top crust. These slits are essential to allow steam to escape during baking, preventing the crust from becoming soggy or bubbling excessively. In a small bowl, lightly beat the large egg white. Using a pastry brush, generously brush the entire top crust and the crimped edges with the beaten egg white. This egg wash will give your pie a stunning, glossy, golden-brown finish. Place the pie in your preheated 400°F (200°C) oven and bake for 45 minutes, or until the crust is a deep golden brown and the filling is visibly bubbly around the edges. If you notice the edges browning too quickly, you can loosely cover them with a pie shield or strips of aluminum foil to protect them.
- Cool and Serve Your Masterpiece: Once baked to perfection, carefully remove the chicken pot pie from the oven and place it on a wire rack to cool. Allow it to rest for at least 10–15 minutes before cutting into slices and serving. This resting period is crucial, as it allows the creamy filling to set properly, resulting in cleaner, more structured slices when you serve. Enjoy your warm, comforting, and utterly delicious homemade chicken pot pie!
Make Ahead & Freezing: Enjoy Your Chicken Pot Pie Anytime
Chicken pot pie is an incredibly versatile dish that’s perfect for meal prepping and freezing. Having a homemade pot pie ready to bake from the freezer is a game-changer for busy schedules. Here’s how to store, freeze, and reheat your delicious creation.
Freezing and Reheating Instructions:
How To Freeze Unbaked Pies: If you plan to freeze your chicken pot pie for future enjoyment, prepare the pie entirely according to the assembly instructions (steps 1-7), but do not brush with egg white or make slits yet. Once assembled in its pie pan, wrap the entire pie tightly with at least two layers of plastic wrap, followed by a layer of heavy-duty aluminum foil. This double-layer protection is essential to prevent freezer burn and keep your pie fresh. Label clearly with the date and freeze for up to 3 months.
When you’re ready to bake a frozen unbaked pie, do not thaw it first. Preheat your oven to 425°F (220°C). Place the frozen pie directly on a baking sheet. Loosely cover the edges of the pie with aluminum foil or a pie shield to prevent them from over-browning while the center thaws and cooks. Bake for 30 minutes with the foil. Then, reduce the oven temperature to 350°F (175°C), remove the foil from the edges, and continue baking for another 70-80 minutes, or until the crust is deeply golden brown and the filling is bubbly and heated through. An instant-read thermometer inserted into the center should read 165°F (74°C).
How To Reheat Baked Pies: If you have leftover baked chicken pot pie, allow it to cool completely before covering it tightly with plastic wrap or aluminum foil. Store in the refrigerator for up to 4 days. To reheat an entire baked pie, cover the edges with foil to prevent further browning and bake at 300°F (150°C) for 20-30 minutes, or until warmed through. For individual slices, place them on a baking sheet and heat at 300°F (150°C) for 15-20 minutes. It is highly recommended to reheat in the oven, not the microwave, to maintain the crispy, flaky texture of the crust. Microwaving can unfortunately make the crust soggy.
Delicious Companions: What to Serve Alongside Your Chicken Pot Pie
While chicken pot pie is a wonderfully hearty and complete meal on its own, pairing it with the right side dishes can elevate the entire dining experience. Think about balancing its richness with fresh, bright, or texturally contrasting accompaniments. Here are some fantastic ideas:
Complementary Dishes to Complete Your Meal
Salads
Crisp and Zesty Italian Salad Recipe
A bright, refreshing Italian salad provides a perfect counterpoint to the creamy richness of chicken pot pie. Its crisp greens, tangy vinaigrette, and fresh vegetables offer a delightful palate cleanser.
Side Dishes
Flavorful Roasted Broccoli Recipe
Roasted broccoli, with its slightly caramelized edges and tender-crisp texture, offers an earthy and slightly bitter complement to the savory pie. A sprinkle of Parmesan cheese enhances its umami notes.
Fruit Salads
Refreshing Fruit Salad With Yogurt
For a lighter, sweeter, and more cleansing accompaniment, a fresh fruit salad with a creamy yogurt dressing provides a burst of natural sugars and a welcome textural contrast.
Appetizers
Warm, Crusty French Bread Recipe
A simple yet effective pairing. Warm, crusty French bread is perfect for soaking up any leftover creamy sauce, ensuring every drop of deliciousness is savored.
Frequently Asked Questions About Chicken Pot Pie
Have questions about making the best chicken pot pie? Here are answers to some common queries to help you master this comforting dish.
Can I use different vegetables in my chicken pot pie?
Absolutely! Chicken pot pie is incredibly versatile. Feel free to swap out peas and corn for other quick-cooking vegetables like green beans, mushrooms, or even spinach (wilted before adding). Ensure any tougher vegetables, such as butternut squash or sweet potatoes, are pre-cooked until tender before adding them to the filling to ensure they soften adequately during baking.
What kind of chicken is best for pot pie?
For ultimate convenience and flavor, a store-bought rotisserie chicken is highly recommended; it’s already cooked, seasoned, and easy to shred. If you prefer to cook your own, any leftover cooked chicken—roasted, grilled, baked, or boiled—can be used. Simply ensure it’s shredded or diced into bite-sized pieces for even distribution in the filling.
My pie crust is always soggy. How can I prevent this?
Soggy crusts are a common issue! To prevent this, ensure your filling is thick enough before adding it to the pie shell; a thin, watery filling will seep into the crust. You can also try par-baking the bottom crust for 10-15 minutes before adding the filling, creating a barrier. Additionally, baking the pie at a sufficiently high temperature (like 400°F initially) helps the crust crisp up quickly, and a glass or ceramic pie dish promotes more even cooking than metal.
How do I get a perfectly golden-brown crust?
The secret to a beautifully golden, glossy crust is an egg wash! Before baking, lightly beat one large egg white and generously brush it over the top crust and crimped edges. This not only adds color but also a lovely sheen. If the edges start to brown too quickly, loosely cover them with aluminum foil or a pie shield.
Can I make this chicken pot pie gluten-free?
Yes, you can! For the crust, use a reliable gluten-free pie crust recipe or a good quality store-bought gluten-free pie crust. For the filling, ensure your chicken stock is gluten-free, and substitute the all-purpose flour for a 1:1 gluten-free all-purpose flour blend when making the roux. These blends are specifically designed to thicken sauces effectively without gluten.

Print Recipe
Classic Chicken Pot Pie
By Chelsea Lords
This classic Chicken Pot Pie recipe features a flaky, buttery crust, a rich, creamy sauce, and a hearty, well-seasoned filling packed with tender chicken and fresh vegetables. It’s an easy-to-make, utterly delicious comfort food perfect for any family meal!
20 minutes
30 minutes
50 minutes
10 slices
Equipment
- Large skillet or pot (for the filling)
- 9-inch Pie pan (preferably ceramic or glass for even baking)
- Pastry cutter or food processor (for pie crust)
- Rolling pin
Ingredients
- 2 pie crusts (store-bought or homemade, see Recipe Notes for homemade option)
- 1 cup diced baby gold potatoes (about 2 small or 1 large potato)
- 4 tablespoons unsalted butter
- 1/3 cup diced yellow onion
- 1 teaspoon minced garlic (equivalent to about 2 cloves)
- 1 cup thinly sliced carrots (from 2 to 3 medium carrots)
- 1/2 cup thinly sliced celery (from 1 to 2 stalks)
- 1/3 cup all-purpose flour
- 1-3/4 cups chicken stock or broth
- 1/2 cup heavy cream
- 1 teaspoon salt
- 1/2 teaspoon pepper (or lemon pepper for a zesty twist, see Note 2)
- 1/2 tablespoon fresh thyme, finely minced
- 1 tablespoon fresh flat-leaf parsley, finely minced
- 1/4 teaspoon celery seed (optional, but highly recommended for depth)
- 2 teaspoons chicken bouillon powder
- 2-1/2 cups shredded rotisserie chicken or chopped cooked chicken
- 3/4 cup frozen peas (no need to thaw)
- 3/4 cup frozen corn (no need to thaw)
- 1 large egg white, beaten (for the egg wash)
Instructions
- Prepare Crust: In a large bowl, whisk together 2 2/3 cups all-purpose flour and 1/2 tsp fine sea salt. Cut in 14 tbsp cubed, chilled unsalted butter until mixture resembles coarse bread crumbs. In a separate bowl, whisk 2 large egg yolks with 4-6 tbsp very cold water. Pour into dry ingredients and stir until just combined. Gently knead briefly to form a dough. Divide into two discs, wrap, and refrigerate for at least 30 minutes.
- Cook Potatoes: Preheat oven to 400°F (200°C). Place diced potatoes in a pot, cover with water, and bring to a boil. Cook for 10-15 minutes until tender. Drain and set aside.
- Sauté Veggies: Melt 4 tbsp unsalted butter in a large skillet over medium-high heat. Sauté diced yellow onion for 2-3 minutes, then add minced garlic for 1 minute. Stir in thinly sliced carrots and celery; cook 6-8 minutes until tender-crisp.
- Make Roux: Whisk 1/3 cup all-purpose flour into vegetables and cook for 1 minute, stirring constantly, to eliminate raw flour taste.
- Form Sauce: Gradually whisk in 1 3/4 cups chicken stock and 1/2 cup heavy cream until smooth. Stir in 1 tsp salt, 1/2 tsp pepper, 1/2 tbsp fresh thyme, 1 tbsp fresh flat-leaf parsley, 1/4 tsp celery seed (optional), and 2 tsp chicken bouillon powder. Simmer over medium-low heat for 6-8 minutes until thickened.
- Combine Filling: Remove from heat. Gently fold in 2 1/2 cups shredded chicken, 3/4 cup frozen peas, 3/4 cup frozen corn, and drained cooked potatoes. Stir until combined.
- Assemble Pie: Roll one chilled crust disc into a 12-inch circle. Place in a 9-inch pie pan. Pour filling into crust. Roll second crust disc and place over filling. Trim excess dough and crimp edges to seal.
- Bake: Make several small slits in the top crust. Brush with 1 beaten large egg white. Bake at 400°F (200°C) for 45 minutes, or until golden brown and bubbly (cover edges with foil if browning too quickly).
- Cool & Serve: Cool on a wire rack for 10-15 minutes before slicing and serving.
Recipe Notes
- Note 1 (Homemade Pie Crust): For a homemade crust, you will need: 2 and 2/3 cups all-purpose flour, 1/2 teaspoon fine sea salt, 14 tablespoons unsalted butter (cubed and chilled), 2 large egg yolks, and 4–6 tablespoons of very cold water. Follow step 1 of the main instructions.
- Note 2 (Seasoning Variation): For a delightful zing, consider using lemon pepper instead of standard black pepper. It adds a bright, citrusy note that beautifully cuts through the richness of the pot pie.
- Storage: Store leftover chicken pot pie covered in the refrigerator for up to 4 days. For reheating, use the oven at 350°F (175°C) until warmed through to keep the crust crisp. Avoid microwaving for best crust texture. For longer storage, freeze individual portions or the whole pie (unbaked or baked) for up to 3 months. See the “Make Ahead & Freezing” section for detailed instructions.
Nutrition Information
Please note: Nutrition information provided is an automatic calculation and should be considered an approximation. Actual values may vary based on specific ingredients, portion sizes, and preparation methods.
- Serving: 1 serving
- Calories: 372 kcal
- Carbohydrates: 32g
- Protein: 15g
- Fat: 21g
- Saturated Fat: 9g
- Polyunsaturated Fat: 2g
- Monounsaturated Fat: 8g
- Trans Fat: 0.2g
- Cholesterol: 53mg
- Sodium: 578mg
- Potassium: 387mg
- Fiber: 3g
- Sugar: 3g
- Vitamin A: 2589 IU
- Vitamin C: 8mg
- Calcium: 37mg
- Iron: 2mg
Loved this recipe? Don’t keep it to yourself! Leave a comment below and share your experience!